一.pytorch版本
- pytorch版本为1.7.1
- sizes和aspect_ratio设置如下代码所示:
from torchvision.models.detection.rpn import AnchorGenerator

anchor_generator = AnchorGenerator(sizes=((32, 64, 128),),
                                    aspect_ratios=((0.5, 1.0, 2.0),))
- anchor_generator用于生成anchor,需要输入image_list, feature_maps,从代码处可以看到:

- 定义ImageList类,保存在image_list.py(代码出处:https://github.com/WZMIAOMIAO/deep-learning-for-image-processing)
import torch
from typing import List, Tuple
from torch import Tensor


class ImageList(object):
    """
    Structure that holds a list of images (of possibly
    varying sizes) as a single tensor.
    This works by padding the images to the same size,
    and storing in a field the original sizes of each image
    """

    def __init__(self, tensors, image_sizes):
        # type: (Tensor, List[Tuple[int, int]]) -> None
        """
        Arguments:
            tensors (tensor) padding后的图像数据
            image_sizes (list[tuple[int, int]])  padding前的图像尺寸
        """
        self.tensors = tensors
        self.image_sizes = image_sizes

    def to(self, device):
        # type: (torch.device) -> ImageList # noqa
        cast_tensor = self.tensors.to(device)
        return ImageList(cast_tensor, self.image_sizes)
- 构造image_list和feature_map
# 1. 构造image_list
feature_maps_list = []
# batch_size=1, channel=1, h=w=10
image = torch.zeros([1, 1, 10, 10])  # (batch_size, channel, h, w)
x = ImageList(image, ([10, 10],))

# 2. 构造feature_map
# batch_size=1, channel=1, h=w=3
feature_map = torch.zeros([1, 1, 3, 3])  # (batch_size, channel, h, w)
feature_maps_list.append(feature_map)
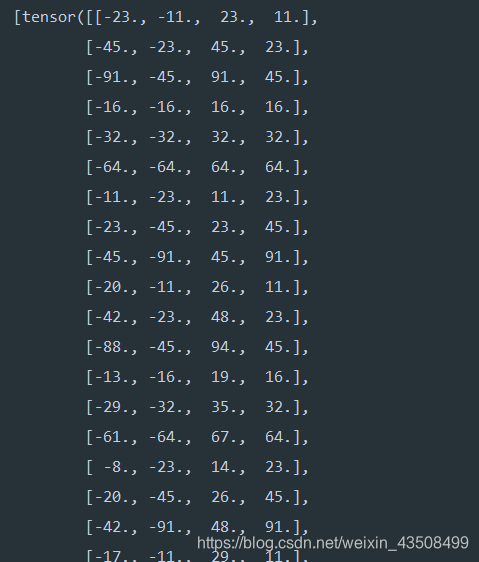
- 推理生成anchors,保存在列表里:
y = anchor_generator(x, feature_maps_list)
print(y)
# y是列表,包含一个元素,y[0]大小为(81x4)
- 由于我们设置了3种尺度和3种比例的anchor配置,feature_map为单通道,大小为3x3,所以一共会生成3x3x3x3 = 81个anchors,每个anchors包含左上角坐标和右下角坐标,所以输出的尺寸应该是(81 x 4)
- 输出结果部分截图如下所示:
二. numpy版本
- numpy版本的实现参考pytorch的代码,代码如下所示:
import numpy as np
def get_anchors(scales=(32, 64, 128), aspect_ratios=(0.5, 1.0, 2.0)):
# part1: 计算没有偏移的基础anchor
scales = np.array(scales)
scales = scales[None, :] # (3,) -> (1, 3)
# 这里主要是对w_ratio和h_ratio的shape作了变换,防止跟scales的shape一样,目的是为了后面进行广播操作
h_ratios = np.sqrt(aspect_ratios)
h_ratios = h_ratios[:, None] # (3,) -> (3,1)
w_ratios = 1/h_ratios
w_ratios = w_ratios[:, None] # (3,) -> (3,1)
# 这里相乘用到了numpy广播操作,(1,3)shape的array和(3,1)shape的array会生成9个数值
ws = (w_ratios * scales).flatten()
hs = (h_ratios * scales).flatten()
# 把生成的9中长款堆叠,除以2得到anchor的左上角坐标和右下角坐标(注意这里还没算上anchor的偏移量)
base_anchors = np.round(np.stack([-ws, -hs, ws, hs], axis=1)/2) # shape = (9, 4)
# part2: 计算anchor的偏移量
# 为了跟pytorch版本作比较,这里设置原图大小为10x10, feature_map的大小为3x3
# feature_map对应原图像的比例
stride_x = np.array(10//3)
stride_y = np.array(10//3)
shift_x = np.arange(0, 3) * stride_x
shift_y = np.arange(0, 3) * stride_y
shift_x, shift_y = np.meshgrid(shift_x, shift_y)
shift_x = shift_x.reshape(-1)
shift_y = shift_y.reshape(-1)
# 左上角跟右下角偏移量是一样的
shifts = np.stack([shift_x, shift_y, shift_x, shift_y], axis=1)
# 这里作shape变换,也是为了shifts和base_anchors相加能进行广播操作
shifts = shifts.reshape(-1, 1, 4) # (9,4) -> (9, 1, 4)
# part3: base_anchor加上偏移量就得到最后我们要的anchors
anchors = (shifts + base_anchors).reshape(-1, 4)
return anchors
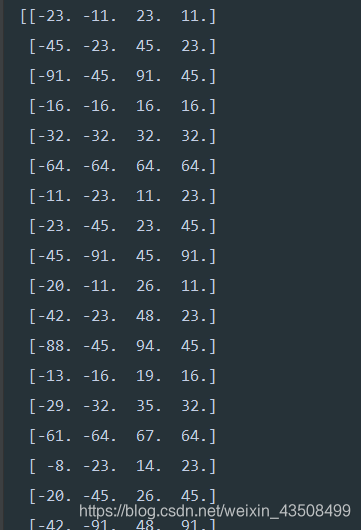
if __name__ == '__main__':
x = get_anchors()
print(x.shape) # (81x4)
print(x)
-
运行结果部分截图如下所示:
-
可以看到结果跟pytorch版本的一样,验证成功
三. 总结
- pytorch版本的代码位置在:torchvision.models.detection.anchor-utils.py
- 还是要结合代码才能更好的了解模型运行机制
结束。