Nginx的实现七层负载
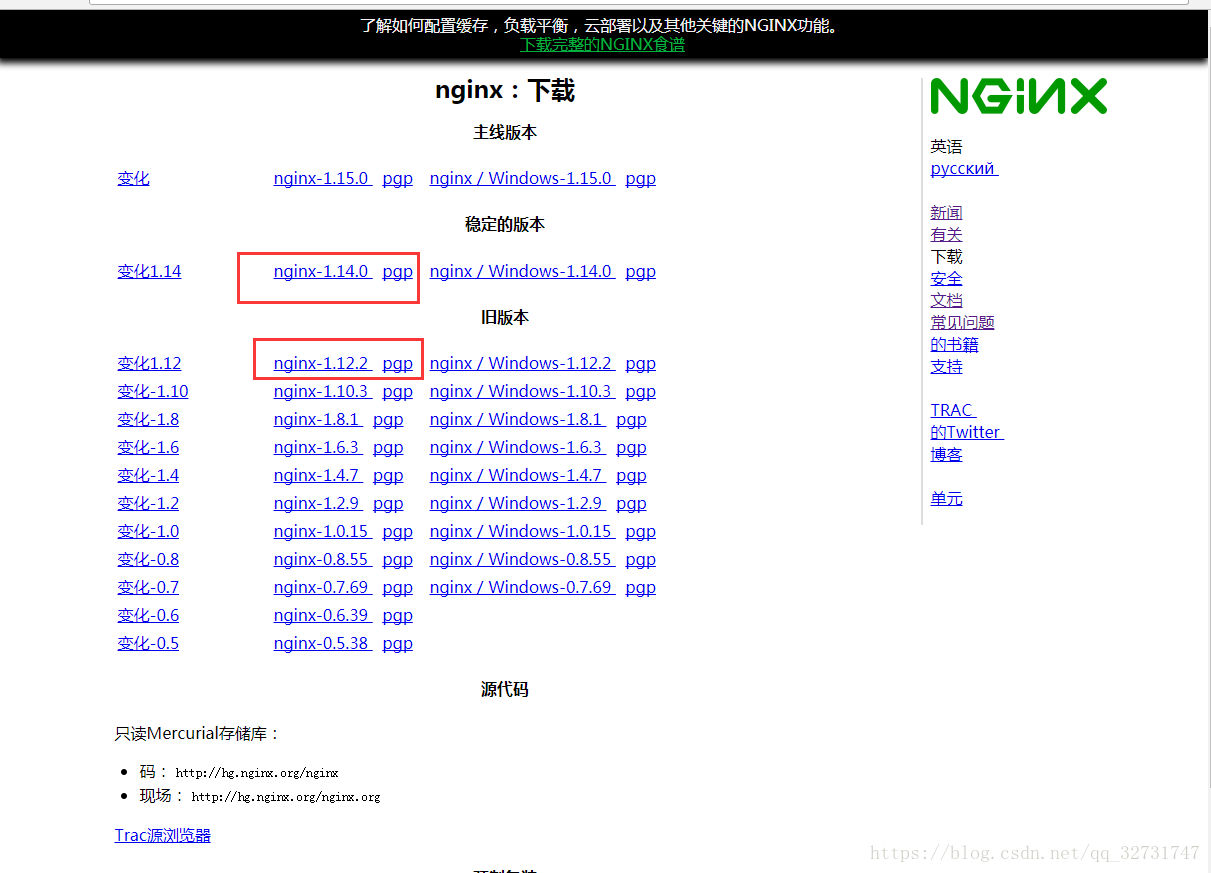
Nginx下载地址:http://nginx.org/en/download.html
实验拓扑图:
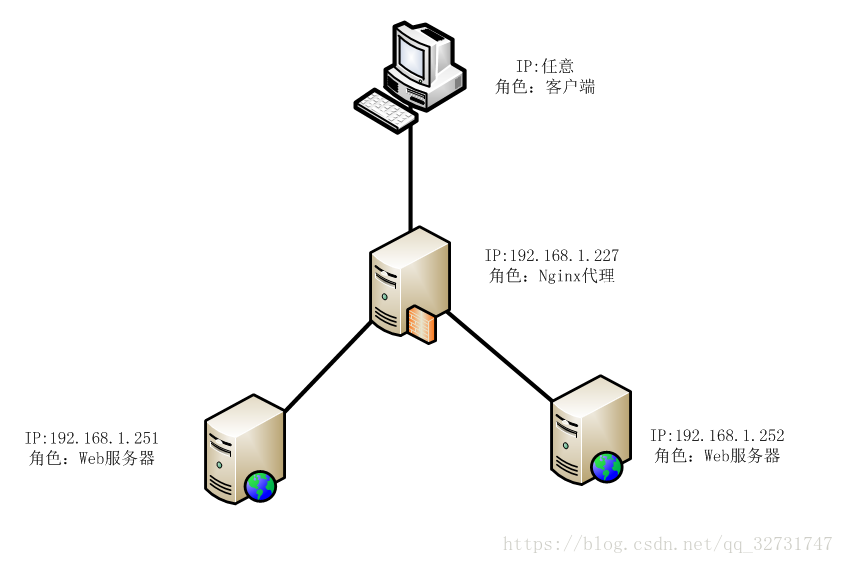
设备列表:
| IP |
主机名 |
角色 |
备注 |
| 192.168.1.227 |
hhxx-01 |
Nginx的分发代理 |
|
| 192.168.1.251 |
hhxx-03 |
Web服务 |
|
| 192.168.1.252 |
hhxx-04 |
Web服务 |
|
| 192.168.1.253 |
实体机 |
客户端 |
实体机 |
使用nginx的实现负载均衡和动静分离
源码编译安装nginx的
一,安装nginx时必须先安装相应的编译工具和相关依赖
[root @hhxx-01~] #yum -y install gcc gcc-c ++ autoconf automake
[root @hhxx-01~] #yum -y install zlib zlib- devel openssl openssl-devel pcre pcre-devel
zlib:和nginx的gzip的提供模块,需要的zlib库支持
OpenSSL的:nginx的提供SSL功能
PCRE:支持地址重写改写功能
#解压Nginx的源码包
[root @hhxx-01~] # tar xf nginx-1.12.2.tar.gz -C /usr/local/src /
[root @hhxx-01~] # cd /usr/local/src/nginx-1.12.2 /
#执行安装路径,开启相应模块
[root @hhxx-01 nginx-1.12.2]#./configure--prefix=/usr/local/nginx --with-http_dav_module - with-http_stub_status_module --with-http_addition_module - with-http_sub_module --with- http_flv_module --with-http_mp4_module
参数:
--with-http_dav_module启用ngx_http_dav_module支持(增加PUT,DELETE,MKCOL:创建集合,COPY和MOVE方法)默认情况下为关闭,需编译开启
--with-http_stub_status_module启用ngx_http_stub_status_module支持(获取nginx自上次启动以来的工作状态)
--with-http_addition_module启用ngx_http_addition_module支持(作为一个输出过滤器,支持不完全缓冲,分部分响应请求)
--with-http_sub_module启用ngx_http_sub_module支持(允许用一些其他文本替换nginx响应中的一些文本)
--with-http_flv_module启用ngx_http_flv_module支持(提供寻求内存使用基于时间的偏移量文件)
--with-http_mp4_module启用对mp4文件支持(提供寻求内存使用基于时间的偏移量文件)
#编译安装
[root @hhxx-01 nginx-1.12.2] #make -j 4 && make install
#创建运行用户
[root @hhxx-01 nginx-1.12.2] #useradd -s /sbin/nologin nginx
#运行Nginx的
[root @hhxx-01 nginx-1.12.2]#/usr/local/nginx/sbin/nginx
#查看80端口状态
[root @hhxx-01 nginx-1.12.2] #netstat -antup | grep 80
tcp 0 0 0.0.0.0:80 0.0.0.0:* LISTEN 3681 / nginx:master
#写入到开机自动运行
[root @hhxx-01 nginx-1.12.2] # echo '/usr/local/nginx/sbin/nginx'>> /etc/rc.local
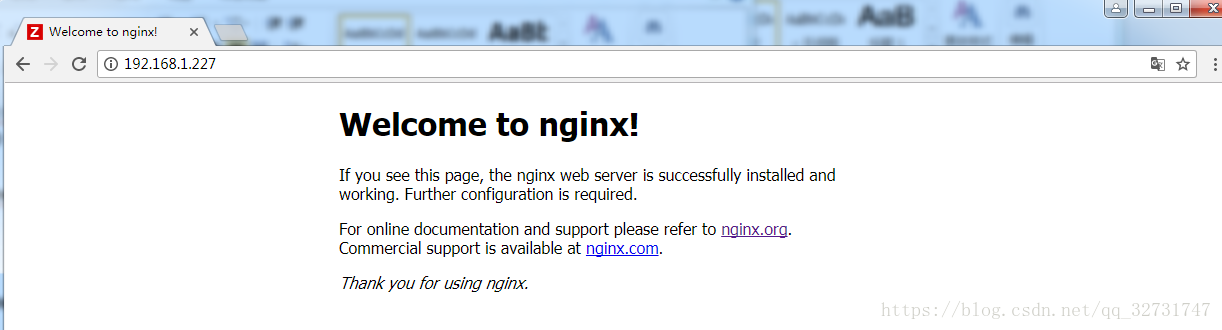
#打开网页查看
nginx的服务日常操作
测试配置文件语法:
[root @hhxx-01 nginx-1.12.2] #cd /usr/local/nginx/sbin /
[root @hhxx-01 sbin]#./nginx -t
nginx:配置文件/ usr / local / nginx / conf / nginx.conf语法没问题
nginx:配置文件/ usr / local / nginx / conf / nginx.conf测试成功
重新加载配置文件:
[root @hhxx-01 sbin]#./nginx -s reload
停止nginx的运行:
[root @hhxx-01 sbin]#./nginx -s stop
修改Nginx的配置文件
[root @hhxx-01 sbin] #cd /usr/local/nginx/conf
#备份一份配置文件
[root @hhxx-01 conf] #cp nginx.conf nginx.conf.bak
#编辑配置文件
[root @hhxx-01 conf] #vim nginx.conf
改:#user nobody;
为:user nginx nginx;

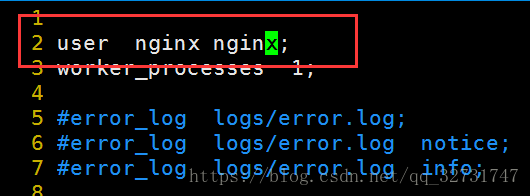
第一个nginx 代表用户 第二个代表用户组
改:
在 location { } 之间 插入以下代码, 定义一个虚拟URL名称,在配置文件的43-46行之间插入
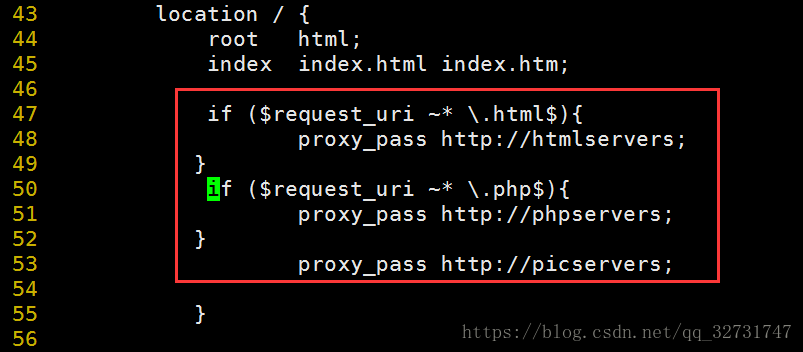
地点 / {
root html;
index index.html index.htm;
if($ request_uri~ * \ .html $){
proxy_passhttp:// htmlservers;
}
if($ request_uri~ * \ .php $){
proxy_passhttp:// phpservers;
}
proxy_passhttp:// picservers;
}
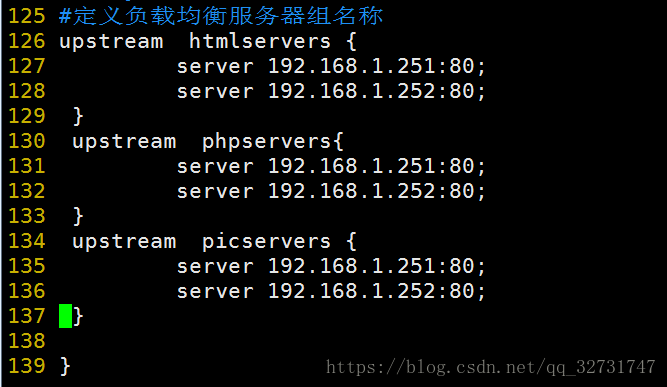
#定义负载均衡设备的ip
#定义负载均衡设备的ip
在配置文件nginx.conf的最后一行}前,添加以下内容:
#定义负载均衡服务器组名称
upstream htmlservers {
服务器192.168.1.251:80;
服务器192.168.1.252:80;
}
upstream phpservers {
服务器192.168.1.251:80;
服务器192.168.1.252:80;
}
upstream picservers {
服务器192.168.1.251:80;
服务器192.168.1.252:80;
}
含义:当用户访问Nginx代理(192.168.1.227)的时候,会通过代理策略把请求发送给 1.251 和 1.252其中一台,默认采用轮询方式,以上只是做了负载均衡,防止单点故障。动静分离一般在Nginx+Tomcat环境下使用,这里就没做了。
#修改完后,检测配置文件是否正常
[root @hhxx-01 conf]#/usr/ocal/nginx/sbin/nginx -t
nginx:配置文件/usr/local/nginx/conf/nginx.conf语法没问题
nginx:配置文件/usr/local/nginx/conf/nginx.conf测试成功
#重载Nginx的
[root @hhxx-01 conf]#/usr/ocal/nginx/sbin/nginx -s reload
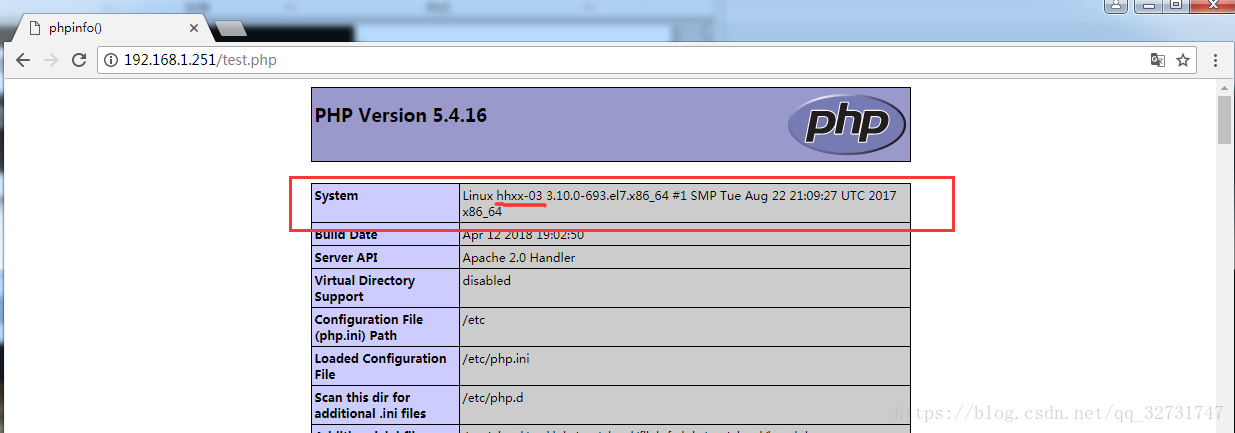
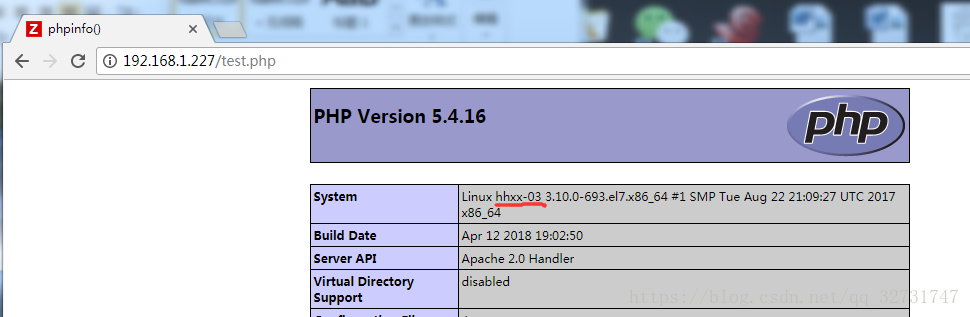
配置后端服务器:hhxx-03
#安装Apache和PHP服务
[root @hhxx-03~] #yum install httpd php -y
#写一个静态测试页面
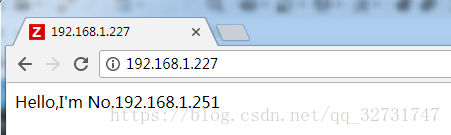
[root @hhxx-03~] #echo“Hello,I' m No.192.168.1.251”> /var/www/html/index.html
[root @hhxx-03~] #cat !$
Hello,I'mNo.192.168.1.251
#写一个PHP探针页面
[root @hhxx-03~] #vim / var / www / html / test.php
<?PHP
phpinfo();
?>

使用RZ命令上传一张JPG格式的图片改名为test.jpg放在。

#启动Apache的服务
[root @hhxx-03 html] #systemctl start httpd
打开网络单独测试:


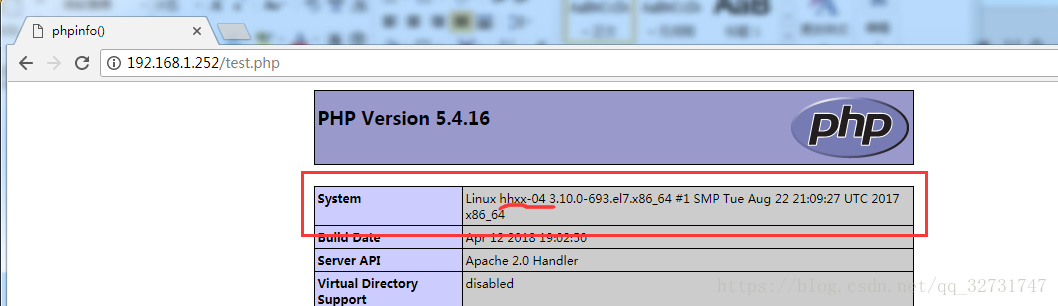
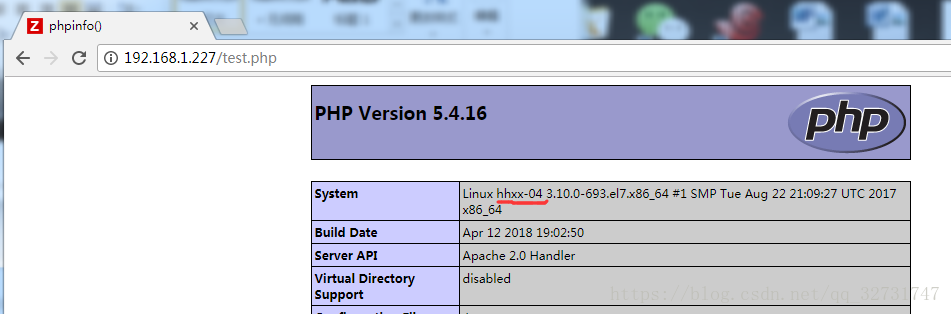
配置后端服务器:hhxx-04
#安装Apache和PHP服务
[root @hhxx-04~] #yum install httpd php -y
#写一个静态测试页面
[root @hhxx-04~] #echo“Hello,I'm No.192.168.1.252”> /var/www/html/index.html
#写一个PHP探针页面
[root @hhxx-04~] #vim /var/www/html/test.php

使用RZ命令上传一张JPG格式的图片,改名为test.jpg放在。

#启动Apache的服务
[root @hhxx-04 html] #systemctl start httpd
打开网页测试:


打开网页测试的nginx代理
通过访问Nginx代理IP地址,可获取到两台后端WEB服务的网页信息,刷新间隔1s左右,实际生产中192.168.1.251和192.168.1.252存放的网页面代码应保持一致,本次实验主要是为了查看效果而采取不同的内容。


总结:
归类一下1.251和1.252这两台Apache服务器上做了那些操作
1、安装apahce
2、部署一个站点
3、源码包要一样 (测试环境下不一样,线上环境要一致)
Nginx(1.227) 代理操作:
1、安装Nginx
2、新增Nginx运行用户、组
3、修改Nginx配置文件
4、定义一个虚拟的URL,名称可以自定义 proxy_passhttp://自定义名称;
5、定义负载分发策略
upstream 自定义名称 {
服务器A IP ;
服务器B IP ;
}