1、安装 shadowsocks 客户端
ss 的客户端有很多语言实现,包括 Python、Go、libev等,这里使用广泛的 Python 后端。
sudo apt-get update
sudo apt-get install python-pip
sudo pip install shadowsocks 此时系统会多出来两个程序:
/usr/bin/ssserver
/usr/bin/sslocal
ubuntu@ubuntu-System:~$ ssserver -h
usage: ssserver [OPTION]...
A fast tunnel proxy that helps you bypass firewalls.
You can supply configurations via either config file or command line arguments.
Proxy options:
-c CONFIG path to config file
-s SERVER_ADDR server address, default: 0.0.0.0
-p SERVER_PORT server port, default: 8388
-k PASSWORD password
-m METHOD encryption method, default: aes-256-cfb
-t TIMEOUT timeout in seconds, default: 300
--fast-open use TCP_FASTOPEN, requires Linux 3.7+
--workers WORKERS number of workers, available on Unix/Linux
--forbidden-ip IPLIST comma seperated IP list forbidden to connect
--manager-address ADDR optional server manager UDP address, see wiki
General options:
-h, --help show this help message and exit
-d start/stop/restart daemon mode
--pid-file PID_FILE pid file for daemon mode
--log-file LOG_FILE log file for daemon mode
--user USER username to run as
-v, -vv verbose mode
-q, -qq quiet mode, only show warnings/errors
--version show version information
Online help: <https://github.com/shadowsocks/shadowsocks>2、配置shadowsocks
sudo gedit /etc/shadowsocks.json{
"server":"xx.xx.xx.xx",
"server_port":xxxx,
"local_address": "127.0.0.1",
"local_port":1080,
"password":"xxxxxxxx",
"timeout":300,
"method":"aes-256-cfb",
"fast_open": true,
"workers": 1
}3、启动shadowsocks
sudo sslocal -c /etc/shadowsocks.json -d start 4、火狐浏览器,代理设置
4.1、在 “附加组件->扩展” 中搜索foxystandard
4.2、安装后点开首选项配置
4.3、工作模式切换为 “使用其基于其预定义模板的代理服务器”
4.4、“代理服务器->新建代理服务器->常规->代理名称” 代理名称随便写xxx,
“->代理服务器细节” 选择“手动配置代理服务器”,“IP” 127.0.0.1 ,“端口”:1080
选择“socks v5”
4.5、 工作模式切换为 “为全部URLS启用代理服务器xxx”,选择“模式订阅”,点“转到”,“订阅名称”随便写xxx,“订阅网址” http://www.woodbunny.com/gfwlist.txt,“添加代理服务器” xxx,“Format” AutoProxy,"Obfuscation" base64,点击“确定”,应该提示添加成功,否则可能没有打开sslocal。
4.6、关闭窗口,应该百度谷歌都可以上了。
5、chrome浏览器,代理设置
5.1、点击浏览器右上角三个点,“更多工具”,"扩展程序",“获取更多扩展程序”,搜索“proxy switchysharp”,下载安装
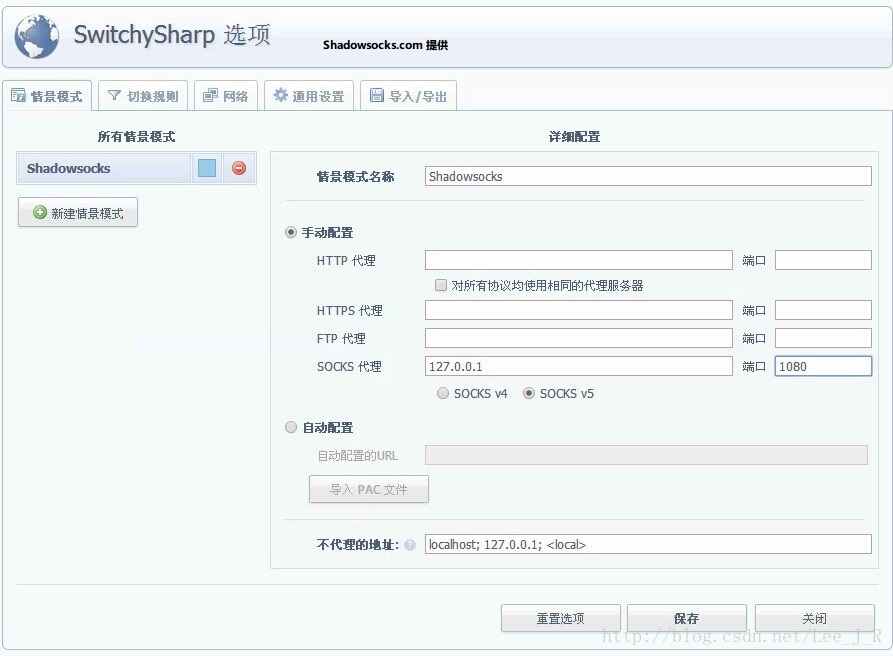
5.2、然后打开 Proxy SwitchySharp 的设置,新建一个情景,命名为 Shadowsocks,并设置好端口,模式为 socks5 如图:
再点切换规则,由于可能大概无法访问 Google,我们就启用切换规则,然后在 URL 模式里输入 *google* 统配好 Google 的所有域名,选择好模式匹配为通配符,情景模式为 Shadowsocks
然后把在线规则列表打钩,输入 URL 为:
https://autoproxy-gfwlist.googlecode.com/svn/trunk/gfwlist.txt
6、配置开机启动
sudo gedit /etc/rc.local 7、设置终端使用代理
git clone https://github.com/rofl0r/proxychains-ng.git
cd proxychains-ng
./configure
make
sudo make install
sudo cp ./src/proxychains.conf /etc/proxychians.conf
cd .. && rm -rf proxychains-ng
sudo gedit /etc/proxychains.conf保存退出即可。
以后在终端要使用代理的命令就在命令的前面加上sudo proxychains4
可以终端输入以下命令测试:
sudo proxychains4 wget http://www.google.com