一、StreamingContext初始化过程
在Spark Streaming中使用StreamingContext来操作DStream,这也好比Spark Core中SparkContext对于RDD,DStream可以说是RDD的又一层封装,作用于DStream上的Operation可以大概分为以下两类:
- Transformation转换操作。
- Output表示输出结果,主要有print,saveAsObjectFiles,saveAsTextFiles。
Spark Streaming主要由3个主要的模块构成。
- Master:主要记录DStream之间的依赖关系或者说是血缘关系,并负责任务调度以生成新的RDD。
- Worker节点:从网络接收数据,存储并执行RDD的计算。
- Client:负责向Spark Streaming中输入数据。
下面来通过一个简单的实例来探究Spark Streaming的执行过程。
val ssc = new StreamingContext(sc,Seconds(2))
val lines = ssc.socketTextStream("localhost",8888)
val words = lines.flatMap(_.split(" "))
val pairs = words.map((word,1))
val wordcount = pairs.reduceByKey(_+_)
wordcount.print()
ssc.start()
ssc.awaitTermination()
在探究之前,我们先来了解一下StreamingContext内部的几个成员变量。
- JobScheduler :用于定期生成Spark Job
- DStreamGraph :包含DStream之间的依赖关系的容器
- StreamingTab :用以Spark Streaming运行作业的监控
在StreamingContext中,各个组件的初始化过程如下:
private[streaming] val conf = sc.conf

  private[streaming] val env = SparkEnv.get

  private[streaming] val graph: DStreamGraph = {
    if (isCheckpointPresent) {
      cp_.graph.setContext(this)
      cp_.graph.restoreCheckpointData()
      cp_.graph
    } else {
      assert(batchDur_ != null, "Batch duration for streaming context cannot be null")
      val newGraph = new DStreamGraph()
      newGraph.setBatchDuration(batchDur_)
      newGraph
    }
  }

  private val nextReceiverInputStreamId = new AtomicInteger(0)

  private[streaming] var checkpointDir: String = {
    if (isCheckpointPresent) {
      sc.setCheckpointDir(cp_.checkpointDir)
      cp_.checkpointDir
    } else {
      null
    }
  }

  private[streaming] val checkpointDuration: Duration = {
    if (isCheckpointPresent) cp_.checkpointDuration else graph.batchDuration
  }

  private[streaming] val scheduler = new JobScheduler(this)

  private[streaming] val waiter = new ContextWaiter

  private[streaming] val progressListener = new StreamingJobProgressListener(this)

  private[streaming] val uiTab: Option[StreamingTab] =
    if (conf.getBoolean("spark.ui.enabled", true)) {
      Some(new StreamingTab(this))
    } else {
      None
    }

  /** Register streaming source to metrics system */
  private val streamingSource = new StreamingSource(this)
  SparkEnv.get.metricsSystem.registerSource(streamingSource)

  /** Enumeration to identify current state of the StreamingContext */
  private[streaming] object StreamingContextState extends Enumeration {
    type CheckpointState = Value
    val Initialized, Started, Stopped = Value
  }

  import StreamingContextState._
  private[streaming] var state = Initialized
StreamingContext初始化完成之后,调用socketTextStream来创建 SocketInputDstream:
 def socketTextStream(
      hostname: String,
      port: Int,
      storageLevel: StorageLevel = StorageLevel.MEMORY_AND_DISK_SER_2
    ): ReceiverInputDStream[String] = {
    socketStream[String](hostname, port, SocketReceiver.bytesToLines, storageLevel)
  }

 def socketStream[T: ClassTag](
      hostname: String,
      port: Int,
      converter: (InputStream) => Iterator[T],
      storageLevel: StorageLevel
    ): ReceiverInputDStream[T] = {
    new SocketInputDStream[T](this, hostname, port, converter, storageLevel)
  }
关于SocketInputDStream的继承图如下:
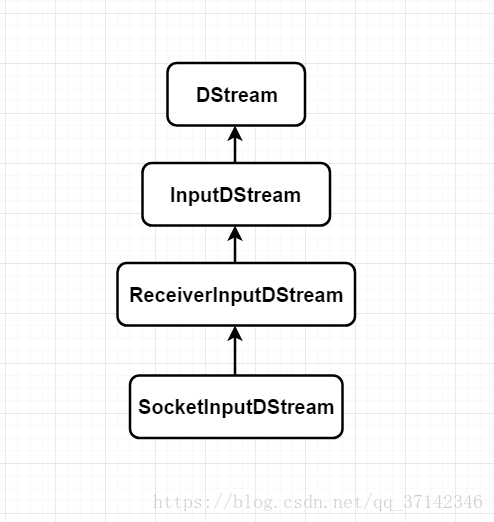
在父类InputDStream中,它会把自己加入DStreamGraph中,InputDStream中的代码片段如下:
//InputStream将自己添加到DStreamGraph中
  ssc.graph.addInputStream(this)
在SocketInputDStream类中,会定义产生一个新的SocketReceiver,源码如下:
 //产生一个新的SocketReceiver
  def getReceiver(): Receiver[T] = {
    new SocketReceiver(host, port, bytesToObjects, storageLevel)
  }
在创建完SocketReceiver后,会进行一系列的我们 自定义的转换操作,如flatMap,reduceByKey等操作。那么Spark Streaming是如何接受到客户端发送来的数据呢?底层又是如何创建Socket并且生成Spark Job的,下面,我们带着这一系列问题来探究其原理。
二、数据的接收
上面剖析到Spark Streaming在创建完SocketReceiver后会进行执行我们自定义的操作,执行完这些操作之后,StreamingContext就会调用它的start方法进行启动,在该start方法中会调用JobScheduler的start方法。其源码如下:
/**
   * Start the execution of the streams.
   *
   * @throws SparkException if the context has already been started or stopped.
   */
  def start(): Unit = synchronized {
    if (state == Started) {
      throw new SparkException("StreamingContext has already been started")
    }
    if (state == Stopped) {
      throw new SparkException("StreamingContext has already been stopped")
    }
    validate()
    sparkContext.setCallSite(DStream.getCreationSite())
    //调用JobScheduler.start方法
    scheduler.start()
    state = Started
  }
在JobScheduler中的start源码如下,它会创建ReceiverTracker,然后调用它的start方法:
 def start(): Unit = synchronized {
    if (eventActor != null) return // scheduler has already been started

    logDebug("Starting JobScheduler")
    eventActor = ssc.env.actorSystem.actorOf(Props(new Actor {
      def receive = {
        case event: JobSchedulerEvent => processEvent(event)
      }
    }), "JobScheduler")

    listenerBus.start()
    receiverTracker = new ReceiverTracker(ssc)
    //调用ReceiverTracker.start方法
    receiverTracker.start()
    jobGenerator.start()
    logInfo("Started JobScheduler")
  }
在ReceiverTracker的start方法会判断InputStreams是否存在,并且在Executor中启动Receiver线程,最后调用ReceiverLaunch.start方法。源码如下:
/** Start the actor and receiver execution thread. */
  def start() = synchronized {
    if (actor != null) {
      throw new SparkException("ReceiverTracker already started")
    }

    if (!receiverInputStreams.isEmpty) {
      actor = ssc.env.actorSystem.actorOf(Props(new ReceiverTrackerActor),
        "ReceiverTracker")
      // private val receiverExecutor = new ReceiverLauncher()
      //调用ReceiverLauncher的start方法
      if (!skipReceiverLaunch) receiverExecutor.start()
      logInfo("ReceiverTracker started")
    }
  }
在ReceiverLauncher线程中调用startReceivers方法:
/** This thread class runs all the receivers on the cluster.  */
  class ReceiverLauncher {
    @transient val env = ssc.env
    @volatile @transient private var running = false
    @transient val thread  = new Thread() {
      override def run() {
        try {
          SparkEnv.set(env)
          startReceivers()
        } catch {
          case ie: InterruptedException => logInfo("ReceiverLauncher interrupted")
        }
      }
    }

    def start() {
      thread.start()
    }
在startReceivers方法中主要将接收到的数据 定义为RDD并且分发到各个worker节点上去,在这个函数中,会首先启动ReceiverSupervisor,然后由ReceiverSupervisor来触发Receiver执行。startReceivers方法源码如下:
 /**
     * Get the receivers from the ReceiverInputDStreams, distributes them to the
     * worker nodes as a parallel collection, and runs them.
     */
    /**
      * 定义RDD
      */
    private def startReceivers() {
      val receivers = receiverInputStreams.map(nis => {
        val rcvr = nis.getReceiver()
        rcvr.setReceiverId(nis.id)
        rcvr
      })

      // Right now, we only honor preferences if all receivers have them
      val hasLocationPreferences = receivers.map(_.preferredLocation.isDefined).reduce(_ && _)

      // Create the parallel collection of receivers to distributed them on the worker nodes
      //定义RDD并且分布到worker节点上
      val tempRDD =
        if (hasLocationPreferences) {
          val receiversWithPreferences = receivers.map(r => (r, Seq(r.preferredLocation.get)))
          ssc.sc.makeRDD[Receiver[_]](receiversWithPreferences)
        } else {
          ssc.sc.makeRDD(receivers, receivers.size)
        }

      val checkpointDirOption = Option(ssc.checkpointDir)
      val serializableHadoopConf = new SerializableWritable(ssc.sparkContext.hadoopConfiguration)

      // Function to start the receiver on the worker node
      val startReceiver = (iterator: Iterator[Receiver[_]]) => {
        if (!iterator.hasNext) {
          throw new SparkException(
            "Could not start receiver as object not found.")
        }
        val receiver = iterator.next()
        val supervisor = new ReceiverSupervisorImpl(
          receiver, SparkEnv.get, serializableHadoopConf.value, checkpointDirOption)
        //启动ReceiverSupervisor
        supervisor.start()
        supervisor.awaitTermination()
      }
      // Run the dummy Spark job to ensure that all slaves have registered.
      // This avoids all the receivers to be scheduled on the same node.
      if (!ssc.sparkContext.isLocal) {
        ssc.sparkContext.makeRDD(1 to 50, 50).map(x => (x, 1)).reduceByKey(_ + _, 20).collect()
      }

      // Distribute the receivers and start them
      logInfo("Starting " + receivers.length + " receivers")
      running = true
      ssc.sparkContext.runJob(tempRDD, ssc.sparkContext.clean(startReceiver))
      running = false
      logInfo("All of the receivers have been terminated")
    }
在ReceiverSupervisor中的start方法源码如下:
  /** Start the supervisor */
  def start() {
    onStart()
    startReceiver()
  }

  /** Start receiver */
  def startReceiver(): Unit = synchronized {
    try {
      logInfo("Starting receiver")
      //启动Receiver
      //Receiver是一个抽象方法,SocketInputDStream继承了Receiver
      receiver.onStart()
      logInfo("Called receiver onStart")
      onReceiverStart()
      receiverState = Started
    } catch {
      case t: Throwable =>
        stop("Error starting receiver " + streamId, Some(t))
    }
  }
在start方法中调用了startReceiver方法,在startReceiver方法中,调用了Receiver抽象类的start方法,其中SocketInputDStream继承了该抽象类,因此会调用SocketInputDStream.onStart方法,因此,其源码如下:
//实现了抽象类Receiver的onStart方法
  def onStart() {
    // Start the thread that receives data over a connection
    new Thread("Socket Receiver") {
      setDaemon(true)
      override def run() { receive() }
    }.start()
  }

  /** Create a socket connection and receive data until receiver is stopped */
  //创建真正的Scoket连接接收数据
  def receive() {
    var socket: Socket = null
    try {
      logInfo("Connecting to " + host + ":" + port)
      socket = new Socket(host, port)
      logInfo("Connected to " + host + ":" + port)
      val iterator = bytesToObjects(socket.getInputStream())
      while(!isStopped && iterator.hasNext) {
        store(iterator.next)
      }
      logInfo("Stopped receiving")
      restart("Retrying connecting to " + host + ":" + port)
    } catch {
      case e: java.net.ConnectException =>
        restart("Error connecting to " + host + ":" + port, e)
      case t: Throwable =>
        restart("Error receiving data", t)
    } finally {
      if (socket != null) {
        socket.close()
        logInfo("Closed socket to " + host + ":" + port)
      }
    }
  }
在onStart方法中调用了receive方法,在该方法中可以看到Socket被真正的创建,不断的接收发送来的数据。
这里需要注意的是:Receiver运行在Worker机器上的Executor JVM进程之中,而不是Driver Application的JVM之内。
三、数据的存储与处理
1. 数据的存储
上面我们看到了Spark Streaming最后在SocketReceiver中使用receiver函数真正的创建了Socket去接收数据,那么接收的数据将如何存储,并且如何进行后续的处理呢?
数据的处理流程如下:
- 在SocketReceiver.reciever中接收数据,将数据放入BlockGenerator.currentBuffer中,currentBuffer是一个ArrayBuffer数据结构。
- 在BlockGenerator中会有一个定时器blockIntervalTimer,在函数updateCurrentBuffer中会将currentBuffer中的数据封装为一个个的Block,然后放入blocksForPush队列,它是一个ArrayBlockQueue数据结构,支持FIFO。
- 然后在BlockGenerator中有一个线程BlockPushingThread,它会不停的将blocksForPush队列中的成员通过keepPushingBlocks函数中调用pushArrayBuffer传递给BlockManager,让BlockManager存储在内存当中。
- 同时pushArrayBuffer函数还会将BlockManager存储的Block的信息报告给driver。
下面我们来看看BlockGenerator中的源码。其成员变量如下:
 private case class Block(id: StreamBlockId, buffer: ArrayBuffer[Any])

  private val clock = new SystemClock()
  private val blockInterval = conf.getLong("spark.streaming.blockInterval", 200)
  private val blockIntervalTimer =
    new RecurringTimer(clock, blockInterval, updateCurrentBuffer, "BlockGenerator")
  //队列大小
  private val blockQueueSize = conf.getInt("spark.streaming.blockQueueSize", 10)
  private val blocksForPushing = new ArrayBlockingQueue[Block](blockQueueSize)
  //该线程通过调用keepPushingBlocks函数将blocksForPush队列中的成员传递给BlockManager
  private val blockPushingThread = new Thread() { override def run() { keepPushingBlocks() } }

  @volatile private var currentBuffer = new ArrayBuffer[Any]
  @volatile private var stopped = false
在向blocksForPushing队列中添加定义的Block时,当队列满的时候会进行阻塞操作,我们也可以看到通过参数"spark.streaming.blockInterval"可以设置队列的大小,这里也可以作为我们在实际开发中的一个调优点,增大队列的大小,提升处理的速度,不过该队列占有太多的内存,也有可能导致Spark作业的内存不足,发生OOM,因此,可根据实际情况设置,一般情况我们采用默认值即可。
updateCurrentBuffer函数源码如下:
 /** Change the buffer to which single records are added to. */
  private def updateCurrentBuffer(time: Long): Unit = synchronized {
    try {
      val newBlockBuffer = currentBuffer
      currentBuffer = new ArrayBuffer[Any]
      if (newBlockBuffer.size > 0) {
        val blockId = StreamBlockId(receiverId, time - blockInterval)
        //将当前buffer中的数据封装为一个新的Block,放入blockForPush队列
        val newBlock = new Block(blockId, newBlockBuffer)
        listener.onGenerateBlock(blockId)
        //放入队列,当队列满的时候阻塞
        blocksForPushing.put(newBlock)  // put is blocking when queue is full
        logDebug("Last element in " + blockId + " is " + newBlockBuffer.last)
      }
    } catch {
      case ie: InterruptedException =>
        logInfo("Block updating timer thread was interrupted")
      case e: Exception =>
        reportError("Error in block updating thread", e)
    }
  }
keepPushingBlocks函数源码如下:
 /** Keep pushing blocks to the BlockManager. */
  private def keepPushingBlocks() {
    logInfo("Started block pushing thread")
    try {
      while(!stopped) {
        Option(blocksForPushing.poll(100, TimeUnit.MILLISECONDS)) match {
          case Some(block) => pushBlock(block)
          case None =>
        }
      }
      // Push out the blocks that are still left
      logInfo("Pushing out the last " + blocksForPushing.size() + " blocks")
      while (!blocksForPushing.isEmpty) {
        logDebug("Getting block ")
        val block = blocksForPushing.take()
        pushBlock(block)
        logInfo("Blocks left to push " + blocksForPushing.size())
      }
      logInfo("Stopped block pushing thread")
    } catch {
      case ie: InterruptedException =>
        logInfo("Block pushing thread was interrupted")
      case e: Exception =>
        reportError("Error in block pushing thread", e)
    }
  }
在上面的源码中它会调用pushBlock函数将数据传递给BlockManager:
  private def pushBlock(block: Block) {
    listener.onPushBlock(block.id, block.buffer)
    logInfo("Pushed block " + block.id)
  }
在pushBlock函数中,调用了BlockGeneratorListener接口的onPushBlock函数,注意这里会使用它的匿名实现类调用onPushBlock实现方法,并且在该实现方法中调用pushArrayBuffer函数将数据传递给BlockManager。

def onPushBlock(blockId: StreamBlockId, arrayBuffer: ArrayBuffer[_]) {
      pushArrayBuffer(arrayBuffer, None, Some(blockId))
    }
最后pushArrayBuffer中最终调用pushAndReportBlock函数完成相关操作:
/** Store block and report it to driver */
  def pushAndReportBlock(
      receivedBlock: ReceivedBlock,
      metadataOption: Option[Any],
      blockIdOption: Option[StreamBlockId]
    ) {
    val blockId = blockIdOption.getOrElse(nextBlockId)
    val numRecords = receivedBlock match {
      case ArrayBufferBlock(arrayBuffer) => arrayBuffer.size
      case _ => -1
    }

    val time = System.currentTimeMillis
    val blockStoreResult = receivedBlockHandler.storeBlock(blockId, receivedBlock)
    logDebug(s"Pushed block $blockId in ${(System.currentTimeMillis - time)} ms")

    val blockInfo = ReceivedBlockInfo(streamId, numRecords, blockStoreResult)
    val future = trackerActor.ask(AddBlock(blockInfo))(askTimeout)
    Await.result(future, askTimeout)
    logDebug(s"Reported block $blockId")
  }
由trackerActor.ask可以知道最终将数据包装成ReceivedBlockInfo传递给ReceiverTracker中,使用的数据结构是HashMap:
/** Remote Akka actor for the ReceiverTracker */
  private val trackerActor = {
    val ip = env.conf.get("spark.driver.host", "localhost")
    val port = env.conf.getInt("spark.driver.port", 7077)
    val url = AkkaUtils.address(
      AkkaUtils.protocol(env.actorSystem),
      SparkEnv.driverActorSystemName,
      ip,
      port,
      "ReceiverTracker")
    env.actorSystem.actorSelection(url)
  }
剖析了数据的接收过来是如何存储的,下面我们来看看它又是如何将其转换为Spark Job进行数据处理的。
2. 数据的处理
数据处理的函数调用流程如下:
JobGenerator.generateJobs ---> DStreamGraph.generateJobs ---> DStream.generateJob --->getOrCompute --->计算生成RDD
在JobGenerator中的generateJobs函数源码如下所示:
/** Generate jobs and perform checkpoint for the given `time`.  */
  private def generateJobs(time: Time) {
    // Set the SparkEnv in this thread, so that job generation code can access the environment
    // Example: BlockRDDs are created in this thread, and it needs to access BlockManager
    // Update: This is probably redundant after threadlocal stuff in SparkEnv has been removed.
    SparkEnv.set(ssc.env)
    Try {
      //以time为关键字获取此时间之前的所有blockIds
      jobScheduler.receiverTracker.allocateBlocksToBatch(time) // allocate received blocks to batch
      //调用DStreamGraph.generateJobs
      graph.generateJobs(time) // generate jobs using allocated block
    } match {
      case Success(jobs) =>
        val receivedBlockInfos =
          jobScheduler.receiverTracker.getBlocksOfBatch(time).mapValues { _.toArray }
        jobScheduler.submitJobSet(JobSet(time, jobs, receivedBlockInfos))
      case Failure(e) =>
        jobScheduler.reportError("Error generating jobs for time " + time, e)
    }
    eventActor ! DoCheckpoint(time, clearCheckpointDataLater = false)
  }
最后在DStream中的generateJob函数中会调用getOrCompute函数,源码如下:
  /**
   * Generate a SparkStreaming job for the given time. This is an internal method that
   * should not be called directly. This default implementation creates a job
   * that materializes the corresponding RDD. Subclasses of DStream may override this
   * to generate their own jobs.
   */
  private[streaming] def generateJob(time: Time): Option[Job] = {
    //调用getOrCompute生成RDD
    getOrCompute(time) match {
      case Some(rdd) => {
        val jobFunc = () => {
          val emptyFunc = { (iterator: Iterator[T]) => {} }
          //调用SparkContext.runJob方法运行计算的RDD
          context.sparkContext.runJob(rdd, emptyFunc)
        }
        Some(new Job(time, jobFunc))
      }
      case None => None
    }
  }
在DStream的generateJob函数中我们终于看到了它调用SparkContext的runJob函数来执行Spark作业了,因此,我们也梳理通了整条线路,从数据的接收到数据的存储,再到生成RDD并且执行Spark 作业。
至此,关于Spark Streaming的执行流程源码剖析到这里,如有任何问题,欢迎指教留言讨论。