版权声明:版权所有,需要请联系作者 https://blog.csdn.net/weixin_42930928/article/details/82877565
需要安装node.js,如何安装请自行百度
1、使用vs2017 创建项目,选择ASP.NET Core Web应用程序,名称为:ASPNetAngularDemo

选择angular项目,可以看到是 .NET Core 版本:ASP.NET Core 2.0

创建完项目后,最终项目结构如下

2、运行,点击CTRL+F5运行,项目默认存在三个菜单

3、我们新添加一个菜单到项目中
3.1 在ClientApp\app\components下添加新文件夹:test。并在test文件夹下添加两个文件:test.component.html和test.component.ts


可以根据fetchdata文件夹中的文件内容添加,在test.component.html文件中添加如下内容
<h1>Test Angular</h1>
<table class="table" *ngIf="models">
    <thead>
    <tr>
        <th>
            First
        </th>
        <th>Second</th>
        <th>Third</th>
    </tr>
    </thead>
    <tbody >
    <tr *ngFor="let a of models">
        <td>{{a.first}}</td>
        <td>{{a.second}}</td>
        <td>{{a.third}}</td>
    </tr>
    </tbody>
</table>
在test.component.ts文件中添加如下内容
import { Component } from '@angular/core';

@Component({
    selector: 'test',
    templateUrl: './test.component.html'
})
export class TestComponent {
    public models: MyModel[];

    constructor() {
        this.models =
        [
            { 'first': 'first1', 'second': 'second1', 'third': 'third1' },
            { 'first': 'first2', 'second': 'second2', 'third': 'third2' },
            { 'first': 'first3', 'second': 'second3', 'third': 'third3' },
            { 'first': 'first4', 'second': 'second4', 'third': 'third4' }
        ];
    }
}

interface MyModel {
    first: string;
    second: string;
    third: string;
}
3.2 在菜单中添加个Test内容,即在navmenu文件夹下的navemenu.component.html中添加,第30-34行为添加内容
<div class='main-nav'>
    <div class='navbar navbar-inverse'>
        <div class='navbar-header'>
            <button type='button' class='navbar-toggle' data-toggle='collapse' data-target='.navbar-collapse'>
                <span class='sr-only'>Toggle navigation</span>
                <span class='icon-bar'></span>
                <span class='icon-bar'></span>
                <span class='icon-bar'></span>
            </button>
            <a class='navbar-brand' [routerLink]="['/home']">AspNetAngularDemo</a>
        </div>
        <div class='clearfix'></div>
        <div class='navbar-collapse collapse'>
            <ul class='nav navbar-nav'>
                <li [routerLinkActive]="['link-active']">
                    <a [routerLink]="['/home']">
                        <span class='glyphicon glyphicon-home'></span> Home
                    </a>
                </li>
                <li [routerLinkActive]="['link-active']">
                    <a [routerLink]="['/counter']">
                        <span class='glyphicon glyphicon-education'></span> Counter
                    </a>
                </li>
                <li [routerLinkActive]="['link-active']">
                    <a [routerLink]="['/fetch-data']">
                        <span class='glyphicon glyphicon-th-list'></span> Fetch data
                    </a>
                </li>
                <li [routerLinkActive]="['link-active']">
                    <a [routerLink]="['/test']">
                        Test
                    </a>
                </li>
            </ul>
        </div>
    </div>
</div>
运行程序,已经可以在左侧菜单中看到Test菜单

那么点击Test菜单是否会跳转到相应的页面呢,可以看到在添加了Test后,并没有进入相应页面,而是跳转到了home页面,这是为什么呢?

在components文件夹中存在三个文件,
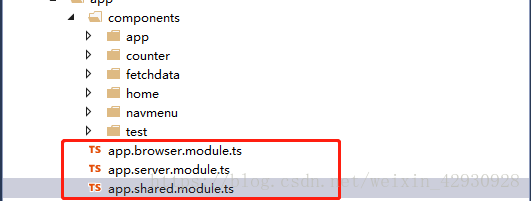
可以分别打开看一下其中的内容。可以看到在app.shared.module.ts文件中都有一些引用,我们就一样画葫芦,添加上对TestComponent的引入,添加的内容在行:12,21,32三行
import { NgModule } from '@angular/core';
import { CommonModule } from '@angular/common';
import { FormsModule } from '@angular/forms';
import { HttpModule } from '@angular/http';
import { RouterModule } from '@angular/router';

import { AppComponent } from './components/app/app.component';
import { NavMenuComponent } from './components/navmenu/navmenu.component';
import { HomeComponent } from './components/home/home.component';
import { FetchDataComponent } from './components/fetchdata/fetchdata.component';
import { CounterComponent } from './components/counter/counter.component';
import { TestComponent } from './components/test/test.component';

@NgModule({
    declarations: [
        AppComponent,
        NavMenuComponent,
        CounterComponent,
        FetchDataComponent,
        HomeComponent,
        TestComponent
    ],
    imports: [
        CommonModule,
        HttpModule,
        FormsModule,
        RouterModule.forRoot([
            { path: '', redirectTo: 'home', pathMatch: 'full' },
            { path: 'home', component: HomeComponent },
            { path: 'counter', component: CounterComponent },
            { path: 'fetch-data', component: FetchDataComponent },
            { path: 'test', component: TestComponent },
            { path: '**', redirectTo: 'home' }
        ])
    ]
})
export class AppModuleShared {
}
再次运行项目,就可以我们写的test的页面了

通过示例,大致了解了项目结构和内容。
项目下载:https://gitee.com/sesametech-group/AspNetAngularDemo
