一.必要的知识简单介绍
1.Apscheduler
调度器用于调度python代码,可以使脚本稍后执行、只执行一次或定期执行。可以添加或删除作业,主要在现有的应用程序内部运行。它集成Twisted、Qt、Gevent等。可以利用 pip install apscheduler 安装。
三个内置的调度系统:
1.corn格式调度(可以选择开始/结束的时间)
2.基于时间间隔interval执行(以偶数时间间隔运行作业,并有可选开始/结束时间)
3.一次性延迟执行(运行一次,可设置时间运行)
支持存储作业的后端:
1.SQLAlchemy
2.MongoDB
3.Redis
4.Zookeeper
5.RethingDB
该调度器包含了四个组件:
1.triggers(触发器) 每个作业都有自己的触发器
2.job stores(作业存储器)
3.executors(执行器) 提交可用的线程运行作业
4.schedulers(调度器) 配置作业存储,执行器通过调度器程序完成如添加、修改和取消作业。
选择正确的调度器(看你用什么框架):
1.BlockingScheduler:当调度程序是进程中唯一在运行的程序时使用
基于运行于前台调度器(start()会阻塞),它是一个简单的调度器,当调用start()一个call,则这个call不会返回(永远)
2.BackgroundScheduler:当不使用的任何框架(如Twisted, Qt等等)时候使用,并希望调度程序在后台应用程序中
使用单线程,在后台运行的调度程序(start())马上回来,设置daemon背景线程中的迭代项(默认为True)。注: deamon为守护进程,当只剩下守护进程时,整个python就会退出。
API:
     def fick():
         print(.......)
     if __name__='__main__':
        scheduler = BackgroundScheduler()
        scheduler = add_job(fick,'interval',seconds=3)
scheduler.start()3.TwistedScheduler:构建一个Twisted程序时应用(scrapy就是基于twisted实现的,所以需要该调度器)
     def fick():
         print(.......)
     if __name__='__main__':
        scheduler = TwistedScheduler()
        scheduler = add_job(fick,'interval',seconds=3)
        scheduler.start()
4.QtScheduler等与3同理。
APScheduler内置三个触发器类型:
1.data:当想在某一时刻运行一次工作时使用
2.interval:当想在固定的时间间隔运行作业使用
3.cron:当希望在一天中的特定时间定期运行
向调度器增加作业有两种方法:
向调度器删除作业有两种方法:
job = scheduler.add_job(myfunc, 'interval', minutes=2)
job.remove()scheduler.add_job(myfunc, 'interval', minutes=2, id='my_job_id')
scheduler.remove_job('my_job_id')暂停、恢复和修改作业:
2.apscheduler.schedulers.base.BaseScheduler.pause_job()
1.apscheduler.job.Job.resume()
2.apscheduler.schedulers.base.BaseScheduler.resume_job()
修改:
job.modify(max_instances=6, name='Alternate name')
2.Klein
Klein是一个用Python开发生产就绪Web服务的微框架,由Werkzeug和Twisted构建。本介绍的目的是向您展示如何安装,使用和部署基于Klein的Web应用程序。
安装:pip install klein (要先装python-dev和bulid-essential依赖)
实例:
from klein import Klein
app = Klein()
@app.route('/user/<username>')#可变route<username>,也可以写成不变,将username去掉即可
def pg_user(request, username):
    return 'Hi %s!' % (username,)
app.run("localhost", 8080)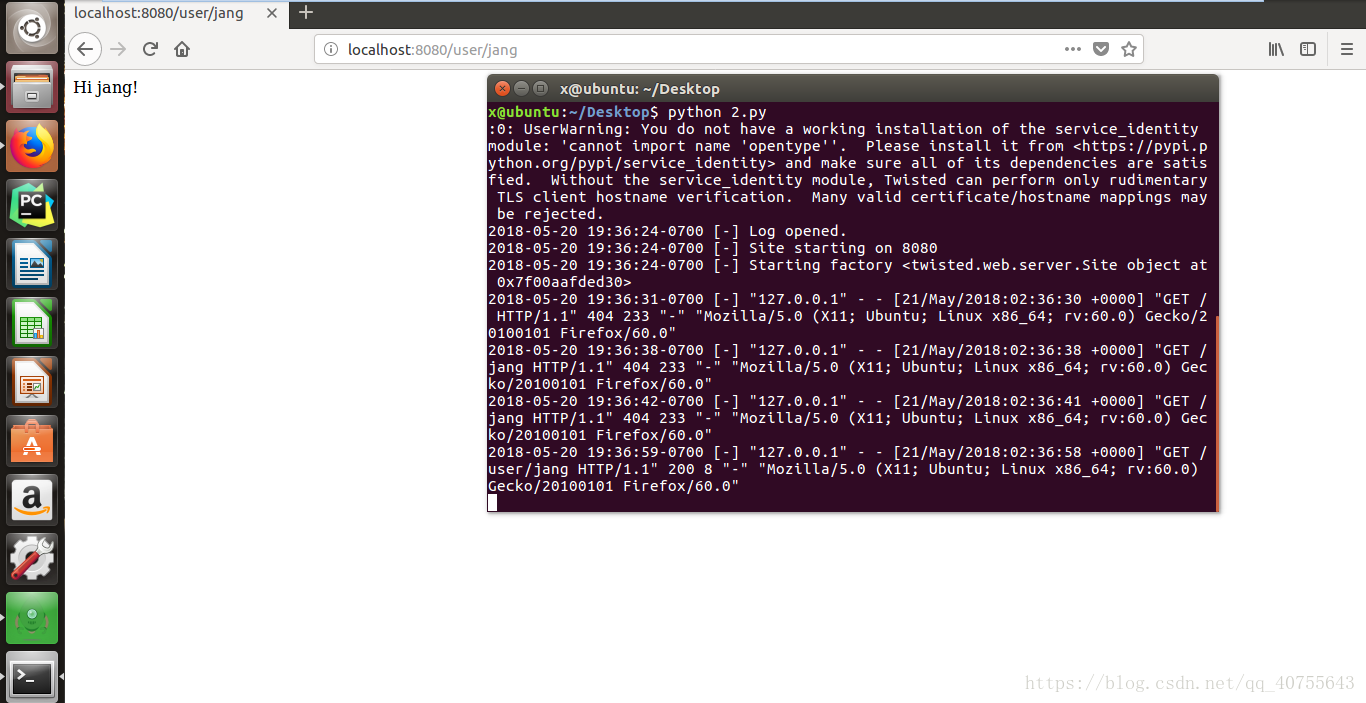
从klein包里直接导入run和route,创建klein实例。然后,它在端口8080上启动一个Twisted Web服务器,侦听回环地址。在web上访问"http://localhost:8080/user/jang(可变)",web会显示"Hi jang"
还可以定义他的匹配类型,string、int和float
例子:
from klein import Klein
app = Klein()

@app.route('/<string:arg>')
def pg_string(request, arg):
    return 'String: %s!' % (arg,)

@app.route('/<float:arg>')
def pg_float(request, arg):
    return 'Float: %s!' % (arg,)

@app.route('/<int:arg>')
def pg_int(request, arg):
    return 'Int: %s!' % (arg,)

app.run("localhost", 8080)
如果您运行此示例并访问http://localhost:8080/somestring,它将被pg_string捕捉;http://localhost:8080/1.0将被pg_float捕捉;http://localhost:8080/1将被pg_int捕捉。
静态文件:
实例:
from twisted.web.static import File
from klein import Klein
app = Klein()

@app.route('/', branch=True)
def pg_index(request):
    return File('./')

app.run("localhost", 8080)
注:若有多个route,则执行第一个路由,其他均被覆盖。
from klein import Klein
app = Klein()

@app.route('/user/<username>')
def pg_user(request, username):
    return 'Hi %s!' % (username,)

@app.route('/user/bob')
def pg_user_bob(request):
    return 'Hello there bob!'

app.run("localhost", 8080)
这里bob的路由被<usename>覆盖。
Return Anything
您可以返回一个结果(可以是常规文本,资源,或可渲染)同步(通过return)或异步(通过Deferred)。记住不要给克莱恩unicode,您首先必须将其编码为bytes。
3.MongoDB
安装:pip install pymongo
简单使用:
from pymongo import MongoClient
client = pymongo.MongoClient(url)#url=('local':27017)或('mongodb://localhost:27017/')
db = client['database']
collection = db['collection']
mongodb中的数据使用json格式表示并存储。
聚合管道:使用aggregate()方法来使用聚合。使用聚合管道可以对集合中的文档进行变换和组合。 管道是由一个个功能节点组成的,这些节点用管道操作符来进行表示。聚合管道以一个集合中的所有文档作为开始,然后这些文档从一个操作节点流向下一个节点 ,每个操作节点对文档做相应的操作。这些操作可能会创建新的文档或者过滤掉一些不符合条件的文档,在管道中可以对文档进行重复操作。 管道表达式只可以操作当前管道中的文档,不能访问其他的文档:表达式操作可以在内存中完成对文档的转换。
语法:
db.collection.aggregate([ <pipeline>, <...> ], options)参数:
| 操作符 | 描述 |
| aggregate | 要聚合的集合名称 |
| pipeline | 管道操作符 |
| explain | 返回指定aggregate各个阶段管道的执行计划信息 |
| allowDiskUse | 每个阶段管道限制为100MB的内存,如果大于100MB的数据可以先写入临时文件。设置为true时,aggregate操作可时可以先将数据写入对应数据目录的子目录中 的唯一并以_tmp结尾的文档中。 |
| cursor | 指定游标的初始批批大小。光标的字段的值是一个与场batchSize文件。 |
| bypassDocumentValidation | 只有当你指定了$out操作符,使db.collection.aggregate绕过文档验证操作过程中。这让您插入不符合验证要求的文档。 |
管道操作符:
| 操作符 | 描述 |
| $project | 数据投影,主要用于重命名、增加和删除字段 |
| $match | 过滤操作,筛选符合条件文档, 作为下一阶段的输入 $match的语法和查询表达式db.collection.find() 的语法相同 注意:1. 不能在$match操作符中使用$where 表达式操作符。 2. $match尽量出现在管道的前面,这样可以提早过滤文档,加快聚合速度。 3. 如果$match出现在最前面的话,可以使用索引来加快查询。 |
| $limit | 限制经过管道的文档数量 $limit的参数只能是一个正整数 |
| $skip | 从待操作集合开始的位置跳过文档的数目 $skip参数也只能为一个正整数 |
$unwind |
将数组分解为单个的元素,并与文档的其余部分一同返回 注意:1.如果$unwind目标字段不存在,则整个文档都会被忽略过滤掉 2.如果$unwind目标字段不是一个数组,则会报错 3.如果$unwind目标字段数组为空,则该文档也会被忽略过滤掉 |
| $group | 可以将文档依据指定字段的不同值进行分组,如果选定了需要进行分组的字段, 就可以将指定的字段传递给$group函数的_id字段 注意:1.$group的输出是无序的。 2.$group操作默认实在内存中进行的,超过此限制会报错., 若要允许处理大型数据集,allowDiskUse 将选项设置为启用 $group 操作真实写入临时文件。详情请见官方文档 |
| $sort | 对文档按照指定字段排序 注意:1.如果将$sort放到管道前面的话可以利用索引,提高效率 2.在管道中如果$sort出现在$limit之前的话,$sort只会对前$limit个文档进行操作, 这样在内存中也只会保留前$limit个文档,从而可以极大的节省内存 3.$sort操作符默认在内存中进行,超过此限制会报错, 若要允许处理大型数据集,allowDiskUse 将选项设置为启用 $group 操作真实写入临时文件。 |
| $geoNear | 会返回一些坐标值,这些值以按照距离指定点距离由近到远进行排序 |
| $sample | 从待操作的集合中随机返回指定数量的文档 注意:如果指定的数量 N 大于等于集合文档总数的5%,$sample 执行集合扫描,执行排序, 然后选择前 N 的文档(受排序的内存限制) 如果 N 是小于 5%的集合中的文档总数 如果使用 WiredTiger 存储引擎,$sample 使用伪随机游标在抽样 N 文档集合。 如果使用 MMAPv1 存储引擎,$sample 使用 _id 索引随机选择 N 个文档。 |
| $out | 用户将聚合的结果输出到指定的集合,如果要使用$out则必须在整个管道操作的最后阶段 , 如果指定的集合尚不存在,$out 操作会在当前数据库中创建一个新的集合。 集合不是可见的直到聚合完成。如果聚合失败,MongoDB 不会创建集合。 如果集合指定的 $out 操作已经存在,然后完成后的聚合, $out 阶段以原子方式以新的结果集合替换现有集合的, $out 操作不会更改任何存在于以前的集合的索引。如果聚合失败$out 则不会对现有集合做任何更改。 |
$redact |
字段所处的document结构的级别. $redact还有三个重要的参数: 1)$$DESCEND: 返回包含当前document级别的所有字段,并且会继续判字段包含内嵌文档,内嵌文档的字段也会去判断是否符合条件。 2)$$PRUNE:返回不包含当前文档或者内嵌文档级别的所有字段,不会继续检测此级别的其他字段,即使这些字段的内嵌文档持有相同的访问级别。 3)$$KEEP:返回包含当前文档或内嵌文档级别的所有字段,不再继续检测此级别的其他字段,即使这些字段的内嵌文档中持有不同的访问级别 |
聚合表达式:
| 表达式 | 描述 | 实例 |
| $sun | 计算总和 | db.mycol.aggregate([ {$group : {_id : "$by_user", num_tutorial : {$sum : "$likes"}}} ]) |
| $avg | 计算平均值 | db.mycol.aggregate([ {$group : {_id : "$by_user", num_tutorial : {$avg : "$likes"}}} ]) |
| $min | 获取集合中所有文档对应值得最小值。 | db.mycol.aggregate([ {$group : {_id : "$by_user", num_tutorial : {$min : "$likes"}}} ]) |
| $max | 获取集合中所有文档对应值得最大值。 | db.mycol.aggregate( [{$group : {_id : "$by_user", num_tutorial : {$max : "$likes"}}} ]) |
| $push | 在结果文档中插入值到一个数组中。 | db.mycol.aggregate( [{$group : {_id : "$by_user", url : {$push: "$url"}}} ]) |
| $addToSet | 在结果文档中插入值到一个数组中,但不创建副本 | db.mycol.aggregate( [{$group : {_id : "$by_user", url : {$addToSet: "$url"}}} ]) |
| $first | 根据资源文档的排序获取第一个文档数据。 | db.mycol.aggregate( [{$group : {_id : "$by_user", first_url : {$first : "$url"}}} ]) |
| $last | 根据资源文档的排序获取最后一个文档数据。 | db.mycol.aggregate( [{$group : {_id : "$by_user", first_url : {$last : "$url"}}} ]) |
图例聚合过程:

1、$project实例
db.article.aggregate(
  { $project : {
    title : 1 ,
    author : 1 ,
  }}
 );
这样的话结果中就只还有_id,tilte和author三个字段了,默认情况下_id字段是被包含的,如果要想不包含_id话可以这样:
db.article.aggregate(
  { $project : {
    _id : 0 ,
    title : 1 ,
    author : 1
}});2.$match实例
db.articles.aggregate( [
            { $match : { score : { $gt : 70, $lte : 90 } } },
            { $group: { _id: null, count: { $sum: 1 } } }
            ] );
$match用于获取分数大于70小于或等于90记录,然后将符合条件的记录送到下一阶段$group管道操作符进行处理。
3.$skip实例
db.article.aggregate(
  { $skip : 5 });
经过$skip管道操作符处理后,前五个文档被"过滤"掉
下面是$group具体应用实例:
db.items.insert( [
  {
   "quantity" : 2,
   "price" : 5.0,
   "pnumber" : "p003",
  },{
   "quantity" : 2,
   "price" : 8.0,
   "pnumber" : "p002"
  },{
   "quantity" : 1,
   "price" : 4.0,
   "pnumber" : "p002"
  },{
   "quantity" : 2,
   "price" : 4.0,
   "pnumber" : "p001"
  },{
   "quantity" : 4,
   "price" : 10.0,
   "pnumber" : "p003"
  },{
   "quantity" : 10,
   "price" : 20.0,
   "pnumber" : "p001"
  },{
   "quantity" : 10,
   "price" : 20.0,
   "pnumber" : "p003"
  },{
   "quantity" : 5,
   "price" : 10.0,
   "pnumber" : "p002"
  }
]) 一:$sum统计items有几条
> db.items.aggregate([{$group:{_id:,count:{$sum:1}}}])
{ "_id" : , "count" : 8 }
二:统计quantity的总数
> db.items.aggregate([{$group:{_id:,total:{$sum:"$quantity"}}}])
{ "_id" : , "total" : 36 }
三:通过产品类型来进行分组,然后在统计卖出的数量是多少
> db.items.aggregate([{$group:{_id:"$pnumber",total:{$sum:"$quantity"}}}])
{ "_id" : "p001", "total" : 12 }
{ "_id" : "p002", "total" : 8 }
{ "_id" : "p003", "total" : 16 } 四:$max通过相同的产品类型来进行分组,然后查询相同产品类型卖出最多的订单详情
> db.items.aggregate([{$group:{_id:"$pnumber",max:{$max:"$quantity"}}}])
{ "_id" : "p001", "max" : 10 }
{ "_id" : "p002", "max" : 5 }
{ "_id" : "p003", "max" : 10 } 五:$min通过相同的产品类型来进行分组,然后查询相同产品类型卖出最少的订单详情
> db.items.aggregate([{$group:{_id:"$pnumber",min:{$min:"$quantity"}}}])
{ "_id" : "p001", "min" : 2 }
{ "_id" : "p002", "min" : 1 }
{ "_id" : "p003", "min" : 2 }
六:通过相同的产品类型来进行分组,统计各个产品数量,然后获取最大的数量
> db.items.aggregate([{$group:{_id:"$pnumber",total:{$sum:"$quantity"}}}])
{ "_id" : "p001", "total" : 12 }
{ "_id" : "p002", "total" : 8 }
{ "_id" : "p003", "total" : 16 }
> db.items.aggregate([
{$group:{_id:"$pnumber",total{$sum:"$quantity"}}},
{$group:{_id:,max:{$max:"$total"}}}
])
{ "_id" : , "max" : 16 }七:$avg先根据$group,在计算平均值,只会针对数字的进行计算,会对字符串忽略
> db.items.aggregate([{$group:{_id:"$pnumber",price:{$avg:"$price"}}}])
{ "_id" : "p001", "price" : 12 }
{ "_id" : "p002", "price" : 7.333333333333333 }
{ "_id" : "p003", "price" : 11.666666666666666 } 八:$push将指定的表达式的值添加到一个数组中,这个值不要超过16M,不然会出现错误
通过相同的产品类型来进行分组,然后查询每个相同产品卖出的数量放在数组里面
> db.items.aggregate([{$group:{_id:"$pnumber",quantitys:{$push:"$quantity"}}}])
{ "_id" : "p001", "quantitys" : [ 2, 10 ] }
{ "_id" : "p002", "quantitys" : [ 2, 1, 5 ] }
{ "_id" : "p003", "quantitys" : [ 2, 4, 10 ] }
> db.items.aggregate([{$group:{_id:"$pnumber",quantitys:{$push:{quantity:"$quantity",price:"$price"}}}}])
{ "_id" : "p001", "quantitys" : [ { "quantity" : 2, "price" : 4 }, { "quantity": 10, "price" : 20 } ] }
{ "_id" : "p002", "quantitys" : [ { "quantity" : 2, "price" : 8 }, { "quantity": 1, "price" : 4 }, { "quantity" : 5, "price" : 10 } ] }
{ "_id" : "p003", "quantitys" : [ { "quantity" : 2, "price" : 5 }, { "quantity": 4, "price" : 10 }, { "quantity" : 10, "price" : 20 } ] }九:$addToSet将表达式的值添加到一个数组中(无重复值,这个例子刚好没有重复值,有重复值会自动保留只剩一个),这个值不要超过16M,不然会出现错误
> db.items.aggregate([{$group:{_id:"$pnumber",quantitys:{$addToSet:"$quantity"}}}])
{ "_id" : "p001", "quantitys" : [ 10, 2 ] }
{ "_id" : "p002", "quantitys" : [ 5, 1, 2 ] }
{ "_id" : "p003", "quantitys" : [ 10, 4, 2 ] } $last:返回每组最后一个文档,如果有排序,按照排序,如果没有按照默认的存储的顺序的最后个文档。
> db.items.aggregate([{$group:{_id:"$pnumber",quantityFrist:{$first:"$quantity"}}}])
{ "_id" : "p001", "quantityFrist" : 2 }
{ "_id" : "p002", "quantityFrist" : 2 }
{ "_id" : "p003", "quantityFrist" : 2 }
MongoDB提供以下系统变量:
1.ROOT:引用在聚合流水线阶段当前正在处理的根文档即顶层文档
2.CURRENT:引用在聚合流水线阶段中正在处理的字段路径开始,除非另有记载,所有阶段起始与根相同
3.REMOVE:计算结果为缺失值的变量
若要访问变量的值,请在变量中使用字符串,以双无标志作为前缀的名称($$)。
如果变量引用对象,则要访问对象,使用点表示法:$$<variable><field>
4.http协议的8中请求类型
<1>get方法:主要用于向指定的URL请求资源(资源文件或是数据即可,可带参数也可不带参数),用于登录后请求数据等,安全性低。
<2>post方法:主要向指定的URL/URI提交数据,通常用表单发送,post传递的数据/参数不是明文形式而是封装后的,安全性高,像注册,登录等通过该方法实现。
<3>put方法:功能和post相似,用来将信息放到请求的URL上,put是幂等方法,post为非幂等方法,put在请求时容易造成冗余。
<4>delete方法:用于删除URL上的某个资源,返回状态有31种:
200:删除成功执行,返回被删除资源
202:删除请求被接受,但还未执行
204:删除请求被执行,但没有返回被删除资源
<5>head方法:向服务器索要与get请求相一致的响应,只不过响应体不会被返回,这一方法可以在不必传输整个响应内容的情况下,就可以获取包含在响应消息头中的元信息。
<6>options方法:返回服务器针对特定资源所支持的http请求方法
<7>trace:返回显示器收到的请求,主要用于测试或诊断
<8>connect:http/1.1协议中保留给能够将连接改为管道方法的代理服务器
5.关于Json模块的一些常用方法
<1> json.dumps() 用于将dict类型的数据转成str类型。
<2> json.loads() 用于将str类型的数据转成dict类型。
<3> json.dump() 用于将dict类型的数据转成str类型,并写到json文件中。
两种写入方法:
1.
jsboj = json.dumps(name_emb)
with open(emb_filename,'w') as f:
     f.write(jsobj)
     f.close()
2.
json.dump(name_emb.open(emb_filename,'w'))二、爬虫代码介绍与分析
定时爬取指定网站上的快讯存在本地的MongoDB数据库中,并将最新的快讯更新传送(通过http)到目标数据库OBJ中。本文爬取了三个资讯网站,其中两个利用网站的API爬取。爬虫框架用scrapy,定时任务用apscheduler,存储用mongodb,另外用klein写一个简单的api,返回一下当前统计信息。
1.三个爬虫spider代码:
# -*- coding: utf-8 -*-
import scrapy
from ..items import CoinnewsItem
from datetime import datetime

class BabitSpider(scrapy.Spider):
    name = 'babit'
    allowed_domains = ['8btc.com']
    start_urls = ['http://www.8btc.com/news']

    def parse(self, response):
        for article in response.xpath('//div[@id="list_content_all"]/article'):#找到所有快讯的块
            time_from_now = article.xpath('div[@class="article-content"]/div[@class="article-info clearfix"]/span/text()').extract_first()#找到快讯发布时间的块
            if not time_from_now.endswith('分钟前'):#判断是不是几分钟前
                break
            url = article.xpath('div[@class="article-content"]/div[@class="article-title article-title_news"]/a/@href').extract_first()#获取快讯内容的链接
            yield scrapy.Request(url=url, callback=self.parse_detail)#传给下一级Parse获取详细的资讯信息

    def parse_detail(self, response):
        title = response.xpath('//div[@class="article-title"]/h1/text()').extract_first()#获取快讯的标题
        detail = ""
        for p in response.xpath('//div[@class="article-content"]/p'):#快讯内容位置
            detail += p.xpath('./text()').extract_first()#获得具体快讯内容
        item = CoinnewsItem()
        item['content'] = '【' + title + '】' + detail#存放快讯内容
        strtime = response.xpath('//div[@class="single-crumbs clearfix"]/span/time/@datetime').extract_first()#获取快讯发布时间
        date_str = strtime.replace('+08:00', '+0800')#替换时间,原因是格式不匹配
        dt = datetime.strptime(date_str, '%Y-%m-%dT%H:%M:%S%z')#转换格式datetime.strptime(date_string, format):将格式字符串转换为datetime对象;
        item['time'] = int(dt.timestamp())#存放快讯发布时间
        item['origin'] = '8bit'#存放获取快讯的来源
        item['is_upload'] = False#标记为false表示还未传送给OBJ数据库
        item['item_id'] = response.url.split('/')[-1]#快讯的id
        yield item
# -*- coding: utf-8 -*-
import scrapy
import json
from ..items import CoinnewsItem
class BishijieSpider(scrapy.Spider):
name = 'bishijie'
allowed_domains = ['bishijie.com']
start_urls = ['http://www.bishijie.com/api/newsv17/index?size=100&client=pc']#API地址
def parse(self, response):
rjson = json.loads(response.text)
for daily in rjson['data']:
for news in daily['buttom']:
item = CoinnewsItem()
item['content'] = "【"+news['title']+"】"+news['content']
item['item_id'] = news['newsflash_id']
item['time'] = news['issue_time']
item['origin'] = "币世界"
item['is_upload'] = False
yield item# -*- coding: utf-8 -*-
import scrapy
import json
from datetime import datetime
from ..items import CoinnewsItem
class JinseSpider(scrapy.Spider):
name = 'jinse'
allowed_domains = ['jinse.com']
start_urls = ['https://api.jinse.com/v3/live/list?limit=100']#请求地址API(不需要签名)
def parse(self, response):
rjson = json.loads(response.text)
for daily in rjson['list']:#在list列表里
for news in daily['lives']:#参数在lives列表里
item = CoinnewsItem()
item['content'] = news['content']#内容
item['item_id'] = news['id']#快讯的id
item['time'] = news['created_at']#快讯的时间
item['origin'] = "金色财经"#快讯的来源
item['is_upload'] = False
yield item
2.items代码:
# -*- coding: utf-8 -*-

# Define here the models for your scraped items
# See documentation in:
# https://doc.scrapy.org/en/latest/topics/items.html

import scrapy

class CoinnewsItem(scrapy.Item):
  # define the fields for your item here like:
    content = scrapy.Field()#快讯的内容
    origin = scrapy.Field()#快讯的来源(哪个网站)
    item_id = scrapy.Field()#快讯的id
    time = scrapy.Field()#快讯的时间
    is_upload = scrapy.Field()#全部初始化为False,意思是把爬取下来的快讯全都标记为未存入指定的数据库,利用mongdb聚合管道判断是否重复传入
3.pipeline代码:
# -*- coding: utf-8 -*-

# Define your item pipelines here
#
# Don't forget to add your pipeline to the ITEM_PIPELINES setting
# See: https://doc.scrapy.org/en/latest/topics/item-pipeline.html
import pymongo
from scrapy.exceptions import DropItem

class CoinnewsPipeline(object):

    def __init__(self, mongo_uri, mongo_db, mongo_collection):#初始化mongo数据库
        self.mongo_uri = mongo_uri
        self.mongo_db = mongo_db
        self.collection_name = mongo_collection

    @classmethod
    def from_crawler(cls, crawler):
        return cls(
            mongo_uri=crawler.settings.get('MONGO_URI'),
            mongo_db=crawler.settings.get('MONGO_DATABASE', 'coinnews'),
            mongo_collection=crawler.settings.get('MONGO_COLLECTION', 'coinnews_items')
        )

    def open_spider(self, spider):#连接数据库
        self.client = pymongo.MongoClient(self.mongo_uri)
        self.db = self.client[self.mongo_db]

    def close_spider(self, spider):#关闭数据库
        self.client.close()

    def process_item(self, item, spider):#写入MongoDB数据库
        existed = self.db[self.collection_name].find_one({'item_id':item['item_id'], 'origin':item['origin']})#查找第一个对象
        if existed:
            raise DropItem('item has been collected.')
        else:
            self.db[self.collection_name].insert_one(dict(item))#必须为dict类型,不能传入item对象
            return item #返会被处理过得item
4.settings的代码:
# -*- coding: utf-8 -*-

# Scrapy settings for coinnews project
#
# For simplicity, this file contains only settings considered important or
# commonly used. You can find more settings consulting the documentation:
#
#     https://doc.scrapy.org/en/latest/topics/settings.html
#     https://doc.scrapy.org/en/latest/topics/downloader-middleware.html
#     https://doc.scrapy.org/en/latest/topics/spider-middleware.html

BOT_NAME = 'coinnews'

SPIDER_MODULES = ['coinnews.spiders']
NEWSPIDER_MODULE = 'coinnews.spiders'


# Crawl responsibly by identifying yourself (and your website) on the user-agent #自行修改
USER_AGENT = 'Mozilla/5.0 (X11; Linux x86_64) AppleWebKit/537.36 (KHTML, like Gecko) Ubuntu Chromium/65.0.xxxx.181 Chrome/65.0.xxxx.181 Safari/537.36

# Obey robots.txt rules
ROBOTSTXT_OBEY = False #改为false

# Configure maximum concurrent requests performed by Scrapy (default: 16)
#CONCURRENT_REQUESTS = 32

# Configure a delay for requests for the same website (default: 0)
# See https://doc.scrapy.org/en/latest/topics/settings.html#download-delay
# See also autothrottle settings and docs
DOWNLOAD_DELAY = 3
# The download delay setting will honor only one of:
CONCURRENT_REQUESTS_PER_DOMAIN = 1
#CONCURRENT_REQUESTS_PER_IP = 16

# Disable cookies (enabled by default)
#COOKIES_ENABLED = False

# Disable Telnet Console (enabled by default)
#TELNETCONSOLE_ENABLED = False

# Override the default request headers:
#DEFAULT_REQUEST_HEADERS = {
#   'Accept': 'text/html,application/xhtml+xml,application/xml;q=0.9,*/*;q=0.8',
#   'Accept-Language': 'en',
#}

# Enable or disable spider middlewares
# See https://doc.scrapy.org/en/latest/topics/spider-middleware.html
#SPIDER_MIDDLEWARES = {
#    'coinnews.middlewares.CoinnewsSpiderMiddleware': 543,
#}

# Enable or disable downloader middlewares
# See https://doc.scrapy.org/en/latest/topics/downloader-middleware.html
#DOWNLOADER_MIDDLEWARES = {
#    'coinnews.middlewares.CoinnewsDownloaderMiddleware': 543,
#}

# Enable or disable extensions
# See https://doc.scrapy.org/en/latest/topics/extensions.html
#EXTENSIONS = {
#    'scrapy.extensions.telnet.TelnetConsole': None,
#}

# Configure item pipelines
# See https://doc.scrapy.org/en/latest/topics/item-pipeline.html
ITEM_PIPELINES = {
   'coinnews.pipelines.CoinnewsPipeline': 300,
}

# Enable and configure the AutoThrottle extension (disabled by default)
# See https://doc.scrapy.org/en/latest/topics/autothrottle.html
#AUTOTHROTTLE_ENABLED = True
# The initial download delay
#AUTOTHROTTLE_START_DELAY = 5
# The maximum download delay to be set in case of high latencies
#AUTOTHROTTLE_MAX_DELAY = 60
# The average number of requests Scrapy should be sending in parallel to
# each remote server
#AUTOTHROTTLE_TARGET_CONCURRENCY = 1.0
# Enable showing throttling stats for every response received:
#AUTOTHROTTLE_DEBUG = False

# Enable and configure HTTP caching (disabled by default)
# See https://doc.scrapy.org/en/latest/topics/downloader-middleware.html#httpcache-middleware-settings
#HTTPCACHE_ENABLED = True
#HTTPCACHE_EXPIRATION_SECS = 0
#HTTPCACHE_DIR = 'httpcache'
#HTTPCACHE_IGNORE_HTTP_CODES = []
#HTTPCACHE_STORAGE = 'scrapy.extensions.httpcache.FilesystemCacheStorage'

MONGO_URI = 'mongodb://xxxxxx:[email protected]:27017'#mongo数据地址
MONGO_DATABASE = 'coinnews'#数据库名称
MONGO_COLLECTION = 'coinnews_items'#数据库集合

OBJ_BASE = 'http://xx.xxx.xxx.xxx:8088/'#目的数据库
OBJ_URL = 'xxxxxx/xxxxx/xxxxxxx/import'#目的数据的url
BUCKET_SIZE = 100 #每次最大的传输量6.flush-mongo代码:
import requests
import pymongo
import json
import copy
from .settings import OBJ_BASE, OBJ_URL, MONGO_URI, MONGO_DATABASE, MONGO_COLLECTION, BUCKET_SIZE#导入参数

def export_newflash(payload, retry=5):#调用连接后台接口,retry=5当调用不成功尝试次;payload为有效载荷:请求request消息或响应response消息中可能会包含真正要传递的数据
    success_flag = False
    url = OBJ_BASE + OBJ_URL
    headers = {"Content-Type":"application/json"}#在发送前编码所有字符的为json格式
    r = requests.post(url, data=payload, headers=headers)#向指定的url提交数据

    while retry > 0:#发送不成功进行再连接
        if r.status_code == 200:#状态码为200,请求成功
            success_flag = True #修改flag为真,再发送成功,退出while循环
            break
        r = requests.post(url, data=payload)#状态码不为200,retry失败
        retry -= 1   #尝试次数-1
    return success_flag #返回是否发送成功标志

def flush_news():#获取mongodb数据库已经存储的数据(该数据库既用于存储,又起到过滤数据的作用)
    client = pymongo.MongoClient(MONGO_URI)#连接数据库
    db = client[MONGO_DATABASE]#获取数据库
    collection = db[MONGO_COLLECTION]#获取collection
    while True:
        cursor = collection.aggregate([{'$match':{'is_upload':False}},#选取标记为False的文档
                                       {'$limit':BUCKET_SIZE},#最大返回文档数为100
                                       {'$project':{'originalFlashId':'$_id','content':1, 'origin':1, 'time':1, '_id':0}},#返回参数为content,origin,time,不含id
                                       {'$group':{'_id':None,'count':{'$sum':1},'data':{'$push':'$$ROOT'}}},#(没有id被过滤掉了)分组,创建一个变量count,使用$sum计算分组后的数据的条数,将文档放入data里面
                                       {'$project':{'_id':False}}])
        try:
            payload = cursor.next()#cursor(游标)类似一个指针,next可以获取下一个文档的内容放在payload中
        except StopIteration:
            break
        if not payload or payload['count'] == 0:#为空则退出
            break

        _payload = {            #把内容格式转换成字符串,匹配接口
            "count":payload["count"],
            "data":[]
        }

        for item in copy.deepcopy(payload['data']):#深度复制,生成新对象
            item["originalFlashId"] = str(item["originalFlashId"])
            _payload["data"].append(item)

        success_flag = export_newflash(json.dumps(_payload))#将str类型的文档传入export_newflash
        if not success_flag:#传入不成功,报错
            raise RuntimeError("upload new flash failed! retry times exhausted!")

        for item in payload['data']:#更新集合中的文档(如果已经上传过得文档将标志改为True)
            collection.update_one({'_id':item['originalFlashId']},{'$set':{'is_upload':True}})
7.定时爬虫的脚本app的代码:(该代码应该放在整个爬虫代码外)
import json
from datetime import datetime
from klein import run, route #导入klein
import pymongo#导入mongo
#使用 apscheduler 做定时任务
from apscheduler.schedulers.twisted import TwistedScheduler #Twisted调度器
from apscheduler.schedulers.background import BackgroundScheduler#不使用任何以下框架(asyncio、gevent、Tornado、Twisted、Qt),并且需要在你的应用程序后台运行调度程序
from scrapy.crawler import CrawlerProcess
from scrapy.utils.project import get_project_settings
from scrapy.spiderloader import SpiderLoader
from coinnews.settings import MONGO_URI, MONGO_DATABASE, MONGO_COLLECTION#导入数据库的地址,名称,集合
from coinnews.flush_mongo import flush_news
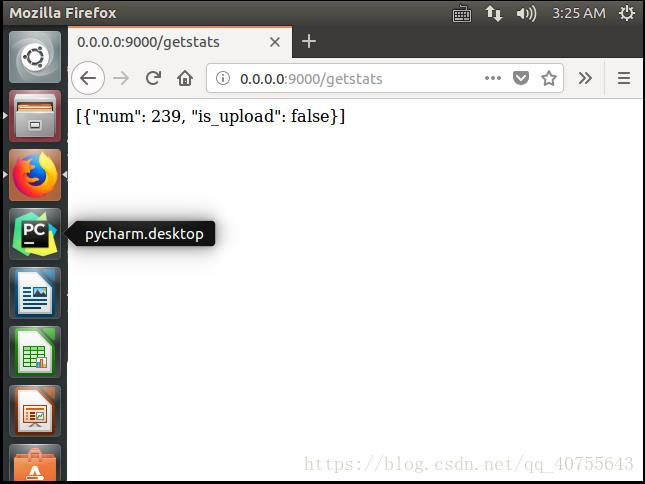
@route('/getstats')#路由名称
def home(request):#函数的作用是统计每个爬虫爬取的文件数
client = pymongo.MongoClient(MONGO_URI)#连接数据库
db = client[MONGO_DATABASE]#获取数据库
collection = db[MONGO_COLLECTION]#获取collection
response = []#声明一个列表用于存取聚合管道过滤的数据
for stat in collection.aggregate([
{'$group':{'_id':'$is_upload','num':{'$sum':1}}},#MongoDB的聚合管道,统计每个网站(_id)获取的文章总数(num)
{'$project':{'is_upload':'$_id', 'num':1, '_id':0}}#输出结果只有is_upload,num两个个字段的表数据,不包含_id,输出is_upload:_id
]):
response.append(stat)
client.close()
return json.dumps(response)#将dict类型的数据转成str类型的数据
def schedule():#调度器
export_scheduler = BackgroundScheduler()#声明后台调度器
export_scheduler.add_job(flush_news, 'interval', minutes=60)#添加作业,间隔60分钟执行flush_news
export_scheduler.start()#开启调度器
process = CrawlerProcess(get_project_settings())#声明爬虫进程
sloader = SpiderLoader(get_project_settings())#爬虫存储器,获取所有的爬虫,存放list里面
crawler_scheduler = TwistedScheduler()#声明一个Twisted进程,因为scrapy就是基于Twisted的爬虫框架
for spidername in sloader.list():#对list里面的爬虫进行提取然后启动
crawler_scheduler.add_job(process.crawl, 'interval', args=[spidername], minutes=30)#每30分钟启动爬虫进程
crawler_scheduler.start()#启动爬虫调度器
process.start(False)#保持进程开启
from multiprocessing import Process#多进程
p = Process(target=schedule)#开启线程,不间断运行去调用调度器
p.start()
run("0.0.0.0", 9000)#klein的run函数,查询地址http://0.0.0.0:9000/getstats
p.join()在控制台启动爬虫:nohup python3 app.py &
最后,我们在web输入:http://0.0.0.0:9000/getstats
利用可视化MongoDB工具Robo 3T可以查看爬取到的结果类似下图:
