前期安装请参考: scrapy爬虫笔记(安装)
在确保安装环境没有问题的情况下,新建一个项目需要在cmd中进行
首先,在自定义的文件夹(我的是E:\study\python_anaconda_pf\MyProject\scrapy_study)下面创建一个工程,我的工程名字为movie_250
在文件夹空白位置按照键盘shift不松手点击鼠标右键,选择“在此处打开命令窗口”,或者在cmd中cd到这个文件夹也可

输入命令 scrapy startproject movie_250

查看文件夹会发现自动生成了一个以工程名命名的文件夹,这个文件夹称为“项目文件”

2. 打开PyCharm,找到这个文件夹,看一下文件夹里面的目录结构(都是自动生成的,不需要自行修改名称)
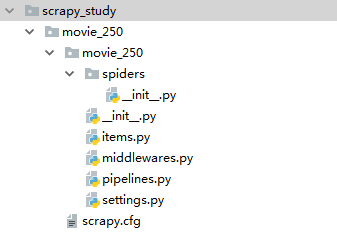
各个文件的含义:
scrapy.cfg 是项目的配置文件,默认内容如下:
# Automatically created by: scrapy startproject
#
# For more information about the [deploy] section see:
# https://scrapyd.readthedocs.io/en/latest/deploy.html

[settings]
default = movie_250.settings

[deploy]
#url = http://localhost:6800/
project = movie_250
除注释内容以外,主要声明了两件事情:
定义默认的配置文件settings的位置是在项目模块下的settings文件
定义项目名称为 movie_250
items.py 定义爬虫爬取的项目,可以认为是爬取的字段信息,需自行按照规则(默认生成的)填写,规则如下:
# -*- coding: utf-8 -*-

# Define here the models for your scraped items
#
# See documentation in:
# https://doc.scrapy.org/en/latest/topics/items.html

import scrapy


class Movie250Item(scrapy.Item):
    # define the fields for your item here like:
    # name = scrapy.Field()
    pass
按照给出的name字段填写即可,其他不改
或者将代码整体改为(本质上没有任何区别)
from scrapy import Item,Field

class Mobie_250Item(Item):
    #define the fields for your item here like:
    # name = Field()
    pass
记住 Movie250Item 这个类(其他文件会引用),是继承了Scrapy模块中的Item类
pipelines.py 字面意思是“管道”,主要作为爬虫数据的处理,在实际项目中主要用于数据的清洗、入库、存储等操作
默认代码如下:
# -*- coding: utf-8 -*-

# Define your item pipelines here
#
# Don't forget to add your pipeline to the ITEM_PIPELINES setting
# See: https://doc.scrapy.org/en/latest/topics/item-pipeline.html


class Movie250Pipeline(object):
    def process_item(self, item, spider):
        return item
定义的函数接收三个参数,其中self和spider不用管,中间的item是接收的自定义文件Movie_250_spider.py 返回的数据
另外,注释中提到了“需要在seetting文件中做相应的配置”,这个放到具体案例中说
settings.py 主要是对爬虫项目的配置,例如请求头的填写、是否符合机器人规则、延时等等,默认代码如下
# -*- coding: utf-8 -*-

# Scrapy settings for movie_250 project
#
# For simplicity, this file contains only settings considered important or
# commonly used. You can find more settings consulting the documentation:
#
#     https://doc.scrapy.org/en/latest/topics/settings.html
#     https://doc.scrapy.org/en/latest/topics/downloader-middleware.html
#     https://doc.scrapy.org/en/latest/topics/spider-middleware.html

BOT_NAME = 'movie_250'

SPIDER_MODULES = ['movie_250.spiders']
NEWSPIDER_MODULE = 'movie_250.spiders'


# Crawl responsibly by identifying yourself (and your website) on the user-agent
#USER_AGENT = 'movie_250 (+http://www.yourdomain.com)'

# Obey robots.txt rules
ROBOTSTXT_OBEY = True

# Configure maximum concurrent requests performed by Scrapy (default: 16)
#CONCURRENT_REQUESTS = 32

# Configure a delay for requests for the same website (default: 0)
# See https://doc.scrapy.org/en/latest/topics/settings.html#download-delay
# See also autothrottle settings and docs
#DOWNLOAD_DELAY = 3
# The download delay setting will honor only one of:
#CONCURRENT_REQUESTS_PER_DOMAIN = 16
#CONCURRENT_REQUESTS_PER_IP = 16

# Disable cookies (enabled by default)
#COOKIES_ENABLED = False

# Disable Telnet Console (enabled by default)
#TELNETCONSOLE_ENABLED = False

# Override the default request headers:
#DEFAULT_REQUEST_HEADERS = {
#   'Accept': 'text/html,application/xhtml+xml,application/xml;q=0.9,*/*;q=0.8',
#   'Accept-Language': 'en',
#}

# Enable or disable spider middlewares
# See https://doc.scrapy.org/en/latest/topics/spider-middleware.html
#SPIDER_MIDDLEWARES = {
#    'movie_250.middlewares.Movie250SpiderMiddleware': 543,
#}

# Enable or disable downloader middlewares
# See https://doc.scrapy.org/en/latest/topics/downloader-middleware.html
#DOWNLOADER_MIDDLEWARES = {
#    'movie_250.middlewares.Movie250DownloaderMiddleware': 543,
#}

# Enable or disable extensions
# See https://doc.scrapy.org/en/latest/topics/extensions.html
#EXTENSIONS = {
#    'scrapy.extensions.telnet.TelnetConsole': None,
#}

# Configure item pipelines
# See https://doc.scrapy.org/en/latest/topics/item-pipeline.html
#ITEM_PIPELINES = {
#    'movie_250.pipelines.Movie250Pipeline': 300,
#}

# Enable and configure the AutoThrottle extension (disabled by default)
# See https://doc.scrapy.org/en/latest/topics/autothrottle.html
#AUTOTHROTTLE_ENABLED = True
# The initial download delay
#AUTOTHROTTLE_START_DELAY = 5
# The maximum download delay to be set in case of high latencies
#AUTOTHROTTLE_MAX_DELAY = 60
# The average number of requests Scrapy should be sending in parallel to
# each remote server
#AUTOTHROTTLE_TARGET_CONCURRENCY = 1.0
# Enable showing throttling stats for every response received:
#AUTOTHROTTLE_DEBUG = False

# Enable and configure HTTP caching (disabled by default)
# See https://doc.scrapy.org/en/latest/topics/downloader-middleware.html#httpcache-middleware-settings
#HTTPCACHE_ENABLED = True
#HTTPCACHE_EXPIRATION_SECS = 0
#HTTPCACHE_DIR = 'httpcache'
#HTTPCACHE_IGNORE_HTTP_CODES = []
#HTTPCACHE_STORAGE = 'scrapy.extensions.httpcache.FilesystemCacheStorage'
入门级的可能会用到的是:请求头重写、配置使用Pipeline等,这些放在具体案例中说
middlewares 字面意思“中间件”,太复杂了,目前还用不太到,不讲了
两个__init__.py 是空文件
3.
手动在spiders文件夹下新建一个py文件,命名建议为:工程名_spider.py
这个文件是写爬虫规则的
4. 运行程序有两种方法
方法一:在项目文件夹下(也就是顶层的movie_250文件夹)内通过命令行运行
scrapy crawl 项目名
方法二:使用方法一每次运行显得很麻烦,如果有输出的话也不好看,那么就写一个main.py就好了
在第二层movie_250文件夹(这个文件夹称为模块/包)内新建main.py,并写入
from scrapy import cmdline
cmdline.execute("scrapy crawl 项目名".split())
然后每次只运行这个文件就ok啦
5. 完整的一个目录结构是这样的:
