一、环境
1、系统win10,python3.6,tensorflow-GPU1.8 。
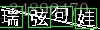
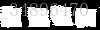
2、目标:分割如下图所示类型的中文验证码的汉字区域:

希望的分割效果如下图(也就是识别出文字区域):

二、为什么尝试去分割中文验证码
1、网上去解决英文字母验证码识别的文章到处都有,但是解决中文验证码的很少。
2、中文汉字的数量是英文字母不可比的,就拿常用3500个汉字来说,就上图四个汉字验证码
来说如果不对验证码分割直接使用神经网络进行端到端识别的话,学习成本会非常大,
其次,网络输出层需要3500的4次方个类别,这样的计算量是相当庞大的。
三、验证码分割为什么使用深度学习,不选择opencv等现有算法的方式?
1、尝试过使用opencv形态学转化等等的算法去分割如上图所示的验证码,大概方式如下:
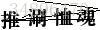
(1)、先对验证码进行灰度处理,再二值化处理,如图:
(2)、再对验证码进行腐蚀,目的是腐蚀掉除了汉字以外的噪音杂线(实际上对汉字本身影响也不小)
(3)、再对验证码进行膨胀操作,目的是恢复原本被腐蚀的汉字区域
(4)、再对验证码进行区域检测,检测验证码白色汉字的矩形区域,获取区域位置,再对原图进行分割
结论:最终效果非常不理想,会出现偏旁被分割出去,或者两个字连在一起无法分割的
情况。可能是我知识有限,如果有朋友有很好的解决算法(除深度学习)去分割
上述中文验证码,请评论指出,谢谢。
四、采用 全卷积网络 去实现
1、图片大小为宽100,高30(数据的生成,下小节),输入数据和标签数据如下图:
2、网络深度为 7 层,前三层为 卷积+池化 层,将图片依次提取为50x15,25x7,12x3
的特征图。
3、接下去的三层为 图片resize + 卷积层 分别resize为大小 25x7,50x15,100x30的
特征图
4、最后一层也为卷积层,目的是将channel道合成为1, 最后输出的tensor为
(?,100,30,1)
5、为了加快训练,参数初始化使用xavier,隐藏层之间使用batch normalization ,
优化算法使用动量算法。
6、代码在最后给出。
五、数据的生成
1、生成的输入数据和标签数据形式如下图:


2、如前几张图片所示,验证码中汉字的位置存在一定范围内的随机性,噪音杂线也存在
存在随机性
3、目的:为了让网络进行 文字区域 的检测。可以看出,上右图的黑色区域是左边图片
的文字区域,有了标签图片的样式,就很容易分割出左图的四个汉字了。
4、数据最后使用numpy库,将图片二值化后除于255 化归为0和1的数据,储存为npy格式
的文件,数据为6万张训练图片和6万张标签图片,数据的shape为(60000,3000)。
六、代码
1、训练代码:
import tensorflow.contrib.slim as slim
import tensorflow as tf
import numpy as np
import random
import time


def cal_loss(y_pre,y_label):
    # return tf.reduce_mean(tf.nn.sigmoid_cross_entropy_with_logits(labels=y_label, logits=y_pre))
    # return -tf.reduce_sum(y_label*tf.log(y_pre))
    # return tf.reduce_mean(tf.square(y_label - y_pre))
    return tf.reduce_mean(tf.pow(tf.subtract(y_pre,y_label),2))


def network(in_image,if_is_training):
	batch_norm_params={
		'is_training':if_is_training,
		'zero_debias_moving_mean':True,
		'decay':0.99,
		'epsilon':0.001,
		'scale':True,
		'updates_collections':None
	}

	with slim.arg_scope([slim.conv2d],activation_fn=tf.nn.relu,
		padding='SAME',
		weights_initializer=slim.xavier_initializer(),
		biases_initializer=tf.zeros_initializer(),
		normalizer_fn=slim.batch_norm,
		normalizer_params=batch_norm_params,
		weights_regularizer=slim.l2_regularizer(0.0005)):
		out_1=32
		out_2=64
		out_3=128

		net=slim.conv2d(in_image,num_outputs=out_2,kernel_size=[3,3],stride=1,scope='conv1')
		print('1_con:   ',net.get_shape())
		net=slim.max_pool2d(net,kernel_size=[2,2],stride=2,scope='pool1')
		print('1_pool:  ',net.get_shape())

		net=slim.conv2d(net,num_outputs=out_2,kernel_size=[3,3],stride=1,scope='conv2')
		print('2_con:   ',net.get_shape())
		net=slim.max_pool2d(net,kernel_size=[2,2],stride=2,scope='pool2')
		print('2_pool:  ',net.get_shape())

		net=slim.conv2d(net,num_outputs=out_1,kernel_size=[3,3],stride=1,scope='conv3')
		print('3_con:   ',net.get_shape())
		net=slim.max_pool2d(net,kernel_size=[2,2],stride=2,scope='pool3')
		print('3_pool:  ',net.get_shape())

		net = tf.image.resize_images(net, size=(25,7), method=tf.image.ResizeMethod.NEAREST_NEIGHBOR)
		net=slim.conv2d(net,num_outputs=out_1,kernel_size=[3,3],stride=1,scope='conv4')
		print('deconv1:   ',net.get_shape())

		net = tf.image.resize_images(net, size=(50,15), method=tf.image.ResizeMethod.NEAREST_NEIGHBOR)
		net=slim.conv2d(net,num_outputs=out_1,kernel_size=[3,3],stride=1,scope='conv5')
		print('deconv2:   ',net.get_shape())


		net = tf.image.resize_images(net, size=(100,30), method=tf.image.ResizeMethod.NEAREST_NEIGHBOR)
		net=slim.conv2d(net,num_outputs=out_2,kernel_size=[3,3],stride=1,scope='conv6')
		print('deconv3:   ',net.get_shape())

		net=slim.conv2d(net,num_outputs=1,
			activation_fn=tf.nn.sigmoid,
			kernel_size=[3,3],stride=1,
			weights_initializer=tf.zeros_initializer(),
			scope='conv7')
		print('5_con:   ',net.get_shape())


		net = tf.reshape(net, shape=[-1,3000], name='end')

		return net


def main():
	in_image= tf.placeholder(dtype=tf.float32, shape=[None,3000], name='in_image')
	out_image=tf.placeholder(dtype=tf.float32, shape=[None,3000], name='out_image')

	# 和 batch normalization一起使用,在训练时为True,预测时False
	if_is_training=tf.placeholder(dtype=tf.bool,name='if_is_training')

	x_input = tf.reshape(in_image, shape=[-1,100,30,1], name='x_input')

	pre_image=network(x_input,if_is_training)

	l2_loss = tf.add_n(tf.losses.get_regularization_losses())
	loss=cal_loss(pre_image,out_image) + l2_loss

	#和 batch normalization 一起使用
	update_ops=tf.get_collection(tf.GraphKeys.UPDATE_OPS)
	with tf.control_dependencies(update_ops):
		# train_op = tf.train.GradientDescentOptimizer(0.01).minimize(loss)
		train_op = tf.train.MomentumOptimizer(learning_rate=0.01,momentum=0.9,use_nesterov=True).minimize(loss)

	model_saver=tf.train.Saver()
	tf.add_to_collection('pre_img',pre_image)

	x_image=np.load('in_img.npy')
	y_image=np.load('out_img.npy')
	# min_x_image=x_image[:100,:]
	# min_y_image=y_image[:100,:]
	all_loss=[]
	# with tf.device('/gpu:0'):
	with tf.Session() as sess:
		sess.run(tf.global_variables_initializer())
		while True:
			#输入训练次数,方便控制和继续训练
			command=input('input: ')
			if command=='qq':
				break
			for i in range(int(command)):
				# begin=time.time()
				bt=random.randint(0,59899)
				min_x_image=x_image[bt:(bt+100),:]
				min_y_image=y_image[bt:(bt+100),:]

				sess.run(train_op,feed_dict={in_image:min_x_image,out_image:min_y_image,if_is_training:True})
				# end=time.time()
				# print('count:  ',i,'  times:',end - begin)
				if i%50==0:
					print('\n','count:',i)
					loss_op=sess.run(loss,feed_dict={in_image:min_x_image,out_image:min_y_image,if_is_training:True})
					# if loss_op<=500:
					# 	break
					print(' loss:      ',loss_op,'\n')
					all_loss.append(loss_op)
					print(all_loss)

		model_saver.save(sess,'./model/mymodel.ckpt')
		np.save('loss.npy',np.array(all_loss))

if __name__=='__main__':
	main()
2、数据生成的代码
from PIL import Image,ImageFont,ImageDraw
import random
import os
import numpy as np
import cv2


class ImageChar():
	"""
	1、读取3500.txt 这是最常用3500汉字 并随机挑选出汉字
	2、在./fonts/ 文件夹下存放 字体格式 随机挑选格式 然后依据格式随机生成汉字
	3、随机画指定数目的干扰线
	4、环境:Mac python3.5

	"""
	def __init__(self, color=(0,0,0),size=(100,30),
		fontlist=['./fonts/'+i for i in os.listdir('./fonts/') if not i =='.DS_Store'],
		fontsize=20,
		num_word=4):#生成多少个字的验证码(图片宽度会随之增加)


		self.num_word=num_word
		self.color=color

		self.fontlist=fontlist

		if self.num_word==4:
			self.size=size
		else:
			self.size=((self.fontsize+5)*self.num_word,40)

		#随机挑选一个字体 randint(0,2)会取0,1,2 所以减去 1
		self.fontpath=self.fontlist[random.randint(0,len(self.fontlist)-1)]
		self.fontsize=fontsize

		self.chinese=open('3500.txt','r').read()

		self.font=ImageFont.truetype(self.fontpath, self.fontsize)


	def rand_chinese(self):
		chinese_str=''
		for i in range(self.num_word):
			chinese_str=chinese_str+self.chinese[random.randint(0,3499)]
		return chinese_str

	def rand_line_points(self,mode=0):
		width,height=self.size
		if mode==0:
			return (random.randint(0, width), random.randint(0, height))
		elif mode==1:
			return (random.randint(0,6),random.randint(0, height))
		elif mode==2:
			return (random.randint(width-6,width),random.randint(0, height))


	#随机生成一张 输入 图片 和 一张 标签图片
	def rand_draw(self,num_lines=4):
		width,height=self.size
		gap=5
		start=0

		#第一张,带噪音的验证码
		self.img1 = Image.new('RGB',self.size,(255,255,255))
		self.draw1=ImageDraw.Draw(self.img1)
		self.img2 = Image.new('RGB',self.size,(255,255,255))
		self.draw2=ImageDraw.Draw(self.img2)


		#把线画上去
		for i in range(num_lines//2):
			self.draw1.line([self.rand_line_points(),self.rand_line_points()],(0,0,0))
		for i in range(num_lines//2):
			self.draw1.line([self.rand_line_points(1),self.rand_line_points(2)],(0,0,0))


		i=0
		words=self.rand_chinese()
		# img1_crops=[]
		for word in words:
			x=start+(self.fontsize+gap)*i+random.randint(0,gap)
			y=random.randint(0,height-self.fontsize-gap)
			i+=1
			self.draw1.text((x,y),word,fill=(0,0,0),font=self.font)
			# img1_crop=self.img1.crop((x,y+4,x+20,y+24))
			# img1_crops.append(img1_crop)
			self.draw2.rectangle([(x,y+4),(x+20,y+24)],fill=(0,0,0))
		# paste_x=0
		# for img1_c in img1_crops:
		# 	self.img2.paste(img1_c,box=(paste_x,0))
		# 	paste_x=paste_x+20


		# self.img1.show()
		# self.img2.show()

		return self.img1,self.img2


	def born_rand_datanpy(self):
		in_np_img = np.ones((1000,3000))
		out_np_img= np.ones((1000,3000))

#读取文件下的图片转化为npy格式存储
def prepare_data():
	path_in ='./data_classify/in_img/'
	# path_in='./data_classify/out_img/'
	# path_in='./test/'
	in_list=[path_in+i for i in os.listdir(path_in) if '.jpg' in i ]
	in_np_img=np.ones((60000,3000))
	for i in range(len(in_list)):
		if i%1000==0:
			print(i)
		img=cv2.imread(in_list[i])
		gray = cv2.cvtColor(img,cv2.COLOR_BGR2GRAY)
		ret,gray = cv2.threshold(gray,127,255,cv2.THRESH_BINARY_INV)
		gray=gray.reshape(3000,)
		in_np_img[i,:]=gray/255
	np.save('out_img_1.npy',in_np_img)


if __name__=='__main__':
	imgchr=ImageChar()
	# imgchr.rand_draw()
	for i in range(60000):
		if i%1000==0:
			print(i)
		img1,img2=imgchr.rand_draw()
		img1.save('./data_classify/in_img/'+str(i)+'.jpg')
		img2.save('./data_classify/out_img/'+str(i)+'.jpg')
		# img1.save('./test/'+str(i)+'.jpg')
	# prepare_data()
七、训练以及效果
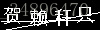
1、在GPU下训练两个小时后,输入如下图片:

2、对输入图片进行预处理,即,对图片进行灰度、二值化,再除于255化归于0和1数据
再输入到网络中。
3、输出图片,再乘于255后,如下图:
4、对输出图片用opencv进行腐蚀操作,再对输出图片进行矩形边界检测:
kernel = np.ones((5,5),np.uint8)
img_bin = cv2.erode(img_bin,kernel,iterations = 1)
extent=2
img_bin, contours,h= cv2.findContours(img_bin,cv2.RETR_EXTERNAL,cv2.CHAIN_APPROX_NONE)
print(len(contours))
5、利用对输出图片的边界检测所获取的位置,对输入图片进行分割,效果如下:
img_pre = cv2.imread('网络的输入图片')
for cnt in contours:
	x,y,w,h = cv2.boundingRect(cnt)
	print((w+2*extent)*(h+2*extent))
	# if w*h>100:
	img_pre = cv2.rectangle(img_pre,(x- extent,y- extent),(x+w+ extent,y+h+ extent),(0,255,0),1)