1.前言
cobbler是一个可以实现批量安装系统的Linux应用程序。它有别于pxe+kickstart,cobbler可以实现同个服务器批量安装不同操作系统版本。
2.系统环境准备及其下载cobbler
一.系统环境
系统版本:CentOS release 6.7 (Final)
内网IP:192.168.232.7/24 #用来对内通信,提供cobbler服务
外网IP:10.220.5.166/24 #连接外网
二. 关闭安全服务
[root@ken ~]# cat /etc/redhat-release     #检查系统版本
CentOS release 6.7 (Final)
[root@ken ~]# service iptables stop       #关闭防火墙
[root@ken ~]# setenforce 0                #关闭selinux
三. 下载cobbler及其所需服务程序
[root@ken ~]# yum install cobbler dhcp tftp-server xinetd syslinux httpd pykickstart -y
yum安装cobbler需要使用网络yum源,大家可以复制下面的代码到自己的yum仓库保存即可
[epel]
name=epel
enabled=1
gpgcheck=0
baseurl=https://mirrors.aliyun.com/epel/6Server/x86_64/
3.配置dhcp
[root@ken ~]# vim /etc/dhcp/dhcpd.conf                  #配置dhcp配置文件,并写入如下代码

subnet 192.168.232.0 netmask 255.255.255.0 {
  range 192.168.232.10 192.168.232.20;
  option domain-name-servers 8.8.8.8;
  option routers 192.168.232.7;
  default-lease-time 600;
  max-lease-time 7200;
  filename "pxelinux.0";
}

[root@ken ~]# service dhcpd restart                     #重启dhcpd服务,使之配置生效
Starting dhcpd:                     [  OK  ]
4.配置tftp
[root@ken ~]# vim /etc/xinetd.d/tftp

# default: off
# description: The tftp server serves files using the trivial file transfer \
#       protocol.  The tftp protocol is often used to boot diskless \
#       workstations, download configuration files to network-aware printers, \
#       and to start the installation process for some operating systems.
service tftp
{
        socket_type             = dgram
        protocol                = udp
        wait                    = yes
        user                    = root
        server                  = /usr/sbin/in.tftpd
        server_args             = -s /var/lib/tftpboot
        disable                 = no                     #把yes修改为no,即启动tftp服务
        per_source              = 11
        cps                     = 100 2
        flags                   = IPv4
}
[root@ken ~]# service xinetd restart                     #重启xinetd,使之配置生效
Stopping xinetd:                                  [FAILED]
Starting xinetd:                                  [  OK  ]

[root@ken ~]# chkconfig xinetd on                        #把xinetd加入系统启动项,实现开机自动启动
[root@ken ~]# chkconfig --list | grep tftp               #检查确认tftp是否已经成功开启
    tftp:              on
5.配置cobbler
首先检查cobbler配置
[root@ken ~]# cobbler check
The following are potential configuration items that you may want to fix:

1 : The 'server' field in /etc/cobbler/settings must be set to something other than localhost, or kickstarting features will not work.  This should be a resolvable hostname or IP for the boot server as reachable by all machines that will use it.
2 : For PXE to be functional, the 'next_server' field in /etc/cobbler/settings must be set to something other than 127.0.0.1, and should match the IP of the boot server on the PXE network.
3 : some network boot-loaders are missing from /var/lib/cobbler/loaders, you may run 'cobbler get-loaders' to download them, or, if you only want to handle x86/x86_64 netbooting, you may ensure that you have installed a *recent* version of the syslinux package installed and can ignore this message entirely.  Files in this directory, should you want to support all architectures, should include pxelinux.0, menu.c32, elilo.efi, and yaboot. The 'cobbler get-loaders' command is the easiest way to resolve these requirements.
4 : change 'disable' to 'no' in /etc/xinetd.d/rsync
5 : debmirror package is not installed, it will be required to manage debian deployments and repositories
6 : The default password used by the sample templates for newly installed machines (default_password_crypted in /etc/cobbler/settings) is still set to 'cobbler' and should be changed, try: "openssl passwd -1 -salt 'random-phrase-here' 'your-password-here'" to generate new one
7 : fencing tools were not found, and are required to use the (optional) power management features. install cman or fence-agents to use them

Restart cobblerd and then run 'cobbler sync' to apply changes.
根据如上反馈,需要一一进行修改才能继续进行
问题一:
cobbler文件默认是127.0.0.1本地回环地址,需要更改为提供cobbler服务的ip地址 192.163.232.7
[root@ken ~]# sed -i 's/server: 127.0.0.1/server: 192.168.232.7/g' /etc/cobbler/settings
问题二:
netx_server也是默认本地127.0.0.1回环地址,需要修改为提供cobbler服务的ip地址 192.163.232.7
[root@ken ~]# sed -i 's/next_server: 127.0.0.1/next_server: 192.168.232.7/g' /etc/cobbler/settings
问题三:
可以忽略
问题四:
启动rsync即可
[root@ken ~]# vim /etc/xinetd.d/rsync

   # default: off
   # description: The rsync server is a good addition to an ftp server, as it \
   #       allows crc checksumming etc.
    service rsync
   {
        disable = no                                 #yes更改为no
        flags           = IPv6
        socket_type     = stream
        wait            = no
        user            = root
        server          = /usr/bin/rsync
        server_args     = --daemon
        log_on_failure  += USERID
   }

[root@ken ~]# service xinetd  restart                #重启xinetd服务
Stopping xinetd:                           [  OK  ]
Starting xinetd:                           [  OK  ]
[root@ken ~]# chkconfig --list | grep rsync          #检查rsync是否已经启动
    rsync:             on
 问题五:
 可以忽略
 问题六:
 更改密码,并把新生成的加密数据填写进/etc/cobbler/settings
[root@ken ~]# openssl passwd -1 -salt '123' '123456'
$1$123$7mft0jKnzzvAdU4t0unTG1
[root@ken ~]# vim /etc/cobbler/settings
92 # cobbler has various sample kickstart templates stored
93 # in /var/lib/cobbler/kickstarts/. This controls
94 # what install (root) password is set up for those
95 # systems that reference this variable. The factory
96 # default is "cobbler" and cobbler check will warn if
97 # this is not changed.
98 # The simplest way to change the password is to run
99 # openssl passwd -1
100 # and put the output between the "" below.
101 default_password_crypted: "$1$123$7mft0jKnzzvAdU4t0unTG1"     #把新生成的加密密码填写在101行处
102
103 # the default template type to use in the absence of any
104 # other detected template. If you do not specify the template
105 # with '#template=<template_type>' on the first line of your
106 # templates/snippets, cobbler will assume try to use the
107 # following template engine to parse the templates.
问题七:
可以忽略
以上问题解决之后,需要同步和重启
[root@ken ~]# service cobblerd restart #重启cobbler服务
[root@ken ~]# cobbler sync #进行同步
再次检查是否已经更改完成
[root@ken ~]# cobbler check
The following are potential configuration items that you may want to fix:

1 : some network boot-loaders are missing from /var/lib/cobbler/loaders, you may run 'cobbler get-loaders' to download them, or, if you only want to handle x86/x86_64 netbooting, you may ensure that you have installed a *recent* version of the syslinux package installed and can ignore this message entirely.  Files in this directory, should you want to support all architectures, should include pxelinux.0, menu.c32, elilo.efi, and yaboot. The 'cobbler get-loaders' command is the easiest way to resolve these requirements.
2 : debmirror package is not installed, it will be required to manage debian deployments and repositories
3 : fencing tools were not found, and are required to use the (optional) power management features. install cman or fence-agents to use them

Restart cobblerd and then run 'cobbler sync' to apply changes.
已经更改完毕!
6.挂载光盘并进行数据导入
挂载光盘
[root@ken ~]# mount /dev/cdrom /mnt
数据导入
[root@ken ~]# cobbler import --path=/mnt --name=centos6.7  #进行数据导入
task started: 2018-09-09_021922_import
task started (id=Media import, time=Sun Sep  9 02:19:22 2018)
Found a candidate signature: breed=redhat, version=rhel6
Found a matching signature: breed=redhat, version=rhel6
Adding distros from path /var/www/cobbler/ks_mirror/centos6.7:
creating new distro: centos6.7-x86_64
trying symlink: /var/www/cobbler/ks_mirror/centos6.7 -> /var/www/cobbler/links/centos6.7-x86_64
creating new profile: centos6.7-x86_64
associating repos
checking for rsync repo(s)
checking for rhn repo(s)
checking for yum repo(s)
starting descent into /var/www/cobbler/ks_mirror/centos6.7 for centos6.7-x86_64
processing repo at : /var/www/cobbler/ks_mirror/centos6.7
need to process repo/comps: /var/www/cobbler/ks_mirror/centos6.7
looking for /var/www/cobbler/ks_mirror/centos6.7/repodata/*comps*.xml
Keeping repodata as-is :/var/www/cobbler/ks_mirror/centos6.7/repodata
*** TASK COMPLETE ***
查看distro
[root@ken ~]# cobbler distro list
   centos6.7-x86_64
查看profile
[root@ken ~]# cobbler profile list
   centos6.7-x86_64
7.自定义profile
[root@ken ~]# cobbler profile add --distro=centos6.7-x86_64 --name=centos6.7_ken --kickstart=/var/lib/cobbler/kickstarts/ks.cfg
[root@ken ~]# cobbler sync
8. 准备ks文件
在root目录下找到ks文件,并移动到/var/lib/cobbler/kickstarts/到目录下改名为ks.cfg
[root@ken ~]# ls
anaconda-ks.cfg  install.log  install.log.syslog
[root@ken ~]# mv anaconda-ks.cfg /var/lib/cobbler/kickstarts/ks.cfg
[root@ken ~]# vim /var/lib/cobbler/kickstarts/ks.cfg
# Kickstart file automatically generated by anaconda.
#version=DEVEL
install
# Kickstart file automatically generated by anaconda.
#version=DEVEL
install
url --url=http://192.168.232.7/cobbler/ks_mirror/centos6.7/ #这里需要更改为repodata所在的http地址
lang en_US.UTF-8
keyboard us
network --onboot no --device eth0 --bootproto dhcp --noipv6
rootpw 123
reboot
firewall --service=ssh
authconfig --enableshadow --passalgo=sha512
selinux --disabled
timezone --utc Asia/Shanghai
bootloader --location=mbr --driveorder=sda --append="crashkernel=auto rhgb quiet"
# The following is the partition information you requested
# Note that any partitions you deleted are not expressed
# here so unless you clear all partitions first, this is
# not guaranteed to work
clearpart --all
zerombr
part /boot --fstype=ext4 --size=500
part pv.008002 --grow --size=1
volgroup VolGroup --pesize=4096 pv.008002
logvol / --fstype=ext4 --name=lv_root --vgname=VolGroup --grow --size=1024 --maxsize=51200
logvol swap --name=lv_swap --vgname=VolGroup --grow --size=2016 --maxsize=2016
repo --name="CentOS" --baseurl=http://192.168.232.7/cobbler/ks_mirror/centos6.7/ --cost=100 #这里的地址和上面的url地址保持一致
%packages
@core
@server-policy
@workstation-policy
%end
9.重启服务
[root@ken ~]# service httpd restart
[root@ken ~]# service cobblerd restart
[root@ken ~]# service dhcpd restart
[root@ken ~]# service xinetd restart
10.测试
新建一个虚拟机,需要和cobbler服务器所在同一个虚拟网络中(nat,桥接等)。
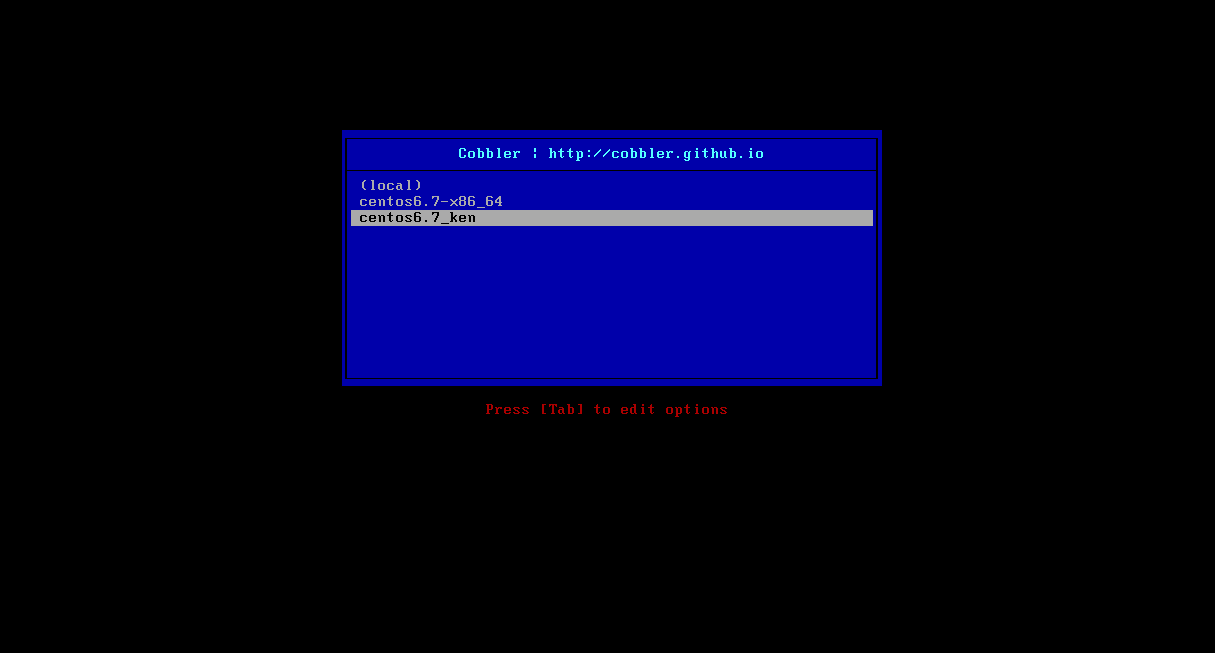
选择第二个我们自定义的包即可进行自动化安装。
接下来的博文将会介绍如何使用cobbler,实现在同一个服务器批量安装不同版本系统。
以及pxe+kickstart
因为热爱 所以炽热
--技术流ken