简介
本篇博客继续延续上面的两篇博客内容(传送门),今天给大家带来的是在你已有的界面框架上去搭建一个类似手机淘宝App的主页界面。我们首先来看一下手机淘宝主页界面的主要组成部分:

根据上面我给出的图,我把它分为三个部分,如图:
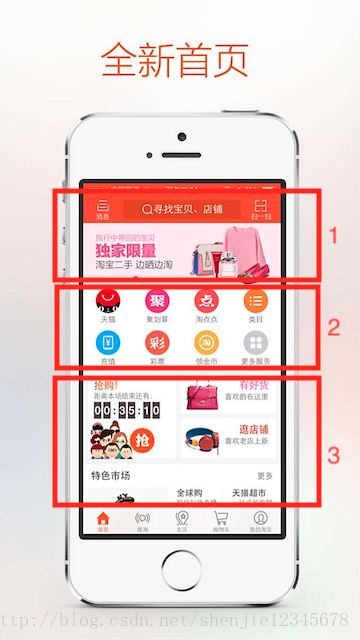
第一部分是横向滚动的信息框;
第二部分是主菜单分类;
第三部分是用推荐算法得出的商品信息;
根据界面的大致布局,我们基本上可以肯定使用 UITableView 或者 UICollectionView 即可完成最基本的界面布局,在这篇博客中,我们就先使用 UITableView 来完成开发吧!等到下一篇博客,我们再继续使用 UICollectionView 来实现。
具体实现
问:如何开发才使得我们的界面布局看上去丰富呢?
答:我们可以定义一个界面配置文件,比如说 json 格式的文件。在我们每次打开 App 的时候去读取这个json文件,根据在 json 中配置的每个secion部分需要用到多少行,在 “
- (NSInteger)tableView:(UITableView *)tableView numberOfRowsInSection:(NSInteger)section; ” 函数里返回具体的值。配置文件可以参考如下格式:
 [
  {
  "cHeadlineShow": "0",
  "cTemplateId":"1",
  "NewsBanner": [
                 "https://pic1.zhimg.com/50/v2-637fe965b1fe027e814290dcb691bb3c_hd.jpg",
                 "https://pic4.zhimg.com/50/v2-2273408eced6da59476edea711b107e3_hd.jpg",
                 "https://pic2.zhimg.com/50/v2-18146559506936ec5602ae3a671b5f45_hd.jpg",
                 "https://pic2.zhimg.com/50/v2-47c065ae55b6be6ca4eff7500097f45d_hd.jpg",
                 "https://pic2.zhimg.com/50/v2-c3f045a945967890d6544c2156b9e971_hd.jpg"
]
  },
  {
  "cHeadlineShow": "0",
  "cTemplateId":"2",
  "MenuData": [
               {
               "name": "天猫",
               "ImgUrl": "moon.png"
               },
               {
               "name": "聚划算",
               "ImgUrl": "nong.png"
               },
               {
               "name": "天猫国际",
               "ImgUrl": "qing.png"
               },
               {
               "name": "外卖",
               "ImgUrl": "zhong.png"
               },
               {
               "name": "天猫超市",
               "ImgUrl": "qiu.png"
               },
               {
               "name": "充值中心",
               "ImgUrl": "huan.png"
               },
               {
               "name": "飞猪旅行",
               "ImgUrl": "le.png"
               },
               {
               "name": "领金币",
               "ImgUrl": "guo.png"
               },
               {
               "name": "拍卖",
               "ImgUrl": "qin.png"
               },
               {
               "name": "分类",
               "ImgUrl": "china.png"
               }
               ]
  },
  {
  "cHeadlineShow": "1",
  "cTemplateId":"3",
  "FastLook": ["晚上8时,第十三届全运会闭幕式在天津体育馆举行",
               "中共中央政治局常委、国务院总理李克强宣布,中华人民共和国第十三届运动会闭幕",
               "伴随着第十三届全运会会歌的旋律,第十三届全运会会旗缓缓落下,燃烧了13天的主火炬渐渐熄灭",
               "刘延东、杨晶、艾力更·依明巴海、陈晓光,以及中央军委委员吴胜利出席闭幕式"],
  "sTitle":"新闻快报"
  },
  {
  "cHeadlineShow": "1",
  "cTemplateId":"4",
  "PkgRecommend": [
                   "placehold1.png",
                   "placehold2.png",
                   "placehold3.png",
                   "placehold4.png"
                   ],
  "sTitle":"精品推荐",
  "sSubtitle":"更多"
  }

。。。省略 。。。
问:如何实现一个横向滚动的信息框?
答:问这个问题的基本上都是知道它是由什么控件去实现的,只是不知道怎么去写逻辑,很显而易见,如果要实现一个信息展示框,我们需要去定义UIScrollView,UIPageControl,以及存放数据的数组 NSMutableArray。有的人在初次尝试写这种效果的时候,会为每一个数据去新建一个UIImageView, 这种情况在你数据量少的时候是可以接受的,但是为了 APP 的性能,在这里我就打算只用三个 UIImageView 来完成这一下效果,分别是:左边,中间,右边,每次滑动的时候都重置一下这三张图片。具体的代码我都上传到 GitHub 上了,传送门。实现如下:
//
//  CustomNewsBanner.m
//  CoolFrame
//
//  Created by shenjie on 2017/9/18.
//  Copyright © 2017年 com.snailgames.coolframe. All rights reserved.
//

#import "CustomNewsBanner.h"
#import <SDWebImage/UIImageView+WebCache.h>

@implementation CustomNewsBanner

@synthesize productsArray = _productsArray;
@synthesize scrollView = _scrollView;
@synthesize pageControl = _pageControl;
@synthesize currentIndex = _currentIndex;
@synthesize imgVLeft = _imgVLeft;
@synthesize imgVRight = _imgVRight;
@synthesize imgVCenter = _imgVCenter;
@synthesize delegate = _delegate;

- (id)initWithFrame:(CGRect)frame
{
    self = [super initWithFrame:frame];
    if (self) {
        // Initialization code
        //1.创建 UIScrollView
        _scrollView = [[UIScrollView alloc] init];
        _scrollView.delegate = self;
        _scrollView.backgroundColor = [UIColor clearColor];
        _scrollView.showsHorizontalScrollIndicator = NO;

        //图片视图;左边
        _imgVLeft = [[UIImageView alloc] init];
        _imgVLeft.contentMode = UIViewContentModeScaleAspectFill;
        [_scrollView addSubview:_imgVLeft];

        //图片视图;中间
        _imgVCenter = [[UIImageView alloc] init];
        _imgVCenter.contentMode = UIViewContentModeScaleAspectFill;
        [_scrollView addSubview:_imgVCenter];

        //图片视图;右边
        _imgVRight = [[UIImageView alloc] init];
        _imgVRight.contentMode = UIViewContentModeScaleAspectFill;
        [_scrollView addSubview:_imgVRight];

        //2.创建 UIPageControl
        _pageControl = [[UIPageControl alloc] init];
        //设置当前页指示器的颜色
        _pageControl.currentPageIndicatorTintColor = [UIColor blackColor];
        //设置指示器的颜色
        _pageControl.pageIndicatorTintColor = [UIColor whiteColor];

        //3.添加到视图
        [self addSubview:_scrollView];
        [self addSubview:_pageControl];

        //4.添加点击响应
        UITapGestureRecognizer *tap = [[UITapGestureRecognizer alloc]initWithTarget:self action:@selector(handleTap:)];
        [_scrollView addGestureRecognizer:tap];
        [_scrollView setUserInteractionEnabled:YES];

    }
    return self;
}

- (void)layoutSubviews{
    [super layoutSubviews];

    CGRect rect = self.bounds;
    [_scrollView setFrame:rect];
    _scrollView.contentSize = CGSizeMake(rect.size.width * 3, rect.size.height);
    [_scrollView setContentOffset:CGPointMake(rect.size.width, 0) animated:NO];

    //图片视图;左边
    [_imgVLeft setFrame:CGRectMake(0.0, 0.0, rect.size.width, rect.size.height)];

    //图片视图;中间
    [_imgVCenter setFrame:CGRectMake(rect.size.width, 0.0, rect.size.width, rect.size.height)];

    //图片视图;右边
     [_imgVRight setFrame:CGRectMake(rect.size.width * 2, 0.0, rect.size.width, rect.size.height)];

    //2.创建 UIPageControl
    CGSize size= [_pageControl sizeForNumberOfPages:[_productsArray count]];
    _pageControl.bounds = CGRectMake(0.0, 0.0, size.width, size.height);
    _pageControl.center = CGPointMake(rect.size.width / 2.0, rect.size.height - 20.0);
    _pageControl.numberOfPages = [_productsArray count];
}

- (void)setProductsArray:(NSMutableArray *)productsArray{
    if(!productsArray){
        return;
    }

    _productsArray = [productsArray copy];
    _currentIndex = 0;
    [self setDefaultImage];
}


- (void)reloadImage{
    int leftImageIndex, rightImageIndex;
    NSInteger imageCount = [_productsArray count];

    CGPoint contentOffset = [_scrollView contentOffset];

    //向右滑动
    if(contentOffset.x > self.frame.size.width){
        _currentIndex = (int)(_currentIndex + 1) % imageCount;
    }else if(contentOffset.x < self.frame.size.width){
        _currentIndex = (int)(_currentIndex - 1 + imageCount) % imageCount;
    }

    NSString *url = [_productsArray objectAtIndex:_currentIndex];
    [_imgVCenter sd_setImageWithURL:[NSURL URLWithString:url] placeholderImage:[UIImage imageNamed:@"default_icon"] options:SDWebImageProgressiveDownload];

    //重新设置左右图片
    leftImageIndex = (int)(_currentIndex+imageCount-1)%imageCount;
    rightImageIndex = (int)(_currentIndex+1)%imageCount;

    NSString *url1 = [_productsArray objectAtIndex:leftImageIndex];
    [_imgVLeft sd_setImageWithURL:[NSURL URLWithString:url1] placeholderImage:[UIImage imageNamed:@"default_icon"] options:SDWebImageProgressiveDownload];

    NSString *url2 = [_productsArray objectAtIndex:rightImageIndex];
    [_imgVRight sd_setImageWithURL:[NSURL URLWithString:url2] placeholderImage:[UIImage imageNamed:@"default_icon"] options:SDWebImageProgressiveDownload];
}

- (void)setDefaultImage{
    int count = (int)[_productsArray count];
    NSString *url = [_productsArray objectAtIndex:count - 1];
    [_imgVLeft sd_setImageWithURL:[NSURL URLWithString:url] placeholderImage:[UIImage imageNamed:@"default_icon"] options:SDWebImageProgressiveDownload];

    NSString *url1 = [_productsArray objectAtIndex:0];
    [_imgVCenter sd_setImageWithURL:[NSURL URLWithString:url1] placeholderImage:[UIImage imageNamed:@"default_icon"] options:SDWebImageProgressiveDownload];

    NSString *url2 = [_productsArray objectAtIndex:1];
    [_imgVRight sd_setImageWithURL:[NSURL URLWithString:url2] placeholderImage:[UIImage imageNamed:@"default_icon"] options:SDWebImageProgressiveDownload];

    _currentIndex = 0;
    _pageControl.currentPage = _currentIndex;
}

#pragma mark - UIScrollViewDelegate

// called when scroll view grinds to a halt
- (void)scrollViewDidEndDecelerating:(UIScrollView *)scrollView{
    //重新加载图片
    [self reloadImage];
    //移动到中间
    [_scrollView setContentOffset:CGPointMake(self.frame.size.width, 0) animated:NO];
    //页码设置
    _pageControl.currentPage = _currentIndex;
}

#pragma mark - UITapGestureRecognizer
-(void)handleTap:(id)sender{
    if([[self delegate] respondsToSelector:@selector(newsbanner:didSelectItemAtIndex:)]){
        [_delegate newsbanner:self didSelectItemAtIndex:_currentIndex];
    }
}

@end
问:如何才能去实现主页的分类菜单按钮呢?
答:看这个布局就很清楚,要实现这种效果最快的方式就是使用 UICollectionView + UICollectionViewFlowLayout。通过自定义 UICollectionViewCell 来显示菜单的图片与名称。
//
//  CustomCollectionView.m
//  CoolFrame
//
//  Created by silicon on 2017/10/2.
//  Copyright © 2017年 com.snailgames.coolframe. All rights reserved.
//

#import "CustomCollectionView.h"
#import "CustomFlowLayout.h"
#import "CustomCollectionViewCell.h"
#import "GlobalDefine.h"

@implementation CustomCollectionView
@synthesize delegate = _delegate;

- (id)initWithFrame:(CGRect)frame
{
    self = [super initWithFrame:frame];
    if (self) {
        // Initialization code
        _itemArray = [[NSMutableArray alloc] init];
        [self setBackgroundColor:[UIColor clearColor]];
        [self addSubview:[self collectionView]];
    }
    return self;
}

- (void)layoutSubviews{
    [super layoutSubviews];
    [_collectionView setFrame:self.bounds];
}

-(UICollectionView *)collectionView{
    if (!_collectionView) {
        //自动网格布局
        CustomFlowLayout * flowLayout = [[CustomFlowLayout alloc] init];
        //网格布局
        _collectionView = [[UICollectionView alloc] initWithFrame:self.frame collectionViewLayout:flowLayout];
        [_collectionView setBackgroundColor:[UIColor whiteColor]];
        //注册cell
        [_collectionView registerClass:[CustomCollectionViewCell class] forCellWithReuseIdentifier:@"CustomMenuCell"];

        //设置数据源代理
        _collectionView.dataSource = self;
        _collectionView.delegate = self;
    }

    return _collectionView;
}

- (void)setItemArray:(NSMutableArray *)itemArray{
    _itemArray = [itemArray copy];

}

#pragma mark - collectionViewDelegate

//有多少的分组
-(NSInteger)numberOfSectionsInCollectionView:(UICollectionView *)collectionView{
    return 1;
}

//每个分组里有多少个item
- (NSInteger)collectionView:(UICollectionView *)collectionView numberOfItemsInSection:(NSInteger)section{
    return [_itemArray count];
}

-(void)collectionView:(UICollectionView *)collectionView didSelectItemAtIndexPath:(NSIndexPath *)indexPath{

    if([[self delegate] respondsToSelector:@selector(collectionView:didSelectItemAtIndex:)]){
        [_delegate collectionView:self didSelectItemAtIndex:indexPath.item];
    }

}

- (__kindof UICollectionViewCell *)collectionView:(UICollectionView *)collectionView cellForItemAtIndexPath:(NSIndexPath *)indexPath{

    CustomCollectionViewCell * cell = [collectionView dequeueReusableCellWithReuseIdentifier:@"CustomMenuCell" forIndexPath:indexPath];

    for (int i = 0; i < [_itemArray count]; i++) {
        NSDictionary *dic = [_itemArray objectAtIndex:indexPath.row];
        UIImage *icon = [UIImage imageNamed:[dic objectForKey:@"ImgUrl"]];
        NSString *menuName = [dic objectForKey:@"name"];

        [cell.imgIcon setImage:icon];
        [cell.menuName setText:menuName];
    }

    return cell;
}

@end
问:主页如何实现分割线效果?
答:由于我们在主页使用了 UITabelView 控件,所以我们可以设置 UITabelView 的样式为 UITableViewStyleGrouped 即可将每个板块分隔开。
问:主页如何实现上拉,下拉刷新效果?
答:本文使用的是 MJRefresh, 使用方法如下:
//头部刷新
    MJRefreshNormalHeader *header = [MJRefreshNormalHeader headerWithRefreshingTarget:self refreshingAction:@selector(headerRefreshing)];
    header.automaticallyChangeAlpha = YES;
    header.lastUpdatedTimeLabel.hidden = NO;
    _homeTableView.mj_header = header;

    //底部刷新
    _homeTableView.mj_footer = [MJRefreshBackNormalFooter footerWithRefreshingTarget:self refreshingAction:@selector(footerRereshing)];
    _homeTableView.scrollsToTop = YES;
    _homeTableView.tableFooterView = [[UIView alloc] init];

    [self.view addSubview:_homeTableView];

    //开始第一次数据拉取
    [_homeTableView.mj_header beginRefreshing];
#pragma mark - MJRefresh
//————— 下拉刷新 —————
-(void)headerRefreshing{
NSLog(@"开始刷新数据");
[_homeTableView.mj_header endRefreshing];
}
// ————— 上拉刷新 —————
-(void)footerRereshing{
[_homeTableView.mj_footer endRefreshing];
}
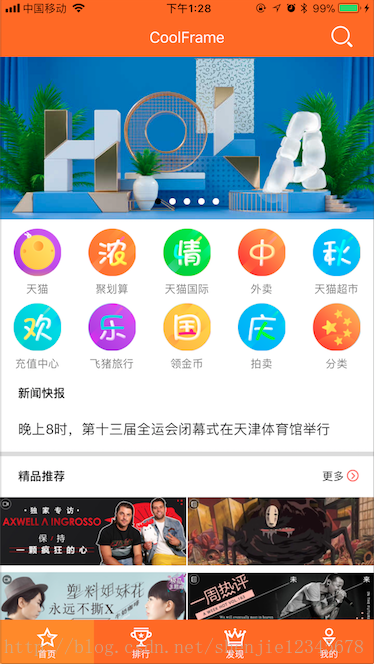
最后效果
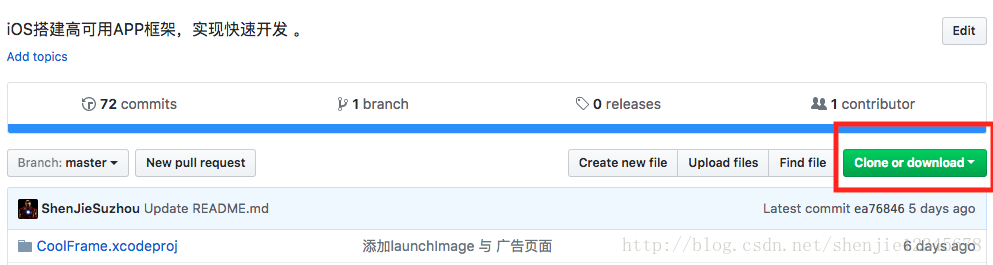
由于代码篇幅的原因,这边只放出了一小部分仅供参考,想看完整实现代码的请到我的 GitHub 上去参阅,如果你觉得很好,请先给个 Star✨ (Star 后你可随时获取最新代码) ,点击右上角的绿色按钮下载完整工程:
具体主页的效果图如下:
好了。祝大家生活愉快。多多收获友谊和爱情。如果想获取更多的讯息,请扫描下方二维码关注我的微信公众号: