版权声明:本文为博主原创文章,未经博主允许不得转载。 https://blog.csdn.net/Register_man/article/details/79022074
一、前言
The primary goal in developing Physijs is to keep it as simple and user-friendly as possible. Physics engines can be daunting and difficult to set up, with so many options and configurations it is easy to feel overwhelmed. Physijs abstracts all of that extra logic out so you can focus on the rest of your project.
简单的来说,physijs这个名字看起来拼写错误的东西,是一套把ammo.js中的底层接口,抽象出来,针对three.js封装好之后,便于使用的物理引擎。
二、GitHub地址
三、兼容经历
1、物理引擎基于worker来进行模拟,而微信开发工具中worker却有bug,无法创建,在最新版本中以修复。
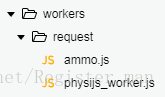
2、Physijs中包含physi.js、ammo.js、physijs_worker.js,除了ammo这个基础物理库以外,另外两个都有
部分源码需要修改,主要是对wx的适配。
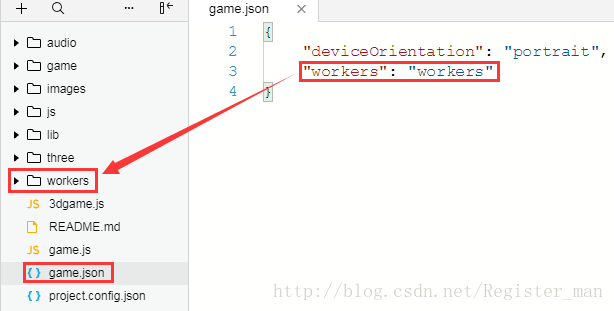
3、worker文件需要放在
worker目录中,并在
game.json中指明路径,worker中需要引用到的其他代码文件,必须一并放到worker目录中。
四、代码
使用physijs的区别主要在于将原本部分使用THREE的接口改变为Physiji即可:
let THREE = require('./three/three')
import Physijs from './three/physi'

export default class game3d {
    constructor() {
        Physijs.scripts.worker = 'workers/request/physijs_worker.js';
        // 此处ammo.js需要直接在worker中进行绑定
        // Physijs.scripts.ammo = './ammo.js';

        // 场景
        this.scene = new Physijs.Scene();
        console.log(this.scene)
        // 透视摄像头
        this.camera = new THREE.PerspectiveCamera(75, window.innerWidth / window.innerHeight, 0.1, 1000);
        // webGL渲染器
        // 同时指定canvas为小游戏暴露出来的canvas
        this.renderer = new THREE.WebGLRenderer({
            canvas: canvas,
            antialias: true
        });
        this.renderer.shadowMapEnabled = true;

        this.light = new THREE.AmbientLight(0xffffff);
        this.scene.add(this.light);
        this.start()
    }
    start() {
        // 在场景中添加雾的效果;样式上使用和背景一样的颜色
        this.renderer.setSize(window.innerWidth, window.innerHeight);
        var geometry = new THREE.CubeGeometry(1, 1, 1);
        // 加载纹理贴图
        var texture = new THREE.TextureLoader().load("images/metal.jpg");
        var material = new THREE.MeshBasicMaterial({ map: texture });
        this.ground = this.createGround()
        this.stage = this.createStage()
        this.scene.add(this.ground);
        this.scene.add(this.stage);
        // 设置camera的高度,若是低于当前场景的高度则屁也看不到
        this.camera.position.z = 15;
        this.camera.position.y = 10;
        this.box = new Physijs.BoxMesh(new THREE.CubeGeometry(1, 1, 1), material);
        this.box.position.y = 10
        this.scene.add(this.box);
        window.requestAnimationFrame(this.loop.bind(this), canvas);
    }
    createGround() {
        var geometry = new THREE.BoxGeometry(30, 1, 30);
        var texture = new THREE.TextureLoader().load("images/metal.jpg");
        var material = new THREE.MeshBasicMaterial({ map: texture });
        let cylinder = new Physijs.BoxMesh (geometry, material, 0);
        cylinder.position.y = 0
        cylinder.position.x = 0.5

        return cylinder
    }
    createStage() {
        var geometry = new THREE.CylinderGeometry(3, 1, 3);
        var texture = new THREE.TextureLoader().load("images/metal.jpg");
        var material = new THREE.MeshBasicMaterial({ map: texture });
        let cylinder = new Physijs.CylinderMesh(geometry, material);
        cylinder.position.y = 5
        cylinder.position.x = 0.5

        return cylinder
    }
    update() {
        this.stage.setAngularVelocity(new THREE.Vector3(0, 5, 0))
        // this.ground.setLinearVelocity(new THREE.Vector3(1, 1, 0))
        // 无法直接改变旋转角度
        // this.box.rotation.z += 0.06;
    }
    loop() {
        this.update()
        this.scene.simulate(); // run physics
        this.renderer.render(this.scene, this.camera);
        window.requestAnimationFrame(this.loop.bind(this), canvas);
    }
}
Physi.js源码修改部分:
1、导出Physiji
let THREE = require('./three')
export default Physijs()
把window.Physijs = (function() {...})
改成function Physijs(){...}this._worker = wx.createWorker('workers/request/physijs_worker.js');
//...
//将this._worker.onmessage()改为
this._worker.onMessage((data)=>{
//...
})Physiji_worker.js源码修改部分:
1、导入ammo.js
//将两文件全部放入worker目录中
require('./ammo.js')
//找到并将下面这行代码注释
//importScripts( params.ammo );
2、适配wx接口
// 将onmessage修改如下
worker.onMessage((res) => {
    //res参数进行匹配
    //...
})worker配置和目录结构:
扫描二维码关注公众号,回复:
3297199 查看本文章

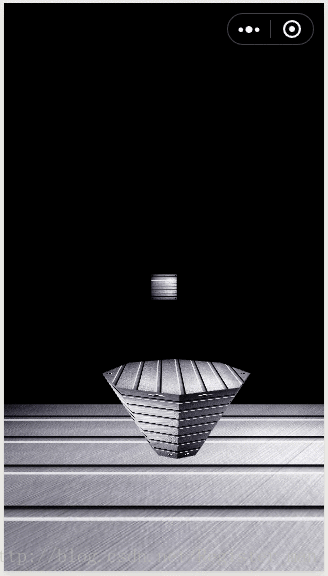
五、效果