上篇文章我们讲到了getResponse()方法,这节接着来看:
getResponse()方法中最重要的有两个方法,sendRequest() 和 readResponse();
先来看 sendRequest() :
/**来自 HttpEngine 类*/

public void sendRequest() throws RequestException, RouteException, IOException {
      if(this.cacheStrategy == null) {
         if(this.httpStream != null) {
            throw new IllegalStateException();
         } else {
            Request request = this.networkRequest(this.userRequest);
            InternalCache responseCache = Internal.instance.internalCache(this.client);
            Response cacheCandidate = responseCache != null?responseCache.get(request):null;
            long now = System.currentTimeMillis();
            this.cacheStrategy = (new Factory(now, request, cacheCandidate)).get();
            this.networkRequest = this.cacheStrategy.networkRequest;
            this.cacheResponse = this.cacheStrategy.cacheResponse;
            if(responseCache != null) {
               responseCache.trackResponse(this.cacheStrategy);
            }

            if(cacheCandidate != null && this.cacheResponse == null) {
               Util.closeQuietly(cacheCandidate.body());
            }

            if(this.networkRequest == null && this.cacheResponse == null) {
               this.userResponse = (new Builder()).request(this.userRequest).priorResponse(stripBody(this.priorResponse)).protocol(Protocol.HTTP_1_1).code(504).message("Unsatisfiable Request (only-if-cached)").body(EMPTY_BODY).build();
            } else if(this.networkRequest == null) {
               this.userResponse = this.cacheResponse.newBuilder().request(this.userRequest).priorResponse(stripBody(this.priorResponse)).cacheResponse(stripBody(this.cacheResponse)).build();
               this.userResponse = this.unzip(this.userResponse);
            } else {
               boolean success = false;

               try {
                  this.httpStream = this.connect();
                  this.httpStream.setHttpEngine(this);
                  if(this.writeRequestHeadersEagerly()) {
                     long contentLength = OkHeaders.contentLength(request);
                     if(this.bufferRequestBody) {
                        if(contentLength > 2147483647L) {
                           throw new IllegalStateException("Use setFixedLengthStreamingMode() or setChunkedStreamingMode() for requests larger than 2 GiB.");
                        }

                        if(contentLength != -1L) {
                           this.httpStream.writeRequestHeaders(this.networkRequest);
                           this.requestBodyOut = new RetryableSink((int)contentLength);
                        } else {
                           this.requestBodyOut = new RetryableSink();
                        }
                     } else {
                        this.httpStream.writeRequestHeaders(this.networkRequest);
                        this.requestBodyOut = this.httpStream.createRequestBody(this.networkRequest, contentLength);
                     }
                  }

                  success = true;
               } finally {
                  if(!success && cacheCandidate != null) {
                     Util.closeQuietly(cacheCandidate.body());
                  }

               }

            }
         }
      }
   }
第10句:
InternalCache responseCache = Internal.instance.internalCache(this.client);Internal 是个抽象类, Internal.instance 对象最终在 OKhttpClient 的static 代码块中构造,
/**来自 OKhttpClient 类*/

     Internal.instance = new Internal() {
        ......
         public InternalCache internalCache(OkHttpClient client) {
            return client.internalCache();
         }
        ......
      };
/**来自 OKhttpClient 类*/
InternalCache internalCache() {
return this.cache != null?this.cache.internalCache:this.internalCache;
}我们这里需要看下cache.internalCache的实现,这个位于Cache.Java里面。
/**来自 Cache 类*/

 this.internalCache = new InternalCache() {
          //根据请求得到响应
         public Response get(Request request) throws IOException {
            return Cache.this.get(request);
         }
          //缓存响应
         public CacheRequest put(Response response) throws IOException {
            return Cache.this.put(response);
         }

         public void remove(Request request) throws IOException {
            Cache.this.remove(request);
         }

         public void update(Response cached, Response network) throws IOException {
            Cache.this.update(cached, network);
         }

         public void trackConditionalCacheHit() {
            Cache.this.trackConditionalCacheHit();
         }

         public void trackResponse(CacheStrategy cacheStrategy) {
            Cache.this.trackResponse(cacheStrategy);
         }
      };
就是一些对cache的控制,sendRequest方法中的responseCache就是Cache中的InternalCache,因此我们继续看下面的代码。
/** getResponse 方法*/

 Response cacheCandidate = responseCache != null
        ? responseCache.get(request)
        : null;
在看get方法之前我们有必要看一下缓存响应的put方法:
/**来自 Cache 类*/


private CacheRequest put(Response response) {
    //得到请求的方法
    String requestMethod = response.request().method();

    if (HttpMethod.invalidatesCache(response.request().method())) {
      try {
        remove(response.request());
      } catch (IOException ignored) {
        // The cache cannot be written.
      }
      return null;
    }
    //不缓存非GET方法的响应
    if (!requestMethod.equals("GET")) {
      // Don't cache non-GET responses. We're technically allowed to cache
      // HEAD requests and some POST requests, but the complexity of doing
      // so is high and the benefit is low.
      return null;
    }

    if (HttpHeaders.hasVaryAll(response)) {
      return null;
    }

    //使用JakeWharton大神的DiskLruCache进行缓存  采用LUR算法
    Entry entry = new Entry(response);
    DiskLruCache.Editor editor = null;
    try {
      editor = cache.edit(urlToKey(response.request()));
      if (editor == null) {
        return null;
      }
      entry.writeTo(editor);
      return new CacheRequestImpl(editor);
    } catch (IOException e) {
      abortQuietly(editor);
      return null;
    }
  }
从上面代码可以看到,首先是对请求的方法进行判断,概括起来就是一句话:只缓存请求方法为GET的响应。然后符合缓存的条件后,使用响应创建一个Entry对象,然后使用DiskLruCache写入缓存,最终返回一个CacheRequestImpl对象。cache是DiskLruCache的实例,调用edit方法传入响应的key值,而key值就是对请求调用urlToKey方法。下面是urlToKey的实现:
/**来自 Cache 类*/

private static String urlToKey(Request request) {
    //MD5
    return Util.md5Hex(request.url().toString());
  }
从代码就可以看出是对请求的URL做MD5然后再得到MD5值的十六进制表示形式,这儿就不继续看了。
Entry实例就是要写入的缓存部分,主要看一下它的writeTo()方法,该方法执行具体的写入磁盘操作:
/**来自 Cache 的static内部类 Entry*/

public void writeTo(Editor editor) throws IOException {
         BufferedSink sink = Okio.buffer(editor.newSink(0));
         sink.writeUtf8(this.url);
         sink.writeByte(10);
         sink.writeUtf8(this.requestMethod);
         sink.writeByte(10);
         sink.writeDecimalLong((long)this.varyHeaders.size());
         sink.writeByte(10);
         int i = 0;

         int size;
         for(size = this.varyHeaders.size(); i < size; ++i) {
            sink.writeUtf8(this.varyHeaders.name(i));
            sink.writeUtf8(": ");
            sink.writeUtf8(this.varyHeaders.value(i));
            sink.writeByte(10);
         }

         sink.writeUtf8((new StatusLine(this.protocol, this.code, this.message)).toString());
         sink.writeByte(10);
         sink.writeDecimalLong((long)this.responseHeaders.size());
         sink.writeByte(10);
         i = 0;

         for(size = this.responseHeaders.size(); i < size; ++i) {
            sink.writeUtf8(this.responseHeaders.name(i));
            sink.writeUtf8(": ");
            sink.writeUtf8(this.responseHeaders.value(i));
            sink.writeByte(10);
         }

         if(this.isHttps()) {
            sink.writeByte(10);
            sink.writeUtf8(this.handshake.cipherSuite().javaName());
            sink.writeByte(10);
            this.writeCertList(sink, this.handshake.peerCertificates());
            this.writeCertList(sink, this.handshake.localCertificates());
            if(this.handshake.tlsVersion() != null) {
               sink.writeUtf8(this.handshake.tlsVersion().javaName());
               sink.writeByte(10);
            }
         }

         sink.close();
      }
从上面的代码可以看到,写入缓存的不仅仅只是响应的头部信息,还包括请求的部分信息:URL、请求方法、请求头部。至此,我们看到对于一个请求和响应,缓存中的key值是请求的URL的MD5值,而value包括请求和响应部分。Entry的writeTo()方法只把请求的头部和响应的头部保存了,最关键的响应主体部分在哪里保存呢?答案在put方法的返回体CacheRequestImpl,下面是这个类的实现:
/**来自 Cache 的内部类 CacheRequestImpl,实现了CacheRequest接口*/

    public CacheRequestImpl(final Editor editor) throws IOException {
         this.editor = editor;
         this.cacheOut = editor.newSink(1);
         this.body = new ForwardingSink(this.cacheOut) {
            public void close() throws IOException {
               Cache arg0 = Cache.this;
               synchronized(Cache.this) {
                  if(CacheRequestImpl.this.done) {
                     return;
                  }

                  CacheRequestImpl.this.done = true;
                  Cache.this.writeSuccessCount++;
               }

               super.close();
               editor.commit();
            }
         };
      }
最终,通过 editor.commit();进行缓存写入。看完了put方法再来看get方法就能好理解点了。
/**来自 Cache 类*/

  Response get(Request request) {

      String key = urlToKey(request);
      Snapshot snapshot;
      try {
         snapshot = this.cache.get(key);
         if(snapshot == null) {
            return null;
         }
      } catch (IOException arg6) {
         return null;
      }

      Cache.Entry entry;
      try {
         entry = new Cache.Entry(snapshot.getSource(0));
      } catch (IOException arg5) {
         Util.closeQuietly(snapshot);
         return null;
      }

      Response response = entry.response(snapshot);
      if(!entry.matches(request, response)) {
         Util.closeQuietly(response.body());
         return null;
      } else {
         return response;
      }
   }
从代码中可以看到,首先是对请求的URL进行MD5计算得到key值,然后尝试根据key值从缓存中得到值,如果没有该值,说明缓存中没有该值,那么直接返回null,否则创建Entry对象,然后再从Entry中得到响应对象,如果请求和响应不匹配(地址,请求方式、请求头) ,那么也返回null,否则就返回响应对象。
下面是Entry的构造方法:
/**来自 Cache 类(Entry的构造方法)*/

  public Entry(Source in) throws IOException {
         try {
            BufferedSource source = Okio.buffer(in);
             //读请求相关信息
            this.url = source.readUtf8LineStrict();
            this.requestMethod = source.readUtf8LineStrict();
            Builder varyHeadersBuilder = new Builder();
            int varyRequestHeaderLineCount = Cache.readInt(source);

            for(int statusLine = 0; statusLine < varyRequestHeaderLineCount; ++statusLine) {
               varyHeadersBuilder.addLenient(source.readUtf8LineStrict());
            }

            this.varyHeaders = varyHeadersBuilder.build();
             //读响应状态行
            StatusLine arg16 = StatusLine.parse(source.readUtf8LineStrict());
            this.protocol = arg16.protocol;
            this.code = arg16.code;
            this.message = arg16.message;
            //读响应首部
            Builder responseHeadersBuilder = new Builder();
            int responseHeaderLineCount = Cache.readInt(source);

            for(int blank = 0; blank < responseHeaderLineCount; ++blank) {
               responseHeadersBuilder.addLenient(source.readUtf8LineStrict());
            }

            this.responseHeaders = responseHeadersBuilder.build();
             //是HTTPS协议,读握手、证书信息
            if(this.isHttps()) {
               String arg17 = source.readUtf8LineStrict();
               if(arg17.length() > 0) {
                  throw new IOException("expected \"\" but was \"" + arg17 + "\"");
               }

               String cipherSuiteString = source.readUtf8LineStrict();
               CipherSuite cipherSuite = CipherSuite.forJavaName(cipherSuiteString);
               List peerCertificates = this.readCertificateList(source);
               List localCertificates = this.readCertificateList(source);
               TlsVersion tlsVersion = !source.exhausted()?TlsVersion.forJavaName(source.readUtf8LineStrict()):null;
               this.handshake = Handshake.get(tlsVersion, cipherSuite, peerCertificates, localCertificates);
            } else {
               this.handshake = null;
            }
         } finally {
            in.close();
         }
      }
在put方法中我们知道了缓存中保存了请求的信息和响应的信息。 获得了包含首部信息的Entry之后,再调用response方法得到正在的响应,下面是response()方法的实现:
/**来自 Cache 内部类 Entry*/

  public Response response(Snapshot snapshot) {
         String contentType = this.responseHeaders.get("Content-Type");
         String contentLength = this.responseHeaders.get("Content-Length");
         Request cacheRequest = (new okhttp3.Request.Builder()).
         url(this.url).
         method(this.requestMethod, (RequestBody)null).
         headers(this.varyHeaders).build();

         return (new okhttp3.Response.Builder()). request(cacheRequest).
         protocol(this.protocol).
         code(this.code).
         message(this.message).
         headers(this.responseHeaders).
         body(new Cache.CacheResponseBody(snapshot, contentType, contentLength)).
         handshake(this.handshake).build();
      }
再看下match方法:
/**来自 Cache 内部类 Entry*/

 public boolean matches(Request request, Response response) {
         return this.url.equals(request.url().toString()) && this.requestMethod.equals(request.method()) && OkHeaders.varyMatches(response, this.varyHeaders, request);
      }
可以看到,响应的首部信息保存在Entry中,而主体部分是在传入的Snapshot中,主体是创建了一个CacheResponseBody对象。CacheResponseBody继承自ResponseBody类并且使用传入的Snapshot获得put中保存的响应主体部分。
最终通过比较发起请求的url,方法,head等信息和缓存中的进行比较,决定是否返回response。
——————————————————————————
OK,再回到 HttpEngine 类,上面分析完了10,11行,我们再来接着看13行,
this.cacheStrategy = (new Factory(now, request, cacheCandidate)).get();可以看到根据当前时间、构建的Request请求体、和得到的缓存响应 创建一个工厂,然后再得到一个CacheStrategy。首先看该工厂的构造方法:
/**来自 Cache 的内部static工厂类 Factory*/

public Factory(long nowMillis, Request request, Response cacheResponse) {
            this.nowMillis = nowMillis;
            this.request = request;
            this.cacheResponse = cacheResponse;
            if (cacheResponse != null) {
                Headers headers = cacheResponse.headers();
                int i = 0;

                for (int size = headers.size(); i < size; ++i) {
                    String fieldName = headers.name(i);
                    String value = headers.value(i);
                    if ("Date".equalsIgnoreCase(fieldName)) {
                        this.servedDate = HttpDate.parse(value);
                        this.servedDateString = value;
                    } else if ("Expires".equalsIgnoreCase(fieldName)) {
                        this.expires = HttpDate.parse(value);
                    } else if ("Last-Modified".equalsIgnoreCase(fieldName)) {
                        this.lastModified = HttpDate.parse(value);
                        this.lastModifiedString = value;
                    } else if ("ETag".equalsIgnoreCase(fieldName)) {
                        this.etag = value;
                    } else if ("Age".equalsIgnoreCase(fieldName)) {
                        this.ageSeconds = HeaderParser.parseSeconds(value, -1);
                    } else if (OkHeaders.SENT_MILLIS
                            .equalsIgnoreCase(fieldName)) {
                        this.sentRequestMillis = Long.parseLong(value);
                    } else if (OkHeaders.RECEIVED_MILLIS
                            .equalsIgnoreCase(fieldName)) {
                        this.receivedResponseMillis = Long.parseLong(value);
                    }
                }
            }
        }
从代码中可以看出,如果候选的缓存响应不为null,那么将响应首部中有关缓存的首部的值得到,主要有Date、Expires、Last-Modified、ETag和Age首部。
其中Date表明响应报文是何时创建的,Expires表示该响应的绝对过期时间,Last-Modified表示最近一次修改的时间。
再看Factory的get方法:
 /**
     *来自 Cache 的内部static工厂类 Factory
     * Returns a strategy to satisfy {@code request}
     * using the a cached response {@code response}.
     */
    public CacheStrategy get() {
      CacheStrategy candidate = getCandidate();

return candidate.networkRequest != null
                        && this.request.cacheControl().onlyIfCached() ?
                     new CacheStrategy((Request) null, (Response) null) : candidate;
    }
从代码中可以看出首先调用getCandidate()得到候选的CacheStrategy对象,然后如果得到的缓存策略表明需要使用网络,但是请求中指定响应只能从缓存中得到,那么返回一个networkRequest和cacheResonse均为null的CacheStrategy。
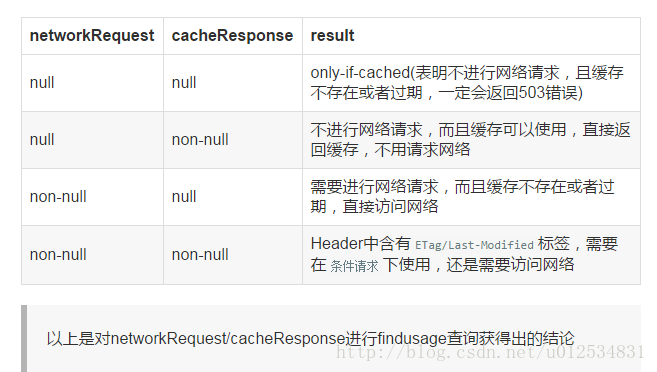
OkHttp中使用了CacheStrategy,它根据之前的缓存结果与当前将要发送Request的header进行策略分析,并得出是否进行请求的结论。
CacheStrategy类似一个mapping操作,将两个值输入,再将两个值输出。
> Input             request, cacheCandidate
    ↓                        ↓
> CacheStrategy     处理,判断Header信息
    ↓                        ↓
> Output        networkRequest, cacheResponse
Request:
开发者手动编写并在Interceptor中递归加工而成的对象,我们只需要知道了目前传入的Request中并没有任何关于缓存的Header。
cacheCandidate:
也就是上次与服务器交互缓存的Response,可能为null。我们现在知道它是一个可以读取缓存Header的Response。
当被CacheStrategy加工输出后,输出networkRequest与cacheResponse,根据是否为空执行不同的请求。
下面主要看一下getCandidate方法,该方法返回的策略是基于请求可以使用网络的假设之上的,所以这也就解释了get()方法中为什么要对使用网络但是请求却指定缓存响应的情况做区分。
/**来自 Cache 的内部static工厂类 Factory*/

private CacheStrategy getCandidate() {
             //如果缓存没有命中(即null),网络请求也不需要加缓存Header了
            if (this.cacheResponse == null) {
             //`没有缓存的网络请求,查上文的表可知是直接访问
                return new CacheStrategy(this.request, (Response) null);
            }
             // 如果缓存的TLS握手信息丢失,返回进行直接连接
                else if (this.request.isHttps()
                    && this.cacheResponse.handshake() == null) {
                return new CacheStrategy(this.request, (Response) null);
            }
             //检测response的状态码,Expired时间,是否有no-cache标签
                else if (!CacheStrategy.isCacheable(this.cacheResponse,
                    this.request)) {
                return new CacheStrategy(this.request, (Response) null);
            } else {
                CacheControl requestCaching = this.request.cacheControl();

                if (!requestCaching.noCache() && !hasConditions(this.request)) {
                    //根据RFC协议计算
                    //计算当前age的时间戳
                    //now - sent + age (s)
                    long ageMillis = this.cacheResponseAge();
                    //大部分情况服务器设置为max-age
                    long freshMillis = this.computeFreshnessLifetime();
                    if (requestCaching.maxAgeSeconds() != -1) {
                    //大部分情况下是取max-age
                        freshMillis = Math.min(freshMillis,
                                TimeUnit.SECONDS.toMillis((long) requestCaching
                                        .maxAgeSeconds()));
                    }
                    long minFreshMillis = 0L;
                    if (requestCaching.minFreshSeconds() != -1) {
                    //大部分情况下设置是0
                        minFreshMillis = TimeUnit.SECONDS
                                .toMillis((long) requestCaching
                                        .minFreshSeconds());
                    }

                    long maxStaleMillis = 0L;
                    //ParseHeader中的缓存控制信息
                    CacheControl responseCaching = this.cacheResponse
                            .cacheControl();
                    if (!responseCaching.mustRevalidate()
                            && requestCaching.maxStaleSeconds() != -1) {
                    //设置最大过期时间,一般设置为0
                        maxStaleMillis = TimeUnit.SECONDS
                                .toMillis((long) requestCaching
                                        .maxStaleSeconds());
                    }
                    //缓存在过期时间内,可以使用
                    //大部分情况下是进行如下判断
                    //now - sent + age + 0 < max-age + 0
                    if (!responseCaching.noCache()
                            && ageMillis + minFreshMillis < freshMillis
                                    + maxStaleMillis) {
                        Builder conditionalRequestBuilder1 = this.cacheResponse
                                .newBuilder();
                        if (ageMillis + minFreshMillis >= freshMillis) {
                            conditionalRequestBuilder1
                                    .addHeader("Warning",
                                            "110 HttpURLConnection \"Response is stale\"");
                        }

                        long conditionalRequest1 = 86400000L;
                        if (ageMillis > conditionalRequest1
                                && this.isFreshnessLifetimeHeuristic()) {
                            conditionalRequestBuilder1
                                    .addHeader("Warning",
                                            "113 HttpURLConnection \"Heuristic expiration\"");
                        }

                        return new CacheStrategy((Request) null,
                                conditionalRequestBuilder1.build());
                    } else {
                        okhttp3.Request.Builder conditionalRequestBuilder = this.request
                                .newBuilder();
                        if (this.etag != null) {
                            conditionalRequestBuilder.header("If-None-Match",
                                    this.etag);
                        } else if (this.lastModified != null) {
                            conditionalRequestBuilder.header(
                                    "If-Modified-Since",
                                    this.lastModifiedString);
                        } else if (this.servedDate != null) {
                            conditionalRequestBuilder.header(
                                    "If-Modified-Since", this.servedDateString);
                        }

                        Request conditionalRequest = conditionalRequestBuilder
                                .build();
                        return hasConditions(conditionalRequest) ? new CacheStrategy(
                                conditionalRequest, this.cacheResponse)
                                : new CacheStrategy(conditionalRequest,
                                        (Response) null);
                    }
                } else {
                 //对应相应的iF请求
                 //如果请求报文使用了`no-cache`标签(这个只可能是开发者故意添加的)
                 //或者有ETag/Since标签(也就是条件GET请求)
                    return new CacheStrategy(this.request, (Response) null);
                }
            }
}- 上面的主要内容是缓存,okhttp实现的缓存策略实质上就是大量的if判断集合,这些是根据RFC标准文档写死的。
-
- Okhttp的缓存是自动完成的,完全由服务器Header决定的,自己没有必要进行控制。网上热传的文章在Interceptor中手工添加缓存代码控制,它固然有用,但是属于Hack式的利用,违反了RFC文档标准,不建议使用,OkHttp的官方缓存控制在注释中。如果读者的需求是对象持久化,建议用文件储存或者数据库即可(比如realm、litepal)。
-
- 服务器的配置非常重要,如果你需要减小请求次数,建议直接找对接人员对max-age等头文件进行优化;服务器的时钟需要严格NTP同步。
总结上面的方法:
如果缓存没有命中,即cacheResponse==null,那么直接进行网络请求
如果请求是HTTPS并且缓存响应中没有握手或者握手信息丢失,那么需要重新进行网络请求
如果响应不应该被存储,那么需要重新进行网络请求 (比如header中指定no-store)
如果请求中指定不使用缓存响应,那么需要进行网络请求 (比如header中指定no-cache)
接下来比较缓存响应检查是否有条件请求的首部,如果有,就进行额外的请求( request.header(“If-Modified-Since”) != null || request.header(“If-None-Match”) != null)
上面得到 CacheStrategy 后,我们下来再回到HttpEngine 定位到 17行:
 if(responseCache != null) {
             responseCache.trackResponse(this.cacheStrategy);
            }
/**来自Cache类*/
private synchronized void trackResponse(CacheStrategy cacheStrategy) {
requestCount++;
if (cacheStrategy.networkRequest != null) {
// If this is a conditional request, we'll increment hitCount if/when it hits.
networkCount++;
} else if (cacheStrategy.cacheResponse != null) {
// This response uses the cache and not the network. That's a cache hit.
hitCount++;
}
}可以看到该方法主要就是对Cache中的三个记录进行赋值,从这儿我们可以得出结论requestCount>=networkCount+hitCount。
当networkRequest和cacheResponse均为null的时候,这个时候的响应既不是从网络得到也不是从缓存得到。 (查阅图1)
cacheResponse表示从缓存上得到的响应。如果该响应没有使用缓存,那么将会为null。
关于Response有一点需要铭记,该类的实例不是一成不变的,响应主体部分只能被消费一次然后关闭,其他参数是不变的。
那么为什么Response的主体部分只能被消费一次呢?
这是因为ResponseBody的底层是用Okio实现的,而Okio的Source只能被读取一次,因为读完之后,Buffer底层的Segment关于之前数据的信息(pos和limit)就丢失了,并且在读完一次之后就将Source关闭了,所以只能读一次。关于Okio的可以参考拆轮子系列:拆 Okio。
——————————————————————–
再用个分割线进行分割,上面的代码得到了缓存策略,即cacheStrategy,再次定位到HttpEngine 的第37行:
this.httpStream = this.connect();/**来自HttpEngine 类*/
private HttpStream connect() throws RouteException, RequestException, IOException {
boolean doExtensiveHealthChecks = !this.networkRequest.method().equals("GET");
return this.streamAllocation.newStream(this.client.connectTimeoutMillis(), this.client.readTimeoutMillis(), this.client.writeTimeoutMillis(), this.client.retryOnConnectionFailure(), doExtensiveHealthChecks);
}跳转到 newStream 方法,
/**来自StreamAllocation 类*/

public HttpStream newStream(int connectTimeout, int readTimeout,
            int writeTimeout, boolean connectionRetryEnabled,
            boolean doExtensiveHealthChecks) throws RouteException, IOException {
        try {
            RealConnection e = this.findHealthyConnection(connectTimeout,
                    readTimeout, writeTimeout, connectionRetryEnabled,
                    doExtensiveHealthChecks);
            Object resultStream;
            if (e.framedConnection != null) {
                resultStream = new Http2xStream(this, e.framedConnection);
            } else {
                e.socket().setSoTimeout(readTimeout);
                e.source.timeout().timeout((long) readTimeout,
                        TimeUnit.MILLISECONDS);
                e.sink.timeout().timeout((long) writeTimeout,
                        TimeUnit.MILLISECONDS);
                resultStream = new Http1xStream(this, e.source, e.sink);
            }

            ConnectionPool arg7 = this.connectionPool;
            synchronized (this.connectionPool) {
                this.stream = (HttpStream) resultStream;
                return (HttpStream) resultStream;
            }
        } catch (IOException arg10) {
            throw new RouteException(arg10);
        }
    }
在newStream 方法中,首先调用了 findHealthyConnection,得到RealConnection对象,再根据framedConnection 是否为空,确定采取的http协议:
Http2xStream 代表是https请求,采用 http2.0或者spdy 协议。
Http1xStream 代表是http请求,采用 http1.0或者 http1.1 协议。
newStream 方法中又调用了 findHealthyConnection ,
这个方法当中又调用了 findConnection 方法:
/**来自StreamAllocation 类*/

private RealConnection findHealthyConnection(int connectTimeout,
int readTimeout, int writeTimeout, boolean connectionRetryEnabled,
boolean doExtensiveHealthChecks) throws IOException, RouteException {
        while (true) {
            RealConnection candidate = this.findConnection(connectTimeout,
                    readTimeout, writeTimeout, connectionRetryEnabled);
            ......
        }
    }
我们再来看findConnection 方法:
/**来自StreamAllocation 类*/

private RealConnection findConnection(int connectTimeout, int readTimeout,
            int writeTimeout, boolean connectionRetryEnabled)
            throws IOException, RouteException {
            ......
RealConnection pooledConnection = Internal.instance.get(
                    this.connectionPool, this.address, this);
            ......
        newConnection1.connect(connectTimeout, readTimeout, writeTimeout,
            ......
Internal.instance.put(this.connectionPool, newConnection1);
        return newConnection1;
    }
重要的看下这三个方法:
前面我们已经说过了get是Internal的方法,是在OkhttpClient中的static代码块中实现的,这个get方法中最终调用了ConnectPool 的get方法,看名字我们就能猜到,这儿维护了一个连接池,这个东西:
private final Deque<RealConnection> connections;get 和 put 都是对它的操作。
OK,看下第二个方法,connect方法,
/**来自 RealConnection 方法,实现了Connection接口*/

public void connect(int connectTimeout, int readTimeout, int writeTimeout, List<ConnectionSpec> connectionSpecs, boolean connectionRetryEnabled) throws RouteException {
      if(this.protocol != null) {
         throw new IllegalStateException("already connected");
      } else {
         RouteException routeException = null;
         ConnectionSpecSelector connectionSpecSelector = new ConnectionSpecSelector(connectionSpecs);
         Proxy proxy = this.route.proxy();
         Address address = this.route.address();
         if(this.route.address().sslSocketFactory() == null && !connectionSpecs.contains(ConnectionSpec.CLEARTEXT)) {
            throw new RouteException(new UnknownServiceException("CLEARTEXT communication not supported: " + connectionSpecs));
         } else {
            while(this.protocol == null) {
               try {
                  this.rawSocket = proxy.type() != Type.DIRECT && proxy.type() != Type.HTTP?new Socket(proxy):address.socketFactory().createSocket();
                  this.connectSocket(connectTimeout, readTimeout, writeTimeout, connectionSpecSelector);
               } catch (IOException arg10) {
                  Util.closeQuietly(this.socket);
                  Util.closeQuietly(this.rawSocket);
                  this.socket = null;
                  this.rawSocket = null;
                  this.source = null;
                  this.sink = null;
                  this.handshake = null;
                  this.protocol = null;
                  if(routeException == null) {
                     routeException = new RouteException(arg10);
                  } else {
                     routeException.addConnectException(arg10);
                  }

                  if(!connectionRetryEnabled || !connectionSpecSelector.connectionFailed(arg10)) {
                     throw routeException;
                  }
               }
            }

         }
      }
   }
可以看到,典型的socket连接,最终使用Okio包进行socket连接。
再底层先不看了,了解到主要流程就行。
再次回到httpEngine方法的37行,我们知道connect方法最终得到一个httpstream对象(好像OKhttp2.x版本这个方法没返回值)。
到这儿,sendRequest 方法我们就分析完了。篇幅太长了,所以我们下篇继续来看 readResponse() 方法。