OkHttp源码解析
同步请求方式
OkHttpClient client = new OkHttpClient.Builder().build();
final Request request = new Request.Builder()
        .url("")
        .build();
try {
    Response response = client.newCall(request).execute();
    if(response.isSuccessful()){
        Log.d(TAG, "RequestGET: "+response.body().string());
    }
} catch (IOException e) {
    e.printStackTrace();
}
生成client
OkHttpClient client = new OkHttpClient.Builder().build();

或者

OkHttpClient client1 = new OkHttpClient();
- 前者使用建造者模式创建,后者直接new出来,那么两种有什么不同呢,前者可以显示指定请求方式,请求响应超时时间,读取文件超时时间等等,而后者就不能指定,一切用的是默认值
- 我们来看一下构造器的代码就知道了
public OkHttpClient() {
    this(new Builder());
  }

public Builder() {
  dispatcher = new Dispatcher();
  protocols = DEFAULT_PROTOCOLS;
  connectionSpecs = DEFAULT_CONNECTION_SPECS;
  eventListenerFactory = EventListener.factory(EventListener.NONE);
  proxySelector = ProxySelector.getDefault();
  cookieJar = CookieJar.NO_COOKIES;
  socketFactory = SocketFactory.getDefault();
  hostnameVerifier = OkHostnameVerifier.INSTANCE;
  certificatePinner = CertificatePinner.DEFAULT;
  proxyAuthenticator = Authenticator.NONE;
  authenticator = Authenticator.NONE;
  connectionPool = new ConnectionPool();
  dns = Dns.SYSTEM;
  followSslRedirects = true;
  followRedirects = true;
  retryOnConnectionFailure = true;
  connectTimeout = 10_000;
  readTimeout = 10_000;
  writeTimeout = 10_000;
  pingInterval = 0;
}
- 可以看到我们在创建client的时候已经为我们做了许多的初始化工作,比较重要的有:
- 调度器:这个会负责安排我们的网络请求
-
- 注意事项:OkHttpClient强烈建议全局单例使用,因为每一个OkHttpClient都有自己单独的连接池和线程池,复用连接池和线程池能够减少延迟、节省内存。
生成call
- 当我们写好我们的请求(request)的时候,就可以生成一个Call对象了,该对象代表了一个准备被执行的请求。
- Call是可以被取消的。Call对象代表了一个request/response 对(Stream).还有就是一个Call只能被执行一次。
- 同步我们执行call.execute()
public Response execute() throws IOException {
    synchronized (this) {
      if (executed) throw new IllegalStateException("Already Executed");
      executed = true;
    }
    captureCallStackTrace();
    eventListener.callStart(this);
    try {
      client.dispatcher().executed(this);
      Response result = getResponseWithInterceptorChain();
      if (result == null) throw new IOException("Canceled");
      return result;
    } catch (IOException e) {
      eventListener.callFailed(this, e);
      throw e;
    } finally {
      client.dispatcher().finished(this);
    }
  }
- 解析:首先如果executed等于true,说明已经被执行,如果再次调用执行就抛出异常。这说明了一个Call只能被执行。
- 异步我们执行call.enqueue(Callback);
public void enqueue(Callback responseCallback) {
    synchronized (this) {
      if (executed) throw new IllegalStateException("Already Executed");
      executed = true;
    }
    captureCallStackTrace();
    eventListener.callStart(this);
    client.dispatcher().enqueue(new AsyncCall(responseCallback));
  }
- 解释:这里的new AsyncCall(responseCallback)其实就是runable的子类,也就是说同步是在当前线程执行,而异步是在新的线程执行
- 在同步的时候,我们通过getResponseWithInterceptorChain();获取请求结果
- 异步的时候,通过回调直接将结果回调出去
接下来看看这个调度器(Dispatcher)
- Dispatcher是保存同步和异步Call的地方,并负责执行异步AsyncCall。
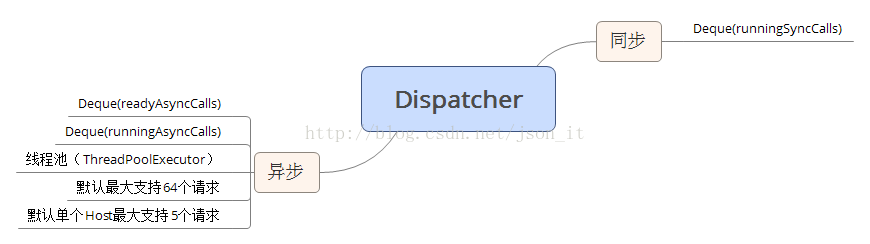
- 如上图,针对同步请求,Dispatcher使用了一个Deque保存了同步任务;
synchronized void executed(RealCall call) {
    runningSyncCalls.add(call);
  }
- 针对异步请求,Dispatcher使用了两个Deque,一个保存准备执行的请求,一个保存正在执行的请求,为什么要用两个呢?因为Dispatcher默认支持最大的并发请求是64个,单个Host最多执行5个并发请求,如果超过,则Call会先被放入到readyAsyncCall中,当出现空闲的线程时,再将readyAsyncCall中的线程移入到runningAsynCalls中,执行请求。
synchronized void enqueue(AsyncCall call) {
    if (runningAsyncCalls.size() < maxRequests && runningCallsForHost(call) < maxRequestsPerHost) {
      runningAsyncCalls.add(call);
      executorService().execute(call);
    } else {
      readyAsyncCalls.add(call);
    }
  }
先看同步
- 将同步任务当到了runningSyncCalls集合中。在经过拦截器的处理之后,得到了响应的Response,最终会执行finally语句块:
void finished(RealCall call) {
    finished(runningSyncCalls, call, false);
  }

private <T> void finished(Deque<T> calls, T call, boolean promoteCalls) {
    int runningCallsCount;
    Runnable idleCallback;
    synchronized (this) {
      if (!calls.remove(call)) throw new AssertionError("Call wasn't in-flight!");
      if (promoteCalls) promoteCalls();
      runningCallsCount = runningCallsCount();
      idleCallback = this.idleCallback;
    }

    if (runningCallsCount == 0 && idleCallback != null) {
      idleCallback.run();
    }
  }
- 对于同步请求,只是简单的将同步请求移除runningSyncCalls集合。promoteCalls参数是false,因此不会执行promoteCalls方法,promoteCalls方法用于遍历并执行异步请求待执行集合中的请求。
再看异步
- 将请求放入队列之后,在线程池中最终会调用AsyncCall的execute()方法执行异步请求
protected void execute() {
boolean signalledCallback = false;
try {
Response response = getResponseWithInterceptorChain();
if (retryAndFollowUpInterceptor.isCanceled()) {
signalledCallback = true;
responseCallback.onFailure(RealCall.this, new IOException("Canceled"));
} else {
signalledCallback = true;
responseCallback.onResponse(RealCall.this, response);
}
} catch (IOException e) {
if (signalledCallback) {
Platform.get().log(INFO, "Callback failure for " + toLoggableString(), e);
} else {
eventListener.callFailed(RealCall.this, e);
responseCallback.onFailure(RealCall.this, e);
}
} finally {
client.dispatcher().finished(this);
}
}
- 此处的执行逻辑和同步的执行逻辑基本相同,区别在最后一句代码:client.dispatcher().finished(this);因为这是一个异步任务,所以会调用另外一个finish方法:
void finished(AsyncCall call) {
    finished(runningAsyncCalls, call, true);
  }
- 可以看到最后一个参数是true,这意味着需要执行promoteCalls方法:
private void promoteCalls() {
if (runningAsyncCalls.size() >= maxRequests) return;
if (readyAsyncCalls.isEmpty()) return;
for (Iterator<AsyncCall> i = readyAsyncCalls.iterator(); i.hasNext(); ) {
AsyncCall call = i.next();
if (runningCallsForHost(call) < maxRequestsPerHost) {
i.remove();
runningAsyncCalls.add(call);
executorService().execute(call);
}
if (runningAsyncCalls.size() >= maxRequests) return;
}
}
- 该方法主要是遍历执行readyRunningCalls集合中待执行的请求,当然前提是正在执行的Call总数没有超过64,并且readyAsyncCalls集合不为空。如果readyAsyncCalls集合为空,则意味着请求差不多都执行了。放入runningAsyncCalls集合中的请求会继续走上述的流程,直到全部的请求被执行
接下来看看Okhttp的拦截器
- 我们在看之前无论是同步还是异步的时候,都会执行这个方法
Response response = getResponseWithInterceptorChain();
Response getResponseWithInterceptorChain() throws IOException {
List<Interceptor> interceptors = new ArrayList<>();
interceptors.addAll(client.interceptors());
interceptors.add(retryAndFollowUpInterceptor);
interceptors.add(new BridgeInterceptor(client.cookieJar()));
interceptors.add(new CacheInterceptor(client.internalCache()));
interceptors.add(new ConnectInterceptor(client));
if (!forWebSocket) {
interceptors.addAll(client.networkInterceptors());
}
interceptors.add(new CallServerInterceptor(forWebSocket));
Interceptor.Chain chain = new RealInterceptorChain(interceptors, null, null, null, 0,
originalRequest, this, eventListener, client.connectTimeoutMillis(),
client.readTimeoutMillis(), client.writeTimeoutMillis());
return chain.proceed(originalRequest);
}
- 在该方法中,我们依次添加了用户自定义的interceptor、retryAndFollowUpInterceptor、BridgeInterceptor、CacheInterceptor、ConnectInterceptor、 networkInterceptors、CallServerInterceptor,并将这些拦截器传递给了这个RealInterceptorChain。
- 拦截器之所以可以依次调用,并最终再从后先前返回Response,都依赖于RealInterceptorChain的proceed方法。
public Response proceed(Request request, StreamAllocation streamAllocation, HttpCodec httpCodec,
RealConnection connection) throws IOException {
if (index >= interceptors.size()) throw new AssertionError();
calls++;
if (this.httpCodec != null && !this.connection.supportsUrl(request.url())) {
throw new IllegalStateException("network interceptor " + interceptors.get(index - 1)
+ " must retain the same host and port");
}
if (this.httpCodec != null && calls > 1) {
throw new IllegalStateException("network interceptor " + interceptors.get(index - 1)
+ " must call proceed() exactly once");
}
RealInterceptorChain next = new RealInterceptorChain(interceptors, streamAllocation, httpCodec,
        connection, index + 1, request, call, eventListener, connectTimeout, readTimeout,
        writeTimeout);
    Interceptor interceptor = interceptors.get(index);
    Response response = interceptor.intercept(next);
if (httpCodec != null && index + 1 < interceptors.size() && next.calls != 1) {
throw new IllegalStateException("network interceptor " + interceptor
+ " must call proceed() exactly once");
}
if (response == null) {
throw new NullPointerException("interceptor " + interceptor + " returned null");
}
if (response.body() == null) {
throw new IllegalStateException(
"interceptor " + interceptor + " returned a response with no body");
}
return response;
}
RealInterceptorChain next = new RealInterceptorChain(interceptors, streamAllocation, httpCodec,
connection, index + 1, request, call, eventListener, connectTimeout, readTimeout,
writeTimeout);
Interceptor interceptor = interceptors.get(index);
Response response = interceptor.intercept(next);
- 可以看到,第一个拦截器调用了拦截器自身的intercept方法,
- 这里我们随便点进去一个拦截器看看他的intercept方法
public Response intercept(Chain chain) throws IOException {
Request userRequest = chain.request()
Request.Builder requestBuilder = userRequest.newBuilder()
RequestBody body = userRequest.body()
....
Response networkResponse = chain.proceed(requestBuilder.build())
HttpHeaders.receiveHeaders(cookieJar, userRequest.url(), networkResponse.headers())
Response.Builder responseBuilder = networkResponse.newBuilder()
.request(userRequest)
....
return responseBuilder.build()
}
- 代码有点长,我只拿到了比较重要的一部分,在这里我们可以看到,在这个拦截器的intercept方法中调用了chain的process方法,那么,到这里就可以看到
- 拦截器调用chain的process方法,这个方法内部有调用下一个拦截器的intercept方法,这样就实现了从第一个拦截器走到最后一个拦截器的过程,并通过类似递归的过程将拦截器生成的内容返回出去
- 下面就来细看看各个拦截器的作用吧
- 从刚才的方法中我们拿到拦截器的添加顺序
List<Interceptor> interceptors = new ArrayList<>();
    interceptors.addAll(client.interceptors());
    interceptors.add(retryAndFollowUpInterceptor);
    interceptors.add(new BridgeInterceptor(client.cookieJar()));
    interceptors.add(new CacheInterceptor(client.internalCache()));
    interceptors.add(new ConnectInterceptor(client));
    if (!forWebSocket) {
      interceptors.addAll(client.networkInterceptors());
    }
    interceptors.add(new CallServerInterceptor(forWebSocket));
RetryAndFollowUpInterceptor(拦截器),这里看他的intercept方法
public Response intercept(Chain chain) throws IOException {
Request request = chain.request();
RealInterceptorChain realChain = (RealInterceptorChain) chain;
Call call = realChain.call();
EventListener eventListener = realChain.eventListener();
StreamAllocation streamAllocation = new StreamAllocation(client.connectionPool(),
createAddress(request.url()), call, eventListener, callStackTrace);
this.streamAllocation = streamAllocation;
int followUpCount = 0;
Response priorResponse = null;
while (true) {
if (canceled) {
streamAllocation.release();
throw new IOException("Canceled");
}
Response response;
boolean releaseConnection = true;
try {
response = realChain.proceed(request, streamAllocation, null, null);
releaseConnection = false;
} catch (RouteException e) {
if (!recover(e.getLastConnectException(), streamAllocation, false, request)) {
throw e.getLastConnectException();
}
releaseConnection = false;
continue;
} catch (IOException e) {
boolean requestSendStarted = !(e instanceof ConnectionShutdownException);
if (!recover(e, streamAllocation, requestSendStarted, request)) throw e;
releaseConnection = false;
continue;
} finally {
if (releaseConnection) {
streamAllocation.streamFailed(null);
streamAllocation.release();
}
}
if (priorResponse != null) {
response = response.newBuilder()
.priorResponse(priorResponse.newBuilder()
.body(null)
.build())
.build();
}
Request followUp = followUpRequest(response, streamAllocation.route());
if (followUp == null) {
if (!forWebSocket) {
streamAllocation.release();
}
return response;
}
closeQuietly(response.body());
if (++followUpCount > MAX_FOLLOW_UPS) {
streamAllocation.release();
throw new ProtocolException("Too many follow-up requests: " + followUpCount);
}
if (followUp.body() instanceof UnrepeatableRequestBody) {
streamAllocation.release();
throw new HttpRetryException("Cannot retry streamed HTTP body", response.code());
}
if (!sameConnection(response, followUp.url())) {
streamAllocation.release();
streamAllocation = new StreamAllocation(client.connectionPool(),
createAddress(followUp.url()), call, eventListener, callStackTrace);
this.streamAllocation = streamAllocation;
} else if (streamAllocation.codec() != null) {
throw new IllegalStateException("Closing the body of " + response
+ " didn't close its backing stream. Bad interceptor?");
}
request = followUp;
priorResponse = response;
}
}
- 该拦截器主要的作用就是:当一个请求由于各种原因失败了,如果是路由或者连接异常,则尝试恢复,否则,根据响应码(ResponseCode),followup方法会对Request进行再处理以得到新的Request,然后沿着拦截器链继续新的Request。
- 注意:如果responseCode是200的话,这些过程就结束了。注意看注释。
BridgeInterceptor,继续看他的intercept方法
public Response intercept(Chain chain) throws IOException {
Request userRequest = chain.request();
Request.Builder requestBuilder = userRequest.newBuilder();
RequestBody body = userRequest.body();
if (body != null) {
MediaType contentType = body.contentType();
if (contentType != null) {
requestBuilder.header("Content-Type", contentType.toString());
}
long contentLength = body.contentLength();
if (contentLength != -1) {
requestBuilder.header("Content-Length", Long.toString(contentLength));
requestBuilder.removeHeader("Transfer-Encoding");
} else {
requestBuilder.header("Transfer-Encoding", "chunked");
requestBuilder.removeHeader("Content-Length");
}
}
if (userRequest.header("Host") == null) {
requestBuilder.header("Host", hostHeader(userRequest.url(), false));
}
if (userRequest.header("Connection") == null) {
requestBuilder.header("Connection", "Keep-Alive");
}
boolean transparentGzip = false;
if (userRequest.header("Accept-Encoding") == null && userRequest.header("Range") == null) {
transparentGzip = true;
requestBuilder.header("Accept-Encoding", "gzip");
}
List<Cookie> cookies = cookieJar.loadForRequest(userRequest.url());
if (!cookies.isEmpty()) {
requestBuilder.header("Cookie", cookieHeader(cookies));
}
if (userRequest.header("User-Agent") == null) {
requestBuilder.header("User-Agent", Version.userAgent());
}
Response networkResponse = chain.proceed(requestBuilder.build());
HttpHeaders.receiveHeaders(cookieJar, userRequest.url(), networkResponse.headers());
Response.Builder responseBuilder = networkResponse.newBuilder()
.request(userRequest);
if (transparentGzip
&& "gzip".equalsIgnoreCase(networkResponse.header("Content-Encoding"))
&& HttpHeaders.hasBody(networkResponse)) {
GzipSource responseBody = new GzipSource(networkResponse.body().source());
Headers strippedHeaders = networkResponse.headers().newBuilder()
.removeAll("Content-Encoding")
.removeAll("Content-Length")
.build();
responseBuilder.headers(strippedHeaders);
String contentType = networkResponse.header("Content-Type");
responseBuilder.body(new RealResponseBody(contentType, -1L, Okio.buffer(responseBody)));
}
return responseBuilder.build();
}
- 可见,BridgeInterceptor的主要作用就是为请求(request before)添加请求头,为响应(Response Before)添加响应头
CacheInterceptor
public Response intercept(Chain chain) throws IOException {
Response cacheCandidate = cache != null
? cache.get(chain.request())
: null;
long now = System.currentTimeMillis();
CacheStrategy strategy = new CacheStrategy.Factory(now, chain.request(), cacheCandidate).get();
Request networkRequest = strategy.networkRequest;
Response cacheResponse = strategy.cacheResponse;
if (cache != null) {
cache.trackResponse(strategy);
}
if (cacheCandidate != null && cacheResponse == null) {
closeQuietly(cacheCandidate.body());
}
if (networkRequest == null && cacheResponse == null) {
return new Response.Builder()
.request(chain.request())
.protocol(Protocol.HTTP_1_1)
.code(504)
.message("Unsatisfiable Request (only-if-cached)")
.body(Util.EMPTY_RESPONSE)
.sentRequestAtMillis(-1L)
.receivedResponseAtMillis(System.currentTimeMillis())
.build();
}
if (networkRequest == null) {
return cacheResponse.newBuilder()
.cacheResponse(stripBody(cacheResponse))
.build();
}
Response networkResponse = null;
try {
networkResponse = chain.proceed(networkRequest);
} finally {
if (networkResponse == null && cacheCandidate != null) {
closeQuietly(cacheCandidate.body());
}
}
if (cacheResponse != null) {
if (networkResponse.code() == HTTP_NOT_MODIFIED) {
Response response = cacheResponse.newBuilder()
.headers(combine(cacheResponse.headers(), networkResponse.headers()))
.sentRequestAtMillis(networkResponse.sentRequestAtMillis())
.receivedResponseAtMillis(networkResponse.receivedResponseAtMillis())
.cacheResponse(stripBody(cacheResponse))
.networkResponse(stripBody(networkResponse))
.build();
networkResponse.body().close();
cache.trackConditionalCacheHit();
cache.update(cacheResponse, response);
return response;
} else {
closeQuietly(cacheResponse.body());
}
}
Response response = networkResponse.newBuilder()
.cacheResponse(stripBody(cacheResponse))
.networkResponse(stripBody(networkResponse))
.build();
if (cache != null) {
if (HttpHeaders.hasBody(response) && CacheStrategy.isCacheable(response, networkRequest)) {
CacheRequest cacheRequest = cache.put(response);
return cacheWritingResponse(cacheRequest, response);
}
if (HttpMethod.invalidatesCache(networkRequest.method())) {
try {
cache.remove(networkRequest);
} catch (IOException ignored) {
}
}
}
return response;
}
ConnectInterceptor(核心,连接池)
public Response intercept(Chain chain) throws IOException {
RealInterceptorChain realChain = (RealInterceptorChain) chain;
Request request = realChain.request();
StreamAllocation streamAllocation = realChain.streamAllocation();
boolean doExtensiveHealthChecks = !request.method().equals("GET");
HttpCodec httpCodec = streamAllocation.newStream(client, chain, doExtensiveHealthChecks);
RealConnection connection = streamAllocation.connection();
return realChain.proceed(request, streamAllocation, httpCodec, connection);
}
- 这里解释一下相关类
- streamAllocation:直译就是流分配。流是什么呢?我们知道Connection是一个连接远程服务器的物理Socket连接,而Stream则是基于Connection的逻辑Http 请求/响应对。StreamAllocation会通过ConnectPool获取或者新生成一个RealConnection来得到一个连接到Server的Connection连接,同时会生成一个HttpCodec用于下一个CallServerInterceptor,以完成最终的请求;
- HttpCodec:针对不同的版本,OkHttp为我们提供了HttpCodec1(Http1.x)和HttpCodec2(Http2).
- 一句话概括就是:分配一个Connection和HttpCodec,为最终的请求做准备。
- 我们先来看看streamAllocation.newStream到底干了什么
public HttpCodec newStream(
      OkHttpClient client, Interceptor.Chain chain, boolean doExtensiveHealthChecks) {
    int connectTimeout = chain.connectTimeoutMillis();
    int readTimeout = chain.readTimeoutMillis();
    int writeTimeout = chain.writeTimeoutMillis();
    int pingIntervalMillis = client.pingIntervalMillis();
    boolean connectionRetryEnabled = client.retryOnConnectionFailure();

    try {
      RealConnection resultConnection = findHealthyConnection(connectTimeout, readTimeout,
          writeTimeout, pingIntervalMillis, connectionRetryEnabled, doExtensiveHealthChecks);
      HttpCodec resultCodec = resultConnection.newCodec(client, chain, this);

      synchronized (connectionPool) {
        codec = resultCodec;
        return resultCodec;
      }
    } catch (IOException e) {
      throw new RouteException(e);
    }
  }
- 进入findHealthyConnection方法
private RealConnection findHealthyConnection(int connectTimeout, int readTimeout,
int writeTimeout, int pingIntervalMillis, boolean connectionRetryEnabled,
boolean doExtensiveHealthChecks) throws IOException {
while (true) {
RealConnection candidate = findConnection(connectTimeout, readTimeout, writeTimeout,
pingIntervalMillis, connectionRetryEnabled);
synchronized (connectionPool) {
if (candidate.successCount == 0) {
return candidate;
}
}
if (!candidate.isHealthy(doExtensiveHealthChecks)) {
noNewStreams();
continue;
}
return candidate;
}
}
- 可见这里的关键代码就是findConnection这个方法,我们进去看看
private RealConnection findConnection(int connectTimeout, int readTimeout, int writeTimeout,
int pingIntervalMillis, boolean connectionRetryEnabled) throws IOException {
boolean foundPooledConnection = false;
RealConnection result = null;
Route selectedRoute = null;
Connection releasedConnection;
Socket toClose;
synchronized (connectionPool) {
if (released) throw new IllegalStateException("released");
if (codec != null) throw new IllegalStateException("codec != null");
if (canceled) throw new IOException("Canceled");
releasedConnection = this.connection;
toClose = releaseIfNoNewStreams();
if (this.connection != null) {
result = this.connection;
releasedConnection = null;
}
if (!reportedAcquired) {
releasedConnection = null;
}
if (result == null) {
Internal.instance.get(connectionPool, address, this, null);
if (connection != null) {
foundPooledConnection = true;
result = connection;
} else {
selectedRoute = route;
}
}
}
closeQuietly(toClose);
if (releasedConnection != null) {
eventListener.connectionReleased(call, releasedConnection);
}
if (foundPooledConnection) {
eventListener.connectionAcquired(call, result);
}
if (result != null) {
return result;
}
boolean newRouteSelection = false;
if (selectedRoute == null && (routeSelection == null || !routeSelection.hasNext())) {
newRouteSelection = true;
routeSelection = routeSelector.next();
}
synchronized (connectionPool) {
if (canceled) throw new IOException("Canceled");
if (newRouteSelection) {
List<Route> routes = routeSelection.getAll();
for (int i = 0, size = routes.size(); i < size; i++) {
Route route = routes.get(i);
Internal.instance.get(connectionPool, address, this, route);
if (connection != null) {
foundPooledConnection = true;
result = connection;
this.route = route;
break;
}
}
}
if (!foundPooledConnection) {
if (selectedRoute == null) {
selectedRoute = routeSelection.next();
}
route = selectedRoute;
refusedStreamCount = 0;
result = new RealConnection(connectionPool, selectedRoute);
acquire(result, false);
}
}
if (foundPooledConnection) {
eventListener.connectionAcquired(call, result);
return result;
}
result.connect(connectTimeout, readTimeout, writeTimeout, pingIntervalMillis,
connectionRetryEnabled, call, eventListener);
routeDatabase().connected(result.route());
Socket socket = null;
synchronized (connectionPool) {
reportedAcquired = true;
Internal.instance.put(connectionPool, result);
if (result.isMultiplexed()) {
socket = Internal.instance.deduplicate(connectionPool, address, this);
result = connection;
}
}
closeQuietly(socket);
eventListener.connectionAcquired(call, result);
return result;
}
- 可见,在这个方法中主要是找到一个可用的连接,主要分三步
- 第一步,先在连接池中找,找到则返回
- 第二步,如果没找到,设置一些具体信息,再去连接池中找,找到则返回
- 还没找到的话,就自己创建出来,并手动设置信息,连接服务器之后方可使用
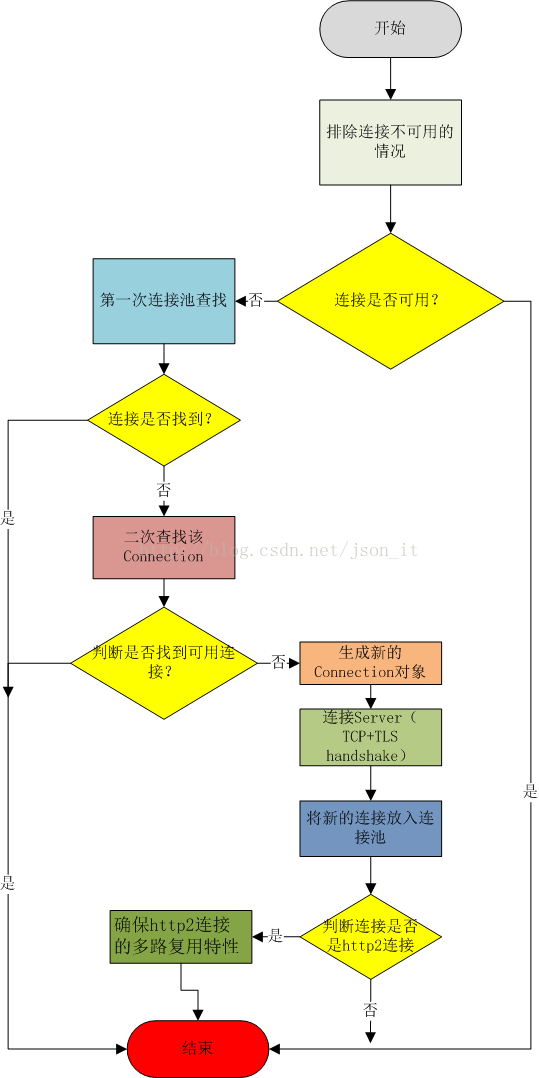
- 我们回过头再看一下刚才的releaseIfNoNewStreams(); 方法,这个方法是为了判断连接是否可用
private Socket releaseIfNoNewStreams() {
    assert (Thread.holdsLock(connectionPool));
    RealConnection allocatedConnection = this.connection;
    if (allocatedConnection != null && allocatedConnection.noNewStreams) {
      return deallocate(false, false, true);
    }
    return null;
  }
- deallocate(false, false, true);这个方法
private Socket deallocate(boolean noNewStreams, boolean released, boolean streamFinished) {
    assert (Thread.holdsLock(connectionPool));

    if (streamFinished) {
      this.codec = null;
    }
    if (released) {
      this.released = true;
    }
    Socket socket = null;
    if (connection != null) {
      if (noNewStreams) {
        connection.noNewStreams = true;
      }
      if (this.codec == null && (this.released || connection.noNewStreams)) {
        release(connection);
        if (connection.allocations.isEmpty()) {
          connection.idleAtNanos = System.nanoTime();
          if (Internal.instance.connectionBecameIdle(connectionPool, connection)) {
            socket = connection.socket();
          }
        }
        connection = null;
      }
    }
    return socket;
  }
- 大概的意思就是这两个方法是用来释放连接资源的,如果不可用的话
- 这里面涉及到具体的网络方面的知识,在这里我也没细看,大概知道其功能就行,暂时
- 那么到这里我们会发现,其实在这个拦截器当中用的最多的就是连接池了,接下来分析一下连接池
ConnectionPool(连接池)
- 在目前的版本下,连接池默认是可以保持5个空闲的连接。这些空闲的连接如果超过5分钟不被使用,则将被连接池移除。
- ConnectionPool中比较关键的几个点:线程池(ThreadPoolExecutor)、队列(Deque)、路由记录表;
- 线程池:用于支持连接池的cleanup任务,清除idle线程;
- 队列:存放待复用的连接;
- 对于连接池,我们最主要看的是他的:存、取、清除;
存
void put(RealConnection connection) {
assert (Thread.holdsLock(this));
if (!cleanupRunning) {
cleanupRunning = true;
executor.execute(cleanupRunnable);
}
connections.add(connection);
}
- 在cleanupRunnable线程的run方法里面是用cleanup来清理的
long cleanup(long now) {
int inUseConnectionCount = 0;
int idleConnectionCount = 0;
RealConnection longestIdleConnection = null;
long longestIdleDurationNs = Long.MIN_VALUE;
synchronized (this) {
for (Iterator<RealConnection> i = connections.iterator(); i.hasNext(); ) {
RealConnection connection = i.next();
if (pruneAndGetAllocationCount(connection, now) > 0) {
inUseConnectionCount++;
continue;
}
idleConnectionCount++;
long idleDurationNs = now - connection.idleAtNanos;
if (idleDurationNs > longestIdleDurationNs) {
longestIdleDurationNs = idleDurationNs;
longestIdleConnection = connection;
}
}
if (longestIdleDurationNs >= this.keepAliveDurationNs
|| idleConnectionCount > this.maxIdleConnections) {
connections.remove(longestIdleConnection);
} else if (idleConnectionCount > 0) {
return keepAliveDurationNs - longestIdleDurationNs;
} else if (inUseConnectionCount > 0) {
return keepAliveDurationNs;
} else {
cleanupRunning = false;
return -1;
}
}
closeQuietly(longestIdleConnection.socket());
return 0;
}
取
RealConnection get(Address address, StreamAllocation streamAllocation, Route route) {
assert (Thread.holdsLock(this));
for (RealConnection connection : connections) {
if (connection.isEligible(address, route)) {
streamAllocation.acquire(connection, true);
return connection;
}
}
return null;
}
移除
public void evictAll() {
  List<RealConnection> evictedConnections = new ArrayList<>();
  synchronized (this) {
    for (Iterator<RealConnection> i = connections.iterator(); i.hasNext(); ) {
      RealConnection connection = i.next();
      if (connection.allocations.isEmpty()) {
        connection.noNewStreams = true;
        evictedConnections.add(connection);
        i.remove();
      }
    }
  }

  for (RealConnection connection : evictedConnections) {
    closeQuietly(connection.socket());
  }
}
最后一个拦截器CallServerInterceptor
public Response intercept(Chain chain) throws IOException {
RealInterceptorChain realChain = (RealInterceptorChain) chain;
HttpCodec httpCodec = realChain.httpStream();
StreamAllocation streamAllocation = realChain.streamAllocation();
RealConnection connection = (RealConnection) realChain.connection();
Request request = realChain.request();
long sentRequestMillis = System.currentTimeMillis();
realChain.eventListener().requestHeadersStart(realChain.call());
httpCodec.writeRequestHeaders(request);
realChain.eventListener().requestHeadersEnd(realChain.call(), request);
Response.Builder responseBuilder = null;
if (HttpMethod.permitsRequestBody(request.method()) && request.body() != null) {
if ("100-continue".equalsIgnoreCase(request.header("Expect"))) {
httpCodec.flushRequest();
realChain.eventListener().responseHeadersStart(realChain.call());
responseBuilder = httpCodec.readResponseHeaders(true);
}
if (responseBuilder == null) {
realChain.eventListener().requestBodyStart(realChain.call());
long contentLength = request.body().contentLength();
CountingSink requestBodyOut =
new CountingSink(httpCodec.createRequestBody(request, contentLength));
BufferedSink bufferedRequestBody = Okio.buffer(requestBodyOut);
request.body().writeTo(bufferedRequestBody);
bufferedRequestBody.close();
realChain.eventListener()
.requestBodyEnd(realChain.call(), requestBodyOut.successfulCount);
} else if (!connection.isMultiplexed()) {
streamAllocation.noNewStreams();
}
}
httpCodec.finishRequest();
if (responseBuilder == null) {
realChain.eventListener().responseHeadersStart(realChain.call());
responseBuilder = httpCodec.readResponseHeaders(false);
}
Response response = responseBuilder
.request(request)
.handshake(streamAllocation.connection().handshake())
.sentRequestAtMillis(sentRequestMillis)
.receivedResponseAtMillis(System.currentTimeMillis())
.build();
int code = response.code();
if (code == 100) {
responseBuilder = httpCodec.readResponseHeaders(false);
response = responseBuilder
.request(request)
.handshake(streamAllocation.connection().handshake())
.sentRequestAtMillis(sentRequestMillis)
.receivedResponseAtMillis(System.currentTimeMillis())
.build();
code = response.code();
}
realChain.eventListener()
.responseHeadersEnd(realChain.call(), response);
if (forWebSocket && code == 101) {
response = response.newBuilder()
.body(Util.EMPTY_RESPONSE)
.build();
} else {
response = response.newBuilder()
.body(httpCodec.openResponseBody(response))
.build();
}
if ("close".equalsIgnoreCase(response.request().header("Connection"))
|| "close".equalsIgnoreCase(response.header("Connection"))) {
streamAllocation.noNewStreams();
}
if ((code == 204 || code == 205) && response.body().contentLength() > 0) {
throw new ProtocolException(
"HTTP " + code + " had non-zero Content-Length: " + response.body().contentLength());
}
return response;
}