前言
OkHttp 主要的逻辑实现都在拦截器,拦截器中的重点,就是与服务端建立连接,这个过程包括了,dns,代理选择,tls连接,socket连接等,下面我们就从源码一步步分析
源码分析
下面从拦截器ConnectInterceptor 开始分析:
代码一
代码一:
/**
 * Opens a connection to the target server and proceeds to the next interceptor. The network might
 * be used for the returned response, or to validate a cached response with a conditional GET.
 */
object ConnectInterceptor : Interceptor {
  @Throws(IOException::class)
  override fun intercept(chain: Interceptor.Chain): Response {
    //看过上篇文章的,应该很熟悉了,每一个Interceptor 都会被包裹为RealInterceptorChain,注意,这里的chain,是下一个Interceptor
    val realChain = chain as RealInterceptorChain
    //这里的call,就是RealCall,下面对initExchange 展开进行描述,见代码二
    val exchange = realChain.call.initExchange(chain)
    //使用参数,对下一个Interceptor 进行拷贝
    val connectedChain = realChain.copy(exchange = exchange)
    //执行下一个Interceptor
    return connectedChain.proceed(realChain.request)
  }
}
代码二
代码二:
在 RealCall.kt 中
  /** Finds a new or pooled connection to carry a forthcoming request and response. */
  internal fun initExchange(chain: RealInterceptorChain): Exchange {
    synchronized(this) {
      check(expectMoreExchanges) { "released" }
      check(!responseBodyOpen)
      check(!requestBodyOpen)
    }
	//exchangeFinder 对象是在RetryAndFollowUpInterceptor中创建的,见代码三
    val exchangeFinder = this.exchangeFinder!!
    //find 创建连接或者在连接池里找到一个可用链接
    // codec ExchangeCodec 接口,它是一个socket 链接,用来传输request和response,
    //有两种实现:Http1ExchangeCodec ,Http2ExchangeCodec
    val codec = exchangeFinder.find(client, chain)
    //创建了一个Exchange,它负责单个http 请求和响应对,真正的实现是在codec 中(实际的IO操作)
    val result = Exchange(this, eventListener, exchangeFinder, codec)
    //保存这个Exchange 对象,在RealCall对象的变量中
    this.interceptorScopedExchange = result
    this.exchange = result
    synchronized(this) {
      this.requestBodyOpen = true
      this.responseBodyOpen = true
    }

    if (canceled) throw IOException("Canceled")
    return result
  }
因为本篇文章,主要是研究,链接建立的过程,所以关于Exchange传输数据的就先不展开,下面来看一个 ExchangeFinder是在哪里 创建的
代码三
在RetryAndFollowUpInterceptor 的intercept 中,调用了下面的函数,为RealCall 对象,创建了一个ExchangeFinder
代码三:
在 RealCall.kt 中

  fun enterNetworkInterceptorExchange(request: Request, newExchangeFinder: Boolean) {
    check(interceptorScopedExchange == null)

    synchronized(this) {
      check(!responseBodyOpen) {
        "cannot make a new request because the previous response is still open: " +
            "please call response.close()"
      }
      check(!requestBodyOpen)
    }

    if (newExchangeFinder) {
      //创建一个ExchangeFinder,在它里面实现了Dns,代理选择,路由选择,tls连接,socket连接
      //具体每个功能的实现,也是有不同的类去完成,下面会一一详解RetryAndFollowUpInterceptor
      this.exchangeFinder = ExchangeFinder(
          connectionPool,
          createAddress(request.url),
          this,
          eventListener
      )
    }
  }
下面就看看代码二中的exchangeFinder.find(client, chain) 函数,看看链接建立的详细过程
代码四
代码四:
在ExchangeFinder.kt 中
  fun find(
    client: OkHttpClient,
    chain: RealInterceptorChain
  ): ExchangeCodec {
    try {
      // 下面到findHealthyConnection函数中一看究竟
      val resultConnection = findHealthyConnection(
          connectTimeout = chain.connectTimeoutMillis,
          readTimeout = chain.readTimeoutMillis,
          writeTimeout = chain.writeTimeoutMillis,
          pingIntervalMillis = client.pingIntervalMillis,
          connectionRetryEnabled = client.retryOnConnectionFailure,
          doExtensiveHealthChecks = chain.request.method != "GET"
      )
      //resultConnection 是 RealConnection 类型,它负责建立socket链接 ,建立tls链接,建立Tunnel(通过http代理,访问https 服务器)等操作
      //面对http1和http2,又有各自不同的传输方式,所以使用newCodec() 抽象为ExchangeCodec,http1和http2 实现不同的接口功能(策略者模式)
      return resultConnection.newCodec(client, chain)
    } catch (e: RouteException) {
      trackFailure(e.lastConnectException)
      throw e
    } catch (e: IOException) {
      trackFailure(e)
      throw RouteException(e)
    }
  }
下面进入findHealthyConnection 函数中
代码五
代码五:
在ExchangeFinder.kt 中
/**
* Finds a connection and returns it if it is healthy. If it is unhealthy the process is repeated
* until a healthy connection is found.
*/
@Throws(IOException::class)
private fun findHealthyConnection(
connectTimeout: Int,
readTimeout: Int,
writeTimeout: Int,
pingIntervalMillis: Int,
connectionRetryEnabled: Boolean,
doExtensiveHealthChecks: Boolean
): RealConnection {
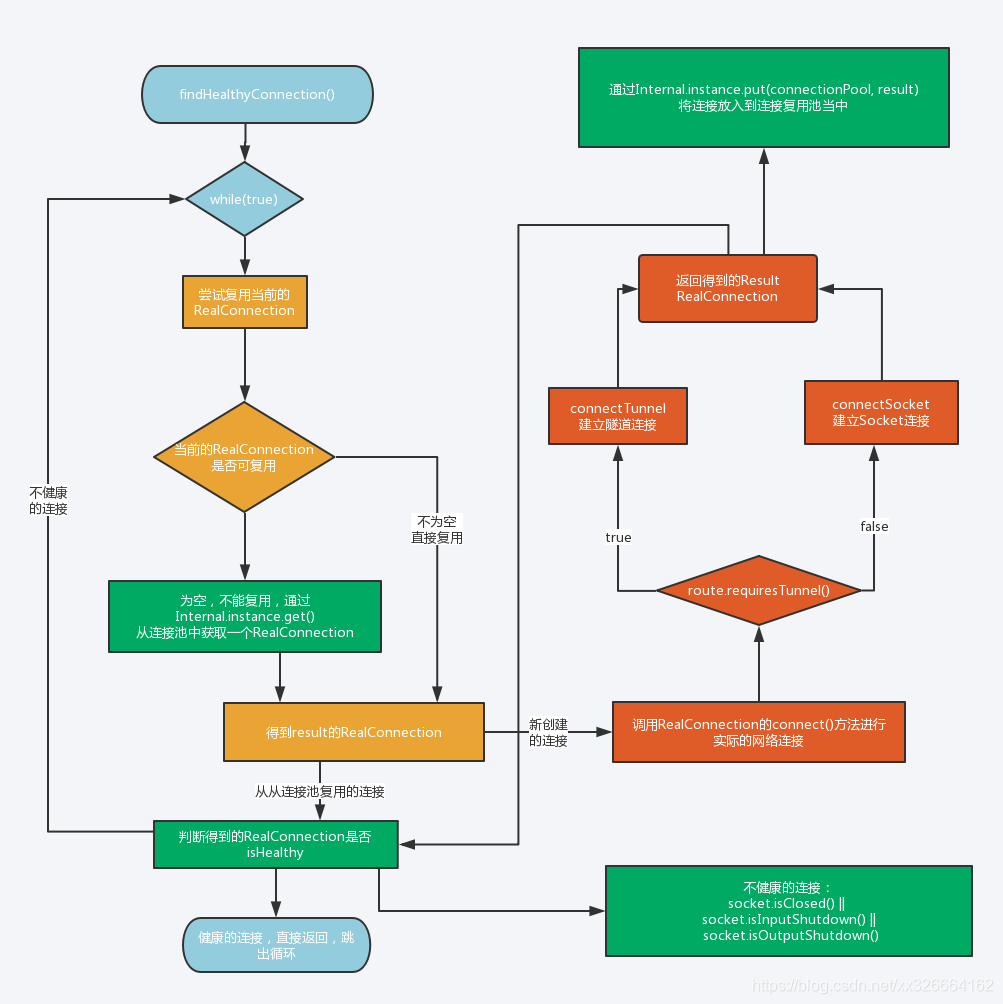
//这里是一个死循环,退出循环的两种情况:1、得到一个健康的连接 2、抛出一个异常
while (true) {
//得到一个连接,新建或者在连接池中,见代码六
val candidate = findConnection(
connectTimeout = connectTimeout,
readTimeout = readTimeout,
writeTimeout = writeTimeout,
pingIntervalMillis = pingIntervalMillis,
connectionRetryEnabled = connectionRetryEnabled
)
// Confirm that the connection is good.
if (candidate.isHealthy(doExtensiveHealthChecks)) {
return candidate
}
// 如果连接,不可用,就从连接池中删除
candidate.noNewExchanges()
// Make sure we have some routes left to try. One example where we may exhaust all the routes
// would happen if we made a new connection and it immediately is detected as unhealthy.
if (nextRouteToTry != null) continue
val routesLeft = routeSelection?.hasNext() ?: true
if (routesLeft) continue
val routesSelectionLeft = routeSelector?.hasNext() ?: true
if (routesSelectionLeft) continue
throw IOException("exhausted all routes")
}
}
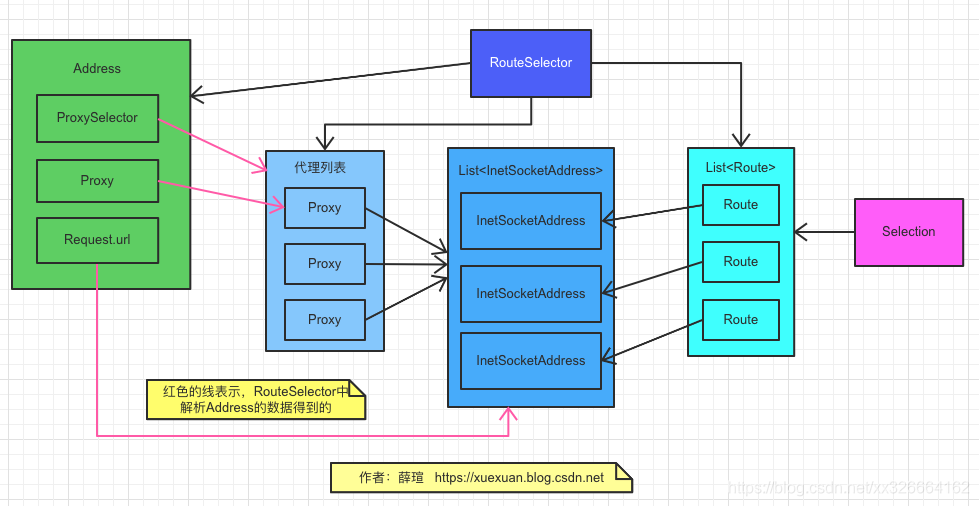
下面涉及的类比较多,来几张图,从总体的认识一下
RouteSelector 是用来根据代理创建Route, 然后封装到Selection
Selection 针对某一个代理的 一系列的Route,切换代理后,该对象也会跟着改变
Route 一个Url可能会对应多个IP地址(DNS负载均衡),每个socket 对应一个Route 对象
Address 包含 一个Url,指定的Proxy(可为空), ProxySelector (可能会有许多Proxy)
这几个类的关系图
下图是,建立连接的流程图:
代码六
代码六:
在ExchangeFinder.kt 类中
  /**
   * Returns a connection to host a new stream. This prefers the existing connection if it exists,
   * then the pool, finally building a new connection.
   *
   * This checks for cancellation before each blocking operation.
   */
  @Throws(IOException::class)
  private fun findConnection(
    connectTimeout: Int,
    readTimeout: Int,
    writeTimeout: Int,
    pingIntervalMillis: Int,
    connectionRetryEnabled: Boolean
  ): RealConnection {
    //如果当前的请求已经取消,就抛出异常
    if (call.isCanceled()) throw IOException("Canceled")
	//下面是使用RealCall 对象当前的连接
    // Attempt to reuse the connection from the call.
    val callConnection = call.connection // This may be mutated by releaseConnectionNoEvents()!
    if (callConnection != null) {
      var toClose: Socket? = null
      synchronized(callConnection) {
        if (callConnection.noNewExchanges || !sameHostAndPort(callConnection.route().address.url)) {
          toClose = call.releaseConnectionNoEvents()
        }
      }

      // If the call's connection wasn't released, reuse it. We don't call connectionAcquired() here
      // because we already acquired it.
      if (call.connection != null) {
        check(toClose == null)
        return callConnection
      }

      // The call's connection was released.
      toClose?.closeQuietly()
      eventListener.connectionReleased(call, callConnection)
    }

    //2、上面RealCall 对象的连接不可用,We need a new connection. Give it fresh stats.
    refusedStreamCount = 0
    connectionShutdownCount = 0
    otherFailureCount = 0

    // Attempt to get a connection from the pool.
    //callAcquirePooledConnection 函数,下面会详细分析
    if (connectionPool.callAcquirePooledConnection(address, call, null, false)) {
      val result = call.connection!!
      eventListener.connectionAcquired(call, result)
      return result
    }
	// 在连接池中也没有找到可用的,就去找Route,然后用Route创建一个连接
	// 寻找Route 的步骤:
	//1、先看nextRouteToTry 有没有值,(如果有值,就是上一次循环赋值的),拿出来使用
	//2、nextRouteToTry 为空,去Selection 中去找(Selection 就是一些列Route的集合)
	//3、如果Selection 中也没有,就去RouteSelector中,先找一个Selection,再在其中找Route
	// 如果是第一次进来,那么会到第三种情况,先创建一个RouteSelector,next() 后Selection,Route 就都有了
    // Nothing in the pool. Figure out what route we'll try next.
    val routes: List<Route>?
    val route: Route
    if (nextRouteToTry != null) {
      // Use a route from a preceding coalesced connection.
      routes = null
      route = nextRouteToTry!!
      nextRouteToTry = null
    } else if (routeSelection != null && routeSelection!!.hasNext()) {
      // Use a route from an existing route selection.
      routes = null
      route = routeSelection!!.next()
    } else {
      // Compute a new route selection. This is a blocking operation!
      var localRouteSelector = routeSelector
      if (localRouteSelector == null) {
        //代码七 会详细介绍RouteSelector
        localRouteSelector = RouteSelector(address, call.client.routeDatabase, call, eventListener)
        this.routeSelector = localRouteSelector
      }
      val localRouteSelection = localRouteSelector.next()
      routeSelection = localRouteSelection
      routes = localRouteSelection.routes

      if (call.isCanceled()) throw IOException("Canceled")

      // Now that we have a set of IP addresses, make another attempt at getting a connection from
      // the pool. We have a better chance of matching thanks to connection coalescing.
      //注意这里参数,有传入routes 参数,
      if (connectionPool.callAcquirePooledConnection(address, call, routes, false)) {
        val result = call.connection!!
        eventListener.connectionAcquired(call, result)
        return result
      }

      route = localRouteSelection.next()
    }

    // 代码如果执行到这里,就说明还没有找到可用连接,但是找到了Route
    // Connect. Tell the call about the connecting call so async cancels work.
    val newConnection = RealConnection(connectionPool, route)
    call.connectionToCancel = newConnection
    try {
     // 建立socket 连接,建立tls连接,建立tunnel
     // 见代码十:
      newConnection.connect(
          connectTimeout,
          readTimeout,
          writeTimeout,
          pingIntervalMillis,
          connectionRetryEnabled,
          call,
          eventListener
      )
    } finally {
      call.connectionToCancel = null
    }
    call.client.routeDatabase.connected(newConnection.route())

    // If we raced another call connecting to this host, coalesce the connections. This makes for 3
    // different lookups in the connection pool!
    if (connectionPool.callAcquirePooledConnection(address, call, routes, true)) {
      val result = call.connection!!
      //把上面找到的route 保存起来,如果当前返回的连接不健康,下次就尝试这个route
      nextRouteToTry = route
      newConnection.socket().closeQuietly()
      //调用事件监听函数
      eventListener.connectionAcquired(call, result)
      return result
    }

    synchronized(newConnection) {
       //放入连接池中
      connectionPool.put(newConnection)
      //见代码九分析
      call.acquireConnectionNoEvents(newConnection)
    }
    //调用事件监听函数
    eventListener.connectionAcquired(call, newConnection)
    return newConnection
  }
下面来详细分析一下RouteSelector、然后在代码八分析 callAcquirePooledConnection 是如何在连接池中选择一个连接的。
来看看RouteSelector 类的完整代码
代码七
代码七:
在RouteSelector.kt 类中

/**
 * Selects routes to connect to an origin server. Each connection requires a choice of proxy server,
 * IP address, and TLS mode. Connections may also be recycled.
 */
class RouteSelector(
  //在RealCall 中创建的address 对象,存放url,port,proxy,proxySelector(proxy 为空时 使用的)
  private val address: Address,
  private val routeDatabase: RouteDatabase,
  private val call: Call,
  private val eventListener: EventListener
) {
  /* State for negotiating the next proxy to use. */
  private var proxies = emptyList<Proxy>()
  private var nextProxyIndex: Int = 0

  /* State for negotiating the next socket address to use. */
  private var inetSocketAddresses = emptyList<InetSocketAddress>()

  /* State for negotiating failed routes */
  private val postponedRoutes = mutableListOf<Route>()

  init {
    //首先会调用这里
    resetNextProxy(address.url, address.proxy)
  }

  // 把设置的代理都找出来,如果没有设置代理,则使用proxySelector,
  private fun resetNextProxy(url: HttpUrl, proxy: Proxy?) {
    fun selectProxies(): List<Proxy> {
      // If the user specifies a proxy, try that and only that.
      if (proxy != null) return listOf(proxy)

      // If the URI lacks a host (as in "http://</"), don't call the ProxySelector.
      val uri = url.toUri()
      if (uri.host == null) return immutableListOf(Proxy.NO_PROXY)

      // Try each of the ProxySelector choices until one connection succeeds.
      //注意这里的proxySelector( 类型是ProxySelector抽象类),对proxySelector 赋值 ,默认通过反射找到"sun.net.spi.DefaultProxySelector",如果为空,则使用NullProxySelector
      val proxiesOrNull = address.proxySelector.select(uri)
      //如果没有找到代理,就返回一个list,其中Proxy 的参数是直接相连,也就是没有代理
      if (proxiesOrNull.isNullOrEmpty()) return immutableListOf(Proxy.NO_PROXY)

      return proxiesOrNull.toImmutableList()
    }

    eventListener.proxySelectStart(call, url)
    proxies = selectProxies()
    //这里赋初值,后面会根据这个字段来判断,是否还有代理
    nextProxyIndex = 0
    eventListener.proxySelectEnd(call, url, proxies)
  }

  /**
   * Returns true if there's another set of routes to attempt. Every address has at least one route.
   */
  operator fun hasNext(): Boolean = hasNextProxy() || postponedRoutes.isNotEmpty()

  /** Returns true if there's another proxy to try. */
  private fun hasNextProxy(): Boolean = nextProxyIndex < proxies.size

  //代码六中,调用了这里,来创建一个Selection(Route 的集合)
  @Throws(IOException::class)
  operator fun next(): Selection {
    if (!hasNext()) throw NoSuchElementException()

    // Compute the next set of routes to attempt.
    val routes = mutableListOf<Route>()
    while (hasNextProxy()) {
      //即使没有代理,proxies也会有一个Proxy,此时nextProxyIndex == 0,所以hasNextProxy()为true,进入到这里
      // Postponed routes are always tried last. For example, if we have 2 proxies and all the
      // routes for proxy1 should be postponed, we'll move to proxy2. Only after we've exhausted
      // all the good routes will we attempt the postponed routes.
      val proxy = nextProxy()
      for (inetSocketAddress in inetSocketAddresses) {
        val route = Route(address, proxy, inetSocketAddress)
        if (routeDatabase.shouldPostpone(route)) {
         //如果这个路由之前失败过,就加入到postponedRoutes 中
          postponedRoutes += route
        } else {
         // 直接把route 加入routes
          routes += route
        }
      }
      //如果有没有失败过得route,就终止循环
      if (routes.isNotEmpty()) {
        break
      }
    }
	//所以的route都是失败过的,就把刚才postponedRoutes 加入到routes
    if (routes.isEmpty()) {
      // We've exhausted all Proxies so fallback to the postponed routes.
      // 把postponedRoutes
      routes += postponedRoutes
      postponedRoutes.clear()
    }
	//用routes 创建Selection 对象
    return Selection(routes)
  }

  /** Returns the next proxy to try. May be PROXY.NO_PROXY but never null. */
  @Throws(IOException::class)
  private fun nextProxy(): Proxy {
    if (!hasNextProxy()) {
      throw SocketException(
          "No route to ${address.url.host}; exhausted proxy configurations: $proxies")
    }
    val result = proxies[nextProxyIndex++]
    resetNextInetSocketAddress(result)
    return result
  }

  /** Prepares the socket addresses to attempt for the current proxy or host. */
  @Throws(IOException::class)
  private fun resetNextInetSocketAddress(proxy: Proxy) {
    // Clear the addresses. Necessary if getAllByName() below throws!
    val mutableInetSocketAddresses = mutableListOf<InetSocketAddress>()
    inetSocketAddresses = mutableInetSocketAddresses

    val socketHost: String
    val socketPort: Int
    if (proxy.type() == Proxy.Type.DIRECT || proxy.type() == Proxy.Type.SOCKS) {
      //如果是直接相连,或者是SOCKS 直接通过ip 和端口,访问后台
      socketHost = address.url.host
      socketPort = address.url.port
    } else {
      // http 系列的代理
      val proxyAddress = proxy.address()
      require(proxyAddress is InetSocketAddress) {
        "Proxy.address() is not an InetSocketAddress: ${proxyAddress.javaClass}"
      }
      socketHost = proxyAddress.socketHost
      socketPort = proxyAddress.port
    }

    if (socketPort !in 1..65535) {
      throw SocketException("No route to $socketHost:$socketPort; port is out of range")
    }

    if (proxy.type() == Proxy.Type.SOCKS) {
      //如果是ip 和端口,不需要dns解析
      mutableInetSocketAddresses += InetSocketAddress.createUnresolved(socketHost, socketPort)
    } else {
      eventListener.dnsStart(call, socketHost)

      // Try each address for best behavior in mixed IPv4/IPv6 environments.
      // 进行dns 解析,因为可能存在dns 负载均衡,所以同一个Url 可以对应多个IP
      val addresses = address.dns.lookup(socketHost)
      if (addresses.isEmpty()) {
        throw UnknownHostException("${address.dns} returned no addresses for $socketHost")
      }

      eventListener.dnsEnd(call, socketHost, addresses)

      for (inetAddress in addresses) {
        mutableInetSocketAddresses += InetSocketAddress(inetAddress, socketPort)
      }
    }
  }

  /** A set of selected Routes. */
  class Selection(val routes: List<Route>) {
    private var nextRouteIndex = 0

    operator fun hasNext(): Boolean = nextRouteIndex < routes.size

    operator fun next(): Route {
      if (!hasNext()) throw NoSuchElementException()
      return routes[nextRouteIndex++]
    }
  }

}
代码八
下面来看一下 代码 connectionPool.callAcquirePooledConnection connectionPool 默认的实现类是RealConnectionPool
在RealConnectionPool 中,使用链表队列 来保存所有的连接RealConnection对象
代码八:
在RealConnectionPool.kt 中

  fun callAcquirePooledConnection(
    address: Address,
    call: RealCall,
    routes: List<Route>?,
    requireMultiplexed: Boolean
  ): Boolean {
    //遍历连接池中的每个连接
    for (connection in connections) {
      synchronized(connection) {
        // isMultiplexed 如果是http2,则为true
        if (requireMultiplexed && !connection.isMultiplexed) return@synchronized
        //检查这个connection 中的route 对应的address 与 参数address 是否匹配
        if (!connection.isEligible(address, routes)) return@synchronized
        //见代码九分析
        call.acquireConnectionNoEvents(connection)
        return true
      }
    }
    return false
  }
一次请求就会有一个RealCall,它需要一个连接RealConnection 去传输数据,下面函数就是把找到的连接与请求建立联系
- 一个RealCall 对应一个RealConnection
- 一个RealConnection 对应多个RealCall
代码九
代码九:
在RealCall.kt 中
  fun acquireConnectionNoEvents(connection: RealConnection) {
    connection.assertThreadHoldsLock()

    check(this.connection == null)
    //把当前的连接加入的
    this.connection = connection
    //把当下的RealCall 对象,存入到RealConnection对象中
    connection.calls.add(CallReference(this, callStackTrace))
  }
剩下就是最最重要的地方,代码六中的 newConnection.connect 连接是如何建立连接的
代码十
代码十:
在RealConnection.kt 中

fun connect(
    connectTimeout: Int,
    readTimeout: Int,
    writeTimeout: Int,
    pingIntervalMillis: Int,
    connectionRetryEnabled: Boolean,
    call: Call,
    eventListener: EventListener
  ) {
    check(protocol == null) { "already connected" }

    var routeException: RouteException? = null
    //连接的规格,默认是TLS(https)和 CLEARTEXT(http)
    val connectionSpecs = route.address.connectionSpecs
    val connectionSpecSelector = ConnectionSpecSelector(connectionSpecs)

    if (route.address.sslSocketFactory == null) {
      //如果没有sslSocketFactory,也就是不能创建ssl连接,那么只能明文连接
      if (ConnectionSpec.CLEARTEXT !in connectionSpecs) {
        //CLEARTEXT 不再规格里,就抛出异常
        throw RouteException(UnknownServiceException(
            "CLEARTEXT communication not enabled for client"))
      }
      val host = route.address.url.host
      if (!Platform.get().isCleartextTrafficPermitted(host)) {
        //系统不支持该host 明文传输
        throw RouteException(UnknownServiceException(
            "CLEARTEXT communication to $host not permitted by network security policy"))
      }
    } else {
      if (Protocol.H2_PRIOR_KNOWLEDGE in route.address.protocols) {
        throw RouteException(UnknownServiceException(
            "H2_PRIOR_KNOWLEDGE cannot be used with HTTPS"))
      }
    }

    while (true) {
      try {

        if (route.requiresTunnel()) {
          //创建tunnel,用于通过http代理访问https
          //其中包含connectSocket、createTunnel
          connectTunnel(connectTimeout, readTimeout, writeTimeout, call, eventListener)
          if (rawSocket == null) {
            // We were unable to connect the tunnel but properly closed down our resources.
            break
          }
        } else {
          //如果不需要创建tunnel,就建立socket 连接,见代码十一
          connectSocket(connectTimeout, readTimeout, call, eventListener)
        }
        //建立tls连接,见代码十二
        establishProtocol(connectionSpecSelector, pingIntervalMillis, call, eventListener)
        eventListener.connectEnd(call, route.socketAddress, route.proxy, protocol)
        break
      } catch (e: IOException) {
          ...省略代码...
      }
    }

    if (route.requiresTunnel() && rawSocket == null) {
      throw RouteException(ProtocolException(
          "Too many tunnel connections attempted: $MAX_TUNNEL_ATTEMPTS"))
    }

    idleAtNs = System.nanoTime()
  }
代码十一
建立socket 连接
代码十一:
在RealConnection.kt 中
  /** Does all the work necessary to build a full HTTP or HTTPS connection on a raw socket. */
  @Throws(IOException::class)
  private fun connectSocket(
    connectTimeout: Int,
    readTimeout: Int,
    call: Call,
    eventListener: EventListener
  ) {
    val proxy = route.proxy
    val address = route.address
    //创建socket
    val rawSocket = when (proxy.type()) {
      Proxy.Type.DIRECT, Proxy.Type.HTTP -> address.socketFactory.createSocket()!!
      else -> Socket(proxy)
    }
    this.rawSocket = rawSocket

    eventListener.connectStart(call, route.socketAddress, proxy)
    rawSocket.soTimeout = readTimeout
    try {
      // 调用各平台的socket连接,平台是指:OpenJDK、JDK、Android等
      Platform.get().connectSocket(rawSocket, route.socketAddress, connectTimeout)
    } catch (e: ConnectException) {
      throw ConnectException("Failed to connect to ${route.socketAddress}").apply {
        initCause(e)
      }
    }
    try {
      //代码四 中的 newCodec ,创建 Http1ExchangeCodec 会把下面的输入 输出流 传递进去
      //得到输入流,以后往这个流中写入数据,write,就会进行发送
      source = rawSocket.source().buffer()
      //输出流,以后可以在这个流中读取数据
      sink = rawSocket.sink().buffer()

    } catch (npe: NullPointerException) {
      if (npe.message == NPE_THROW_WITH_NULL) {
        throw IOException(npe)
      }
    }
  }
代码十二
建立tls 连接,https 特有的
代码十二:
在RealConnection.kt 中

@Throws(IOException::class)
  private fun connectTls(connectionSpecSelector: ConnectionSpecSelector) {
    val address = route.address
    val sslSocketFactory = address.sslSocketFactory
    var success = false
    var sslSocket: SSLSocket? = null
    try {
      // Create the wrapper over the connected socket.
      sslSocket = sslSocketFactory!!.createSocket(
          rawSocket, address.url.host, address.url.port, true /* autoClose */) as SSLSocket

      // Configure the socket's ciphers, TLS versions, and extensions.
      val connectionSpec = connectionSpecSelector.configureSecureSocket(sslSocket)
      if (connectionSpec.supportsTlsExtensions) {
        Platform.get().configureTlsExtensions(sslSocket, address.url.host, address.protocols)
      }

      // Force handshake. This can throw!
      sslSocket.startHandshake()
      // block for session establishment
      val sslSocketSession = sslSocket.session
      val unverifiedHandshake = sslSocketSession.handshake()

      // Verify that the socket's certificates are acceptable for the target host.
      // 默认使用 OkHostnameVerifier 来验证证书和Url 是否匹配
      if (!address.hostnameVerifier!!.verify(address.url.host, sslSocketSession)) {
        val peerCertificates = unverifiedHandshake.peerCertificates
        if (peerCertificates.isNotEmpty()) {
          val cert = peerCertificates[0] as X509Certificate
          throw SSLPeerUnverifiedException("""
              |Hostname ${address.url.host} not verified:
              |    certificate: ${CertificatePinner.pin(cert)}
              |    DN: ${cert.subjectDN.name}
              |    subjectAltNames: ${OkHostnameVerifier.allSubjectAltNames(cert)}
              """.trimMargin())
        } else {
          throw SSLPeerUnverifiedException(
              "Hostname ${address.url.host} not verified (no certificates)")
        }
      }
	  // 在上篇文章中提到,这个可在创建OkHttp的时候,指定哪个证书可被信任
      val certificatePinner = address.certificatePinner!!
      //把tls 返回的信息保存起来
      handshake = Handshake(unverifiedHandshake.tlsVersion, unverifiedHandshake.cipherSuite,
          unverifiedHandshake.localCertificates) {
        certificatePinner.certificateChainCleaner!!.clean(unverifiedHandshake.peerCertificates,
            address.url.host)
      }

      // Check that the certificate pinner is satisfied by the certificates presented.
      certificatePinner.check(address.url.host) {
        handshake!!.peerCertificates.map { it as X509Certificate }
      }

      // Success! Save the handshake and the ALPN protocol.
      val maybeProtocol = if (connectionSpec.supportsTlsExtensions) {
        Platform.get().getSelectedProtocol(sslSocket)
      } else {
        null
      }
      socket = sslSocket
      //把输入和输出流保存起来
      source = sslSocket.source().buffer()
      sink = sslSocket.sink().buffer()
      protocol = if (maybeProtocol != null) Protocol.get(maybeProtocol) else Protocol.HTTP_1_1
      success = true
    } finally {
      if (sslSocket != null) {
        Platform.get().afterHandshake(sslSocket)
      }
      if (!success) {
        sslSocket?.closeQuietly()
      }
    }
  }
创建好连接后,就会返回到 findConnection (代码六),在其中继续往下执行,把这个连接加入到连接池里,然后就返回到find (代码四),其中是这样返回的 return resultConnection.newCodec(client, chain)
我们来看看这个RealConnection 对象的newCodec 函数:
代码十三
代码十三:
在RealConnection.kt 中
  @Throws(SocketException::class)
  internal fun newCodec(client: OkHttpClient, chain: RealInterceptorChain): ExchangeCodec {
    //socket 连接
    val socket = this.socket!!
    //输入流
    val source = this.source!!
    //输出流
    val sink = this.sink!!
    //http2 独有的连接
    val http2Connection = this.http2Connection

    //根据 不同的协议,返回不同的 ExchangeCodec
    return if (http2Connection != null) {
      Http2ExchangeCodec(client, this, chain, http2Connection)
    } else {
      socket.soTimeout = chain.readTimeoutMillis()
      source.timeout().timeout(chain.readTimeoutMillis.toLong(), MILLISECONDS)
      sink.timeout().timeout(chain.writeTimeoutMillis.toLong(), MILLISECONDS)
      Http1ExchangeCodec(client, this, source, sink)
    }
  }
至此,OKHttp的连接过程,就算是分析完了,当然还有很多没有涉及到,比如http2,通道的建立等等。相信熟悉了整体的过程,再去细究这些会轻松许多