
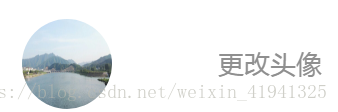
如上图所示:需要完成的功能是点击更改头像,获取本地文件库,选择图片后将原始图片替换。这里我就直接用html文件引入vue来简单实现在这功能,代码如下:
HTML:
<div id="app">
  <div class="item_bock head_p">
     <div class="head_img">
       <img :src="userInfo.avatar"/>
       <--图片地址动态绑定-->
     </div>
     <div class="setting_right" @click.stop="uploadHeadImg">
       <div class="caption">更改头像</div>
     </div>
     <input type="file" accept="image/*" @change="handleFile" class="hiddenInput"/>
   </div>
 </div>
注意:
1.accept 属性用于限制图像的格式 如:(accept=”image/gif, image/jpeg”),accept=”image/*”表示不限制格式。
2.真正打开本地文件的是input,但这里是将其隐藏的。
JS:
var app = new Vue({
  el: '#app',
  data: {
    userInfo: {
      avatar: 'https://gss0.bdstatic.com/-4o3dSag_xI4khGkpoWK1HF6hhy/baike/c0%3Dbaike92%2C5%2C5%2C92%2C30/sign=62d46c39067b020818c437b303b099b6/d4628535e5dde7119c3d076aabefce1b9c1661ba.jpg'
    }
    // 初始图片
  },
  methods: {
    // 打开图片上传
    uploadHeadImg: function () {
      this.$el.querySelector('.hiddenInput').click()
    },
    // 将头像显示
    handleFile: function (e) {
      let $target = e.target || e.srcElement
      let file = $target.files[0]
      var reader = new FileReader()
      reader.onload = (data) => {
        let res = data.target || data.srcElement
        this.userInfo.avatar = res.result
      }
      reader.readAsDataURL(file)
    },
  }
})
注意:
1.this.$el.querySelector('.hiddenInput') 是获取文档中 class=”hiddenInput” 的元素。
2.在打开文件夹选中图片确认后,执行handleFile函数
3.let $target = e.target || e.srcElement 表示调用他的各种属性,
两个的区别是:ie下支持e.srcElement,ff支持e.target。
4.由于手机上可以选择多张图片,所以let file = $target.files[0],表示取第一张图。
5.var reader = new FileReader() FileReader 对象允许Web应用程序异步读取存储在用户计算机上的文件(或原始数据缓冲区)的内容,使用 File 或 Blob 对象指定要读取的文件或数据。
6.onload 事件会在页面或图像加载完成后立即发生。
7.FileReader对象的readAsDataURL方法可以将读取到的文件编码成Data URL。
css:
.item_bock {
  display: flex;
  align-items: center;
  justify-content: space-between;
  height:94px;
  width: 300px;
  padding:0px 24px 0px 38px;
  border-bottom: 1px solid #f7f7f7;
  background: #fff;
}
.head_p {
  height:132px;
}
.head_img{
  height: 90px;
}
.head_img img{
  width:90px;
  height:90px;
  border-radius:50px
}
.setting_right{
  display: flex;
  height: 37px;
  justify-content: flex-end;
  align-items: center;
}
.hiddenInput{
  display: none;
}
.caption {
  color: #8F8F8F;
  font-size: 26px;
  height: 37px;
}
这里只是将图片显示出来,并没有保存起来,如果需要上传或者保存,需要后台接口配合
来源https://blog.csdn.net/weixin_41941325/article/details/80764680