tensorFlow见基础
实验
MNIST数据集介绍
MNIST是一个手写阿拉伯数字的数据集。
其中包含有
60000个已经标注了的训练集,还有
10000个用于测试的测试集。
本次实验的任务就是通过手写数字的图片,识别出具体写的是0-9之中的哪个数字。
理论知识回顾
 View Code
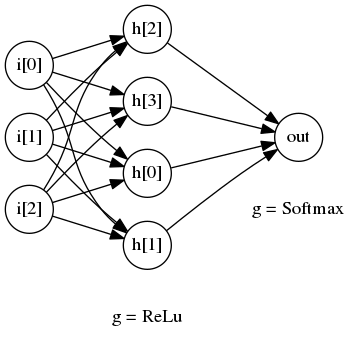
一个典型的浅层神经网络结构如下:
- 上图所示的是一个只有一层隐藏层的浅层神经网络
- 我们有3个输入层节点,分别对应
i[1]i[2]i[3] - 隐藏层有4个节点,分别对应
h[0]h[1]h[2]h[3],对应的激活函数为ReLu函数 - 对于典型的
二分类任务,我们只需要1个输出节点,就是out节点,对应的激活函数是softmax函数
激活函数定义(activation function):

模型设计
MNIST数据一共有784个输入,所以我们需要一个有784个节点的输入层。- 对于中间层,我们设置为
784个节点,使用的激活函数为ReLu MNIST数据使用One-Hot格式输出,有0-910个label,分别对应是否为数字0-9,所以我们在输出层有10个节点,由于0-9的概率是互斥的,我们使用 Softmax 函数作为该层的激活函数
数据准备
首先我们需要先下载
MNIST的数据集。使用以下的命令进行下载:
wget https://devlab-1251520893.cos.ap-guangzhou.myqcloud.com/t10k-images-idx3-ubyte.gz
wget https://devlab-1251520893.cos.ap-guangzhou.myqcloud.com/t10k-labels-idx1-ubyte.gz
wget https://devlab-1251520893.cos.ap-guangzhou.myqcloud.com/train-images-idx3-ubyte.gz
wget https://devlab-1251520893.cos.ap-guangzhou.myqcloud.com/train-labels-idx1-ubyte.gz
实例代码
import numpy as np
import tensorflow as tf
from tensorflow.examples.tutorials.mnist import input_data

def add_layer(inputs, in_size, out_size, activation_function=None):
    W = tf.Variable(tf.random_normal([in_size, out_size]))
    b = tf.Variable(tf.zeros([1, out_size]) + 0.01)

    Z = tf.matmul(inputs, W) + b
    if activation_function is None:
        outputs = Z
    else:
        outputs = activation_function(Z)

    return outputs


if __name__ == "__main__":

    MNIST = input_data.read_data_sets("./", one_hot=True)

    learning_rate = 0.05
    batch_size = 128
    n_epochs = 10

    X = tf.placeholder(tf.float32, [batch_size, 784])
    Y = tf.placeholder(tf.float32, [batch_size, 10])

    l1 = add_layer(X, 784, 1000, activation_function=tf.nn.relu)
    prediction = add_layer(l1, 1000, 10, activation_function=None)

    entropy = tf.nn.softmax_cross_entropy_with_logits(labels=Y, logits=prediction)
    loss = tf.reduce_mean(entropy)

    optimizer = tf.train.GradientDescentOptimizer(learning_rate).minimize(loss)

    init = tf.initialize_all_variables()

    with tf.Session() as sess:
        sess.run(init)

        n_batches = int(MNIST.train.num_examples/batch_size)
        for i in range(n_epochs):
            for j in range(n_batches):
                X_batch, Y_batch = MNIST.train.next_batch(batch_size)
                _, loss_ = sess.run([optimizer, loss], feed_dict={X: X_batch, Y: Y_batch})
                if j == 0:
                    print "Loss of epochs[{0}] batch[{1}]: {2}".format(i, j, loss_)

        # test the model
        n_batches = int(MNIST.test.num_examples/batch_size)
        total_correct_preds = 0
        for i in range(n_batches):
            X_batch, Y_batch = MNIST.test.next_batch(batch_size)
            preds = sess.run(prediction, feed_dict={X: X_batch, Y: Y_batch})
            correct_preds = tf.equal(tf.argmax(preds, 1), tf.argmax(Y_batch, 1))
            accuracy = tf.reduce_sum(tf.cast(correct_preds, tf.float32))

            total_correct_preds += sess.run(accuracy)

        print "Accuracy {0}".format(total_correct_preds/MNIST.test.num_examples)
代码讲解
add_layer 函数
允许用户指定上一层的输出节点的个数作为
input_size, 本层的节点个数作为
output_size, 并指定激活函数
activation_function 可以看到我们调用的时候位神经网络添加了
隐藏层1和
输出层
执行结果:

Loss of epochs[0] batch[0]: 219.555664062
Loss of epochs[1] batch[0]: 4.43757390976
Loss of epochs[2] batch[0]: 6.34549808502
Loss of epochs[3] batch[0]: 4.51894617081
Loss of epochs[4] batch[0]: 1.93666791916
Loss of epochs[5] batch[0]: 1.16164898872
Loss of epochs[6] batch[0]: 2.4195971489
Loss of epochs[7] batch[0]: 0.164100989699
Loss of epochs[8] batch[0]: 2.35461592674
Loss of epochs[9] batch[0]: 1.77732157707
Accuracy 0.9434
可以看到经过10轮的训练,准确度大约在94%左右