16路12位PWM信号发生器,节省主机资源,值得拥有。
先对单个舵机尝试一下,了解一下PWM
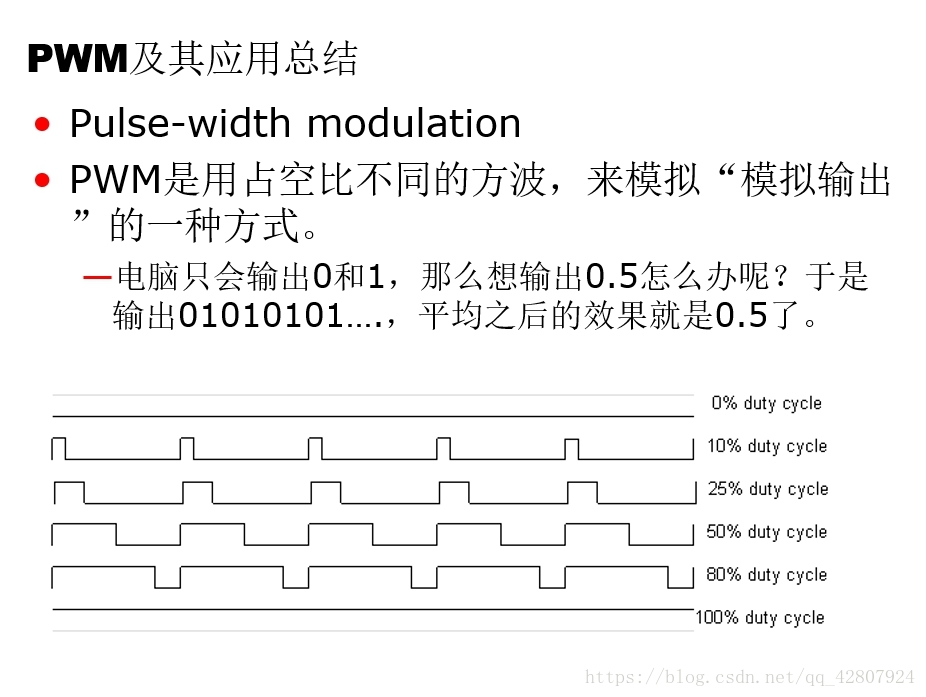
PWM
一个非常简单的舵机例子:
#include <Servo.h>
#define PIN_SERVO 10
Servo myservo;
void setup()
{
  myservo.attach(PIN_SERVO);
}
void loop()
{
  myservo.write(0);
  delay(1000);
  myservo.write(80);
  delay(1000);
  myservo.write(160);
  delay(1000);
  myservo.write(80);
  delay(1000);
  myservo.write(0);
  delay(1000);
}
#include <Servo.h>
#define PIN_SERVO 9
int i=0;
Servo myservo;
void setup()
{
  myservo.attach(PIN_SERVO);
}
void loop()
{
for(i=0;i<160;i++)
{
  myservo.write(i);
  delay(30);
}
for(i=160;i>0;i--)
{
  myservo.write(i);
  delay(30);
}
delay(1000);
}
==主要参数==
电压:DC5V供电
通信接口:I2C
产品尺寸:15+61mm
工作电压:3-5V
逻辑电压:3-5V
V+引脚:5V-6V
工作频率:40-1000HZ
==接线图==
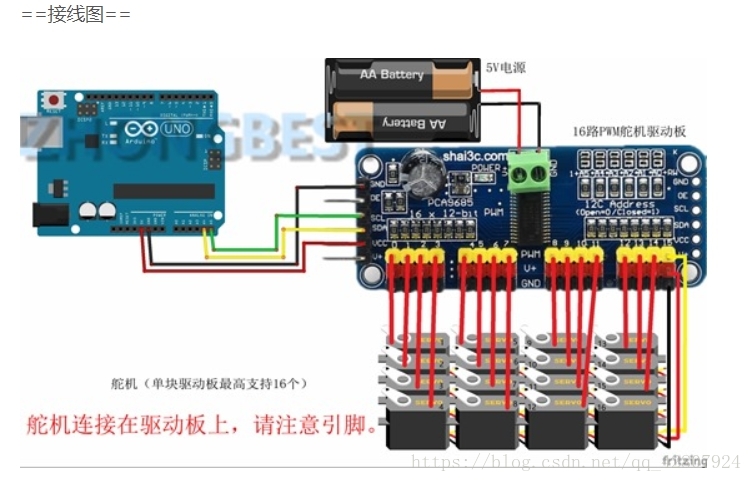
舵机 舵机驱动板
PWM(黄线) PWM(黄色)
扫描二维码关注公众号,回复:
2999123 查看本文章

VCC(红线) V+(红色)
GND(黑或褐线) GND(黑色)
==例子程序==
16路舵机同时转动。原理是定义脉宽最大和最小,通过改变0-15号舵机的脉宽大小实现角度转动
/***************************************************
  This is an example for our Adafruit 16-channel PWM & Servo driver
  Servo test - this will drive 16 servos, one after the other
  这是我们的Adafruit 16通道PWM和伺服驱动器的一个例子,驱动16个伺服电机

  Pick one up today in the adafruit shop!
  ------> http://www.adafruit.com/products/815

  These displays use I2C to communicate, 2 pins are required to
  interface. For Arduino UNOs, thats SCL -> Analog 5, SDA -> Analog 4
  这些显示器使用I2C进行通信,需要2个引脚。
  接口。对于ARDUINO UNOS,这是SCL->模拟5,SDA - >模拟4

  ****************************************************/

#include <Wire.h>
#include <Adafruit_PWMServoDriver.h>

// called this way, it uses the default address 0x40
////以这种方式调用,它使用默认地址0x40。
Adafruit_PWMServoDriver pwm = Adafruit_PWMServoDriver();
// you can also call it with a different address you want
//Adafruit_PWMServoDriver pwm = Adafruit_PWMServoDriver(0x41);
//也可以用不同的地址调用它

/* Depending on your servo make, the pulse width min and max may vary, you  want these to be as small/large as possible without hitting the hard stop
 for max range. You'll have to tweak them as necessary to match the servos you
have!*/
/*根据你的伺服制作,脉冲宽度最小和最大可能变化,你想要这些尽可能小大而不碰到
硬停止,对于最大范围。你必须调整它们以匹配你的伺服系统!*/
#define SERVOMIN  150 // this is the 'minimum' pulse length count (out of 4096)
//这是“最小”脉冲长度计数(在4096)中
#define SERVOMAX  600 // this is the 'maximum' pulse length count (out of 4096)
//这是“最大”脉冲长度计数(在4096中)

// our servo # counter
//uint8_t servonum = 0;

void setup() {
   Serial.begin(9600);
   Serial.println("16 channel Servo test!");

  pwm.begin();

   pwm.setPWMFreq(60);  // Analog servos run at ~60 Hz updates
   ////模拟伺服在60赫兹更新下运行
}

// you can use this function if you'd like to set the pulse length in seconds
// e.g. setServoPulse(0, 0.001) is a ~1 millisecond pulse width. its not precise!
//如果您想以秒为单位设置脉冲长度,则可以使用此函数。
//例如SET伺服脉冲(0,0.001)是一个1毫秒的脉冲宽度。它不是
void setServoPulse(uint8_t n, double pulse) {
   double pulselength;//精度浮点数

   pulselength = 1000000;   // 1,000,000 us per second 每秒100万
   pulselength /= 60;   // 60 Hz
   Serial.print(pulselength); Serial.println(" us per period");
   pulselength /= 4096;  // 12 bits of resolution 12位分辨率
   Serial.print(pulselength); Serial.println(" us per bit");
   pulse *= 1000;
   pulse /= pulselength;
   Serial.println(pulse);
   pwm.setPWM(n, 0, pulse);
}

void loop() {
   // Drive each servo one at a time
   //Serial.println(servonum);
   //每次驱动一个伺服驱动器
//串行打印(伺服);
   for (uint16_t pulselen = SERVOMIN; pulselen < SERVOMAX; pulselen++) {
     pwm.setPWM(0, 0, pulselen);
     pwm.setPWM(1, 0, pulselen);
     pwm.setPWM(2, 0, pulselen);
     pwm.setPWM(3, 0, pulselen);
     pwm.setPWM(4, 0, pulselen);
     pwm.setPWM(5, 0, pulselen);
     pwm.setPWM(6, 0, pulselen);
     pwm.setPWM(7, 0, pulselen);
     pwm.setPWM(8, 0, pulselen);
     pwm.setPWM(9, 0, pulselen);
     pwm.setPWM(10, 0, pulselen);
     pwm.setPWM(11, 0, pulselen);
     pwm.setPWM(12, 0, pulselen);
     pwm.setPWM(13, 0, pulselen);
     pwm.setPWM(14, 0, pulselen);

     pwm.setPWM(15, 0, pulselen);
   }
   delay(500);
   for (uint16_t pulselen = SERVOMAX; pulselen > SERVOMIN; pulselen--) {
     pwm.setPWM(0, 0, pulselen);
     pwm.setPWM(1, 0, pulselen);
     pwm.setPWM(2, 0, pulselen);
     pwm.setPWM(3, 0, pulselen);
     pwm.setPWM(4, 0, pulselen);
     pwm.setPWM(5, 0, pulselen);
     pwm.setPWM(6, 0, pulselen);
     pwm.setPWM(7, 0, pulselen);
     pwm.setPWM(8, 0, pulselen);
     pwm.setPWM(9, 0, pulselen);
     pwm.setPWM(10, 0, pulselen);
     pwm.setPWM(11, 0, pulselen);
     pwm.setPWM(12, 0, pulselen);
     pwm.setPWM(13, 0, pulselen);
     pwm.setPWM(14, 0, pulselen);

     pwm.setPWM(15, 0, pulselen);
   }
   delay(500);

}16路舵机驱动板资料(内含模块级联说明):https://pan.baidu.com/s/1gfhFGDP
例子2:
#include <Wire.h>
#include <Adafruit_PWMServoDriver.h>

// called this way, it uses the default address 0x40
Adafruit_PWMServoDriver pwm = Adafruit_PWMServoDriver();

// our servo # counter
//uint8_t servonum = 0;

void setup() {
  Serial.begin(9600);
  Serial.println("16 channel Servo test!");

  pwm.begin();

  pwm.setPWMFreq(50);  // Analog servos run at ~50 Hz updates模拟伺服运行在50赫兹更新
}

void loop() {
  //setServoPulse(0, 0.001);
  //setServoPulseMS(1, 50);
  pwm.setPin(0,0,0);
  pwm.setPin(1,4096,0);
  pwm.setPin(2,(0.5/20.0)*4096,0);
}
自带例程
/***************************************************
  This is an example for our Adafruit 16-channel PWM & Servo driver
  PWM test - this will drive 16 PWMs in a 'wave'

  Pick one up today in the adafruit shop!
  ------> http://www.adafruit.com/products/815

  These displays use I2C to communicate, 2 pins are required to
  interface. For Arduino UNOs, thats SCL -> Analog 5, SDA -> Analog 4

  Adafruit invests time and resources providing this open source code,
  please support Adafruit and open-source hardware by purchasing
  products from Adafruit!

  Written by Limor Fried/Ladyada for Adafruit Industries.
  BSD license, all text above must be included in any redistribution
这是我们的AdfRuIT 16通道PWM和伺服驱动器的一个例子。
PWM测试-这将驱动16个波姆斯在“波”
今天在AdfRuIT商店挑选一个!
------HTTP://www. AdAfRuIT.COM/PROSTS/815
这些显示器使用I2C进行通信,需要2个引脚。
接口。对于ARDUINO UNOS,这是SCL->模拟5,SDA - >模拟4
ADAFRUIT投入时间和资源来提供这个开源代码,
请通过购买支持AdfRuIT和开源硬件
来自AdfRuIT的产品!
由Limor Fray/Lajayad撰写的AdfuRIT产业。
BSD许可证,以上所有文本必须包含在任何再分配中
***********************************************/

#include <Wire.h>
#include <Adafruit_PWMServoDriver.h>
//以这种方式调用,它使用默认地址0x40。
// called this way, it uses the default address 0x40
Adafruit_PWMServoDriver pwm = Adafruit_PWMServoDriver();
// you can also call it with a different address you want
//Adafruit_PWMServoDriver pwm = Adafruit_PWMServoDriver(0x41);
//你也可以用不同的地址称呼它。
//ADAFRUITIGPWM伺服驱动器PWM=ADAFRUITIGPWM伺服驱动器(0x41);

void setup() {
  Serial.begin(9600);
  Serial.println("16 channel PWM test!");

  // if you want to really speed stuff up, you can go into 'fast 400khz I2C' mode
  // some i2c devices dont like this so much so if you're sharing the bus, watch
  // out for this!
  //如果你真的想加快速度,你可以进入“快速400千赫I2C”模式。
//一些I2C设备不太喜欢这个,所以如果你在共享公共汽车,请注意。
//为了这个!

  pwm.begin();
  pwm.setPWMFreq(1600);  // This is the maximum PWM frequency这是最大PWM频率

  // save I2C bitrate
  uint8_t twbrbackup = TWBR;
  // must be changed after calling Wire.begin() (inside pwm.begin())
  //保存I2C比特率
//必须在调用Word.No.2之后更改(内部PWM(开始))
  TWBR = 12; // upgrade to 400KHz!升级到400千赫!

}

void loop() {
  // Drive each PWM in a 'wave'
  //在“波”中驱动每个PWM
  for (uint16_t i=0; i<4096; i += 8) {
    for (uint8_t pwmnum=0; pwmnum < 16; pwmnum++) {
      pwm.setPWM(pwmnum, 0, (i + (4096/16)*pwmnum) % 4096 );
    }
  }
}