版权声明:本文为博主yellowcong原创文章,未经博主允许不得转载。 https://blog.csdn.net/yelllowcong/article/details/81064669
昨天晚上,看了两集机器学习,手痒痒了,也想学习玩,结果发现卡在了pip安装tensorflow的依赖的这一步,主要是访问google比较的慢,等了半天,最总还是ok得。
安装python
#安装python
yum install python

#安装pip
yum install python-pip python-dev python-virtualenv
创建virtualenv 环境
virtualenv --system-site-packages ~/tensorflow
cd ~/tensorflow

#激活
source bin/activate.fish
可以看到创建得~/tensorflow 得目录下,有4个文件了。

激活virtualenv

安装tensorflow
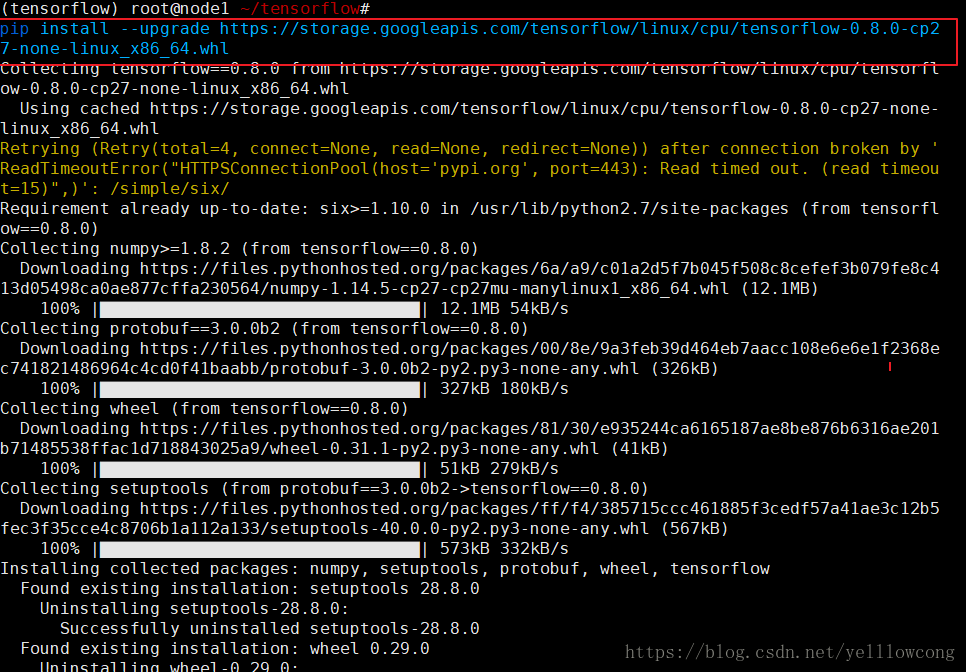
这个地方,注意版本得选择,有cpu加速的版本,有gpu加速的版本,同时,还需要注意python的版本是2.7的还是3.,
#安装cpu加速版本 python2.7
pip install --upgrade https://storage.googleapis.com/tensorflow/linux/cpu/tensorflow-0.8.0-cp27-none-linux_x86_64.whl

#
#gpu ok  Python 2.7:
pip install --upgrade https://storage.googleapis.com/tensorflow/linux/gpu/tensorflow-0.8.0-cp27-none-linux_x86_64.whl

#python 3 cpu加速
 pip install --ignore-installed --upgrade https://storage.googleapis.com/tensorflow/linux/cpu/tensorflow-0.8.0rc0-cp34-cp34m-linux_x86_64.whl

#python3 Gpu加速的版本
 pip install --ignore-installed --upgrade https://storage.googleapis.com/tensorflow/linux/gpu/tensorflow-0.8.0rc0-cp34-cp34m-linux_x86_64.whl
我这个地方,安装的是cpu加速的版本,由于我是在虚拟机下面安装的,所以需要是cpu加速的版本。
python版本查看
直接输入python,然后就可以查看python的版本了。

第二种方法,python --version

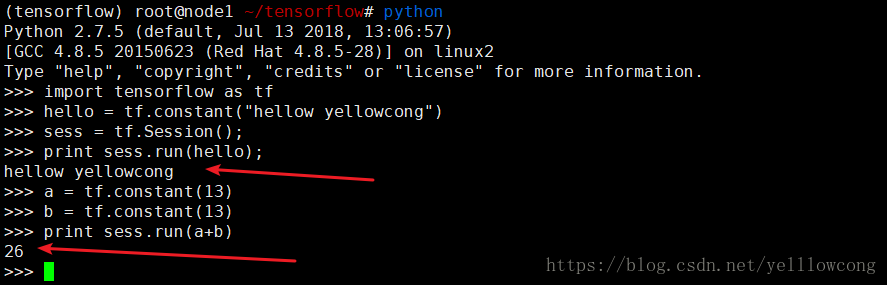
入门案例
import tensorflow as tf
hello = tf.constant("hellow yellowcong")
sess = tf.Session();
print sess.run(hello);

a = tf.constant(13)
b = tf.constant(13)
print sess.run(a+b)
简单的字符连接和加法