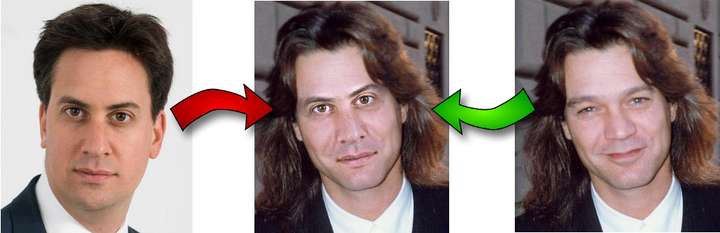
python 实现图片换脸
具体过程分为以下四步
- 识别两个图片中的面部标志
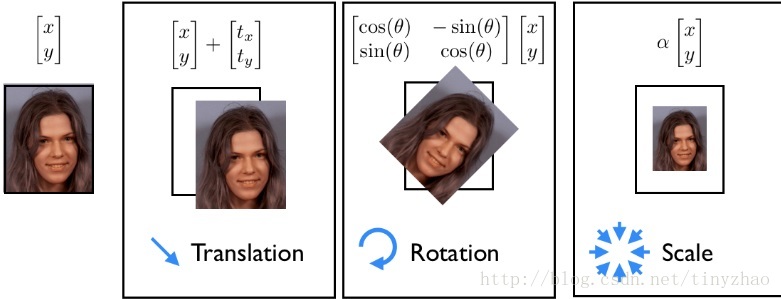
- 旋转、缩放和平移图2以是以适应图1
- 调整图2的白平衡以适应图1,即校正肤色以及匹配光线强弱
- 将调整的的图2的特征融合到图1中
1 面部标志提取
dlib提供了实现面部特征提取的接口:
PREDICTOR_PATH = "/home/matt/dlib-18.16/shape_predictor_68_face_landmarks.dat"
# The .dat file path you need to change to where you place the file

detector = dlib.get_frontal_face_detector()
predictor = dlib.shape_predictor(PREDICTOR_PATH)

def get_landmarks(im):
   rects = detector(im, 1)

   if len(rects) > 1:
       raise TooManyFaces
   if len(rects) == 0:
       raise NoFaces

return numpy.matrix([[p.x, p.y] for p in predictor(im, rects[0]).parts()])
get_landmarks 用于检测面部的关键特征点的坐标
输入:图像对应的numpy array
输出:size:(68,2) 68个面部关键点的坐标(x,y)
原理:
利用dlib.get_frontal_face_detector接口实现图片中的面部提取,返回矩形面部区域,
利用dlib.shape_predictor从面部区域中提取面部关键点(眉毛,眼睛,鼻子及嘴)的位置坐标
其中predictor 需要定义算法,算法模型由dlib.shape_predictor从.dat文件中获取。模型需要预先训练好。
该模型可在 dlib sourceforge repository上下载。
2 普式分析法(Procrustes Analysis)计算人脸对齐映射矩阵
现在我们已经有两个面部标志矩阵,其中的每一行都含有某个面部特征的坐标(如第 30 行给出了鼻尖的坐标)。
我们现在只要弄明白如何旋转、平移和缩放第一个向量的所有点,使其尽可能匹配第二个向量中的点。同理,
同样的变换可用于将第二张图叠加在第一张图上。
- 普式分析法(Procrustes Analysis)原理介绍
- 仿射变换:向量的平移、放缩及旋转变换
参考链接
基本原理:
图像的平移、放缩及旋转都是对原始图像的坐标进行计算。
普式分析法是找出对应的仿射矩阵M,使得图像2经过仿射后,面部特征点与图1的面部特征点相匹配(即接近重合)以数学形式表示:
其中,R为正交矩阵,用于对图像进行旋转映射,T用于对图像进行水平平移映射,s为标量,用于对图像进行缩放映射。
将平移、旋转及缩放的所有映射使用一个仿射矩阵M完成,如何找到映射矩阵M便是普式分析法(Procrustes Analysis)
即def transformation_from_points(points1, points2): points1 = points1.astype(numpy.float64) points2 = points2.astype(numpy.float64) c1 = numpy.mean(points1, axis=0) c2 = numpy.mean(points2, axis=0) points1 -= c1 points2 -= c2 s1 = numpy.std(points1) s2 = numpy.std(points2) points1 /= s1 points2 /= s2 U, S, Vt = numpy.linalg.svd(points1.T * points2) R = (U * Vt).T return numpy.vstack([numpy.hstack(((s2 / s1) * R, c2.T - (s2 / s1) * R * c1.T)), numpy.matrix([0., 0., 1.])])transformation_from_points()输出是矩阵M,其中的实现原理参见Procrustes Analysis
3 利用opencv及计算得到的映射矩阵对图像进行映射
  def warp_im(im, M, dshape):
   output_im = numpy.zeros(dshape, dtype=im.dtype)
   cv2.warpAffine(im,
                  M[:2],
                  (dshape[1], dshape[0]),
                  dst=output_im,
                  borderMode=cv2.BORDER_TRANSPARENT,
                  flags=cv2.WARP_INVERSE_MAP)
return output_im
cv2.warpAffine())接受三个参数,需要变换的原始图像,映射矩阵M 以及变换的图像大小(这个大小如果不和原始图像大小相同,那么函数会自动通过插值来调整像素间的关系)
4 颜色(肤色、光线)校正
COLOUR_CORRECT_BLUR_FRAC = 0.6
# get the index of left and right eyes landmarks
LEFT_EYE_POINTS = list(range(42, 48))
RIGHT_EYE_POINTS = list(range(36, 42))

def correct_colours(im1, im2, landmarks1):
   # blur_amount used to specify the kernel size we used to blur img
   blur_amount = COLOUR_CORRECT_BLUR_FRAC * numpy.linalg.norm(
                             numpy.mean(landmarks1[LEFT_EYE_POINTS], axis=0) -
                             numpy.mean(landmarks1[RIGHT_EYE_POINTS], axis=0))
   blur_amount = int(blur_amount)
   if blur_amount % 2 == 0:
       blur_amount += 1
   im1_blur = cv2.GaussianBlur(im1, (blur_amount, blur_amount), 0)
   im2_blur = cv2.GaussianBlur(im2, (blur_amount, blur_amount), 0)

   # Avoid divide-by-zero errors. Avoid the denominator equel to 0 or is close to 0
   im2_blur += 128 * (im2_blur <= 1.0)
   # colour scaling
   return (im2.astype(numpy.float64) * im1_blur.astype(numpy.float64) /
                                               im2_blur.astype(numpy.float64))
correct_colours 改变图 2 的颜色来匹配图 1,也就是用 im2 除以 im2 的高斯模糊,然后乘以 im1 的高斯模糊。在这里我们使用了颜色平衡( RGB scaling colour-correction),但不是直接使用全图的常数比例因子,而是采用每个像素的局部比例因子。
- 白平衡概念
将整个图像乘以应为白色的像素在实际像素中的值的比例值用来调整像素值的显示。Wiki-Color balance
此处用im2除以im2的高斯模糊,用于保留im2的一些原始
5 mask提取
LEFT_EYE_POINTS = list(range(42, 48))
RIGHT_EYE_POINTS = list(range(36, 42))
LEFT_BROW_POINTS = list(range(22, 27))
RIGHT_BROW_POINTS = list(range(17, 22))
NOSE_POINTS = list(range(27, 35))
MOUTH_POINTS = list(range(48, 61))
OVERLAY_POINTS = [
   LEFT_EYE_POINTS + RIGHT_EYE_POINTS + LEFT_BROW_POINTS + RIGHT_BROW_POINTS,
   NOSE_POINTS + MOUTH_POINTS,
]
# This is the GaussBlur kernel size we defined
FEATHER_AMOUNT = 11

# we will get the filled hull point by points color,this only one part of the whole landmask
def draw_convex_hull(im, points, color):
   # find the convex border points
   points = cv2.convexHull(points)
   # fill the border getting from previous step
   cv2.fillConvexPoly(im, points, color=color)

# This function will return the whole mask filled
def get_face_mask(im, landmarks):
   # mask be filled with white color and other area pixels is black
   im = numpy.zeros(im.shape[:2], dtype=numpy.float64)

   for group in OVERLAY_POINTS:
       draw_convex_hull(im,
                        landmarks[group],
                        color=1)
   # im is the single channel we need to copy it three times to get three channels img
   # then use the transpose to change the front to back ordering
   im = numpy.array([im, im, im]).transpose((1, 2, 0))

   # First make the mask pixel value equal 1, other pixels' value equal 0
   # And GaussBlur the mask
   im = (cv2.GaussianBlur(im, (FEATHER_AMOUNT, FEATHER_AMOUNT), 0) > 0) * 1.0
   # Blur again
   im = cv2.GaussianBlur(im, (FEATHER_AMOUNT, FEATHER_AMOUNT), 0)

   return im

mask = get_face_mask(im2, landmarks2)
# need to affine the im2 mask img to adapt to im1
warped_mask = warp_im(mask, M, im1.shape)
# the pixels beside mask is black(equal 0),
# we took the max value between im1 im2 mask, we can finally get the apropriate mask
combined_mask = numpy.max([get_face_mask(im1, landmarks1), warped_mask],
axis=0)- 常规的 get face mask() 函数定义是:为一张图像和一个标志矩阵生成一个蒙版。蒙版会画出两个白色的凸多边形:一个是眼睛周围的区域,一个是鼻子和嘴部周围的区域。之后,蒙版的边缘区域向外羽化 11 个像素,这可以帮助消除剩下的不连续部分。
- 为图 1 图 2 生成面部蒙版。使用与步骤 2 中的转换,可以使图 2 的蒙版转换至图 1 的坐标空间。
- 之后,对所有元素取最大值操作,将这两个蒙版合二为一。这样做是为了保证图 1 的特征也能被覆盖的同时图 2 特征能显示出来
6 最后的图像叠加
output_im = im1 * (1.0 - combined_mask) + warped_corrected_im2 * combined_mask
得到的combined_mask 是mask值为1周围值为0的图像,从图像1中提取出mask以外的部分,同时使mask区域值为0,从图像2中提取出mask对应的区域像素点,使其余值为0,两者相加,从为得到最后的换脸结果图
