因为最近要做一个学校的项目,重新复习一下富文本编辑器的使用
1.下载kindeditor :直接去官网下载
2.导入
下载解压完之后是这样的:</br>
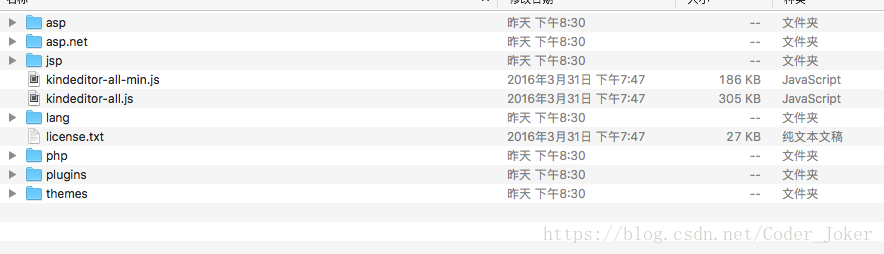
除了asp,asp.net,php 其余的直接ctrl+v 到webapp下 即可
3.引入:
<script type="text/javascript" src="../../kindeditor-all.js"></script>
<script type="text/javascript" src="../../lang/zh-CN.js"></script>
src依具体的文件位置而定
4.
初始化:
<script type="text/javascript">
 initkindEditor();
 function initkindEditor() {
     KindEditor.ready(function (K) {
         var editor = K.create('#demo', {
             themeType: "simple",
             uploadJson: '/upload',
             resizeType: 1,
             pasteType: 2,
             syncType: "",
             filterMode: true,
             allowPreviewEmoticons: false,
             items: [
                    'source', 'undo', 'redo', 'plainpaste', 'wordpaste', 'clearhtml', 'quickformat',
                    'selectall', 'fullscreen', 'fontname', 'fontsize', '|', 'forecolor', 'hilitecolor',
                    'bold', 'italic', 'underline', 'hr', 'removeformat', '|', 'justifyleft', 'justifycenter',
                    'justifyright', 'insertorderedlist', 'insertunorderedlist', '|', 'link', 'image','multiimage',
                    'unlink', 'baidumap', 'emoticons'
                ],
             afterCreate: function () {
                 this.sync();
             },
             afterBlur: function () {
                 this.sync();
             },
             afterChange: function () {
                //富文本输入区域的改变事件,一般用来编写统计字数等判断
                  K('.word_count1').html("最多20000个字符,已输入" + this.count() + "个字符");
             },
             afterUpload:function(url){
               //上传图片后的代码
             },
             allowFileManager: false,
             allowFlashUpload: false,
             allowMediaUpload: false,
             allowFileUpload: false
         });
     });
 }
 </script>
5.调用:
<textarea cols="0" rows="5" name="content" class="form-control" id="demo" style="margin: 0px -0.5px 0px 0px; height: 250px; width: 100%;">
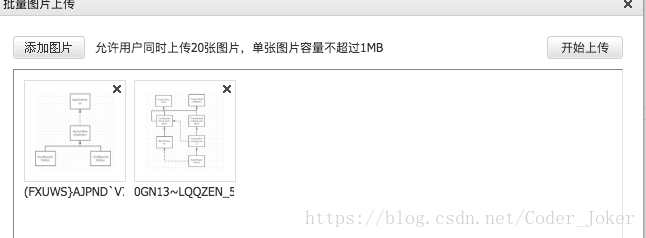
</textarea>文件图片上传:
注意我们在上面初始化时候写的 :'/upload' 后端的代码是这样的:
代码很粗陋异常什么的都没catch,只是为了快速复习一下,因此各位自行补全,但是能完成上传,同时多图片上传也能成功,当多图片上传,点击开始上传的时候:
	@RequestMapping("/upload")
	@ResponseBody
	public void upload(@RequestParam("imgFile")MultipartFile file, HttpServletRequest request,HttpServletResponse response) throws FileUploadException, IOException
	{

		MultipartHttpServletRequest request2=(MultipartHttpServletRequest) request;

		PrintWriter writer = response.getWriter();
		if(!file.isEmpty())
		{
			String realPath = request.getServletContext().getRealPath("/");
			String savePath=realPath+"imgs/";
			SimpleDateFormat  simpleDateFormat=new SimpleDateFormat("yyyyMMdd");
			String dateName = simpleDateFormat.format(new Date());
			savePath+=File.separator+dateName;
			File file2=new File(savePath);
			if(!file2.exists())
			{
				file2.mkdirs();
			}
			String name = UUID.randomUUID().toString().substring(0,5);
			String suffix = file.getOriginalFilename().substring(file.getOriginalFilename().lastIndexOf('.'));
			File newFile=new File(savePath+File.separator+name+suffix);
			if(!newFile.exists())
			{
				newFile.createNewFile();
			}
			file.transferTo(newFile);
			JSONObject jsonObject=new JSONObject();
			jsonObject.put("error", 0);
			jsonObject.put("url", request.getContextPath()+"/imgs/"+dateName+"/"+newFile.getName());
			writer.write(jsonObject.toString());
		}
	}