mac上安装nginx
安装与启动
安装
brew install nginx命令
通过 Homebrew 下载的软件默认位置在 /usr/local/Cellar

应该ln-s 加连接就能全局

nginx -h 查看 nginx 命令参数
nginx -s reopen | quit | reload | stop 开启 退出 重启 停止
nginx -t 测试配置文件是否正确
安装:brew install nginx 或者 sudo brew install nginx
启动:brew services start nginx 或者 sudo brew services start nginx
重启:brew services restart nginx 或者 sudo brew services restart nginx
停止:brew services stop nginx 或者 sudo brew services stop nginx
查看:cat /usr/local/etc/nginx/nginx.conf
编辑:vi /usr/local/etc/nginx/nginx.conf
/usr/local/var/www (服务器默认路径)
nginx -t -c /etc/nginx/nginx.conf 可以检查配置
nginx -s reload -c /etc/nginx/nginx.conf 重新导入配置Nginx 默认8080端口
简单配置-设置缓存-配置https
include servers/*.conf; include可以添加子文件
#http进来的转发发https
server {
    # 域名进来
    listen 80 default_server;
    # ip进来
    listen [::]:80 default_server;
    server_name test.com
    # 重定向到https
    return 302 https://$server_name$redirect_uri
}


# 设置缓存
proxy_cache_path cache levels=1:2 keys_zone=my_test_cache:10m;
# /usr/local/var/www
server {
    listen 8081;
    # 通过host来判断进入那个配置,那样端口80就可以代理到不同的地方
    server_name test.com;

    #
    charset koi8 - r;

    # 日志
    access_log logs / host.access.log main;

    # 代理
    location / {
        # 使用代理缓存
        proxy_cache my_test_cache;
        proxy_pass http://127.0.0.1:8888;
        # 重写host,不然通过nginx,会把浏览器的头改成中间代理
        proxy_set_header Host $host;
    }

    #
    error_page 404 / 404. html;

    #
    redirect server error pages to the static page / 50 x.html#
    error_page 500 502 503 504 / 50 x.html;
    location = /50x.html {
        root html;
    }
}


server{
#比起默认的80 使用了443 默认 是ssl方式  多出default之后的ssl
   listen 443 default ssl;
#default 可省略
#开启  如果把ssl on;这行去掉,ssl写在443端口后面。这样http和https的链接都可以用
    ssl on;
#证书(公钥.发送到客户端的)
    ssl_certificate ssl/server.crt;
#私钥,
    ssl_certificate_key ssl/server.key;
#下面是绑定域名
    server_name www.baidu.com;
    location / {
#禁止跳转
     proxy_redirect off;
#代理淘宝
proxy_pass https://www.tao.com/;
    }
}
学习课程的前提准备
//安装扩展
yum -y install gcc gcc-c++ autoconf pcre pcre-devel make automake
//安装工具
yum -y install wget httpd-tools vim
//初始化目录
cd /opt;mkdir app download logs work backup
//查看安装
yum list | grep gcc
//查看iptables的列表
iptables -L
//关闭iptables
iptables -F
iptables -t nat -L
iptables -t nat -F
getenforce
nginx基础
nginx的中间件架构

nginx简述
nginx是一个开源且高性能、可靠的http中间件、代理服务。
常见的http服务
- httpd-Apache基金会
- iis-微软
- gws-google
为什么选择nginx
原因1、IO多路复用epoll
- 什么IO多路复用
多个描述符的I/O操作都能在一个线程内并发交替地顺序完成,这就是叫I/O多路复用,这里复用指的就是复用一个线程 - 什么事epoll
IO多路复用的实现方式select、poll、epoll

slect的缺点
1、能够监视文件描述符的数量存在最大限制2、线性扫描效率低下epoll模型
1、每当FD就绪,采用系统的回调函数之间将fd放入,效率更高2、最大连接无限制
原因2、轻量级
- 功能模块少
- 代码模块化
原因3、cpu亲和
cpu亲和是一种把cpu核心和nginx工作进程绑定方式,把每个worker进程固定在一个cpu上执行减少切换cpu和cache miss,获得更好的性能。
原因3、sendfile


nginx安装
1、一般使用稳定版安装
新建yum源
vim /etc/yum.repos.d/nginx.repo

新建的内容,修改系统和系统版本
[nginx]
name=nginx repo
baseurl=http://nginx.org/packages/centos/7/$basearch/
gpgcheck=0
enabled=1


可以查看 yum list | grep nginx

安装  yum install nignx

nginx -v
2、安装目录
命令 rpm -ql nginx

/etc/logrotate.d/nginx
/etc/nginx
/etc/nginx/conf.d
/etc/nginx/conf.d/default.conf
/etc/nginx/fastcgi_params
/etc/nginx/koi-utf
/etc/nginx/koi-win
/etc/nginx/mime.types
/etc/nginx/modules
/etc/nginx/nginx.conf
/etc/nginx/scgi_params
/etc/nginx/uwsgi_params
/etc/nginx/win-utf
/etc/sysconfig/nginx
/etc/sysconfig/nginx-debug
/usr/lib/systemd/system/nginx-debug.service
/usr/lib/systemd/system/nginx.service
/usr/lib64/nginx
/usr/lib64/nginx/modules
/usr/libexec/initscripts/legacy-actions/nginx
/usr/libexec/initscripts/legacy-actions/nginx/check-reload
/usr/libexec/initscripts/legacy-actions/nginx/upgrade
/usr/sbin/nginx
/usr/sbin/nginx-debug
/usr/share/doc/nginx-1.14.0
/usr/share/doc/nginx-1.14.0/COPYRIGHT
/usr/share/man/man8/nginx.8.gz
/usr/share/nginx
/usr/share/nginx/html
/usr/share/nginx/html/50x.html
/usr/share/nginx/html/index.html
/var/cache/nginx
/var/log/nginx
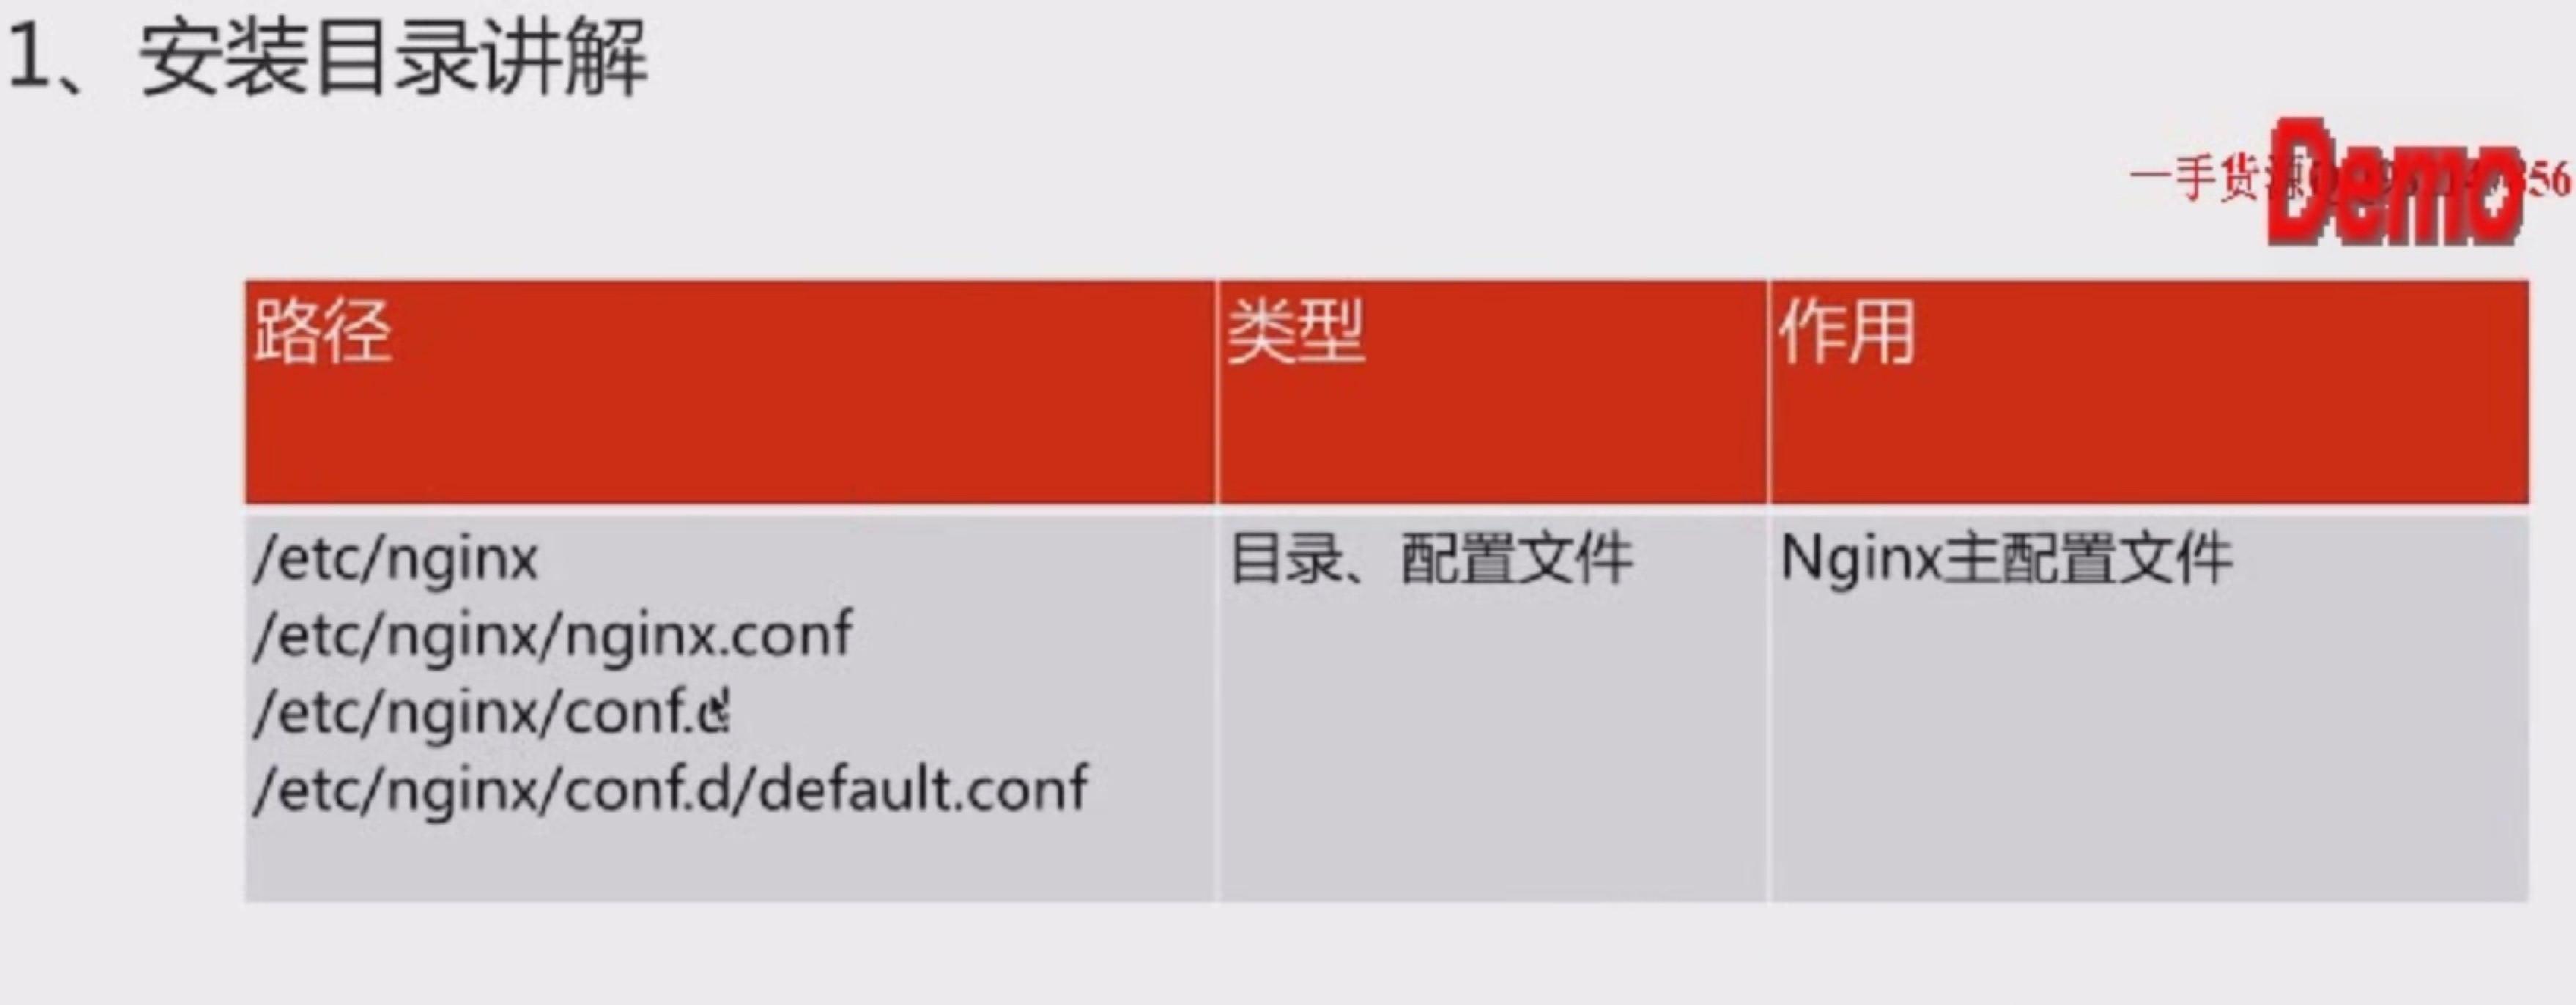


3、编译参数
nginx -V

nginx version: nginx/1.14.0
built by gcc 4.8.5 20150623 (Red Hat 4.8.5-16) (GCC)
built with OpenSSL 1.0.2k-fips  26 Jan 2017
TLS SNI support enabled
configure arguments: --prefix=/etc/nginx --sbin-path=/usr/sbin/nginx --modules-path=/usr/lib64/nginx/modules --conf-path=/etc/nginx/nginx.conf --error-log-path=/var/log/nginx/error.log --http-log-path=/var/log/nginx/access.log --pid-path=/var/run/nginx.pid --lock-path=/var/run/nginx.lock --http-client-body-temp-path=/var/cache/nginx/client_temp --http-proxy-temp-path=/var/cache/nginx/proxy_temp --http-fastcgi-temp-path=/var/cache/nginx/fastcgi_temp --http-uwsgi-temp-path=/var/cache/nginx/uwsgi_temp --http-scgi-temp-path=/var/cache/nginx/scgi_temp --user=nginx --group=nginx --with-compat --with-file-aio --with-threads --with-http_addition_module --with-http_auth_request_module --with-http_dav_module --with-http_flv_module --with-http_gunzip_module --with-http_gzip_static_module --with-http_mp4_module --with-http_random_index_module --with-http_realip_module --with-http_secure_link_module --with-http_slice_module --with-http_ssl_module --with-http_stub_status_module --with-http_sub_module --with-http_v2_module --with-mail --with-mail_ssl_module --with-stream --with-stream_realip_module --with-stream_ssl_module --with-stream_ssl_preread_module --with-cc-opt='-O2 -g -pipe -Wall -Wp,-D_FORTIFY_SOURCE=2 -fexceptions -fstack-protector-strong --param=ssp-buffer-size=4 -grecord-gcc-switches -m64 -mtune=generic -fPIC' --with-ld-opt='-Wl,-z,relro -Wl,-z,now -pie'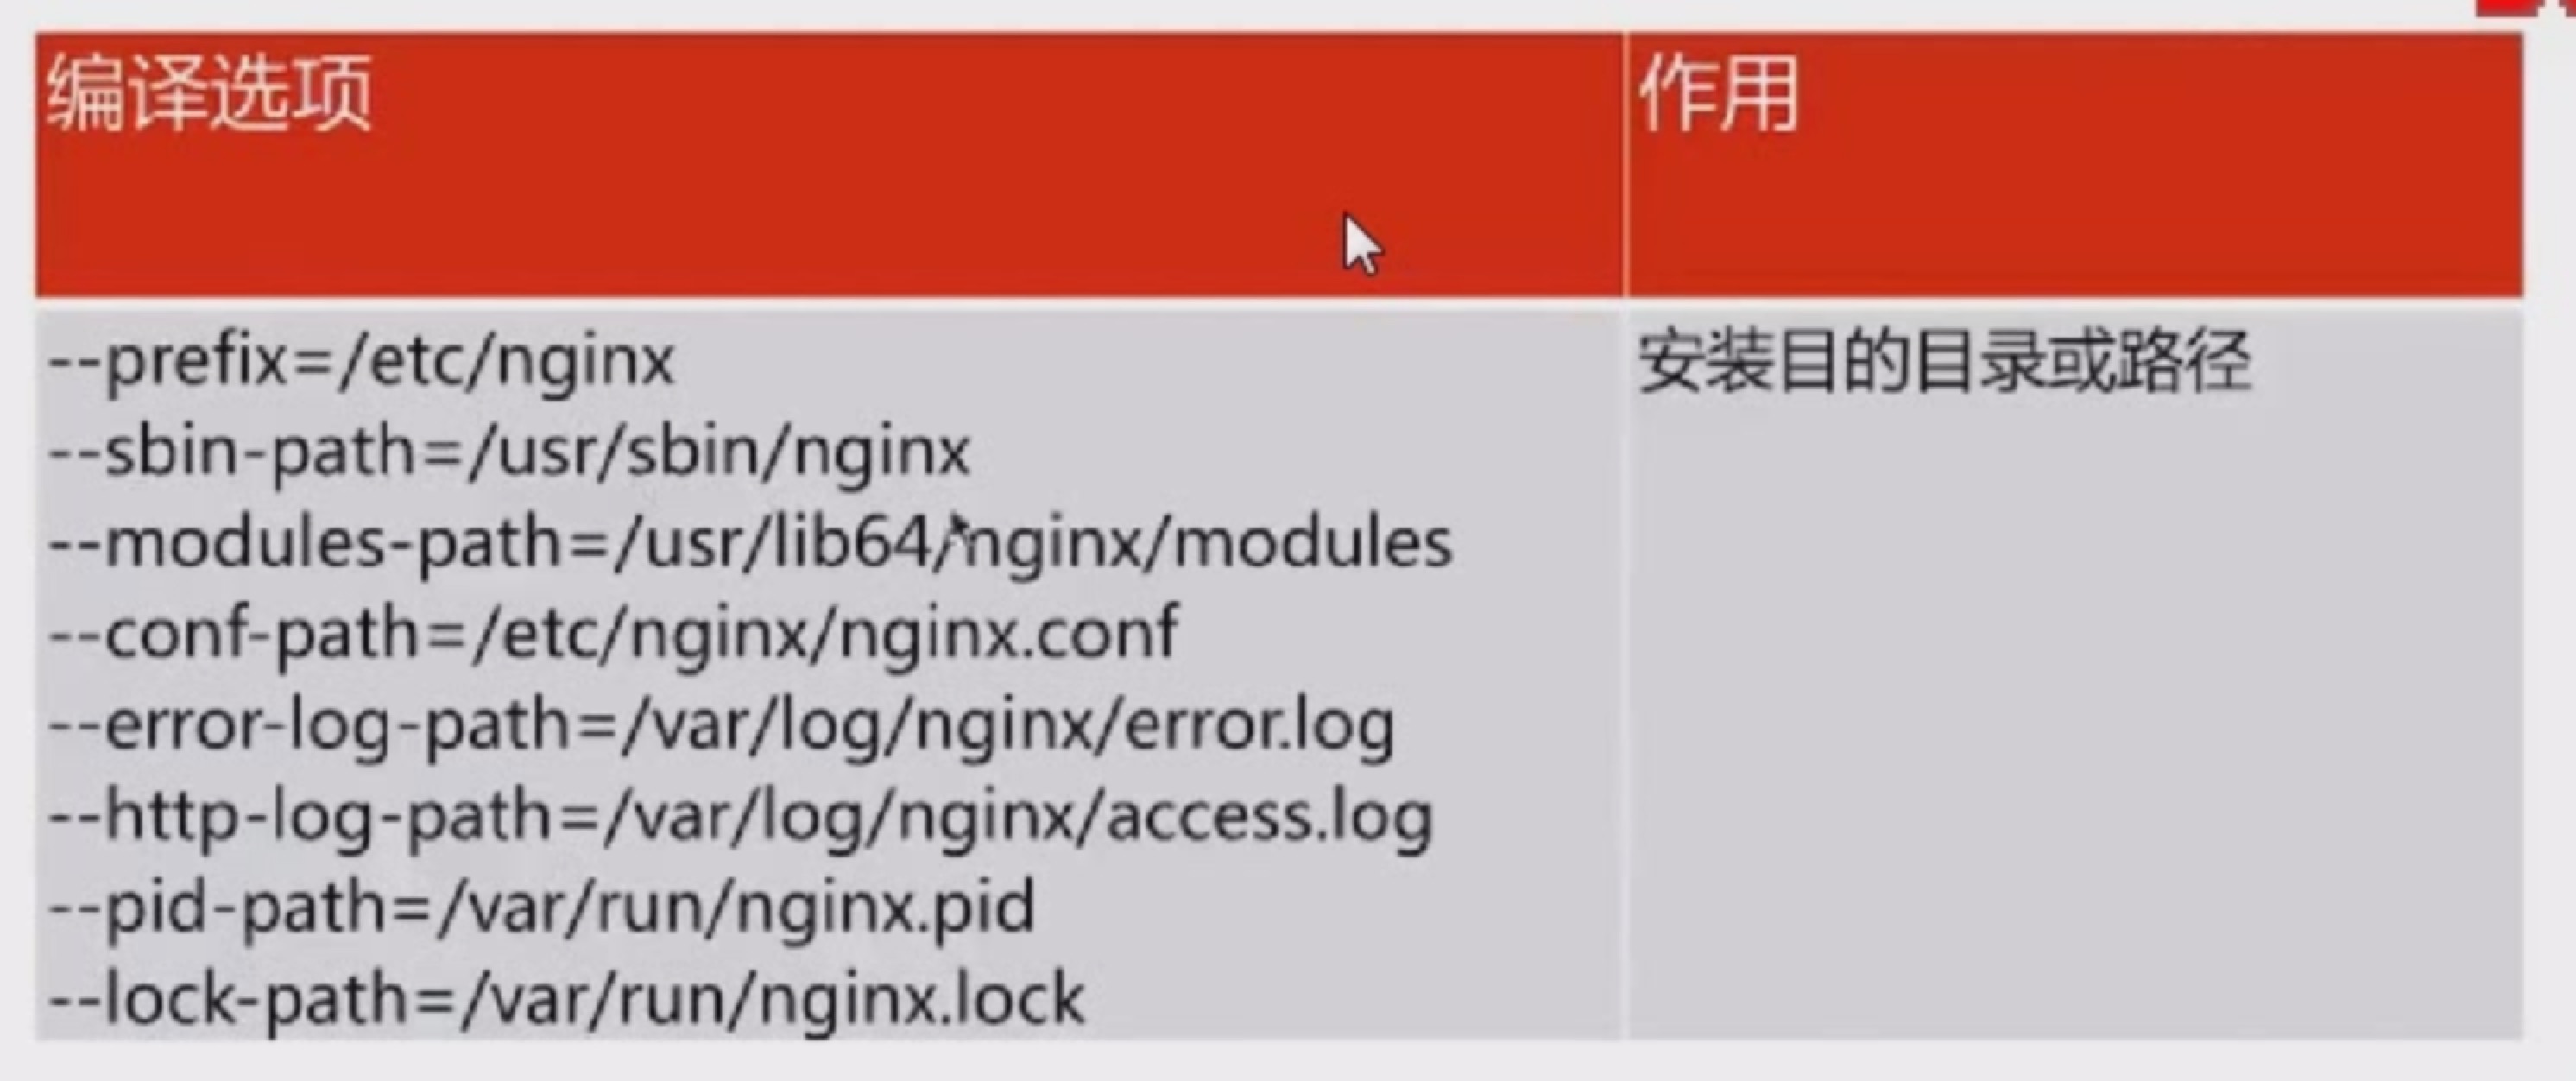
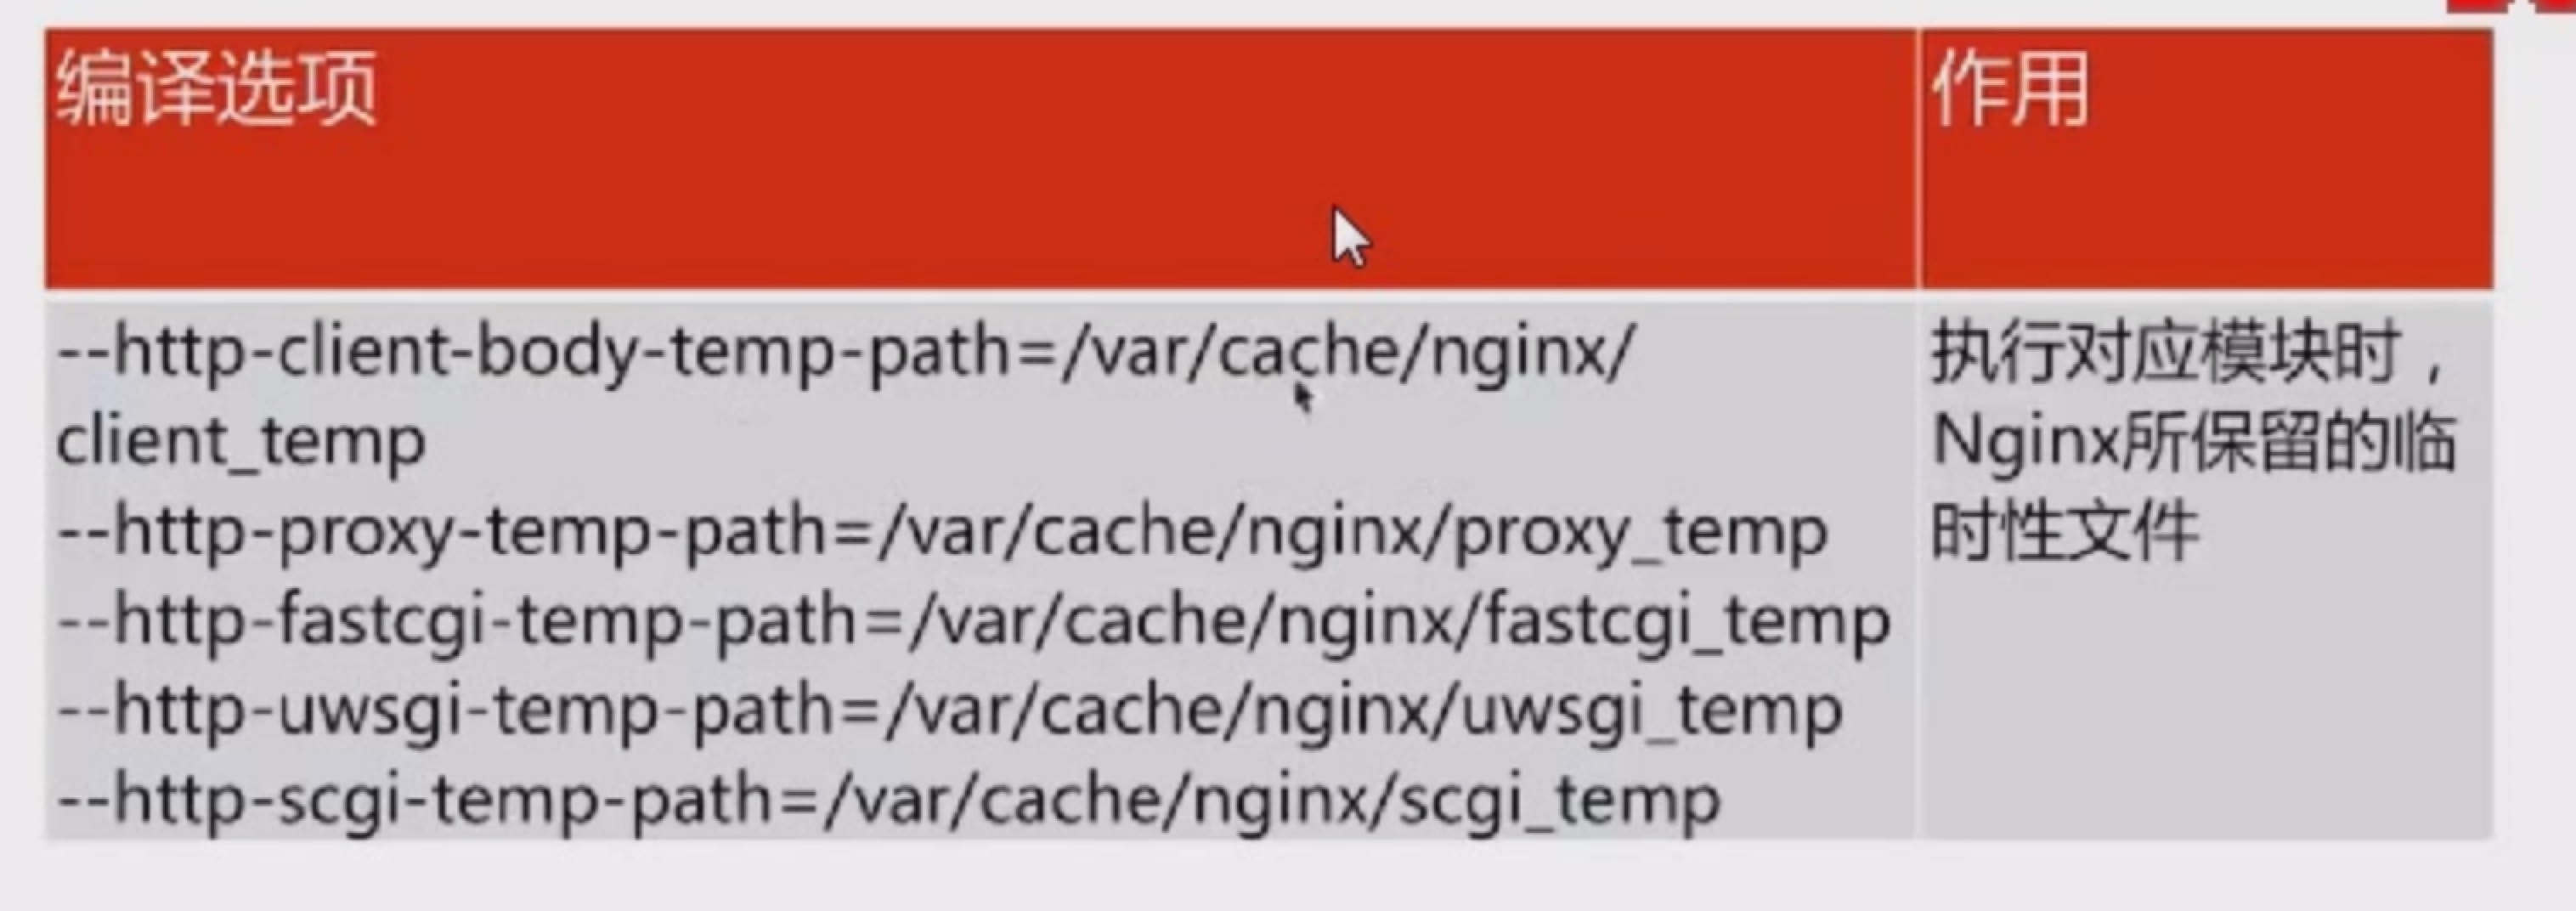


4、nginx基本配置语法
#user  nobody;
worker_processes  1;

#error_log  logs/error.log;
#error_log  logs/error.log  notice;
#error_log  logs/error.log  info;

#pid        logs/nginx.pid;


events {
    worker_connections  1024;
}


http {
    include       mime.types;
    default_type  application/octet-stream;

    #log_format  main  '$remote_addr - $remote_user [$time_local] "$request" '
    #                  '$status $body_bytes_sent "$http_referer" '
    #                  '"$http_user_agent" "$http_x_forwarded_for"';

    #access_log  logs/access.log  main;

    sendfile        on;
    #tcp_nopush     on;

    #keepalive_timeout  0;与客户端的连接时间
    keepalive_timeout  65;

    #gzip  on;

    #可以定义多个server
    server {
        listen       80;
        server_name  localhost;

        #charset koi8-r;

        #access_log  logs/host.access.log  main;

        location /api{
            proxy_pass http://127.0.0.1:3000;
        }
        location /{
            root /home/chenjinxin/www/weather-hl/datanews/;
        }

        #error_page  404              /404.html;

        # redirect server error pages to the static page /50x.html
        #
        error_page   500 502 503 504  /50x.html;
        location = /50x.html {
            root   html;
        }

        # proxy the PHP scripts to Apache listening on 127.0.0.1:80
        #
        #location ~ \.php$ {
        #    proxy_pass   http://127.0.0.1;
        #}

        # pass the PHP scripts to FastCGI server listening on 127.0.0.1:9000
        #
        #location ~ \.php$ {
        #    root           html;
        #    fastcgi_pass   127.0.0.1:9000;
        #    fastcgi_index  index.php;
        #    fastcgi_param  SCRIPT_FILENAME  /scripts$fastcgi_script_name;
        #    include        fastcgi_params;
        #}

        # deny access to .htaccess files, if Apache's document root
        # concurs with nginx's one
        #
        #location ~ /\.ht {
        #    deny  all;
        #}
    }


    # another virtual host using mix of IP-, name-, and port-based configuration
    #
    #server {
    #    listen       8000;
    #    listen       somename:8080;
    #    server_name  somename  alias  another.alias;

    #    location / {
    #        root   html;
    #        index  index.html index.htm;
    #    }
    #}


    # HTTPS server
    #
    #server {
    #    listen       443 ssl;
    #    server_name  localhost;

    #    ssl_certificate      cert.pem;
    #    ssl_certificate_key  cert.key;

    #    ssl_session_cache    shared:SSL:1m;
    #    ssl_session_timeout  5m;

    #    ssl_ciphers  HIGH:!aNULL:!MD5;
    #    ssl_prefer_server_ciphers  on;

    #    location / {
    #        root   html;
    #        index  index.html index.htm;
    #    }
    #}

}
5、http请求
客户端与服务端交互
request 包括请求行、请求头部、请求数据
response 包括状态行、信息报头、响应正文
6、nginx日志状态
包括:error.log(error级别) access_log(每一次访问)
- 使用log_format来配置
- 位置只能配置在http下面
#error_log  logs/error.log;
#error_log  logs/error.log  notice;
#error_log  logs/error.log  info;
#access_log logs/host.access.log main; 可以通过内置变量来保存成特定的格式7、nginx变量
- HTTP请求- arg_PARAMETER http_HEADER sent_http_HEADER
- 内置变量- Nginx内置的 自己查
- 自定义变量- 自己定义
    # 定义一个main在access_log 记录
    log_format  main  '$remote_addr - $remote_user [$time_local] "$request" '
                      '$status $body_bytes_sent "$http_referer" '
                     '"$http_user_agent" "$http_x_forwarded_for"';

    access_log  logs/access.log  main;
8、nginx模块讲解
- 官方模块
--with-http_stub_status_module  nginx的客户端状态
http_stub_status_module的配置
syntax: stub_status;
default: 无;
context: server, location

lccation /mystatus{
    stub_status;
}

--with-http_random_index_module 目录中选择一个随机主页
random_index_module的配置
syntax: random_index on | off;
default: random_index off;
context: location

location / {
    root /usr/share/nginx/html;
    random_index on;
}

---with-http_sub_module  HTTP内容替换
http_sub_module的配置
syntax: sub_filter string(要替换的内容) replacement(替换的内容);
default: 无;
context: http,server,loaction

location /{
    root /opt/app/code;
    index index.html index.html;
    sub_filter '<a>c' '<a>d';//只替换了一个
    sub_filter_once off;//全替换
}

syntax: sub_filter_last_modified on | off; // 校验last_modified
default: sub_filter_last_modified off;
context: http,server,loaction

syntax: sub_filter_once on | off; // 是匹配第一个还是所有都匹配,on就是第一行
default: sub_filter_once on;
context: http,server,loaction- 第三方模块
nginx的请求限制
连接频率限制 - limit_conn_module
请求频率限制 - limit_req_module
| http协议版本 | 连接关系 |
|---|---|
| http1.0 | tcp不能复用 |
| http1.1 | 顺序性tcp复用 主流 |
| http2.0 | 多路复用tcp复用 |
- http请求建立在一次tcp连接基础上
- 一次tcp请求至少产生一次http连接
限制连接
syntax: limit_conn_zone key zone=name:size; // key可以是ip等,zone就是空间的名字  size就是大小比如20m
default: 无;
context: http

syntax: limit_conn zone number; // 配合上面定义的zone的名字 number就是数量
default: 无;
context: http,server,location
请求限制
syntax: limit_req_zone key zone=name:size rate=rate; // key可以是ip等,zone就是空间的名字  size就是大小比如20m rate是速率
default: 无;
context: http

syntax: limit_req zone=name [burst=number][nodelay]; // 配合上面定义的zone的名字 number就是数量
default: 无;
context: http,server,location
limit_conn_zone $binanry_remote_addr zone=conn_zone:1m;
limit_req_zone $binary_remtoe_addr zone=req_zone:1m rate=1r/s;
location / {
root /opt/app/code;
limit_conn conn_zone 1;
#limit_req zone=req_zone burst=3 nodelay;
#limit_req zone=req_zone burst=3;
#limit_req zone=req_zone;
}Nginx的访问控制
- 基于ip的访问控制 - http_access_module
- 基于用户的信任登录 - http_auth_basic_module
http_access_module
允许
syntax: allow address|CIDR(网段)|unix:|all;
default: 无;
context: http,server,location,limit_except
不允许
syntax: deny address|CIDR(网段)|unix:|all;
default: 无;
context: http,server,location,limit_except
例子
location ~ ^/admin.html {
    root /opt/app/code;
    deny 222.128.189.17;
    allow all;
    index index.html index.html;
}
局限性

通过代理访问,ip1别ip2替代
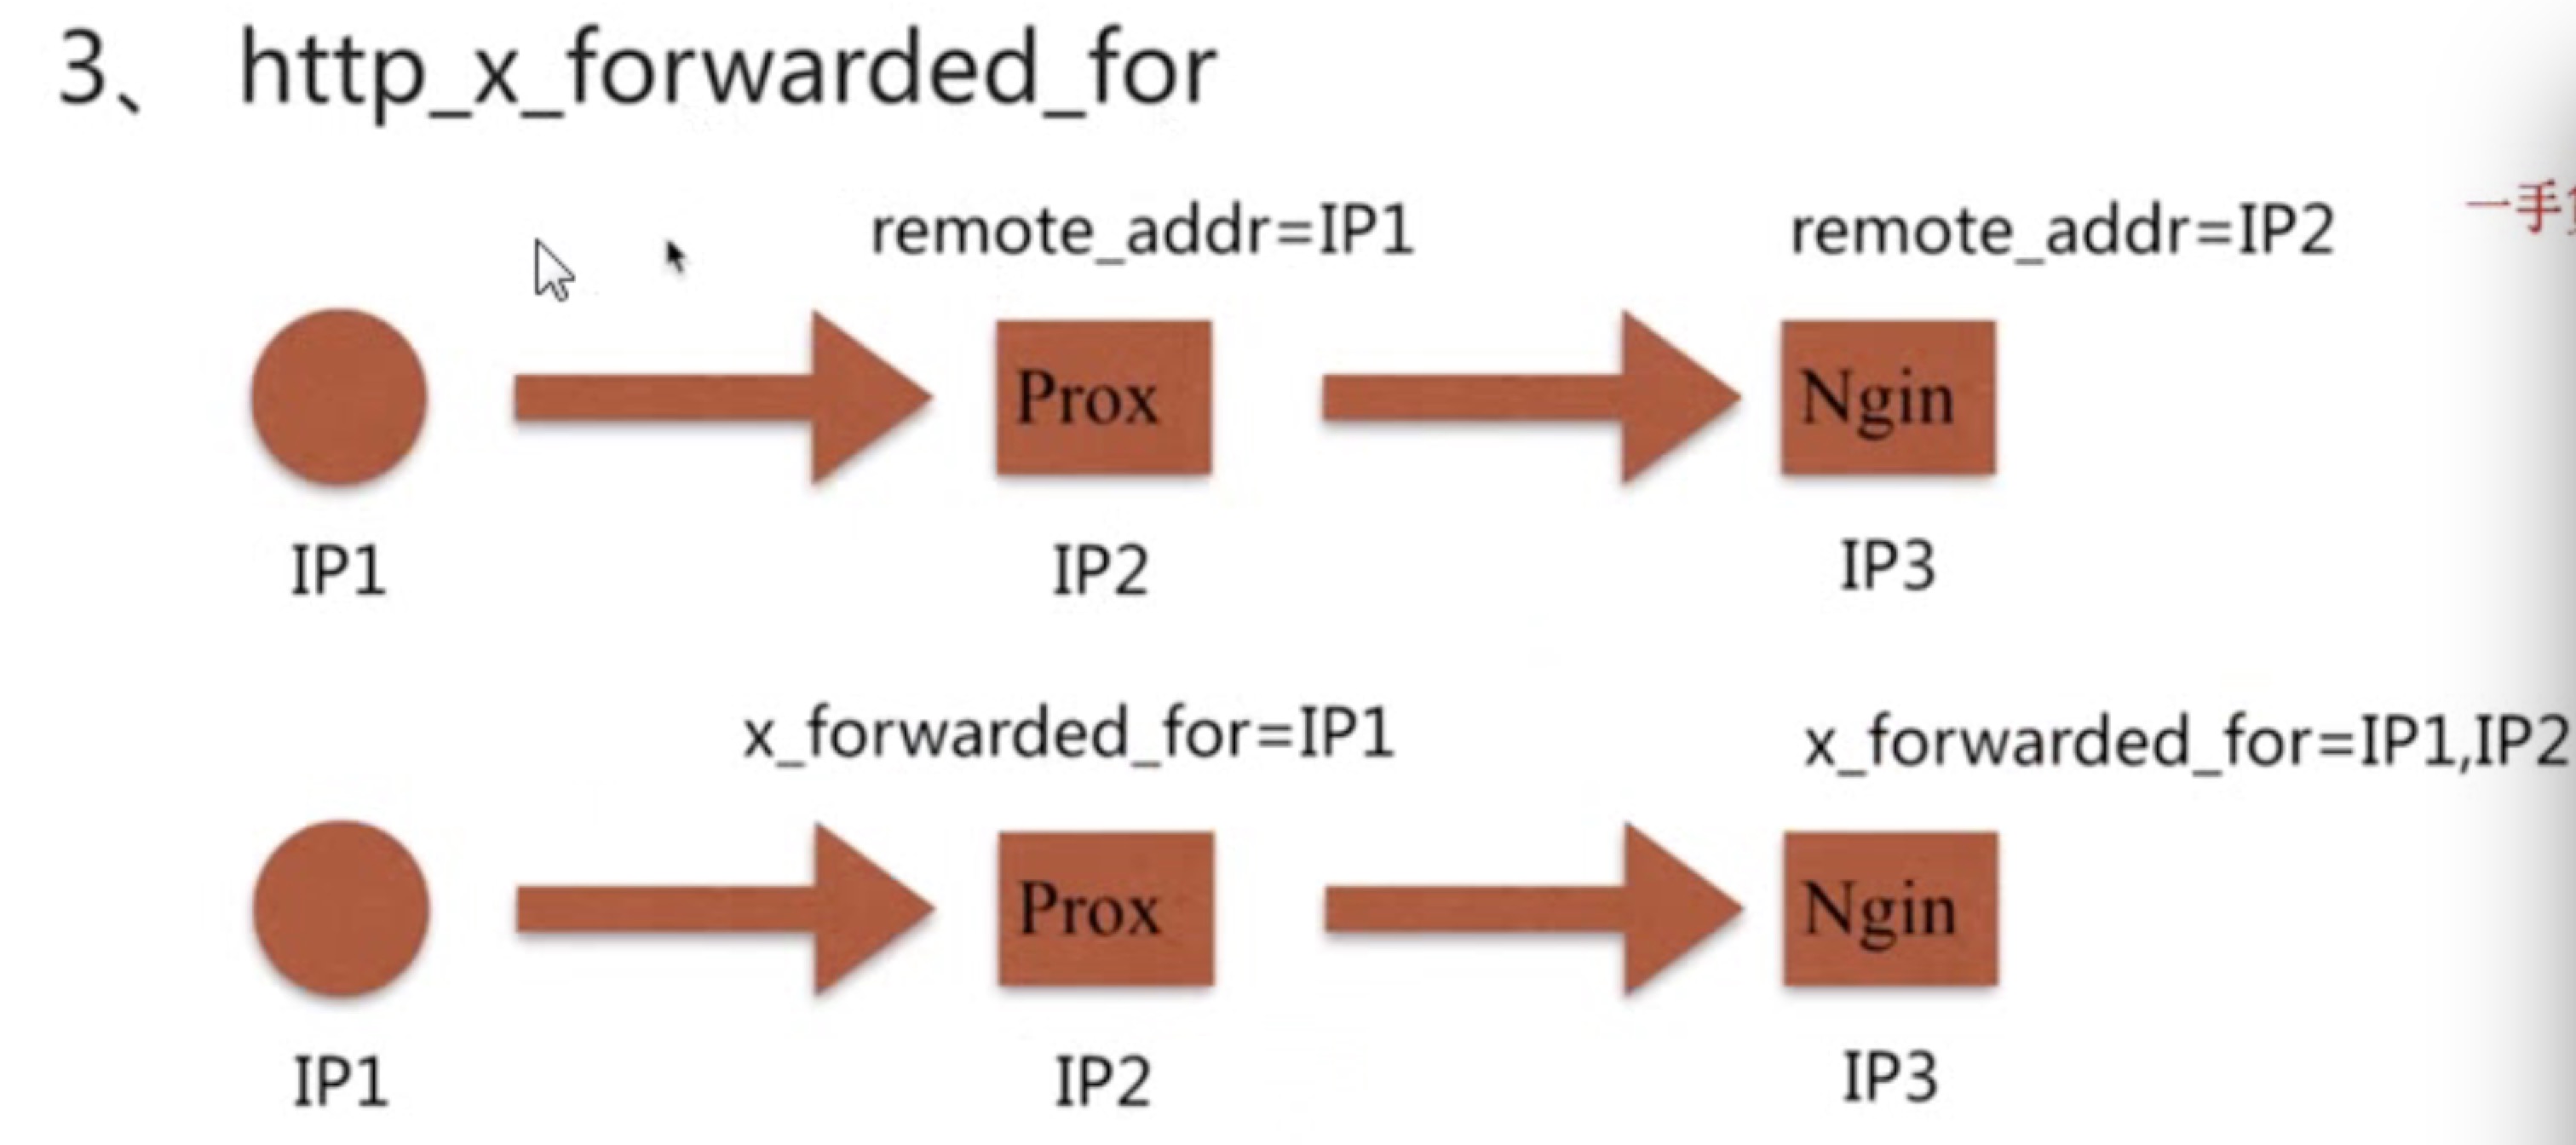
http_x_forwarded_for = Client IP, Proxy(1) IP, Proxy(2) IP, ..解决的方法
- 采用别的http头信息控制访问,如:HTTP_X_FORWARD_FOR
- 结合geo模式
- 通过HTTP自定义变量传递
http_auth_basic_module
syntax: auth_basic string | off;
default: auth_basic off;
context: http,server,location,limit_except
syntax: auth_basic_user_file file;
default: ;
context: http,server,location,limit_except例子
location ~ ^/admin.html {
    root /opt/app/code;
    auth_basic "Auth access test!input your password!";
    auth_basic_user_file /etc/nginx/auth_conf;# 文件
    index index.html index.html;
}
局限性
- 用户信息依赖文件方式
- 操作管理机械,效率低下
解决方案
- nginx解决lua实现高效验证
- nginx和ldap打通,来解决
进阶学习
- 静态资源web服务
- 代理服务
- 负载均衡调度器SLB
- 动态缓存
十、静态资源web服务
一般的web服务

静态资源服务cdn
配置语法----文件读取
syntax: sendfile on|off;
default: sendfile off;
context: http,server,location,if in location
引读:----with-file-aio 异步文件读取
配置语法----tcp_nopush
syntax: tcp_nopush on|off;
default: tcp_nopush off;
context: http,server,location
作用:Sendfile开启的情况下,提高网络包的传输效率
配置语法----tcp_nodelay
syntax: tcp_nodelay on|off;
default: tcp_nodelay on;
context: http,server,location
作用:keepalive联系下,提高网络包的传输实时性
配置语法----压缩
syntax: gzip on|off;
default: gzip off;
context: http,server,location,if in location
压缩比例
syntax: gzip_comp_level level;
default: gzip_comp_level 1;
context: http,server,location
gzip版本
syntax: gzip_http_version 1.0|1.1;
default: gzip_http_version 1.1;
context: http,server,location
http_gzip_static_module - 预读gzip功能
http_gunzip_module - 应用支持gunzip的压缩方式作用:压缩传输
浏览器缓存
HTTP协议定义的缓存机制(如: expires; cache-control)
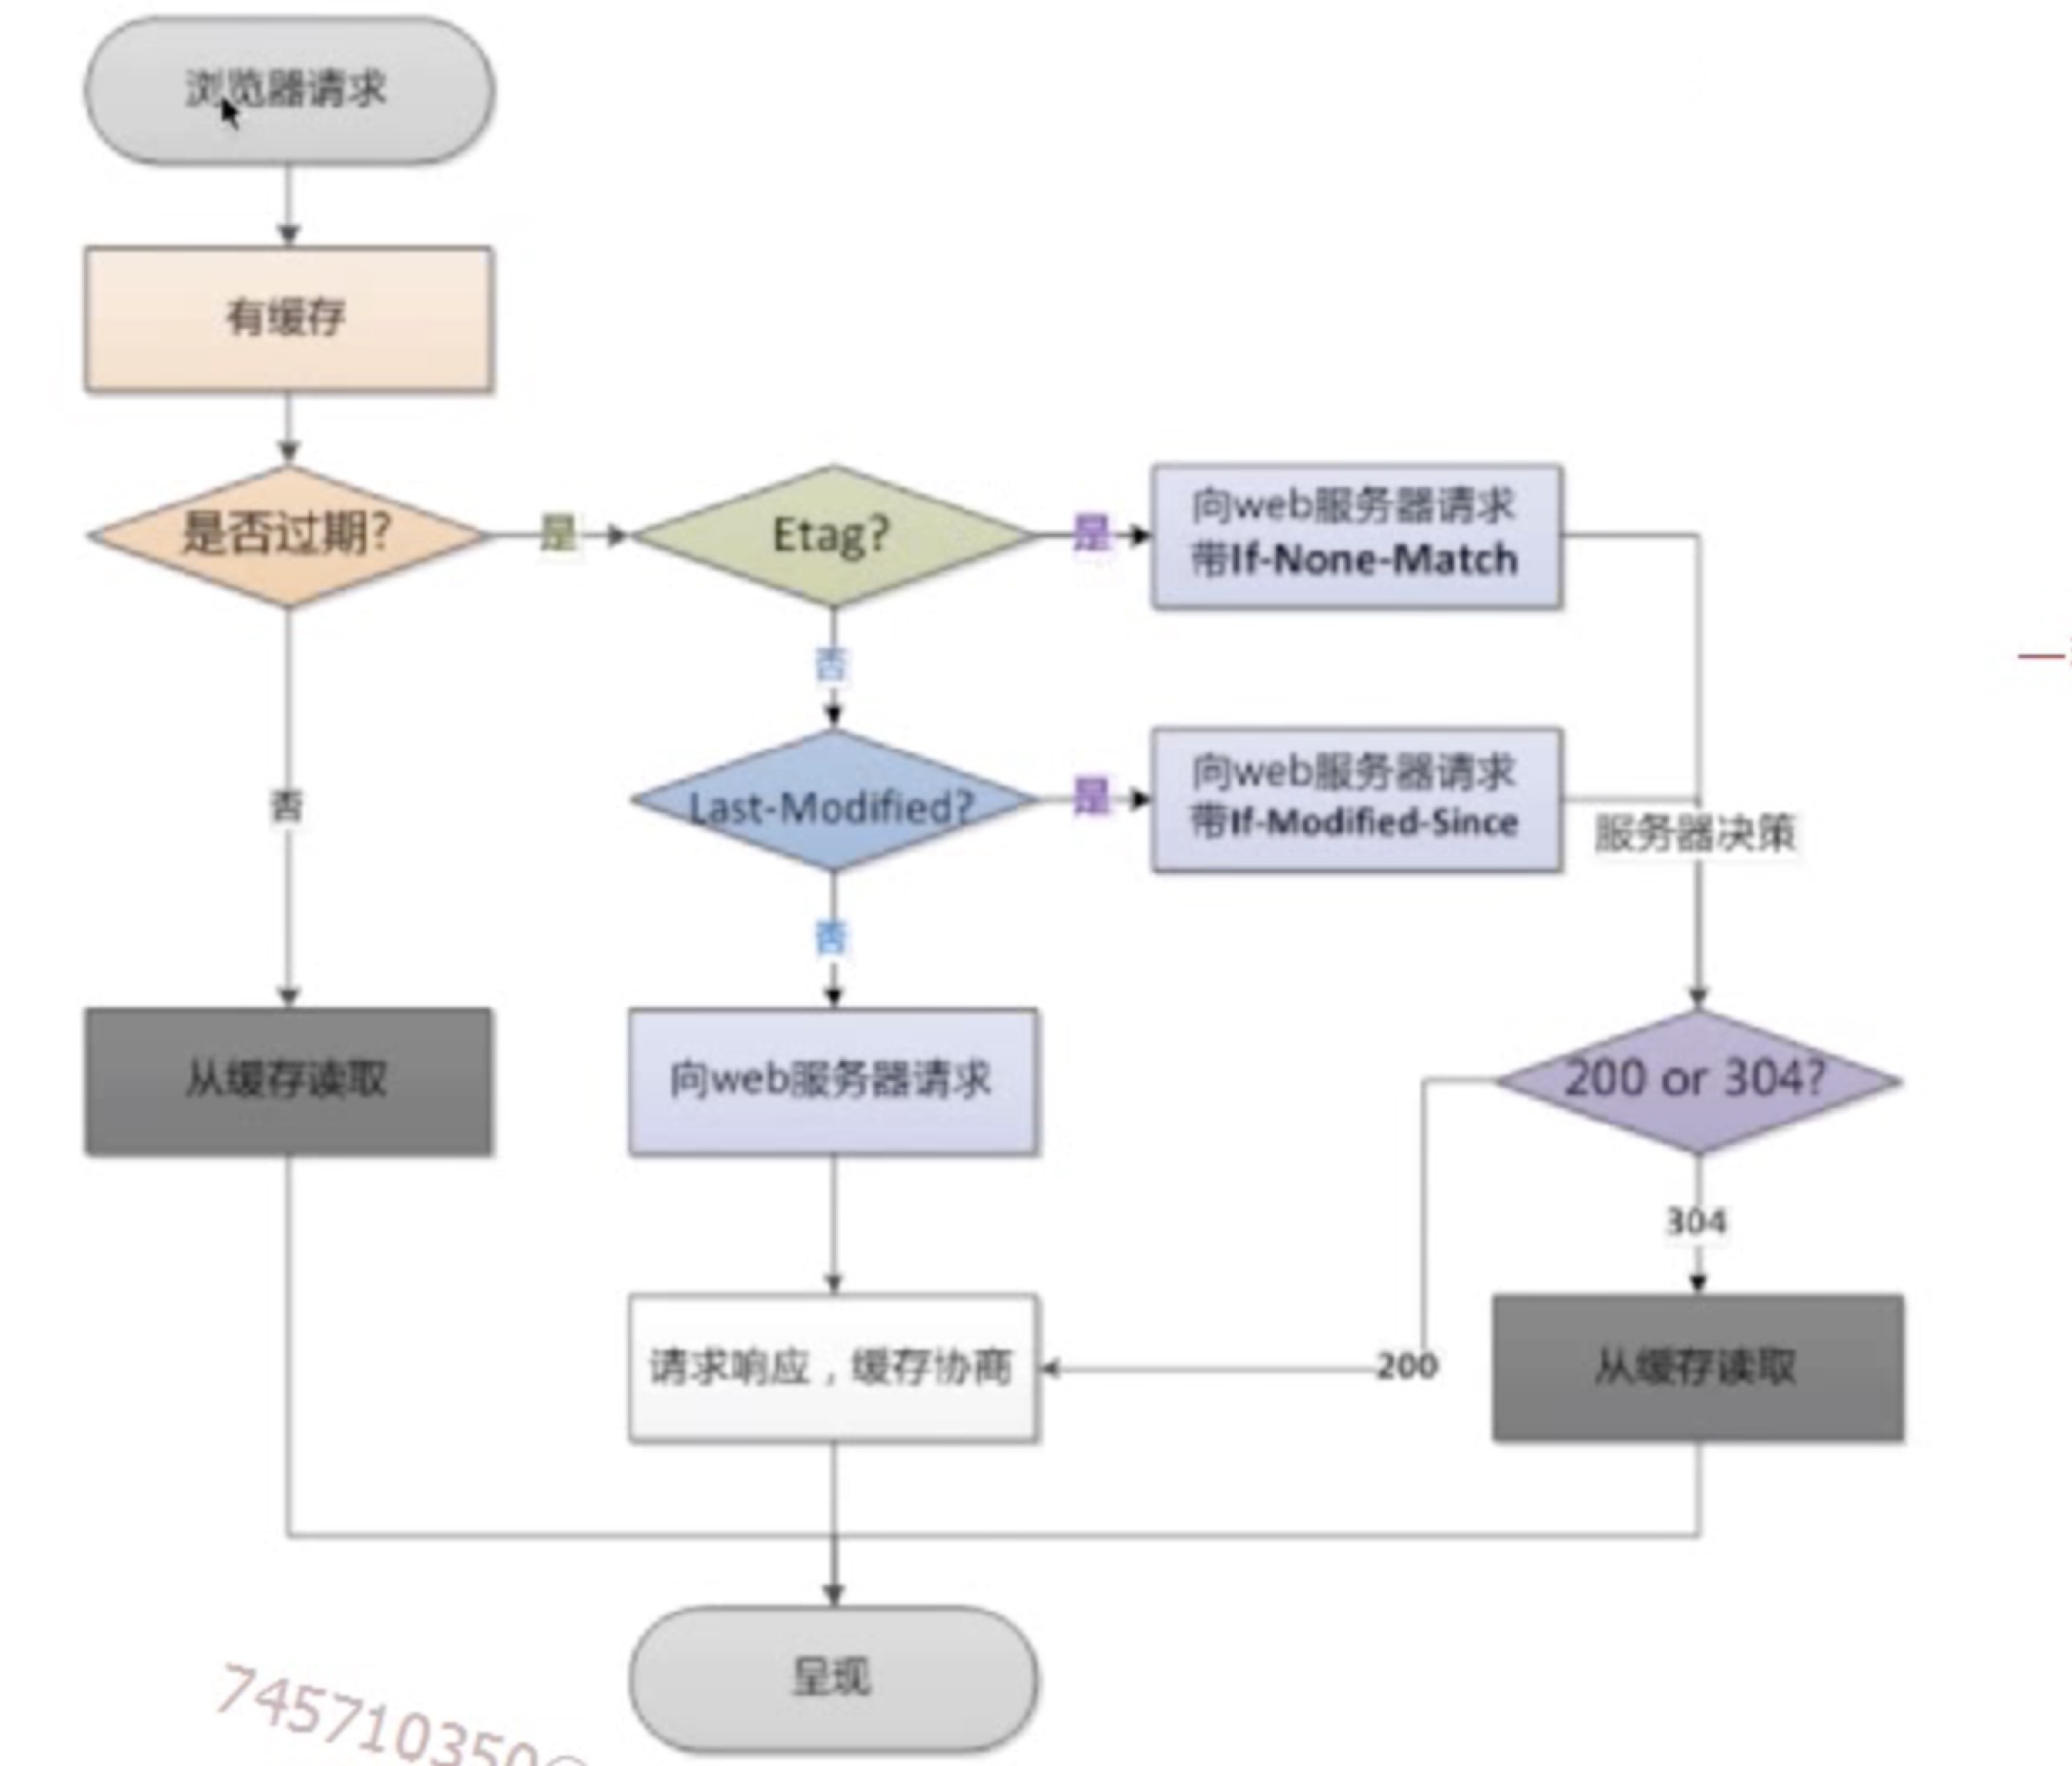
配置语法----expires
添加cache-control expires
syntax: expires [modified] time;
        expires epoch|max|off;
default: expires off;
context: http, server, location, if in location
max-age=0 都会请求服务器,浏览器有时会自己加
跨域访问
nginx怎么做 access-control-allow-origin
syntax:add_header name value [always]
default: ;
context: http, server, location, if in location
防盗链
目的:防止资源被盗用
- 简单放盗链
基于http_refer防盗链的方式
location {
    valid_referers none blocked 116.62.103.228;
    if ($invalid_referer) {
        return 403;
    }
}
代理服务
代理----代未办理
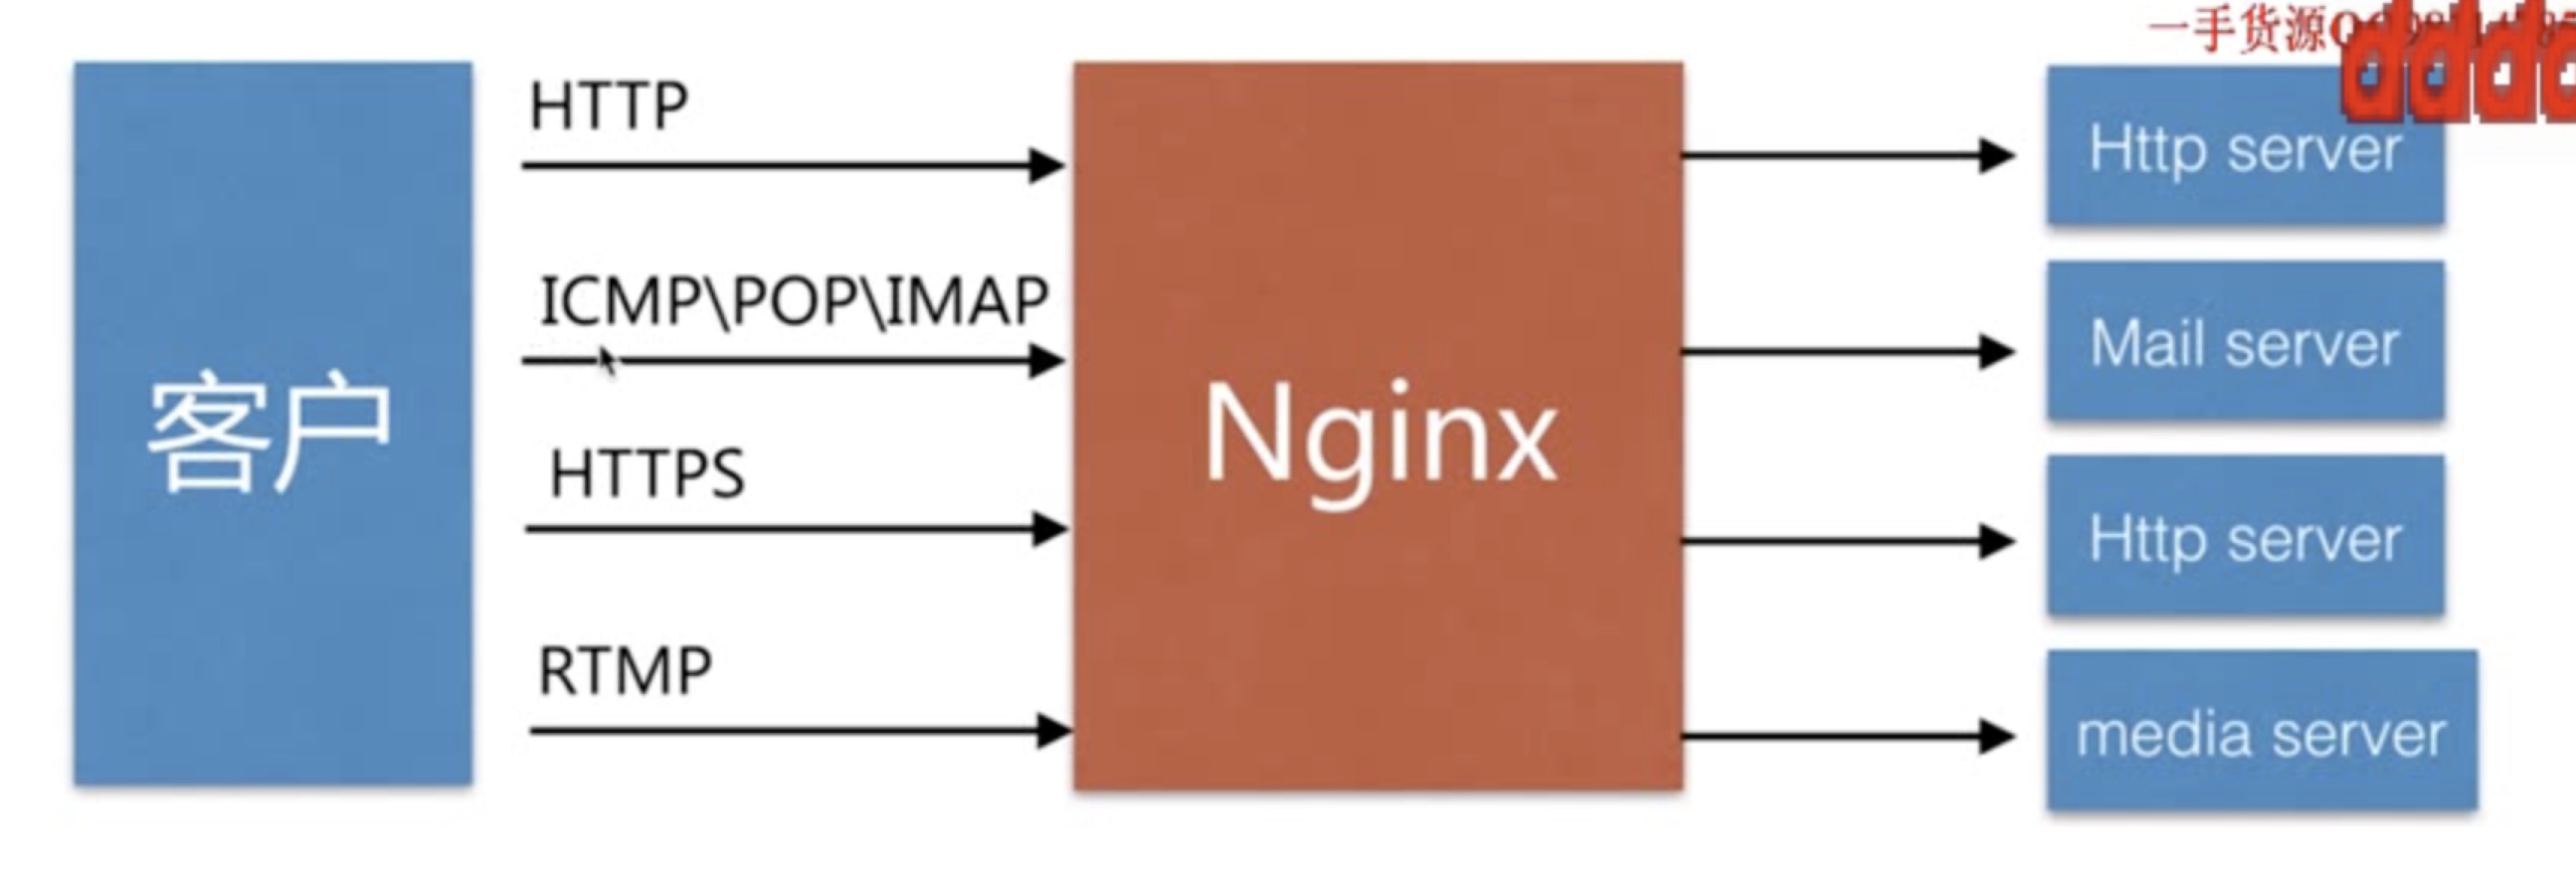
正向代理

vpn的原理
反向代理

代理区别
区别在于代理的对象不一样
正向代理代理的对象时客户端
反向代理代理的对象时服务端
syntax:proxy_pass url
default: ;
context: location, if in location,limit_except
正向代理的例子
location / {
    proxy_pass http://$http_host$request_uri
}
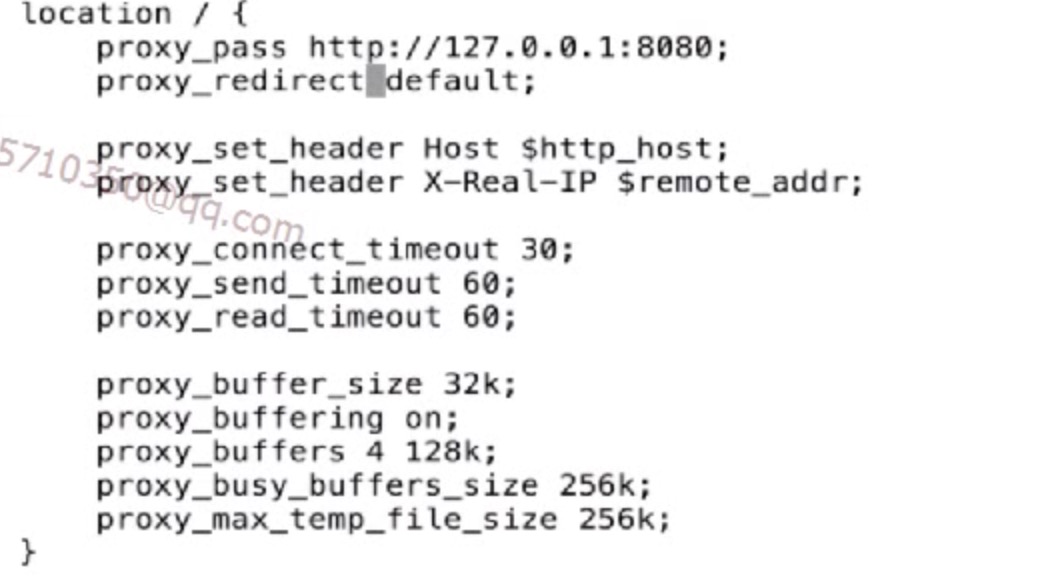
其他的配置语法
缓冲区
syntax:proxy_buffering on | off;
default: proxy_buffering on;
context: http, server, location
扩展:proxy_buffer_size/ proxy_buffers/ proxy_buffers_size
跳转重定向
syntax:proxy_redirect default;
proxy_redirect off; proxyredirect redirect redirect replacement;
default: proxy_redirect default;
context: http, server, location
头信息
syntax:proxy_set_header field value;
default: proxy_set_header Host $proxy_host; proxy_set_header Connection close;
context: http, server, location
扩展:proxy_hide_header / proxy_set_body
超时
syntax:proxy_connect_timeout time;
default: proxy_connect_timeout 60s;
context: http, server, location
例子
三、nginx负载均衡

GSLB 全局负载均衡

SLB

基于LVS的中间件架构
四层负载均衡

七层负载均衡 保存应用层 nginx就是典型的

nginx的实现
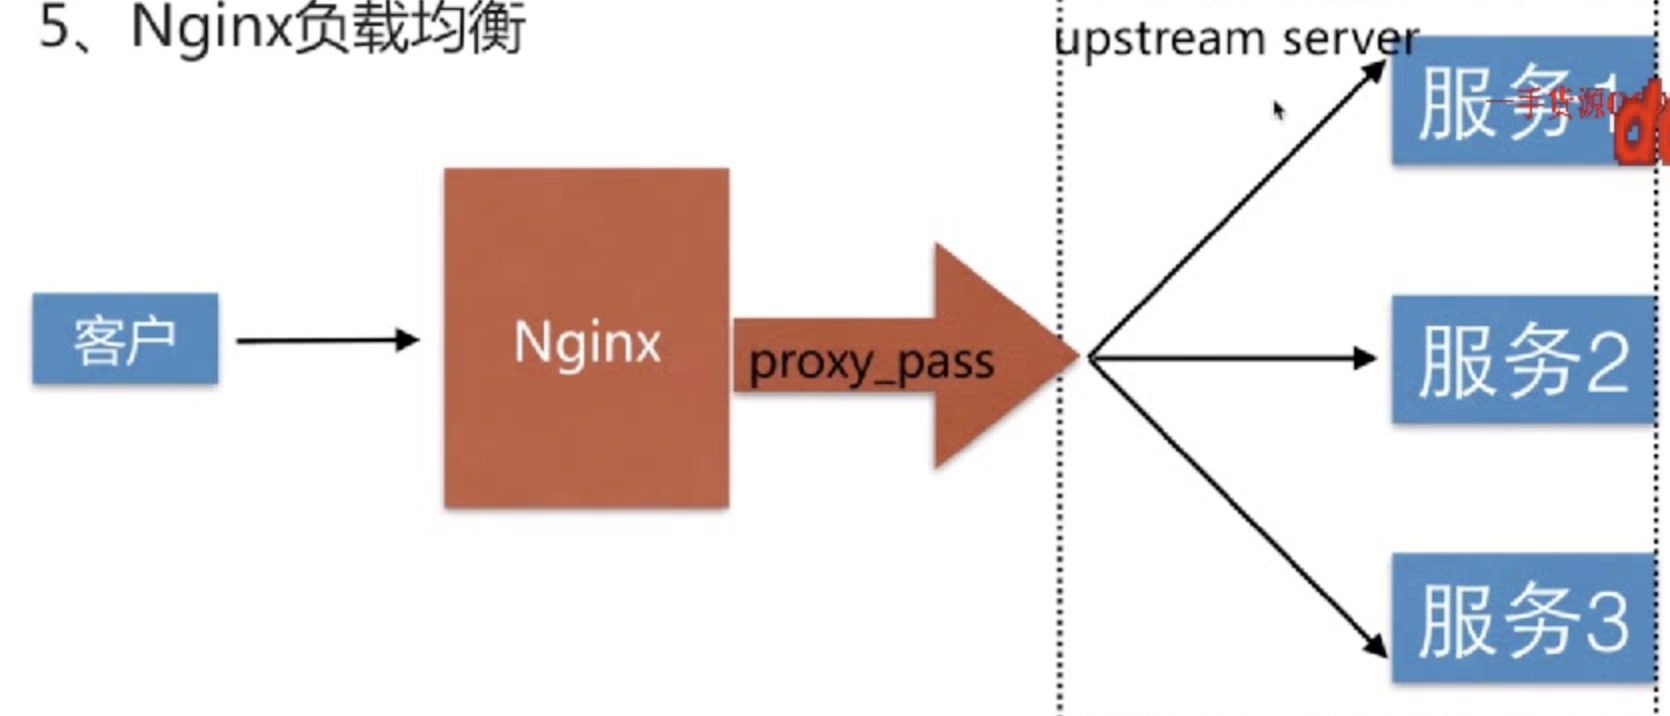
syntax: upstream name {...};
default: ;
context: http
例子
upstream chen {
    server 116.62,103.228:8001;
    server 116.62,103.228:8002;
    server 116.62,103.228:8003;
}

server {
    location / {
        proxy_pass http://chen;
        include proxy_params;
    }
}
upstream举例
upstream backend {
    server backend1.example.com weight=5;
    server backend2.example.com:8080;
    server unix:/tmp/backend3;

    server backend2.example.com:8080 backup;
    server backend2.example.com:8080 backup;
}
后端服务器在负载均衡调度中的状态
| 参数 | 说明 |
|---|---|
| down | 当前的server暂时不参与负载均衡 |
| backup | 预留的备份服务器 |
| max_fails | 允许请求失败的次数 |
| fail_timeout | 经过max_fails失败后,服务暂停的时间 |
| max_conns | 限制最大的接收的连接数,针对服务器配置不一致 |
调度算法
| 算法 | 说明 |
|---|---|
| 轮询 | 按时间顺序逐一分配到不同的后端服务器 |
| 加权轮询 | wright值越大,分配到的访问几率越大 |
| ip_hash | 每一个请求按访问ip的hash结果分配,这样来自通一个ip的固定访问一个后端服务器 |
| least_conn | 最少连接数,那个机器连接数少就分发 |
| url_hash | 按照访问的url的hash结果来分配请求,是每个url定向到同一个后端服务器 |
| hash关键数值 | hash自定义的key |
缓存
1、缓存类型
- 服务端缓存比如radis
- 代理缓存比如在nginx里做
- 客户端缓存
2、代理缓存
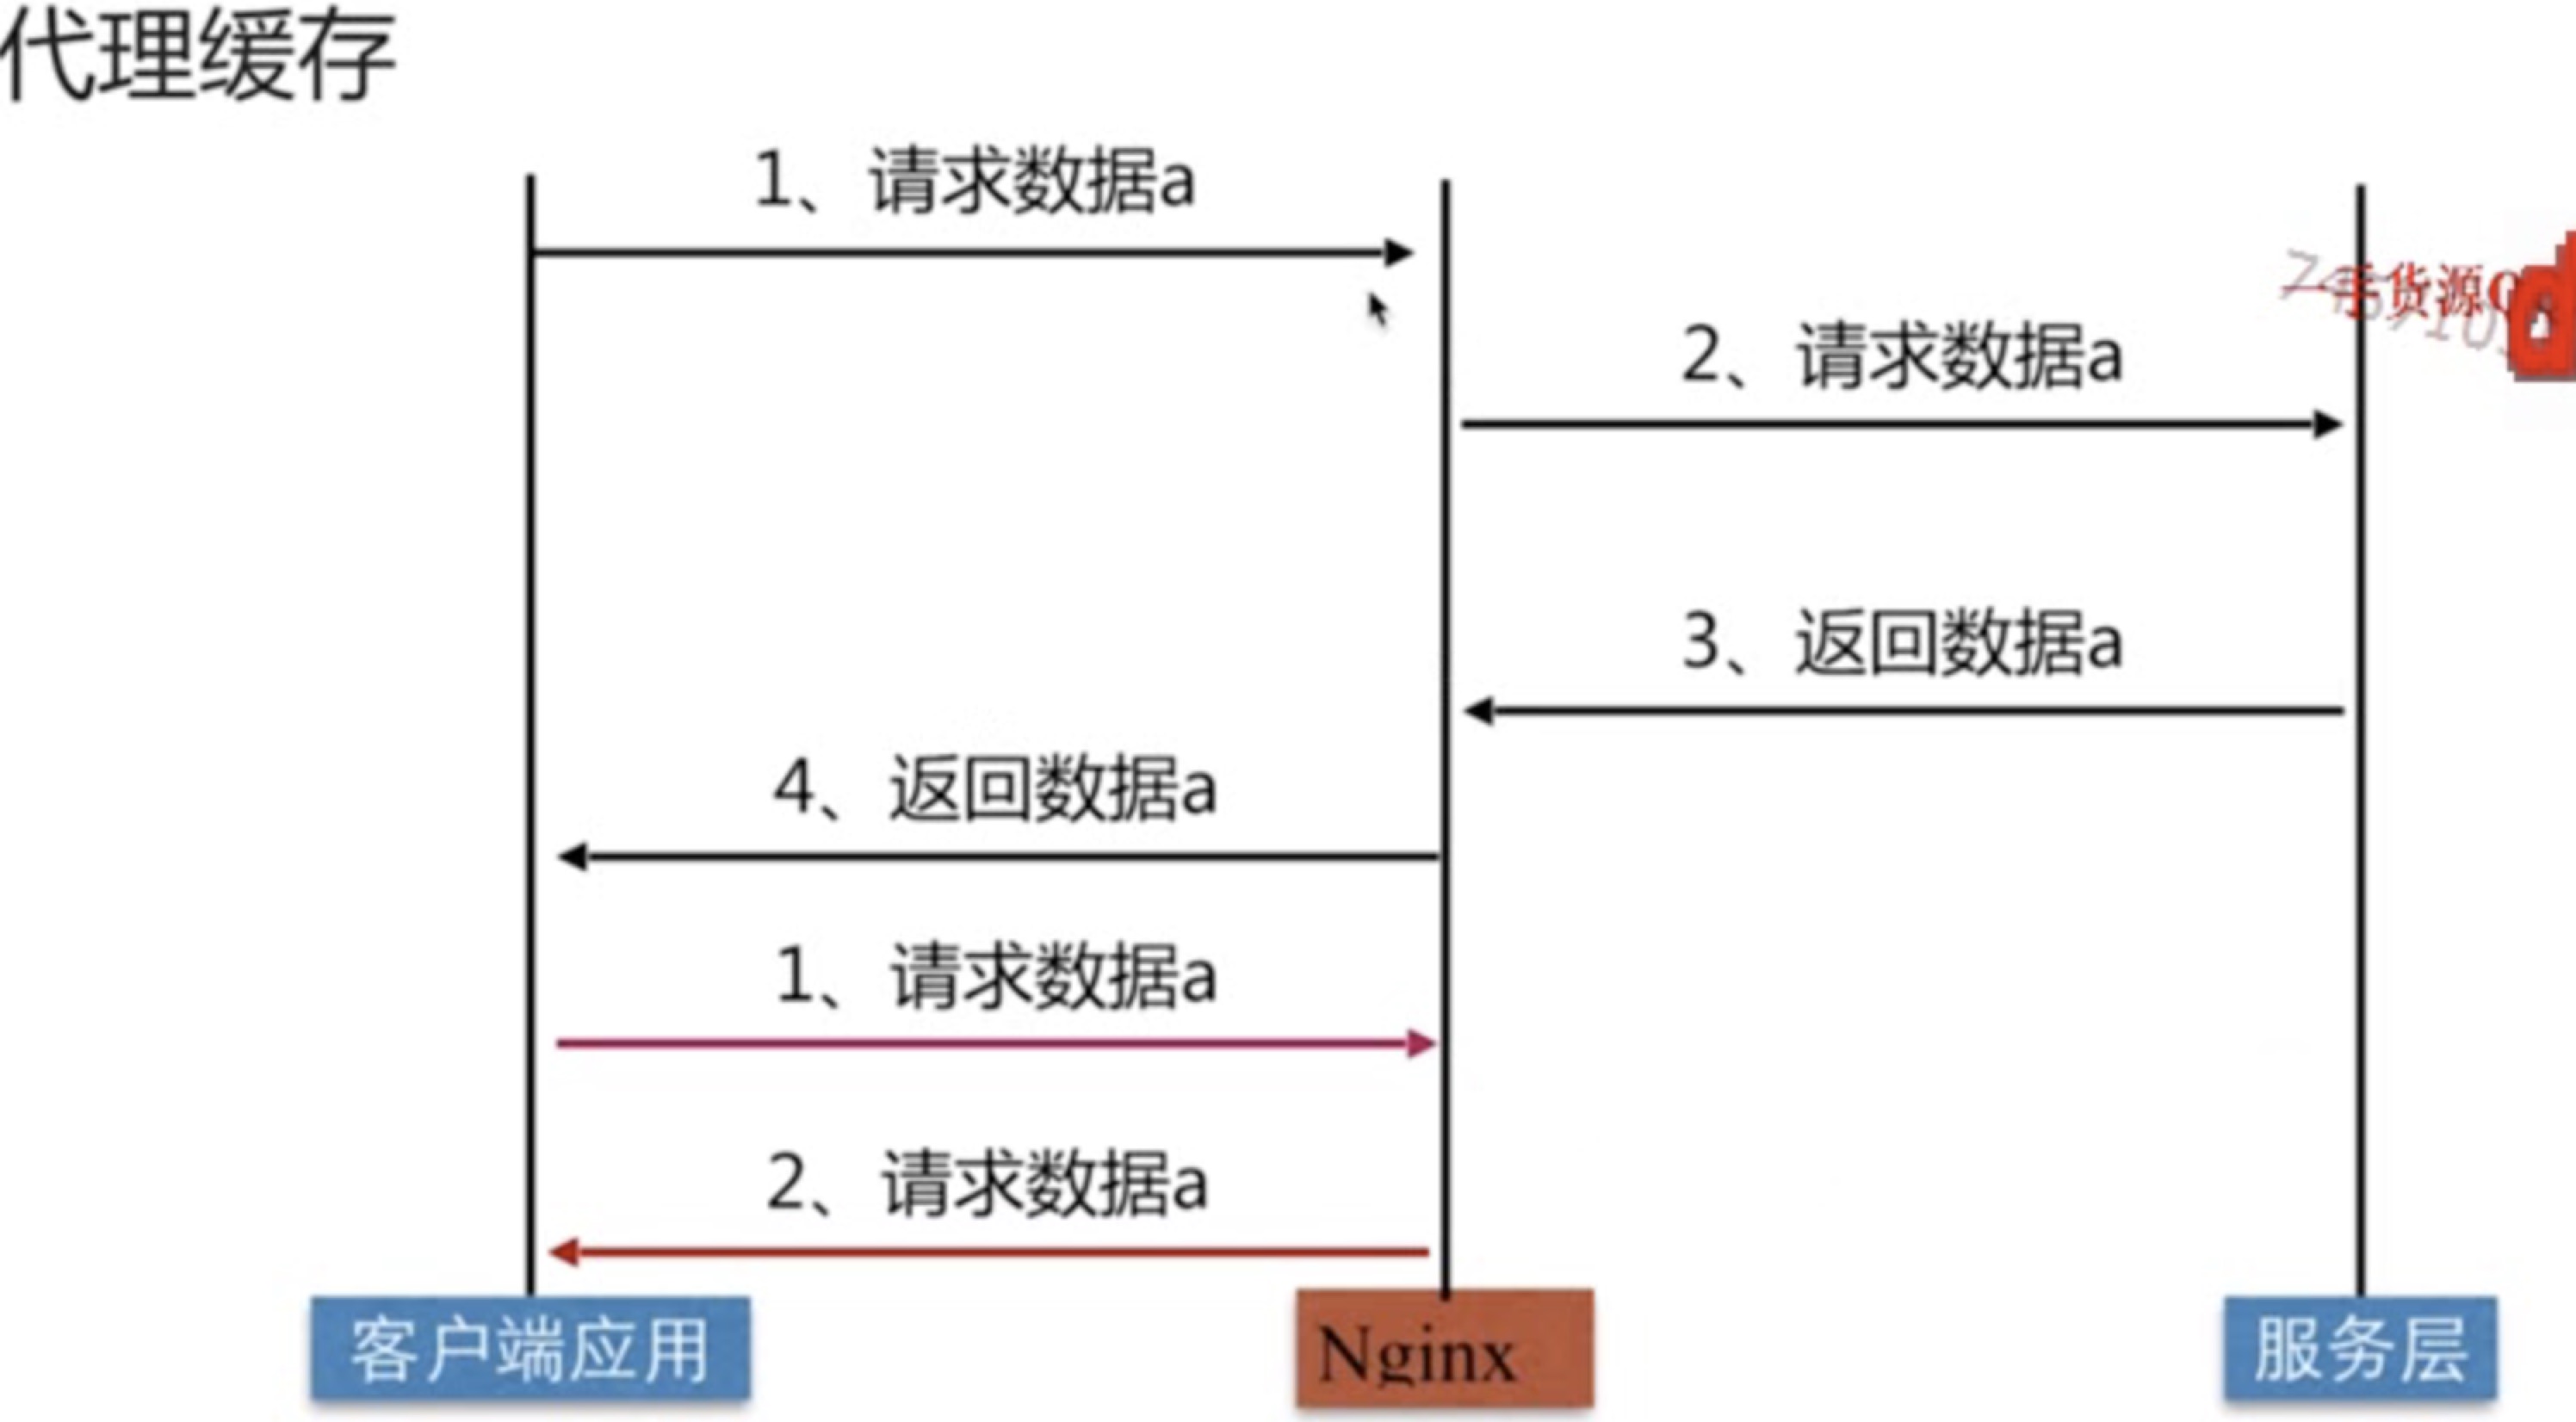
3、proxy_cache配置语法
syntax:proxy_cahe_path path[levels=levels]
    [use_temp_path=on|off]
    keys_zone=name:size[inactive=time]
    [max_size=size][manager_files=number][manager_sleep=time]
    [manager_threshold=time][loader_files=number]
    [loader_sleep=time][loader_threshold=time][purger=on|off]
    [purger_files=number][purger_sleep=time]
    [purger_threshold=time];
default: ;
context: ;
4、配置缓存过期周期
syntax:proxy_cache_valid [code ...] time;
default: ;
context: server.location;
5、配置缓存的维度
syntax:proxy_cache_key string;
default: proxy_cache_key $scheme(协议)$proxy_host$request_uri;
context: server.location;
例子
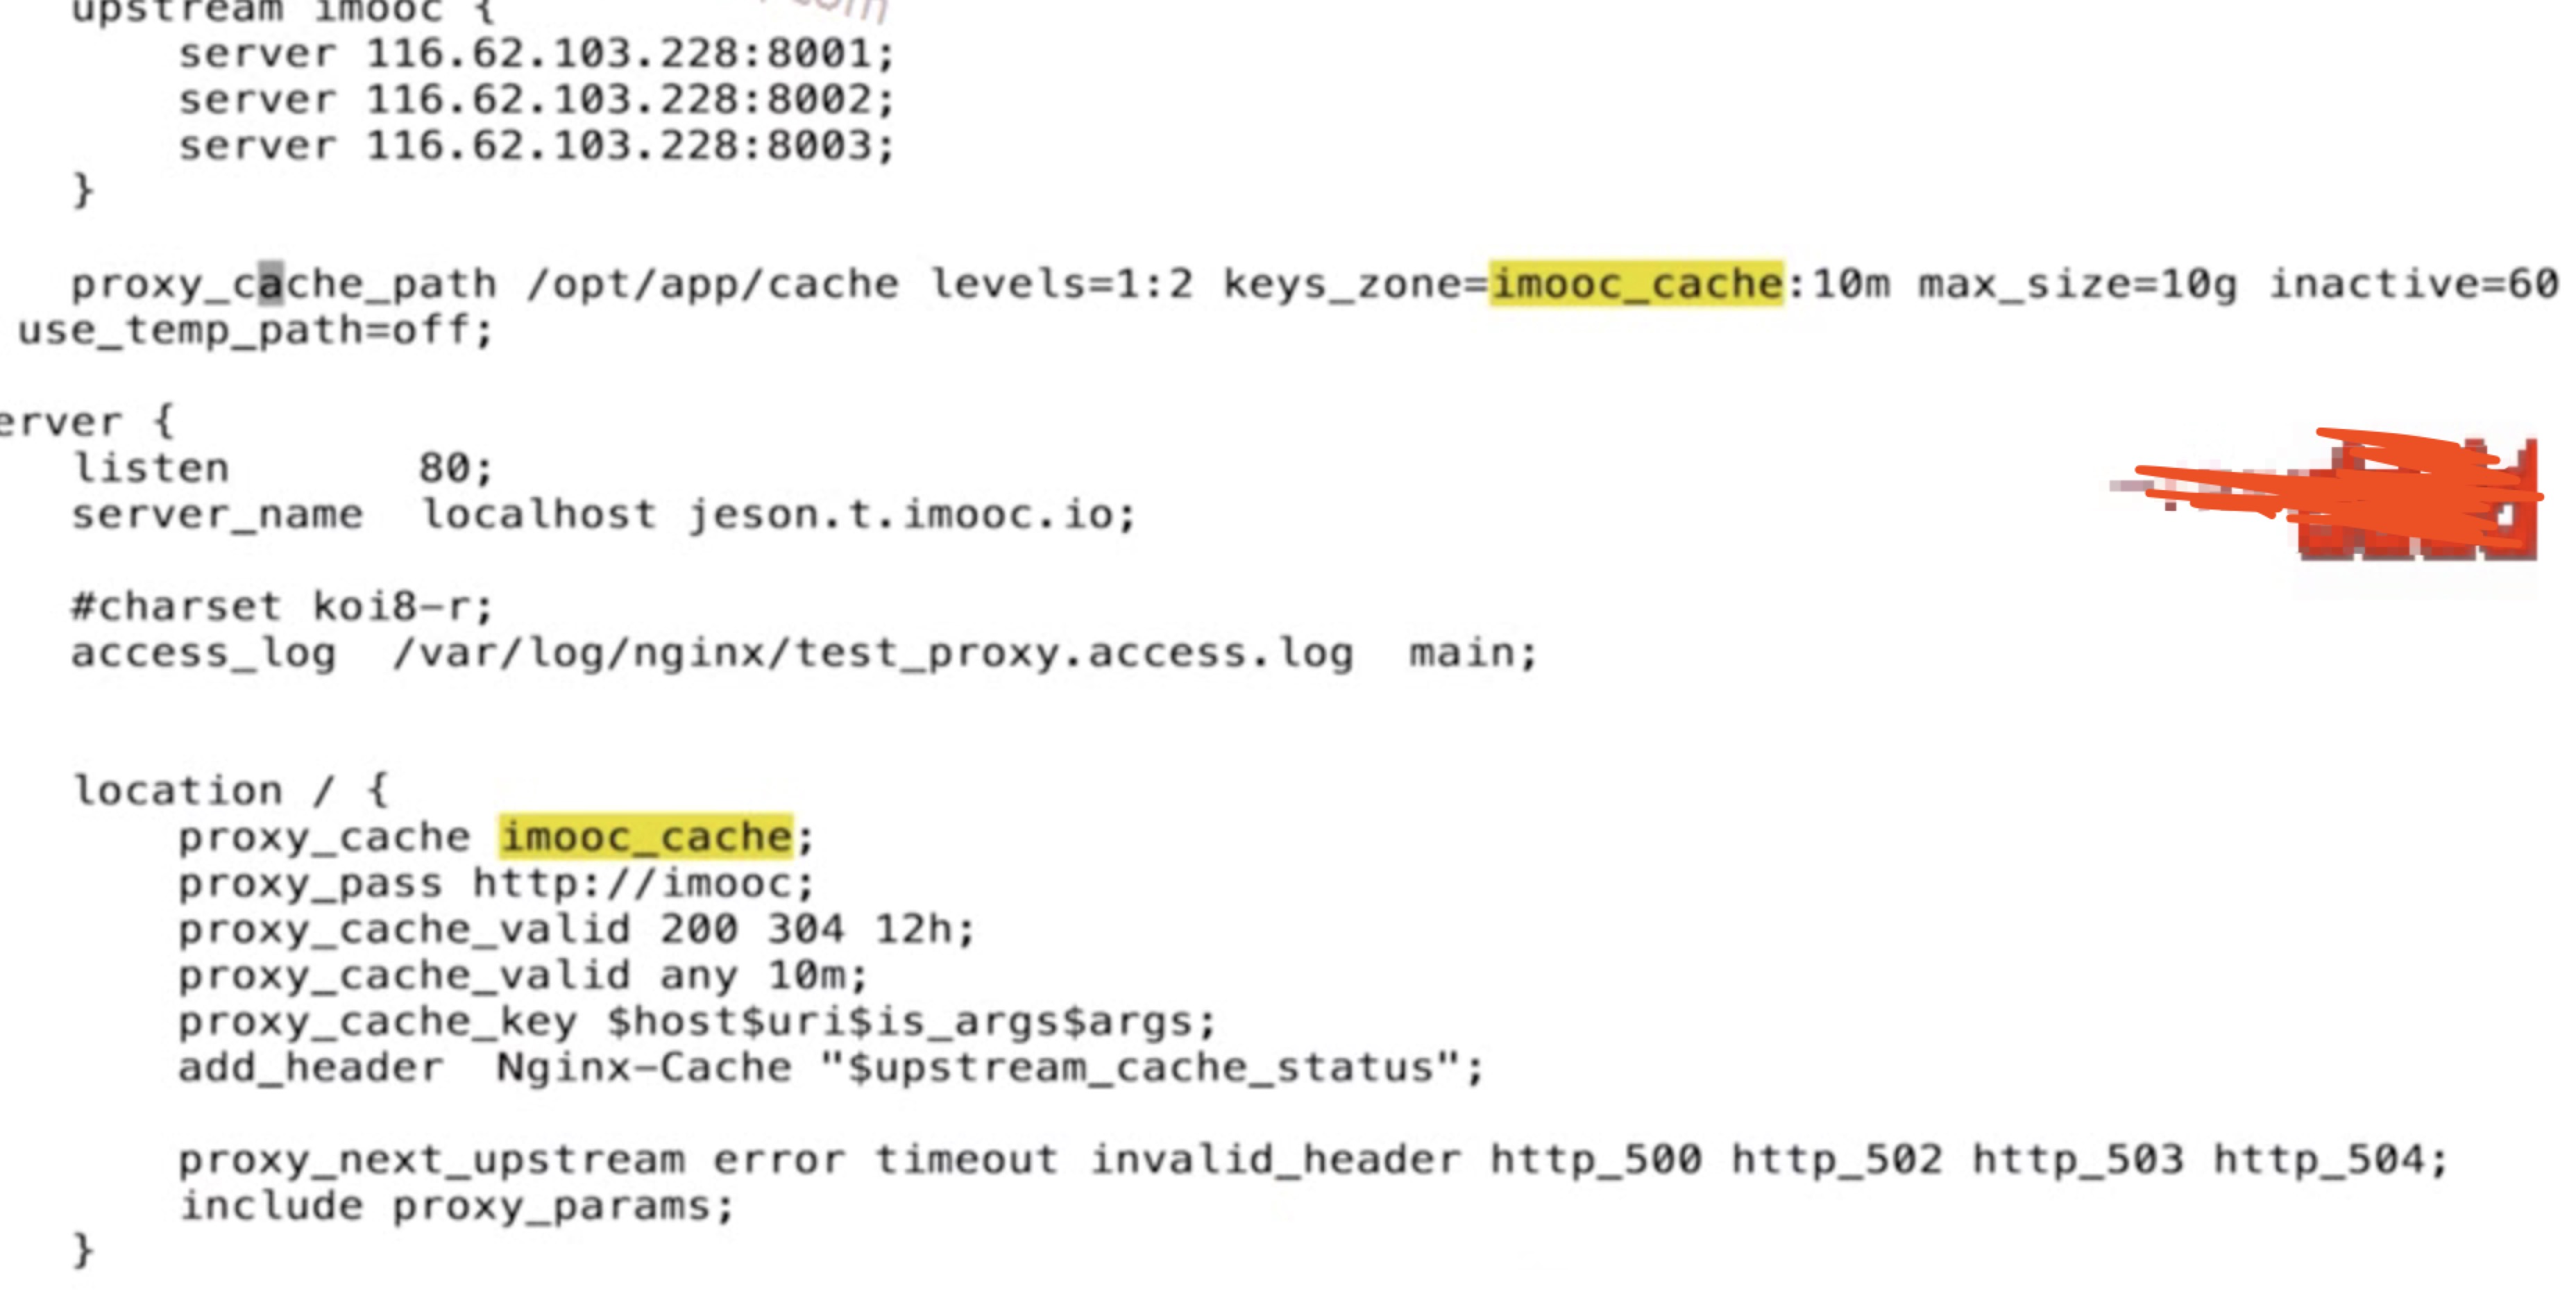
6、如何清理指定缓存
- 方式1、rm -rf 缓存目录内容
- 方式2、第三方扩展模块ngx_cache_purge
7、如何让部分页面不缓存
syntax:proxy_no_cache string;
default: ;
context: http,server,location;
例子
location / {
    proxy_no_cache $cookie_nocache $arg_nocache $arg_comment;
    proxy_no_cache $http_pragma $http_authorization;
}
8、大文件分片请求
syntax:slice size;
default: slice 0;
context: http,server,location;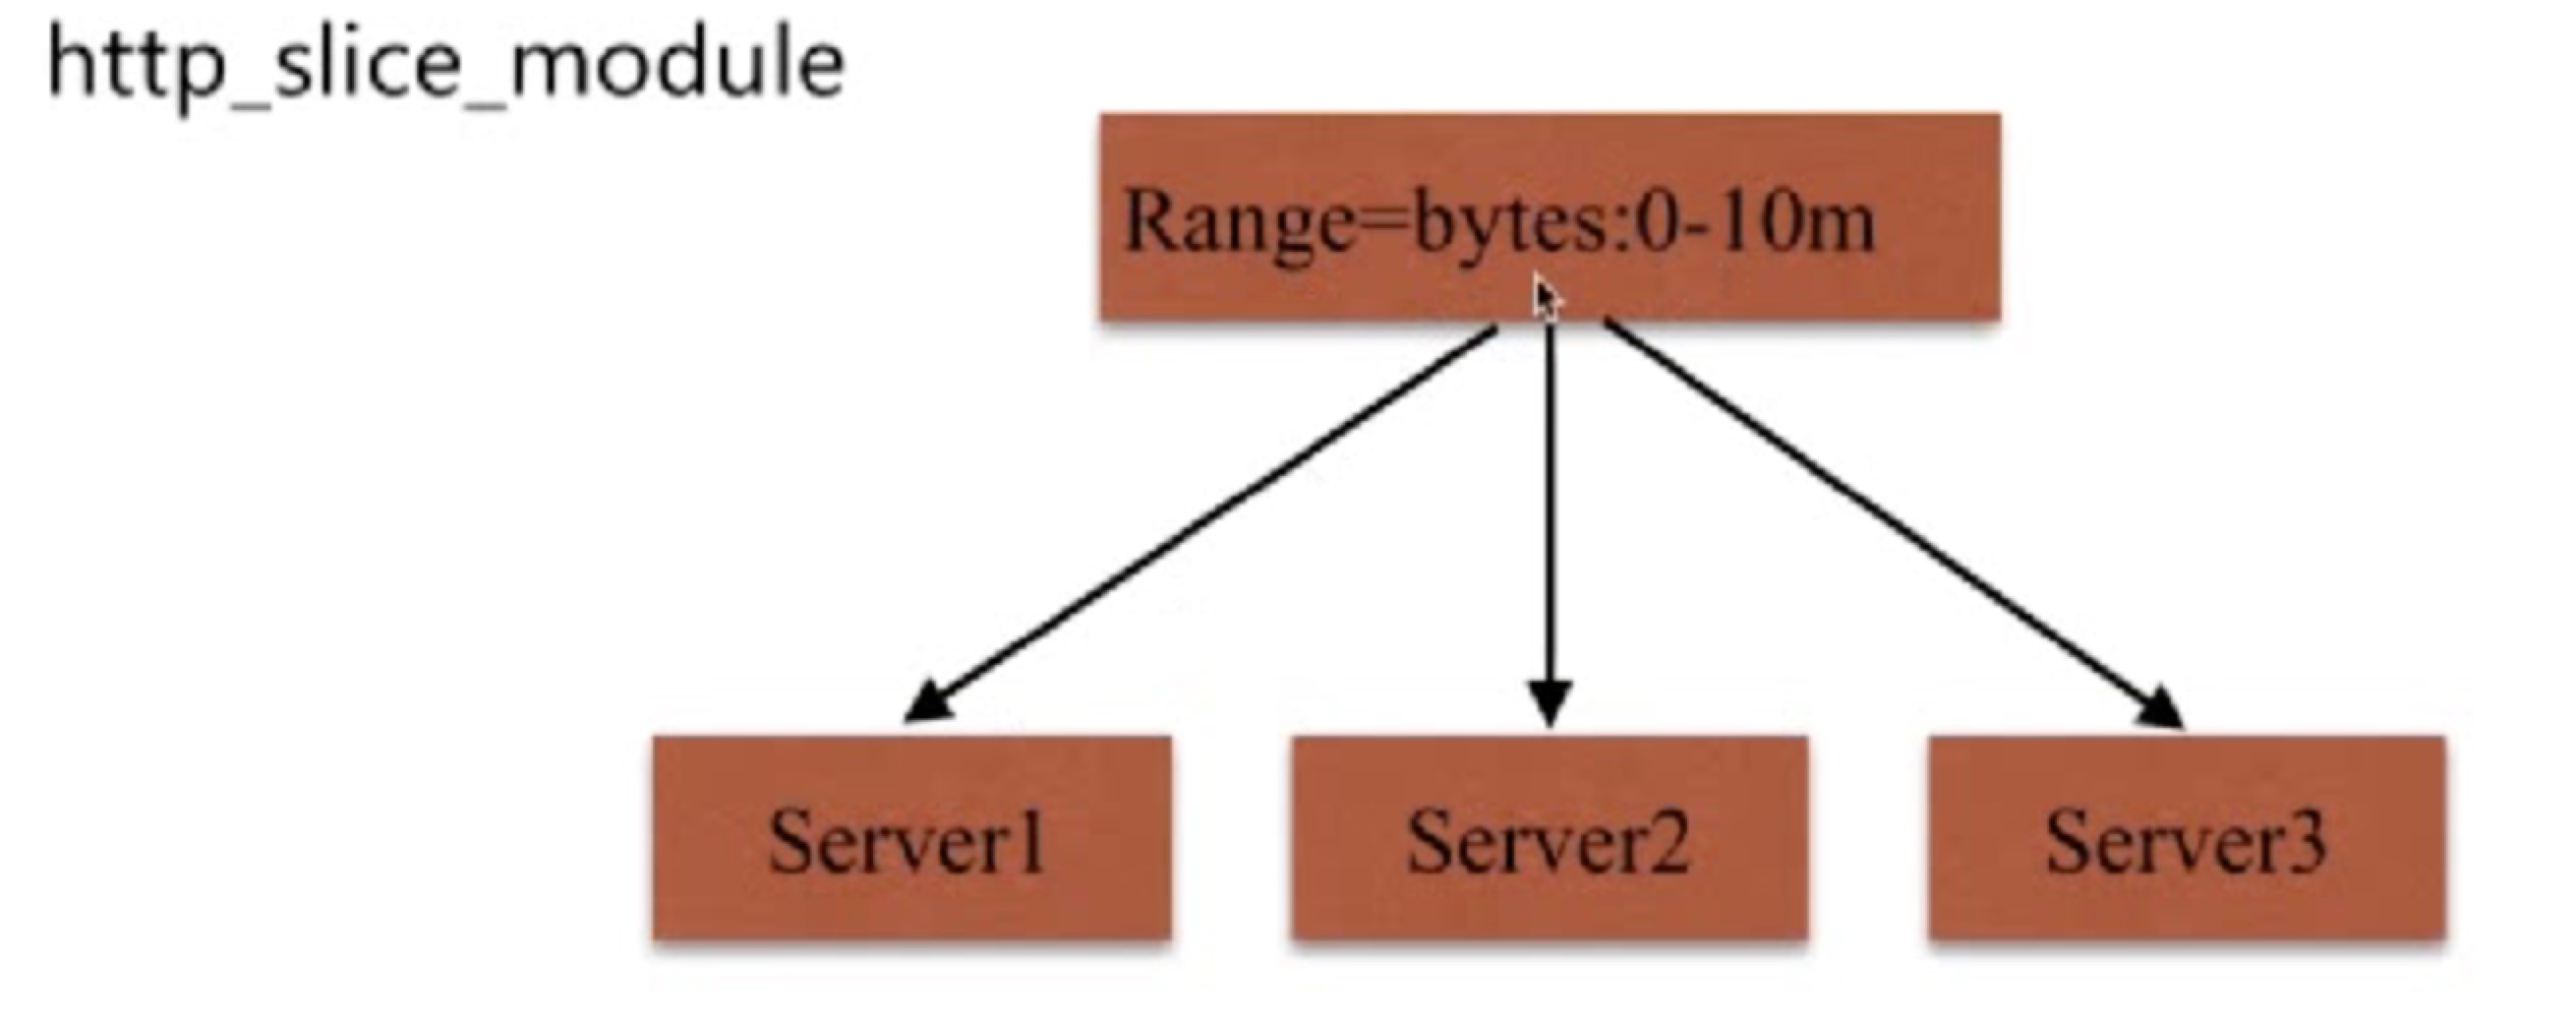
大文件分片请求
优势:每个子请求收到的数据都会形成一个独立文件,一个请求断了,其他请求不受影响
缺点:当文件很大或者slice很小的时候,可能会导致文件描述符耗尽等情况
动静分离
说明
将静态请求和动态请求分离,分离资源,减少不必要的请求消耗,减少请求延时
例子
root /opt/app/code

location ~ \.jsp$ {
    proxy_pass http://java_api;
    index index.html index.html;
}

location ~\.(jpg|png|gif)$ {
    expires 1h;
    gzip on;
}

location / {
    index index.html index.html;
}
rewrite重写
实现url重写以及重定向
场景
- URL访问跳转,支持开发设计,页面跳转,兼容性支持,展示效果等
- SEO优化
- 维护 后台维护、流量转发等
- 安全
配置语法
syntax:rewrite regex(正则) replacement [flag];
default: ;
context: server,location;
例子
rewrite ^(.*)$ /pages/maintain.html break;flag
| 参数 | 说明 |
|---|---|
| last | 停止rewrite检测 |
| break | 停止rewrite检测 |
| redirect | 返回302临时重定向,地址栏会显示跳转后的地址 |
| permanent | 返回301永久重定向,地址栏会显示跳转后的地址 |
rewrite规则优先级
- 执行server的rewrite指令
- 执行location匹配
- 执行选定的location中的rewrie
高级模块
secure_link_module模块
- 制定并允许检查请求的链接的真实性以及保护资源免被受经授权的访问
- 限制链接生效周期
配置语法
syntax:secure_link expression;
default: ;
context: http,server,location;
syntax:secure_link_md5 expression;
default: ;
context: http,server,location;原理


例子
server {
    listen 80;
    server_name localhost;
    root /opt/app/code;

    location / {
        #取得校验参数
        secure_link $arg_md5,$arg_expires;
        #把过期时间 uri  password md5之后跟传入的md5做校验
        secure_link_md5 "$sercure_link_expires$uri password"

        if ($secur_link = "") {
            return 403;
        }
        if ($secure_link = "0") {
            return 410
        }
    }
}
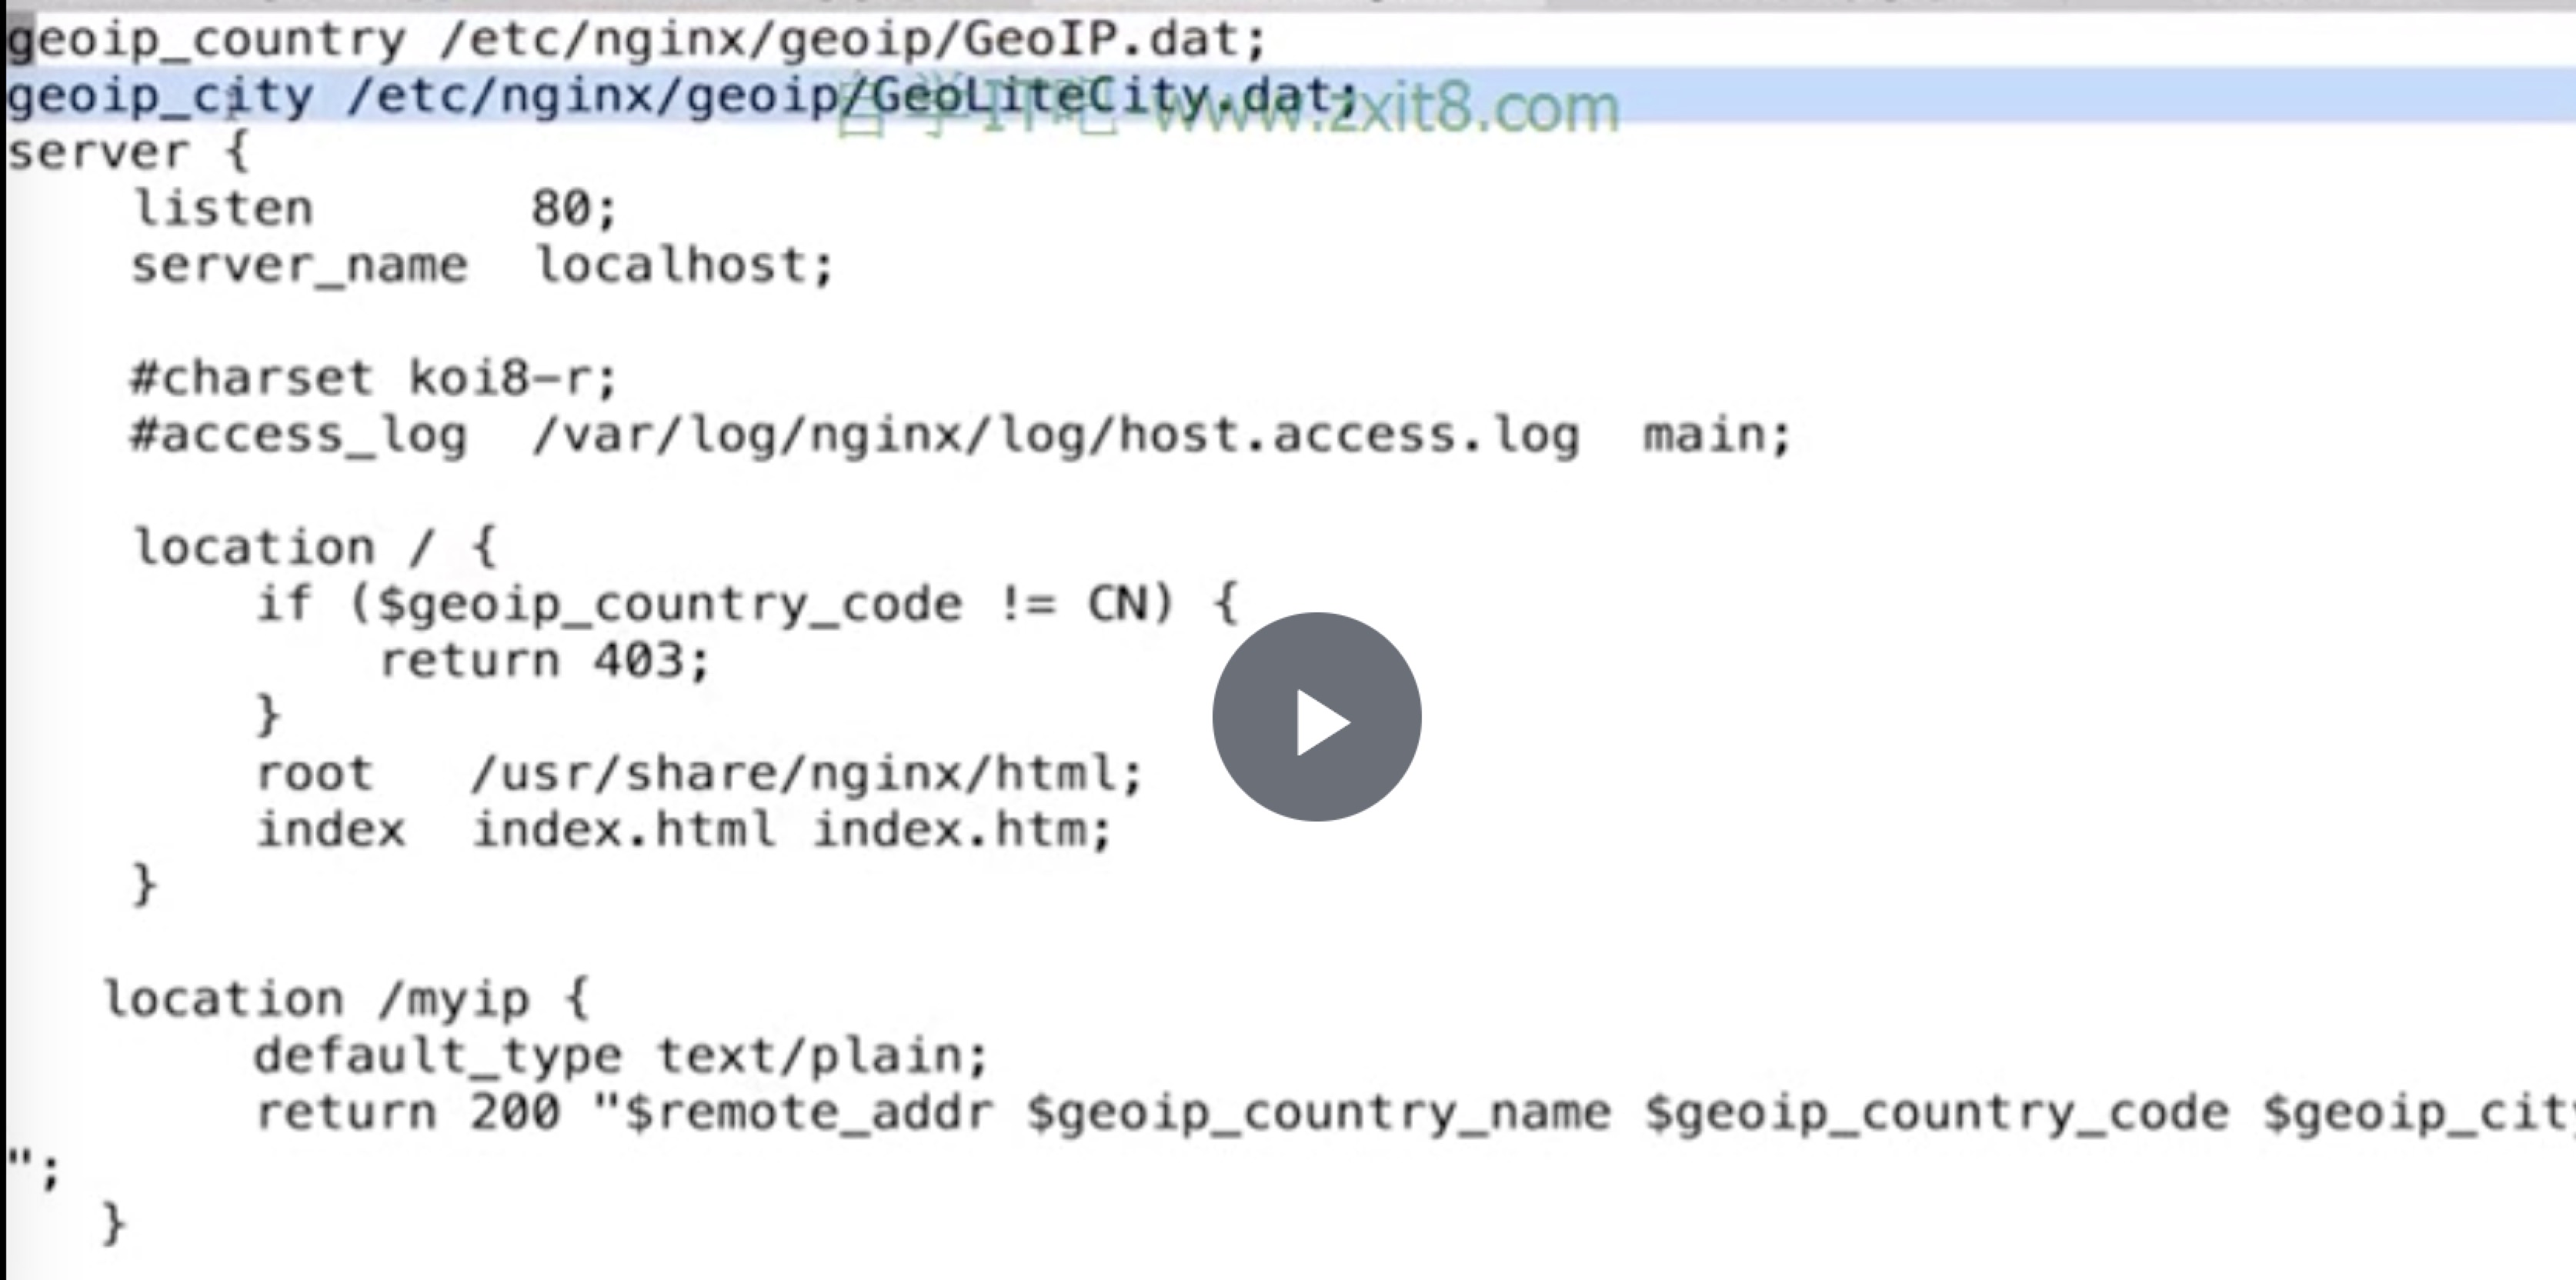
geoip_module模块
基于IP地址匹配MaxMind GeoIP二进制文件,读取IP所在地域信息
安装
yum install nginx-module-geoip使用场景
- 区别国内外HTTP访问规则
- 区别国内部城市地域HTTP访问区别
例子
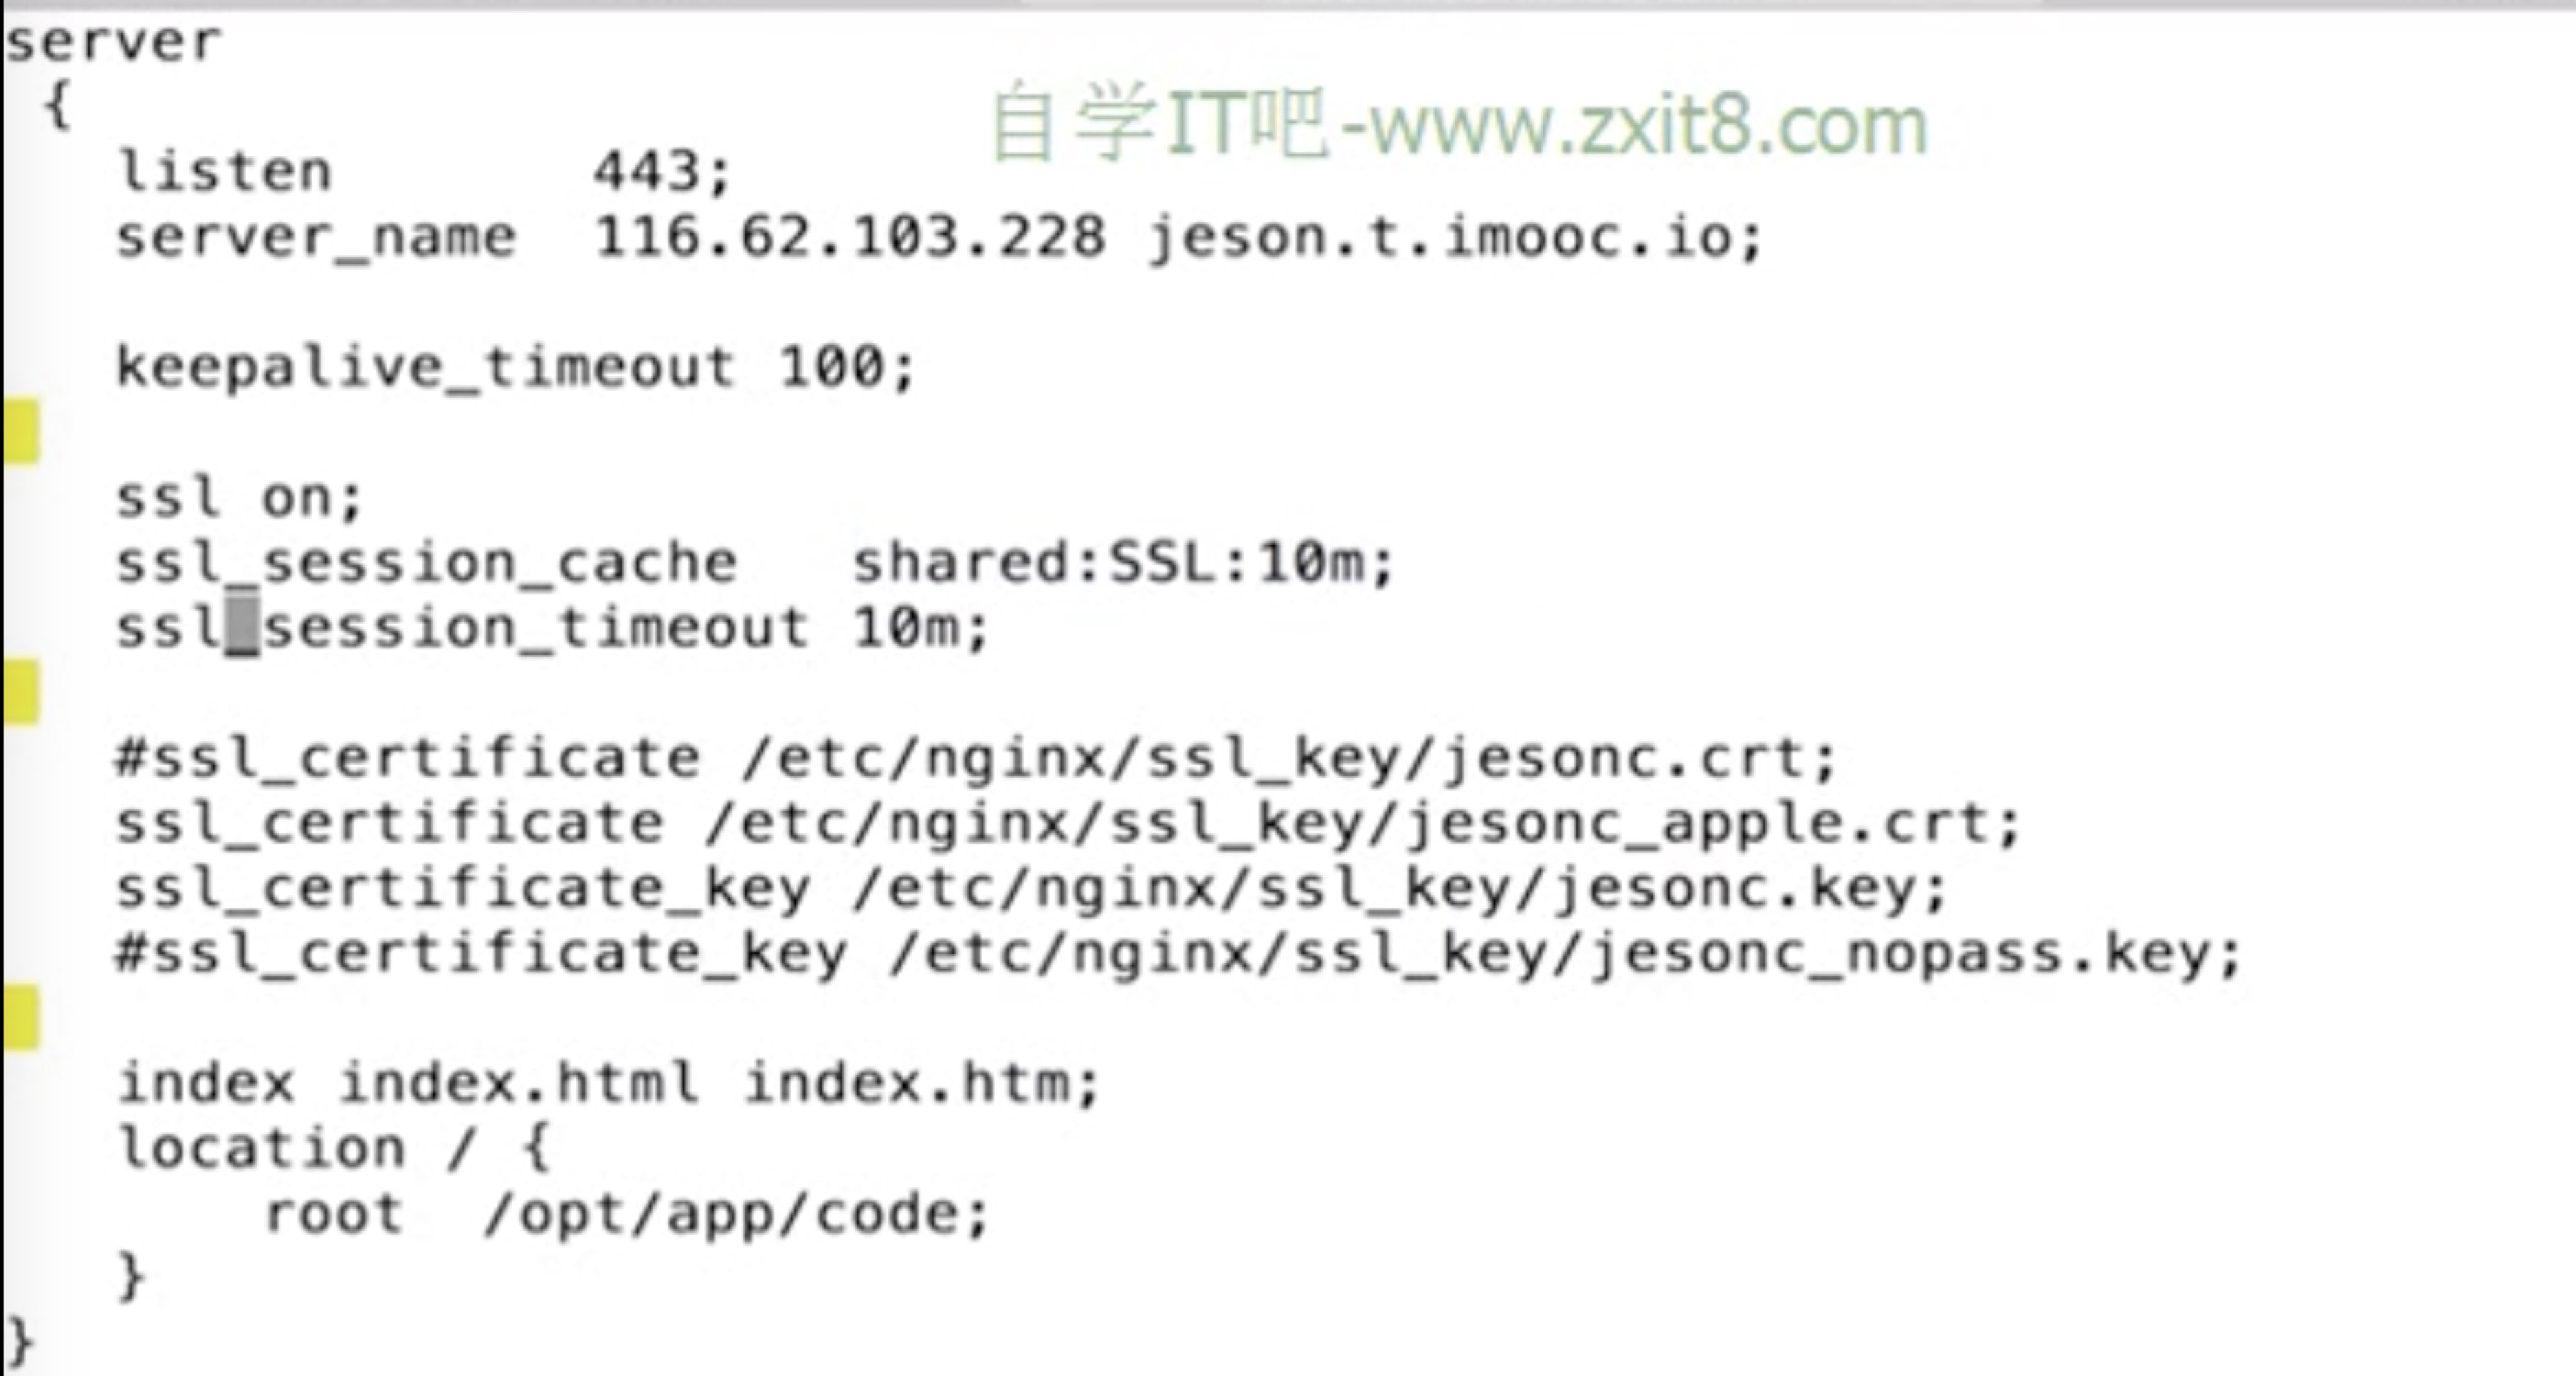
HTTPS
https优化
激活keepalive长连接
ssl session缓存
Nginx与lua开发
- lua及基础语法
- nginx与lua环境
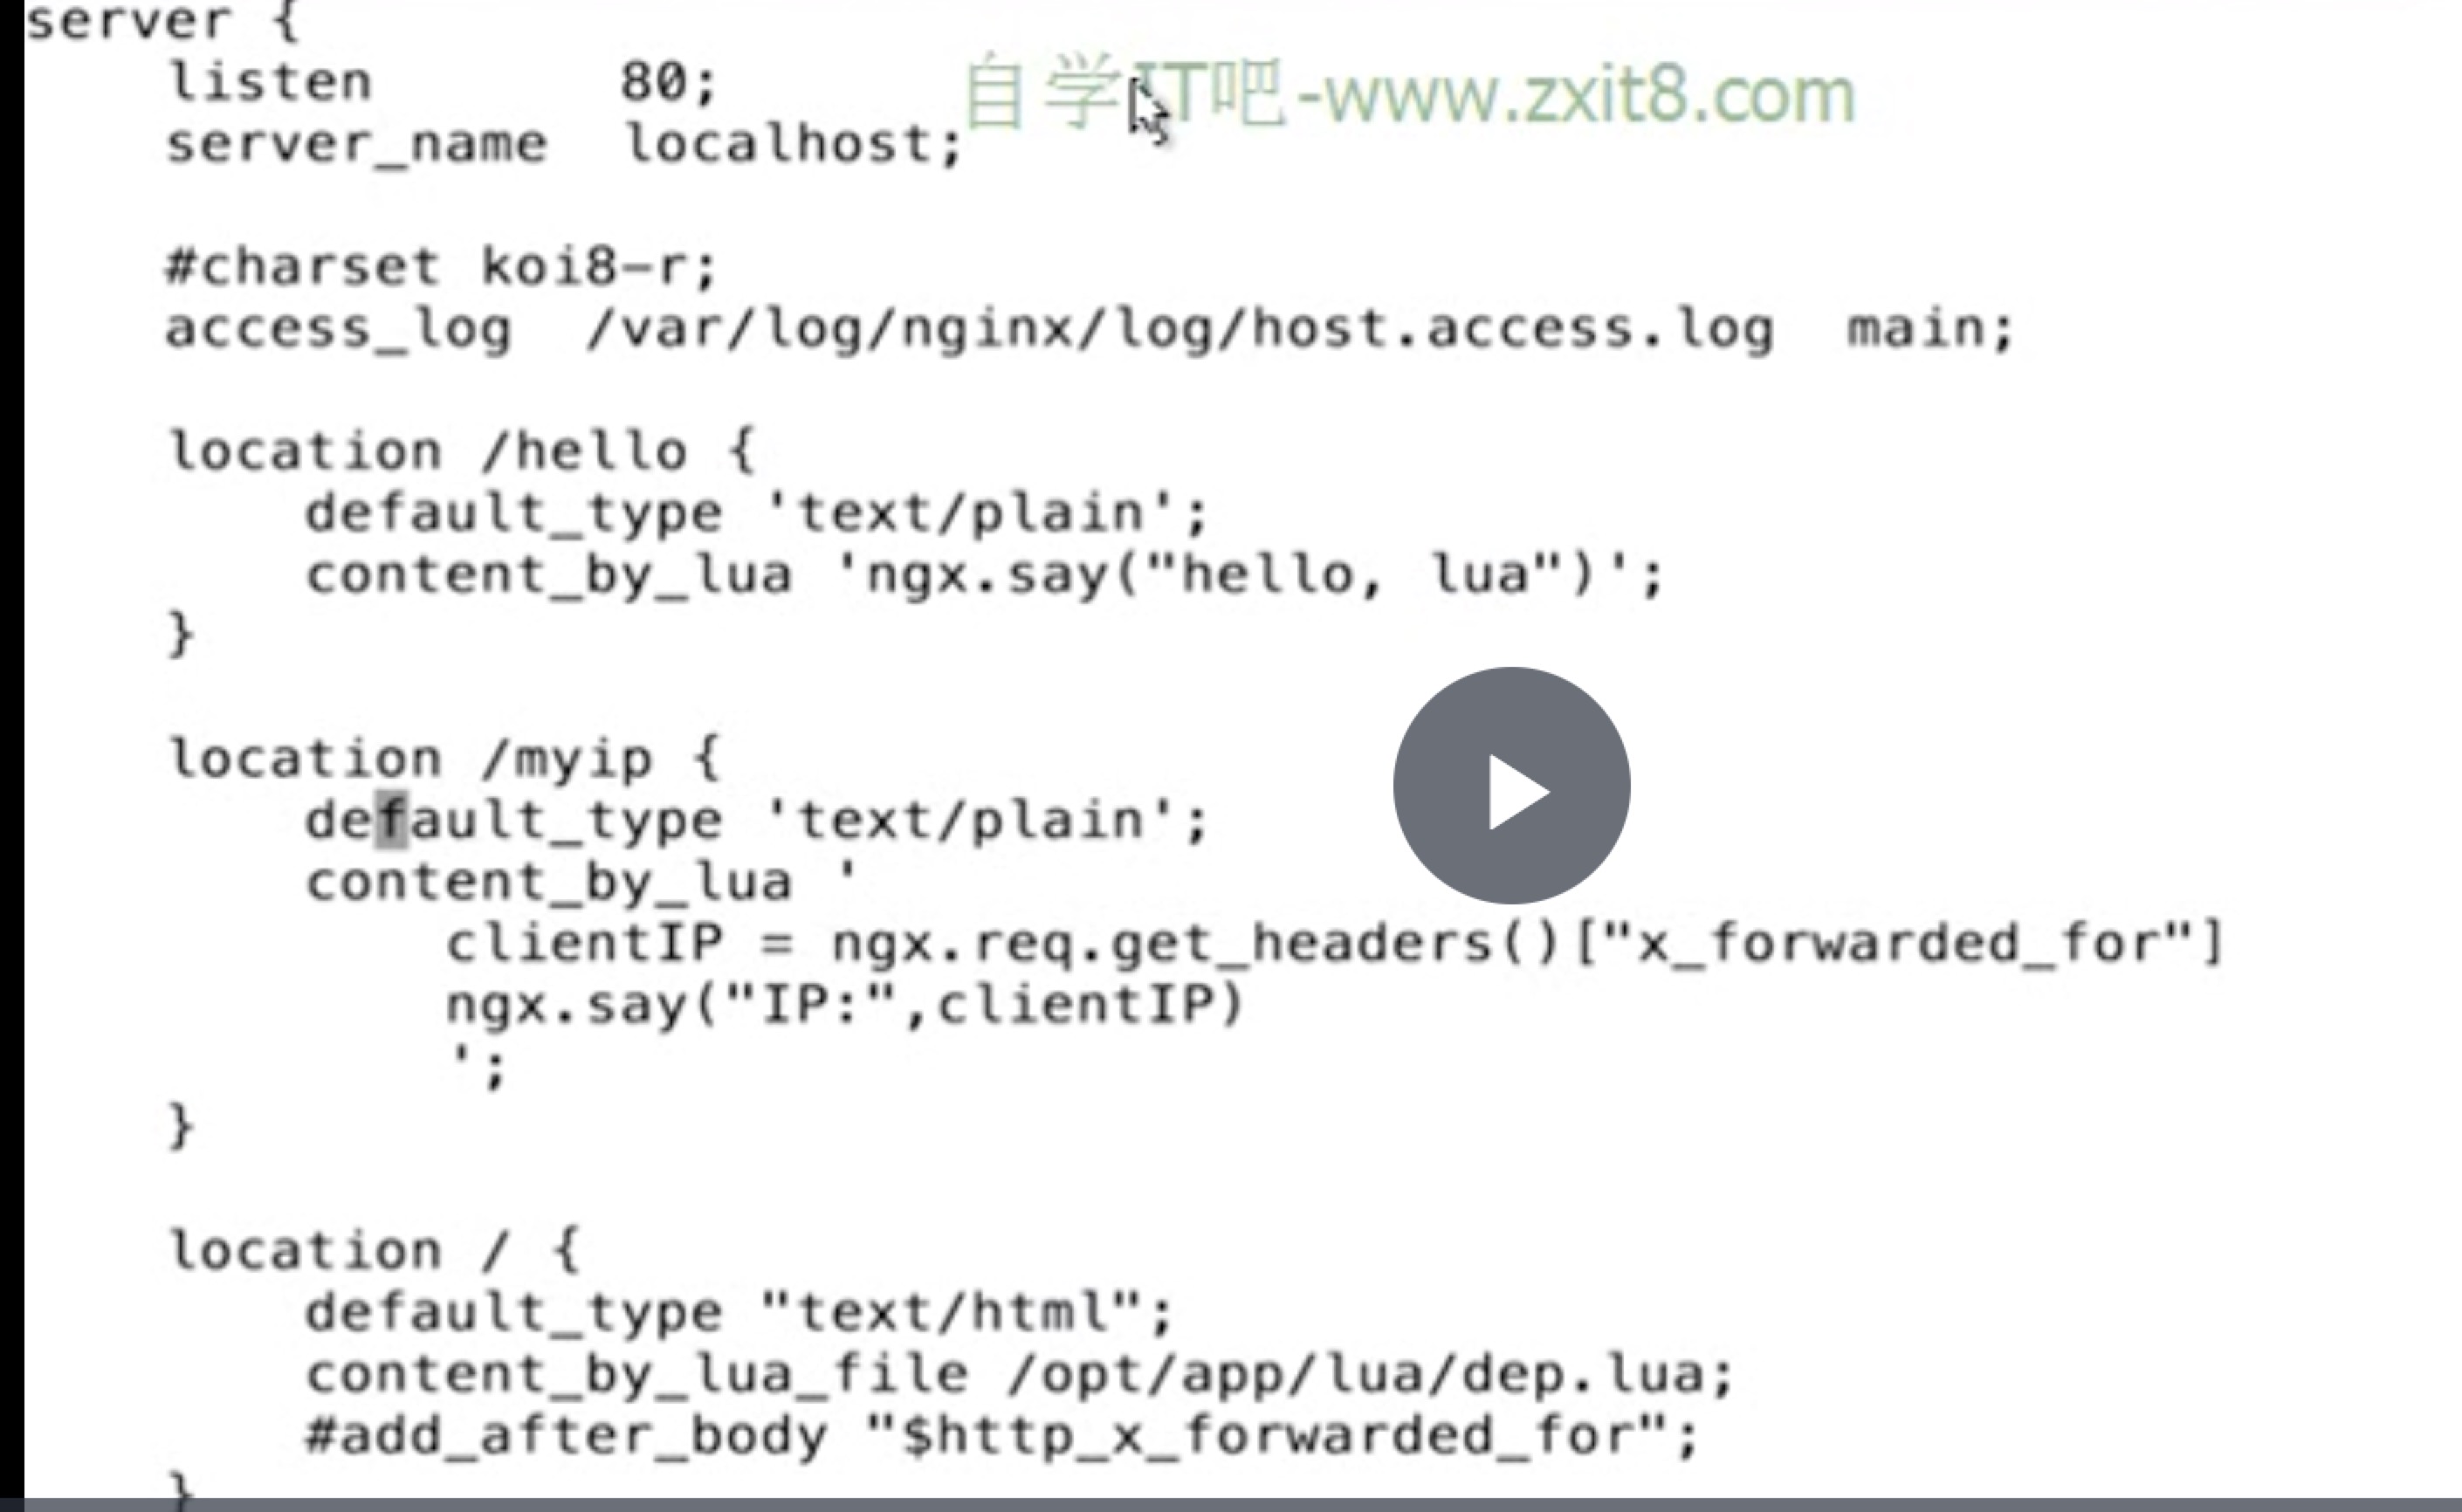
场景:用nginx结合lua实现代码的灰度发布
优势
充分的结合nginx的并发处理epoll优势和lua的轻量实现简单的功能并且高比发的场景
安装
yum install lua运行
[root@VM_0_4_centos ~]# lua
Lua 5.1.4  Copyright (C) 1994-2008 Lua.org, PUC-Rio
> print("heollw")
heollw
>
# lua ./test.lua
heollwnginx+lua环境
- luaJIT
- ngx_devel_kit和lua-nginx-module
- 重新编辑nginx
nginx调用lua模块指令
nginx的可插拔模块化加载执行,共11个处理阶段
| 过程 | 说明 |
|---|---|
| set_by_lua | 设置nginx变量,可以实现复杂的赋值逻辑 |
| set_by_lua_file | |
| access_by_lua | 请求访问阶段处理,用于访问控制 |
| access_by_lua_file | |
| content_by_lua | 内容处理器吗,接受请求处理并输出响应 |
| content_by_lua_file |
nginx lua api
| 参数 | 说明 |
|---|---|
| ngx.var | nginx变量 |
| ngx.req.get_headers | 获取请求头 |
| ngx.req.get_uri_args | 获取uri请求参数 |
| ngx.rediect | 重定向 |
| ngx.print | 输出响应内容体 |
| ngx.say | 通ngx.print,但是会最后输出一个换行符 |
| ngx.header | 输出响应头 |
...
灰度发布
就是一部分用户可以访问,可以通过cookies或者ip等信息来区分
比如:

例子
lua逻辑

nginx常见问题
1. 相同server_name多个虚拟主机优先级访问
server {
    listen 80;
    server_name testserver1 chenjinxinlove.com;
    location {

    }
}
server {
    listen 80;
    server_name testserver2 chenjinxinlove.com;
    location {

    }
}
==默认使用先读取的配置文件==
2. location匹配优先级
- = 进行普通字符精致匹配,也就是完成匹配
- ^~ 表示普通字符匹配,使用前缀匹配
- ~ ~* 表示执行一个正则匹配()
- try_files使用
按顺序检查文件是否存在
location / {
    try_files $uri $uri/ /index.php
}
使用可以先到缓存中查找没有在去动态语言
4. nginx的alias和root区别
location /request_path/imgge/ {
    root /local_path/image
}

// 访问的url
http:///www.chenjinxinlove/request_path/image/cat.png

// 实际路径
/local_path/image/request_path/image/cat.png


location /request_path/imgge/ {
    alias /local_path/image
}

// 访问的url
http:///www.chenjinxinlove/request_path/image/cat.png

// 实际路径
/local_path/image/cat.png
5. 用什么方法传递用户的真实ip
ip
ip1-->ip2-->ip2

set x_real_ip = $remote_addr  在ip1代理中设置真实

$x_real_ip =Ip1  在nginx就可以拿到
6.其他
- Nginx: 413Request Entity Too Large
用户上传文件限制client_max_body_size
- 502 bad gatway
后端服务无响应
- 504 Gateway Time-out
后端服务执行超时
nginx性能优化
1. 性能优化考虑点
当前系统结构瓶颈
观察指标、压力测试了解业务模式
接口业务类型、系统层次化结构性能与安全
2. 压测工具ab
安装
yum install httpd-tools使用
ab -n 2000 -c 2 http://127.0.0.1
-n 总的请求数
-c 并发数
-k 是否开启长连接
qps 每秒请求的次数
quest per second
[root@VM_0_4_centos ~]# ab -n 2000 -c 3 http://www.baidu.com/
This is ApacheBench, Version 2.3 <$Revision: 1430300 $>
Copyright 1996 Adam Twiss, Zeus Technology Ltd, http://www.zeustech.net/
Licensed to The Apache Software Foundation, http://www.apache.org/

Benchmarking www.baidu.com (be patient)
Completed 200 requests

Server Software:        BWS/1.1
Server Hostname:        www.baidu.com
Server Port:            80

Document Path:          /
Document Length:        118146 bytes

Concurrency Level:      3
Time taken for tests:   19.050 seconds
Complete requests:      324
Failed requests:        321
   (Connect: 0, Receive: 0, Length: 321, Exceptions: 0)
Write errors:           0
Total transferred:      38715469 bytes
HTML transferred:       38406497 bytes
Requests per second:    17.01 [#/sec] (mean)
Time per request:       176.389 [ms] (mean)
Time per request:       58.796 [ms] (mean, across all concurrent requests)
Transfer rate:          1984.68 [Kbytes/sec] received

Connection Times (ms)
              min  mean[+/-sd] median   max
Connect:        4    4   0.4      4      10
Processing:    14  170 205.9    186    3054
Waiting:        5   66  52.4     76     265
Total:         18  174 205.9    190    3058

Percentage of the requests served within a certain time (ms)
  50%    190
  66%    255
  75%    303
  80%    305
  90%    310
  95%    312
  98%    314
  99%    317
 100%   3058 (longest request)
3. 系统与nginx性能优化
- 网络
- 系统
- 服务
- 程序
- 数据库、底层服务
文件句柄
linux一起都是文件,文件句柄就是一个索引
设置方式
系统全局性修改、用户局部修改、进程局部性修改
vim /etc/security/limits.conf*就是所有的用户
root               soft   nofile          10000
root               hard   nofile          20000
*                  soft   nofile          10000
*                  hard   nofile          20000
针对进程可以在nginx的配置文件中修改
worker_rlimit_nofile 20000cpu亲和和其他的常优化
把进程通常不会再处理器之间频繁迁移进程迁移的频率小,减少性能损耗
cat /proc/cpuinfo 记录了cpu的信息再nginx配置文件
# 根据cpu的核数做相应的配置,比如是16核
worker_processes 16;
# 把cpu全列出来
worker_cpu_affinity 00000000000000001 00000000000000010 ...;
# auto也可以
worker_cpu_affinity auto;
events {
use epoll;
# 默认就是1024个,可以调高
worker_connections 10240;
}
http {
# 统一设置成utf-8
charset utf-8;
# 日志可以关闭一些不用的
access_log off;
#Core module
sendfile on;
tcp_nopush on;
tcp_nodeny on;
keepalive_timeout 65;
#Gzip module
gzip on;
# 兼容ie6
gzip_disable "MSIE [1-6]\.";
gzip_http_version 1.1;
}安全
- 常见的恶意行为
- 常见的应用层攻击手段
- nginx防攻击策略
- 场景:nginx + lua的安全waf防火墙
1. 常见的恶意行为
- 爬虫行为和恶意抓取、资源盗用
- 基础防盗链功能-目的不让恶意用户能轻易的爬取网站对外数据
- secure_link_module - 对数据安全性提高加密验证和失效性,适合核心重要的数据
- access_module -对后台。部分用户服务的数据提供IP防控
常见的攻击手段
后台密码撞库-通过猜测密码字典不断对后台系统登录性尝试,获取后台登录密码
- 后台登录密码复杂度
- access_module - 对后台提供IP防控
- 预警机制
文件上传漏洞-利用一些可以上传的接口将恶意代码植入到服务器中在通过url去访问以执行代码
sql注入-利用未过滤/未审核用户输入的攻击方法,让应用运行本不应该运行对的SQL代码
nginx+lua防火墙

比较好的实现
http://github.com/loveshell/ngx_lua_waf分类
静态
代理
动静分类

设计评估
硬件 cpu 内存 硬盘(日志)
系统 用户权限、日志目录存放
关联服务 LVS 、keepalive、syslog、Fastcgi
- 合理配置
- 了解原理
- 关注日志