项目要求:利用卷积神经网络来对电报报文进行识别,因为报文数据集较小,需要用到MNIST数据集来作为训练集。
实现步骤:
1. 数据预处理:将报文图片处理成单个数字
2. 网络训练
3. 网络参数微调
4. 分类预测
一. 数据集
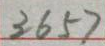
如下所示,每个报文由四个数字组成
为了增加识别率,需要对图片进行预处理,使其对机器识别更友好。
针对以上原始报文的处理步骤如下:
- 读取原始图片素材
- 将彩色图片二值化为黑白图片
- 去除背景噪点
from img_tools import get_clear_bin_image, get_crop_imgs,save_crop_imgsimport matplotlib.pyplot as plt
from PIL import Image
image = Image.open('test_image/1.png') #读取图片
image.show()
imgry = image.convert('L') # 转化为灰度图字符,保存在内存中
bin_clear_img = get_clear_bin_image(imgry) # 处理获得去噪的二值图
child_img_list = get_crop_imgs(bin_clear_img) # 切割图片为单个t图片,例如:4位电报报文就可以分割成4个child
for i in range(4):
new_image = child_img_list[i] # 提取第i个子图
new_img=new_image.resize((28,28),Image.BILINEAR) # 图片大小统一调整为28*28
new_img.show() #显示图片图片预处理函数:
import os
from PIL import Image
from cfg import img_path, bin_clear_folder, origin_pic_folder, cut_pic_folder, data_root
from os.path import join


def get_bin_table(threshold=155):  ## 155为自定义像素值,使图片预处理更好的显示数字轮廓
    """
    获取灰度转二值的映射table
    :param threshold:
    :return:
    """
    table = []
    for i in range(256):
        if i < threshold:
            table.append(1)
        else:
            table.append(0)

    return table
def sum_9_region(img, x, y):
"""
9邻域框,以当前点为中心的田字框,黑点个数,作为移除一些孤立的点的判断依据
:param img: Image
:param x:
:param y:
:return:
"""
cur_pixel = img.getpixel((x, y)) # 当前像素点的值
width = img.width
height = img.height
if cur_pixel == 1: # 如果当前点为白色区域,则不统计邻域值
return 0
if y == 0: # 第一行
if x == 0: # 左上顶点,4邻域
# 中心点旁边3个点
sum = cur_pixel \
+ img.getpixel((x, y + 1)) \
+ img.getpixel((x + 1, y)) \
+ img.getpixel((x + 1, y + 1))
return 4 - sum
elif x == width - 1: # 右上顶点
sum = cur_pixel \
+ img.getpixel((x, y + 1)) \
+ img.getpixel((x - 1, y)) \
+ img.getpixel((x - 1, y + 1))
return 4 - sum
else: # 最上非顶点,6邻域
sum = img.getpixel((x - 1, y)) \
+ img.getpixel((x - 1, y + 1)) \
+ cur_pixel \
+ img.getpixel((x, y + 1)) \
+ img.getpixel((x + 1, y)) \
+ img.getpixel((x + 1, y + 1))
return 6 - sum
elif y == height - 1: # 最下面一行
if x == 0: # 左下顶点
# 中心点旁边3个点
sum = cur_pixel \
+ img.getpixel((x + 1, y)) \
+ img.getpixel((x + 1, y - 1)) \
+ img.getpixel((x, y - 1))
return 4 - sum
elif x == width - 1: # 右下顶点
sum = cur_pixel \
+ img.getpixel((x, y - 1)) \
+ img.getpixel((x - 1, y)) \
+ img.getpixel((x - 1, y - 1))
return 4 - sum
else: # 最下非顶点,6邻域
sum = cur_pixel \
+ img.getpixel((x - 1, y)) \
+ img.getpixel((x + 1, y)) \
+ img.getpixel((x, y - 1)) \
+ img.getpixel((x - 1, y - 1)) \
+ img.getpixel((x + 1, y - 1))
return 6 - sum
else: # y不在边界
if x == 0: # 左边非顶点
sum = img.getpixel((x, y - 1)) \
+ cur_pixel \
+ img.getpixel((x, y + 1)) \
+ img.getpixel((x + 1, y - 1)) \
+ img.getpixel((x + 1, y)) \
+ img.getpixel((x + 1, y + 1))
return 6 - sum
elif x == width - 1: # 右边非顶点
# print('%s,%s' % (x, y))
sum = img.getpixel((x, y - 1)) \
+ cur_pixel \
+ img.getpixel((x, y + 1)) \
+ img.getpixel((x - 1, y - 1)) \
+ img.getpixel((x - 1, y)) \
+ img.getpixel((x - 1, y + 1))
return 6 - sum
else: # 具备9领域条件的
sum = img.getpixel((x - 1, y - 1)) \
+ img.getpixel((x - 1, y)) \
+ img.getpixel((x - 1, y + 1)) \
+ img.getpixel((x, y - 1)) \
+ cur_pixel \
+ img.getpixel((x, y + 1)) \
+ img.getpixel((x + 1, y - 1)) \
+ img.getpixel((x + 1, y)) \
+ img.getpixel((x + 1, y + 1))
return 9 - sum
def remove_noise_pixel(img, noise_point_list):
"""
根据噪点的位置信息,消除二值图片的黑点噪声
:type img:Image
:param img:
:param noise_point_list:
:return:
"""
for item in noise_point_list:
img.putpixel((item[0], item[1]), 1)
def get_clear_bin_image(image):
"""
获取干净的二值化的图片。
图像的预处理:
1. 先转化为灰度
2. 再二值化
3. 然后清除噪点
参考:http://python.jobbole.com/84625/
:type img:Image
:return:
"""
imgry = image.convert('L') # 转化为灰度图
table = get_bin_table()
out = imgry.point(table, '1') # 变成二值图片:0表示黑色,1表示白色
# noise_point_list = [] # 通过算法找出噪声点,第一步比较严格,可能会有些误删除的噪点
# for x in range(out.width):
# for y in range(out.height):
## res_9 = sum_9_region(out, x, y)
# if (0 < res_9 < 3) and out.getpixel((x, y)) == 0: # 找到孤立点
# pos = (x, y) #
# noise_point_list.append(pos)
# remove_noise_pixel(out, noise_point_list)
return out
def get_crop_imgs(img):
"""
按照图片的特点,进行切割,这个要根据具体的验证码来进行工作. # 见本例验证图的结构原理图
分割图片是传统机器学习来识别验证码的重难点,如果这一步顺利的话,则多位验证码的问题可以转化为1位验证字符的识别问题
:param img:
:return:
"""
child_img_list = []
for i in range(4):
# x = 2 + i * (6 + 4) # 见原理图
# y = 0
# child_img = img.crop((x, y, x + 6, y + 10))
x1 = [6,26,54,69] ## 每个数字得左边界
x2 = [25,46,67,91] ## 每个数字右边界
child_img = img.crop((x1[i],10,x2[i],40)) # 数字区域,10为上边界,40为下边界
child_img_list.append(child_img)
return child_img_list
def print_line_x(img, x):
"""
打印一个Image图像的第x行,方便调试
:param img:
:type img:Image
:param x:
:return:
"""
print("line:%s" % x)
for w in range(img.width):
print(img.getpixel((w, x)), end='')
print('')
def print_bin(img):
"""
输出二值后的图片到控制台,方便调试的函数
:param img:
:type img: Image
:return:
"""
print('current binary output,width:%s-height:%s\n')
for h in range(img.height):
for w in range(img.width):
print(img.getpixel((w, h)), end='')
print('')
def save_crop_imgs(bin_clear_image_path, child_img_list):
"""
输入:整个干净的二化图片
输出:每张切成4版后的图片集
保存切割的图片
例如: A.png ---> A-1.png,A-2.png,... A-4.png 并保存,这个保存后需要去做label标记的
:param bin_clear_image_path: xxxx/xxxxx/xxxxx.png 主要是用来提取切割的子图保存的文件名称
:param child_img_list:
:return:
"""
full_file_name = os.path.basename(bin_clear_image_path) # 文件名称
full_file_name_split = full_file_name.split('.')
file_name = full_file_name_split[0]
# file_ext = full_file_name_split[1]
i = 0
for child_img in child_img_list:
cut_img_file_name = file_name + '-' + ("%s.png" % i)
child_img.save(join(cut_pic_folder, cut_img_file_name))
i += 1
# 训练素材准备:文件目录下面的图片的批量操作
def batch_get_all_bin_clear():
"""
训练素材准备。
批量操作:获取所有去噪声的二值图片
:return:
"""
file_list = os.listdir(origin_pic_folder)
for file_name in file_list:
file_full_path = os.path.join(origin_pic_folder, file_name)
image = Image.open(file_full_path)
get_clear_bin_image(image)
def batch_cut_images():
"""
训练素材准备。
批量操作:分割切除所有 "二值 -> 除噪声" 之后的图片,变成所有的单字符的图片。然后保存到相应的目录,方便打标签
"""
file_list = os.listdir(bin_clear_folder)
for file_name in file_list:
bin_clear_img_path = os.path.join(bin_clear_folder, file_name)
img = Image.open(bin_clear_img_path)
child_img_list = get_crop_imgs(img)
save_crop_imgs(bin_clear_img_path, child_img_list) # 将切割的图进行保存,后面打标签时要用
# 中间的demo效果演示
def demo_cut_pic():
"""
做实验研究时的演示代码
:return:
"""
img_path = join(data_root, 'demo-6937/ocr-simple-char-captcha-bin-clear-6937.png')
img = Image.open(img_path)
cut_save = data_root + '/demo-6937'
child_img_list = get_crop_imgs(img)
index = 0
for child_img in child_img_list:
child_img.save(cut_save + '/cut-%d.png' % index)
index += 1
def get_bin_img_name(img_path):
"""
根据原始origin 文件路径,获取二值而且去噪声的文件路径
:param img_path:
:type img_path:str
:return:
"""
path_split = img_path.split('/')
file_name_split = path_split[-1].split('.')
file_name = file_name_split[0] # 文件名
# file_ext = file_name_split[1] # 扩展名
new_file = '/'.join(item for item in path_split[:-2]) + '/bin_clear/' + file_name + '.png'
return new_file
def demo_handle_save_bin_clear_pic(image):
"""
图像处理函数的演示
在训练分析阶段的时候使用:保存二次的二值图,
:type img:Image
:return:
"""
out = get_clear_bin_image(image)
new_file_path = get_bin_img_name(img_path)
print(new_file_path)
out.save(new_file_path)
if __name__ == "__main__":
print(get_bin_table())
# batch_get_all_bin_clear() # 获取所有的二值化的初步去噪的图片
# cut_all_pic() # 切割图片成单个字
# save_train_txt()
# save_test_txt()
# crack_captcha()
# img = Image.open(img_path)
# handle_save_bin_clear_pic(img)
# demo_cut_pic()
pass完成图片处理之后,报文图片被处理成


完成图片处理之后需要使用MNIST的数据集进行训练,先用lenet5模型,训练集为MNIST的全部数据集,测试集为报文数据集。
数据集官网下载。
import numpy as np
from tensorflow.examples.tutorials.mnist import input_data
import os
from PIL import Image

import scipy.io as sio


from keras.layers import Input, Dense, Conv2D, MaxPooling2D, UpSampling2D
from keras.layers.normalization import BatchNormalization
from keras import backend as K
from keras.models import Model
from keras.layers.core import Flatten

mnist = input_data.read_data_sets("MNIST_data/", one_hot=True)
x_train, y_train = mnist.train.images,mnist.train.labels
x_var, y_var = mnist.validation.images,mnist.validation.labels
x_test, y_test = mnist.test.images, mnist.test.labels

train = np.concatenate((x_train,x_var, x_test)) ## 矩阵拼接
train = np.uint8(train*255)
train = train.reshape(train.shape[0], 28, 28).astype('float32')

train_label = np.concatenate((y_train,y_var, y_test))

train_data = train.reshape(train.shape[0], 28, 28, 1).astype('float32')

## 读取测试集
str = "./new_test"   # 数据集路径
#name = os.listdir(str)  # 读取路径下所有文件名
name = open('name.txt')

name_list = []
for f in name.readlines():
    name_list.append(f.strip('\n'))

result =[]   # 建立空白的数组
for filename in name_list:
    img = Image.open(os.path.join(str, filename))
#
    new_image = img.resize((28,28),Image.BILINEAR)
    imgry_new = np.array( new_image.convert('L'))
    result.append(imgry_new)
test = np.array(result) # 将一维数组转化为count行3072列的二维数组

#读取测试集标签
test_labels = np.loadtxt('test_label.txt')
test_label = (np.arange(10) == test_labels[:,None]).astype(int)


## 数据集处理
## 格式转换 [样本数][宽][高][通道数]
test_data = test.reshape(test.shape[0],28,28,1).astype('float32')


# 归一化 0-255 to 0-1
train_data = train_data/ 255
test_data = test_data / 255


 # 建立模型
input_img = Input(shape=(28,28, 1))  # 一维卷积输入层,维度28*28(特征数)
x1 = Conv2D(10,(5,5), activation='relu', padding='same')(input_img)   #卷积层,32个核,宽度为5,激活函数为relu
x1 = BatchNormalization()(x1)   #  规范层,加速模型收敛,防止过拟合
x1 = MaxPooling2D(2, )(x1)   # 池化层

x1 = Conv2D(16,(5,5), activation='relu')(x1)
x1 = BatchNormalization()(x1)   #  规范层,加速模型收敛,防止过拟合
encoded = MaxPooling2D(2)(x1)

encoded = Flatten()(encoded)# 展开
decoded = Dense(120, activation='relu')(encoded)   # softmax激活函数,输出层
decoded = Dense(84, activation='relu')(decoded)   # softmax激活函数,输出层
decoded = Dense(10, activation='softmax')(decoded)   # softmax激活函数,输出层

autoencoder = Model(input_img, decoded)   #编码
autoencoder.compile(optimizer='adam', loss='categorical_crossentropy')  # 优化器为adam,损失函数为categorical_crossentropy
autoencoder.fit(train_data, train_label, epochs=50,
                    batch_size=512, shuffle=True)   # 模型性能计算,内置打印函数,输出训练集,验证集的损失函数值

pr=autoencoder.predict(test_data)  # 测试集预测结果
predict=np.argmax(pr, axis=1)

acc =sum(predict==test_labels)/len(test_labels)
print("The predict accuracy is:",acc)
lenet5网络报文数字预测结果为0.85左右。
后面自己定义卷积神经网络:
import numpy as np
from tensorflow.examples.tutorials.mnist import input_data
import os
from PIL import Image

import scipy.io as sio


from keras.layers import Input, Dense, Conv2D, MaxPooling2D, UpSampling2D
from keras.layers.normalization import BatchNormalization
from keras import backend as K
from keras.models import Model
from keras.layers.core import Flatten

mnist = input_data.read_data_sets("MNIST_data/", one_hot=True)
x_train, y_train = mnist.train.images,mnist.train.labels
x_test, y_test = mnist.test.images, mnist.test.labels
train = np.concatenate((x_train, x_test)) ## 矩阵拼接
train_label = np.concatenate((y_train, y_test))

train_data = train.reshape(-1, 28, 28,1).astype('float32')

## 读取测试集
str = "./new_test"   # 数据集路径
#name = os.listdir(str)  # 读取路径下所有文件名
name = open('name.txt')

name_list = []
for f in name.readlines():
    name_list.append(f.strip('\n'))

result =[]   # 建立空白的数组
for filename in name_list:
    img = Image.open(os.path.join(str, filename))
#
    new_image = img.resize((28,28),Image.BILINEAR)
    imgry_new = np.array( new_image.convert('L'))
    result.append(imgry_new)
test = np.array(result) # 将一维数组转化为count行3072列的二维数组

#读取测试集标签
test_labels = np.loadtxt('test_label.txt')
test_label = (np.arange(10) == test_labels[:,None]).astype(int)


## 数据集处理
## 格式转换 [样本数][宽][高][通道数]
test_data = test.reshape(test.shape[0],28,28,1).astype('float32')


# 归一化 0-255 to 0-1
train_data = train_data/ 255
test_data = test_data / 255


 # 建立模型
input_img = Input(shape=(28,28, 1))  # 一维卷积输入层,维度28*28(特征数)
x1 = Conv2D(128,(5,5), activation='relu', padding='same')(input_img)   #卷积层,32个核,宽度为5,激活函数为relu
x1 = BatchNormalization()(x1)   #  规范层,加速模型收敛,防止过拟合
x1 = MaxPooling2D(2, )(x1)   # 池化层


x1 = Conv2D(64,(5,5), activation='relu', padding='same')(input_img)   #卷积层,32个核,宽度为5,激活函数为relu
x1 = BatchNormalization()(x1)   #  规范层,加速模型收敛,防止过拟合
x1 = MaxPooling2D(2, )(x1)   # 池化层

#x1 = Conv2D(32,(5,5), activation='relu', padding='same')(input_img)   #卷积层,32个核,宽度为5,激活函数为relu
#x1 = BatchNormalization()(x1)   #  规范层,加速模型收敛,防止过拟合
#x1 = MaxPooling2D(2, )(x1)   # 池化层

x1 = Conv2D(32,(5,5), activation='relu')(x1)
x1 = BatchNormalization()(x1)   #  规范层,加速模型收敛,防止过拟合
encoded = MaxPooling2D(2)(x1)

encoded = Flatten()(encoded)# 展开
decoded = Dense(120 ,activation='relu')(encoded)   # softmax激活函数,输出层
decoded = Dense(84,activation='relu')(decoded)   # softmax激活函数,输出层
decoded = Dense(10,activation='softmax')(decoded)   # softmax激活函数,输出层

autoencoder = Model(input_img, decoded)   #编码
autoencoder.compile(optimizer='adam', loss='categorical_crossentropy')  # 优化器为adam,损失函数为categorical_crossentropy
autoencoder.fit(train_data, train_label, epochs=50,
                    batch_size=512, shuffle=True)   # 模型性能计算,内置打印函数,输出训练集,验证集的损失函数值

pr=autoencoder.predict(test_data)  # 测试集预测结果
predict=np.argmax(pr, axis=1)

acc =sum(predict==test_labels)/len(test_labels)
print("The predict accuracy is:",acc)
自定义网络模型的结果为0.95.
后续思路:MNIST为训练集训练网络模型,再用报文部分数据对训练好的模型进行微调,再用报文测试集测试获得结果。