内容:
1,模块传参和模块调用——模块的特征
2,完整的驱动程序组成
**3,在应用空间和内核空间(驱动)之间的数据交换
===============================================**
一,模块传参和模块调用
1,模块传参——-在加载模块时,同时给模块传参数
1> 在编写代码时,需要对模块中的参数进行声明:

    module_param(变量名,变量的类型,权限);

    例如:
        module_param(sno,int,0644);
        module_param(name,charp,0644);
2> 在开发板中,加载模块时,可以传参:
    [root@farsight /drv_module]# insmod hello_drv.ko sno=1002
    ---------hello_init------------
    sno = 1002,name = 小明
    [root@farsight /drv_module]# insmod hello_drv.ko sno=1002 name=farsight
    ---------hello_init------------
    sno = 1002,name = farsight

    加载模块后,在应用空间中,可以看到与模块中变量同名的文件被创建:
    [root@farsight /drv_module]# ls /sys/module/hello_drv/parameters/ -l
    total 0
    -rw-r--r--    1 0        0             4096 Jan  1 00:08 name
    -rw-r--r--    1 0        0             4096 Jan  1 00:08 sno
代码
hello_drv.c文件代码
#include <linux/init.h>
#include <linux/module.h>

int sno = 1001;
char *name = "小明";

static int __init hello_init(void)
{
    printk("---------%s------------\n",__FUNCTION__);
    printk("sno = %d,name = %s\n",sno,name);
    return 0;
}

static void __exit hello_exit(void)
{
    printk("---------%s------------\n",__FUNCTION__);
}

//声明

module_param(sno,int,0644);
module_param(name,charp,0644);

module_init(hello_init);
module_exit(hello_exit);
MODULE_LICENSE("GPL");   //认证
Makefile文件代码
KERNEL_DIR = /home/lpf/1803/s5pv210/kernel/linux-3.0.8    #指定内核源码路径
CUR_DIR = $(shell pwd)


all:
    #使make进入内核源码目录,并将当前目录下的源码作为内核的模块一起编译
    make -C $(KERNEL_DIR) M=$(CUR_DIR) modules

clean:
    #删除上面生成的文件
    make -C $(KERNEL_DIR) M=$(CUR_DIR) clean

install:
    cp *.ko /opt/rootfs/drv_module

obj-m = hello_drv.o
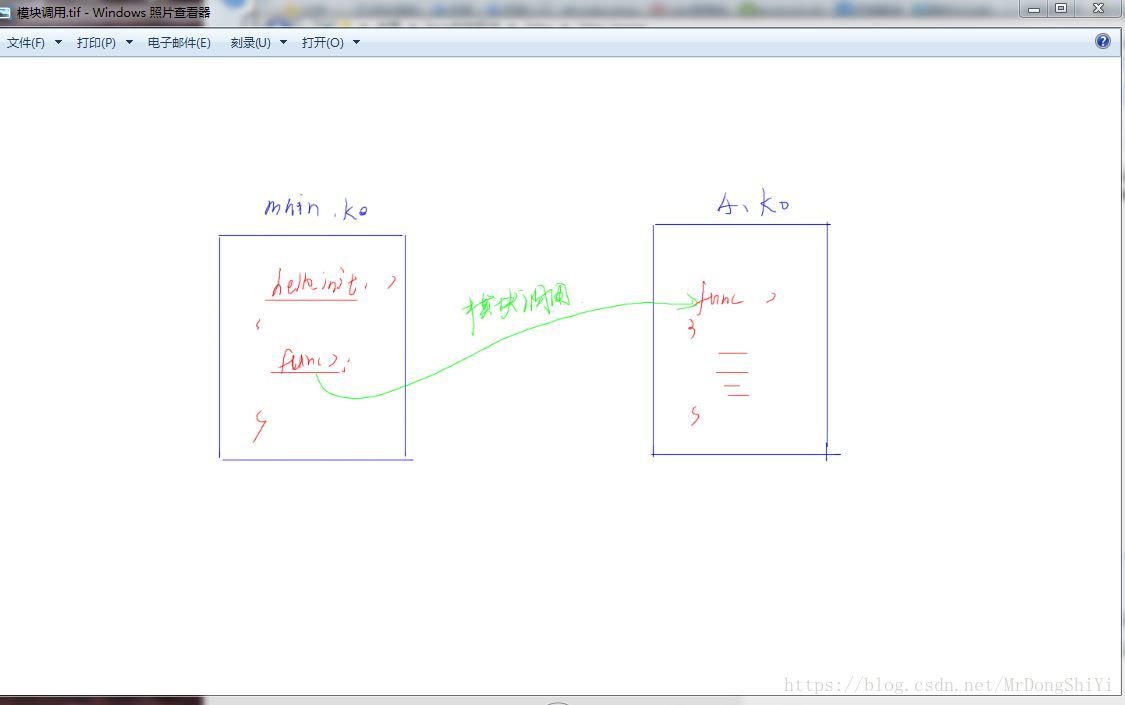
2,模块调用:
代码实现:
        调用模块------hello_drv.c                                   |
        int a,b;                                                    |
        static int __init hello_init(void)                          |
        {                                                           |
            printk("---------%s------------\n",__FUNCTION__);       |
            printk("sno = %d,name = %s\n",sno,name);                |
                                                                    |
            printk("%d + %d = %d\n",a,b,myadd(a,b));                |
            return 0;                                               |
        }                                                           |
        --------------------------------------------------------
        被调用模块----myadd.c
        int myadd(int a,int b)
        {
            return a + b;
        }

        EXPORT_SYMBOL(myadd);

        MODULE_LICENSE("GPL");
    在开发板中:
        必须先加载被调用模块,然后加载调用模块:
        [root@farsight /drv_module]# insmod myadd.ko
        [root@farsight /drv_module]# insmod hello_drv.ko a=3 b=8
        ---------hello_init------------
        sno = 1001,name = 小明
        **3 + 8 = 11
==============================================================================**
代码
hello_drv.c文件代码
#include <linux/init.h>
#include <linux/module.h>
#include "myadd.h"

int sno = 1001;
char *name = "小明";

int a,b;

static int __init hello_init(void)
{
    printk("---------%s------------\n",__FUNCTION__);
    printk("sno = %d,name = %s\n",sno,name);

    printk("%d + %d = %d\n",a,b,myadd(a,b));
    return 0;
}

static void __exit hello_exit(void)
{
    printk("---------%s------------\n",__FUNCTION__);
}

//声明

module_param(a,int,0644);
module_param(b,int,0644);
module_param(sno,int,0644);
module_param(name,charp,0644);

module_init(hello_init);
module_exit(hello_exit);
MODULE_LICENSE("GPL");   //认证
madd.h文件代码
#ifndef __MYADD__
#define __MYADD__

extern int myadd(int a,int b);


#endif
madd.c文件代码
#include <linux/init.h>
#include <linux/module.h>

int myadd(int a,int b)
{
    return a + b;
}

EXPORT_SYMBOL(myadd);

MODULE_LICENSE("GPL");
Makefile文件代码
KERNEL_DIR = /home/lpf/1803/s5pv210/kernel/linux-3.0.8    #指定内核源码路径
CUR_DIR = $(shell pwd)


all:
    #使make进入内核源码目录,并将当前目录下的源码作为内核的模块一起编译
    make -C $(KERNEL_DIR) M=$(CUR_DIR) modules

clean:
    #删除上面生成的文件
    make -C $(KERNEL_DIR) M=$(CUR_DIR) clean

install:
    cp *.ko /opt/rootfs/drv_module

obj-m = hello_drv.o
obj-m += myadd.o
补充:sourceinsight的使用
1> 将建好的工程文件拷贝到 \192.168.7.x\farsight\1803\s5pv210\kernel\linux-3.0.8
2> 在linux中解压:
lpf@ubuntu:~/1803/s5pv210/kernel/linux-3.0.8$ tar -xvf si_linux308-ori.tgz
linux308-ori.IAB
linux308-ori.IAD
linux308-ori.IMB
linux308-ori.IMD
linux308-ori.PFI
linux308-ori.PO
linux308-ori.PR
linux308-ori.PRI
linux308-ori.PS
linux308-ori.WK3
**3> 在共享目录中,双击linux308-ori.PR 打开工程即可
===================================================================================**
二,一个完整的驱动程序的组成
1,需要一个设备号
1>概念:
在linux内核中,设备号用一个32位的整数表示:—–dev_t
分两部分:
主设备号: 表示一类设备—-高12位
次设备号: 表示具体的某个设备的编号 ——— 低20位
2>申请设备号
static inline int register_chrdev(unsigned int major, const char *name,const struct file_operations *fops)
//功能:申请主设备号
//参数1: mojor大于0,表示静态指定主设备号,major等于0,表示让系统动态分配一个主设备号,并通过返回值返回
//参数2: name—字符串,表示驱动的描述信息,由我们自定义
//参数3: fops —- struct file_operations结构体类型的变量的地址
//返回值:
//如果静态指定主设备号:成功返回–0,失败返回–错误码
//如果动态分配主设备号:成功返回–主设备号,失败返回—错误码
    卸载函数:
        static inline void unregister_chrdev(unsigned int major, const char *name)

3> 当驱动加载成功后,可以在文件系统中看到申请的主设备号:
    [root@farsight /drv_module]# insmod hello_drv.ko
    ---------hello_init------------
    [root@farsight /drv_module]# cat /proc/devices
    Character devices:
      1 mem
    256 hello_drv
      2 pty
      3 ttyp
      4 /dev/vc/0
      4 tty
      4 ttyS
      5 /dev/tty
      5 /dev/console
      5 /dev/ptmx
2,需要创建设备节点 —–设备文件,可以在应用层文件系统中可见:/dev/
1>手动创建设备文件
mknod 设备文件名称 类型 主设备号 次设备号
例如:
[root@farsight /drv_module]# mknod /dev/hello c 254 0
[root@farsight /drv_module]# ls -l /dev/hello
crw-r–r– 1 0 0 254, 0 Jan 1 00:01 /dev/hello
2>自动创建设备文件(设备节点)
    #define class_create(owner, name)
    //参数1: 当前模块
    //参数2: 字符串----描述信息,自定义
    //返回值:成功--struct class结构体的地址,失败:NULL
                                                                                            printf(const char *fmt, ...);
    struct device *device_create(struct class *cls, struct device *parent,dev_t devt, void *drvdata,const char *fmt, ...)
    //参数1: class_create返回的指针
    //参数2: 父类,一般为:NULL
    //参数3: 设备号:dev_t
                #define MINORBITS   20
                #define MINORMASK   ((1U << MINORBITS) - 1)

                #define MAJOR(dev)  ((unsigned int) ((dev) >> MINORBITS))
                #define MINOR(dev)  ((unsigned int) ((dev) & MINORMASK))
                #define MKDEV(ma,mi)    (((ma) << MINORBITS) | (mi))
    //参数4: 私有数据,一般为:NULL
    //参数5: 设备文件的名称
    //变参:  配合参数5使用,共同定义设备文件的名称  ,例如;   "hello%d" , 1            表示设备文件的名字为:hello1
    //返回值: 成功-----struct device 结构体的地址,失败---NULL

    开发板中:
        [root@farsight /drv_module]# insmod hello_drv.ko        //加载驱动,会自动创建设备文件
        ---------hello_init------------
        [root@farsight /drv_module]# ls /dev/hello5 -l
        crw-rw----    1 0        0         254,   1 Jan  1 00:29 /dev/hello5
        [root@farsight /drv_module]# ./test             //运行应用程序,打开设备文件
        ---------hello_open------------
3,需要实现操作设备的方法(接口)
1> 实现操作方法
int hello_open(struct inode *inode , struct file *filp)
{
printk(“———%s————\n”,FUNCTION);
            return 0;
        }
        int hello_close(struct inode *inode, struct file *filp)
        {
            printk("---------%s------------\n",__FUNCTION__);

            return 0;
        }

    2> 将操作方法封装到:struct file_operations
        struct file_operations fops = {
            .open = hello_open,
            .release = hello_close,
        };
4,硬件初始化—-地址映射
ioremap(cookie,size)
//参数1: 要映射的物理空间的起始地址
//参数2: 要映射的物理空间的大小
//返回值:
    成功---- 虚拟空间的起始地址
    失败 ---- NULL
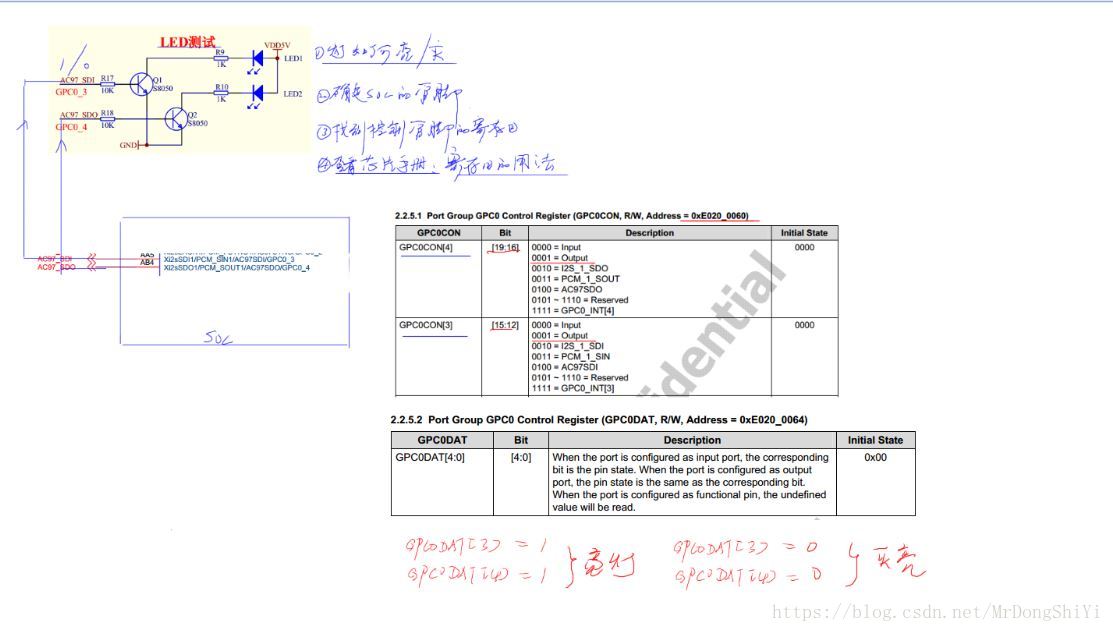
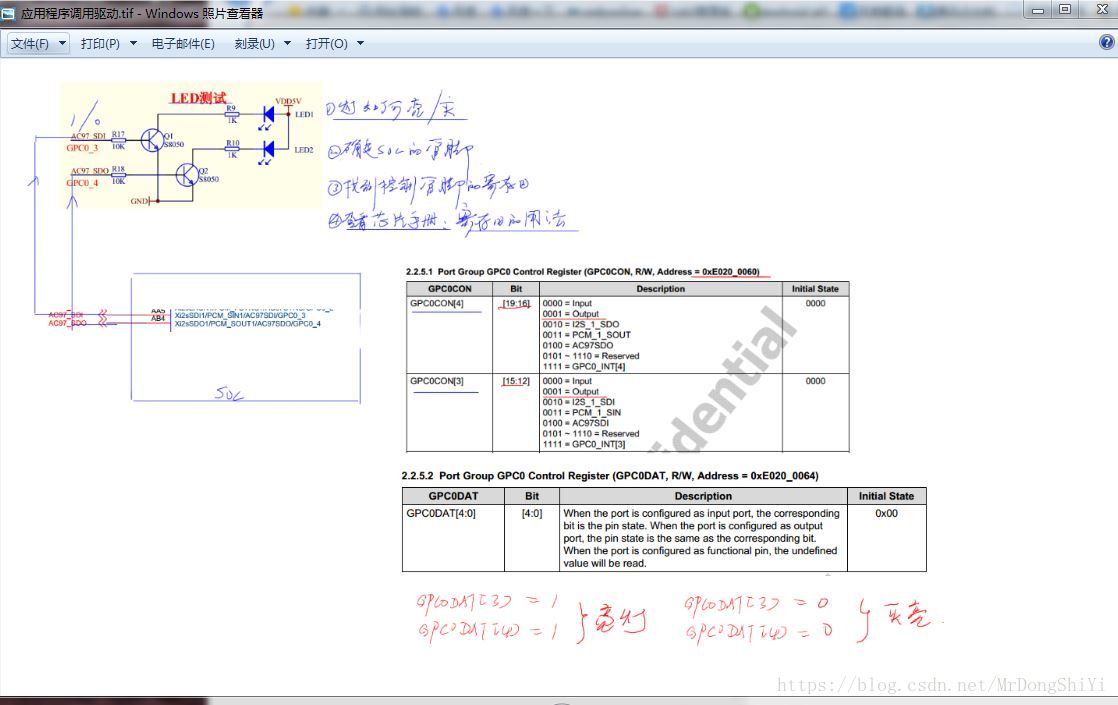
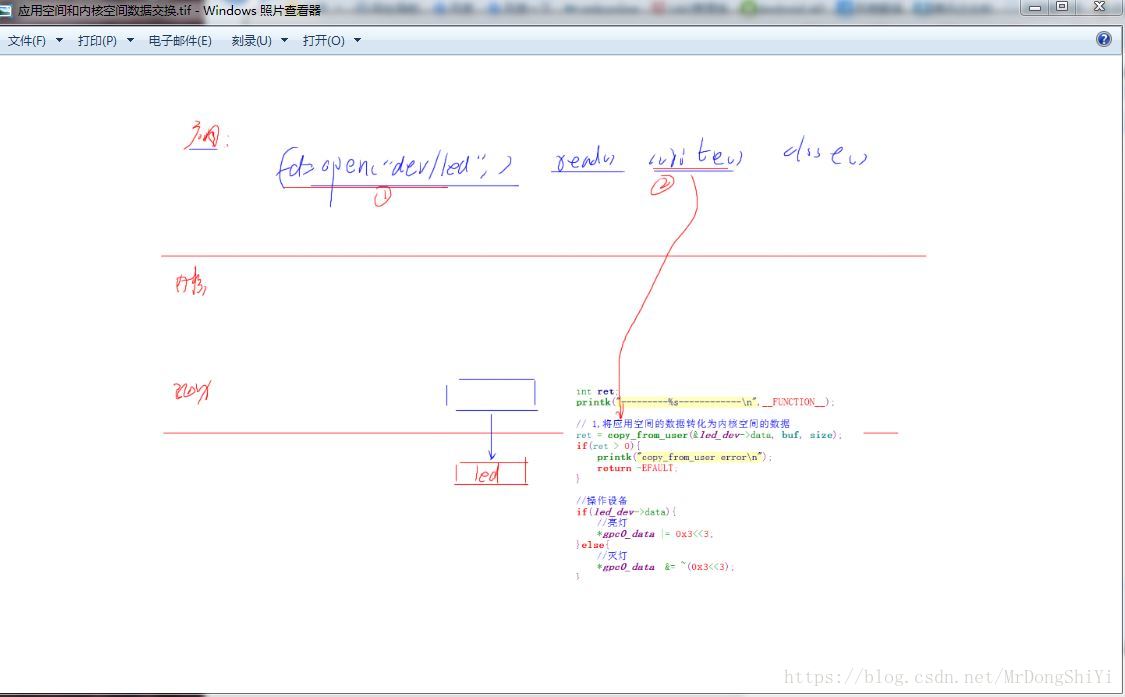
三,应用空间和内核空间(驱动)之间的数据交换
linux中:
驱动程序负责:实现机制 —–能不能做
应用程序负责:实现策略 —– 怎么做
所以,通常在编写驱动程序时,需要由应用空间传递数据给驱动程序,也就是应用空间和内核空间的数据交换.

应用空间  ----- >  内核空间 ------实现write接口函数
static inline unsigned long __must_check copy_from_user(void *to, const void __user *from, unsigned long n)
//参数1: 目标地址---内核空间地址
//参数2: 源地址 ---- 应用空间的数据地址
//参数3: 传递给内核的数据长度
//返回值:成功---0,失败----没有传递成功的剩余数据的个数

内核空间  ----- > 应用空间  ------ 实现read接口函数
static inline unsigned long __must_check copy_to_user(void __user *to, const void *from, unsigned long n)
//参数1: 目标地址---应用空间地址
//参数2: 源地址 ---- 内核空间的数据地址
//参数3: 传递给应用空间的数据长度
//返回值:成功---0,失败----没有传递成功的剩余数据的个数
led_drv.c文件代码
#include <linux/init.h>
#include <linux/module.h>
#include <linux/fs.h>
#include <linux/device.h>
#include <linux/slab.h>

#include <asm/io.h>
#include <asm/uaccess.h>

struct s5pv210_led{
    unsigned int major;
    struct class *cls;
    struct device * dev;
    int data;
};
struct s5pv210_led *led_dev;

unsigned long *gpc0_conf;
unsigned long *gpc0_data;

int led_drv_open(struct inode *inode , struct file *filp)
{
    printk("---------%s------------\n",__FUNCTION__);

    //将对应的管脚设置为输出
    *gpc0_conf  &= ~(0xff<<12);
    *gpc0_conf  |= 0x11<<12;
    return 0;
}

ssize_t led_drv_write(struct file *filp, const char __user *buf, size_t size, loff_t *flag)
{
    int ret;
    printk("---------%s------------\n",__FUNCTION__);

    // 1,将应用空间的数据转化为内核空间的数据
    ret = copy_from_user(&led_dev->data, buf, size);
    if(ret > 0){
        printk("copy_from_user error\n");
        return -EFAULT;
    }

    //操作设备
    if(led_dev->data){
        //亮灯
        *gpc0_data |= 0x3<<3;
    }else{
        //灭灯
        *gpc0_data  &= ~(0x3<<3);
    }
    return size;
}
int led_drv_close(struct inode *inode, struct file *filp)
{
    printk("---------%s------------\n",__FUNCTION__);
    //灭灯
    *gpc0_data  &= ~(0x3<<3);
    return 0;
}
struct file_operations fops = {
    .open = led_drv_open,
    .write = led_drv_write,
    .release = led_drv_close,
};
static int __init led_init(void)
{
    int ret;
    printk("---------%s------------\n",__FUNCTION__);
    // 0, 初始化对象
    led_dev = kzalloc(sizeof(struct s5pv210_led), GFP_KERNEL);
    if(IS_ERR(led_dev)){
        printk("kzalloc error\n");
        return  -ENOMEM;
    }
    // 1,申请设备号
    #if 0
    ret = register_chrdev(led_major, "led_drv", &fops); //静态指定主设备号
    if(ret < 0){
        printk("register_chrdev error!\n");
        return -EINVAL;
    }
    #else
    led_dev->major= register_chrdev(0, "led_drv", &fops); //动态分配主设备号
    if(led_dev->major < 0){
        printk("register_chrdev error!\n");
        ret = -EINVAL;
        goto err_free;
    }
    #endif

    // 2,创建设备文件

    led_dev->cls= class_create(THIS_MODULE,"led_class");
    if(IS_ERR(led_dev->cls)){
        printk("class_create error\n");
        ret = PTR_ERR(led_dev->cls);
        goto err_unregister;
    }

    led_dev->dev= device_create(led_dev->cls, NULL, MKDEV(led_dev->major,1), NULL, "led%d",5);
    if(IS_ERR(led_dev->dev)){
        printk("class_create error\n");
        ret = PTR_ERR(led_dev->dev);
        goto err_class;
    }

    // 3,硬件初始化----地址映射
    gpc0_conf = ioremap(0xE0200060,8);
    gpc0_data = gpc0_conf + 1;


    return 0;

err_class:
    class_destroy(led_dev->cls);
err_unregister:
    unregister_chrdev(led_dev->major, "led_drv");
err_free:
    kfree(led_dev);
    return ret;
}

static void __exit led_exit(void)
{
    printk("---------%s------------\n",__FUNCTION__);
    iounmap(gpc0_conf );
    device_destroy(led_dev->cls, MKDEV(led_dev->major,1));
    class_destroy(led_dev->cls);
    unregister_chrdev(led_dev->major, "led_drv");
    kfree(led_dev);
}

module_init(led_init);
module_exit(led_exit);
MODULE_LICENSE("GPL");   //认证
test.c应用层文件代码
#include <stdio.h>
#include <stdlib.h>
#include <sys/types.h>
#include <sys/stat.h>
#include <fcntl.h>


int main(void)
{
    int fd;
    int i,on;

    fd = open("/dev/led5",O_RDWR);
    if(fd < 0){
    printf("open");
    exit(1);
    }


    for(i = 0; i<10; i++){
    on = 1;
    write(fd,&on,sizeof(on));
    sleep(1);

    on = 0;
    write(fd,&on,sizeof(on));
    sleep(1);
    }

    close(fd);
    return 0;
}
Makefile文件代码
KERNEL_DIR = /home/lpf/1803/s5pv210/kernel/linux-3.0.8    #指定内核源码路径
CUR_DIR = $(shell pwd)
SRC = test.c
MYAPP = test

all:
    #使make进入内核源码目录,并将当前目录下的源码作为内核的模块一起编译
    make -C $(KERNEL_DIR) M=$(CUR_DIR) modules
    arm-none-linux-gnueabi-gcc -o $(MYAPP) $(SRC)

clean:
    #删除上面生成的文件
    make -C $(KERNEL_DIR) M=$(CUR_DIR) clean
    rm $(MYAPP) .*.sw?
install:
    cp *.ko $(MYAPP) /opt/rootfs/drv_module

obj-m = led_drv.o