一、 什么是责任链模式
责任链, 顾名思义是将多个节点通过链条的方式连接起来,每一个节点相当于一个对象,而每一个对象层层相关,直接或者间接引用下一个对象(节点);直到链条中有一个节点处理头节点传下来的事件截止。
二、责任链模式使用场景 (以下摘自 Android源码设计模式)
有一事件,可以被多个对象同时处理,但是由哪个对象处理则在运行时动态决定!
在请求处理者不明确时向多个对象中提交一个请求。
动态指定一组对象处理请求
三、责任链模式UML图
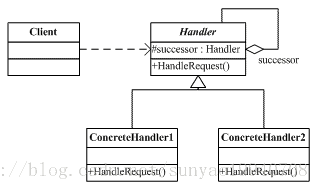
客户端发出请求,调用抽象类Handler中的方法处理逻辑业务。对象ConcreteHandler1与ConcreteHandler2继承Handler,其中ConcreteHandler1中持有下一个节点ConcreteHandler2的引用;事件由1对象发出,如果其处理不了,则交由2对象处理! 这是简单的责任链模式结构图,下面使用代码的方式展现:
Handler.class
/**
 * 抽象类
 */
public abstract class Handler {

    /**
     * 下一代处理者
     */
    public Handler nextProcessor;

    /**
     * 每一个实现类处理
     *
     * @param msg
     */
    public abstract void handleRequest(String msg);

}
Processor1.class
/**
 * 处理者1
 */
public class Processor1 extends Handler {
    @Override
    public void handleRequest(String msg) {
        if(msg.equals("Processor1")) {
            System.out.println("第一个处理者处理");
        } else {
            nextProcessor.handleRequest(msg);
        }
    }
}
Processor2.class
/**
 * 处理者2
 */
public class Processor2 extends Handler {
    @Override
    public void handleRequest(String msg) {
        if(msg.equals("Processor2")) {
            System.out.println("第二个处理者处理");
        } else {
            nextProcessor.handleRequest(msg);
        }
    }
}
测试方法:
@Test
public void testProcessor() {
    Processor1 processor1 = new Processor1();
    Processor2 processor2 = new Processor2();

    processor1.nextProcessor = processor2;
    processor2.nextProcessor = processor1;

    processor1.handleRequest("Processor2");
    }
// 运行结果:
第二个处理者处理
Process finished with exit code 0
四、OKHttp中的责任链模式
摘自百度百科
android网络框架之OKhttp
一个处理网络请求的开源项目,是安卓端最火热的轻量级框架,由移动支付Square公司贡献(该公司还贡献了Picasso)
用于替代HttpUrlConnection和Apache HttpClient(android API23 6.0里已移除HttpClient,现在已经打不出来)
在使用OKHttp之前,我们可能用到更多的网络请求是Async-Http,一种用于异步处理网络的框架,或者更加直接的是使用android自带的HttpUrlConnection 和 HttpClient ,对其进行简单的封装; OKHttp开源出之后,几乎大部分项目都使用到这个开源框架,它有如下有点:

1. 官方在6.0以后添加了OKHttp
2. okHttp支持SPDY
// 同时能进行的最大请求数
private int maxRequests = 64;
// 同时请求的相同HOST的最大个数
private int maxRequestsPerHost = 5;
在 okhttp3.Dispatcher.class 中定义了这两个变量,并发数可以支持到64,当然这两个数值是可以自定义的,这说明OKHttp是支持SPDY的(谷歌开发的基于TCP的应用层协议,用于最小化网络延迟,提升网络速度,优化用户的网络使用体验. SPDY并不是一种替代http的协议,只是对http的一种增强)
—— OKHttp的使用 同步获取
private final OkHttpClient client = new OkHttpClient();

public void run() throws Exception {
    // 创建Request
    Request request = new Request.Builder()
        .url("http://www.baidu.com/")
        .build();

    // 获取到结果
    Response response = client.newCall(request).execute();
    if (!response.isSuccessful()) throw new IOException("Unexpected code " + response);
    System.out.println(response.body().string());
}
—— 异步获取
private final OkHttpClient client = new OkHttpClient();

public void run() throws Exception {
    Request request = new Request.Builder()
        .url("http://www.baidu.com/")
        .build();

    client.newCall(request).enqueue(new Callback() {
      @Override public void onFailure(Request request, Throwable throwable) {
        throwable.printStackTrace();
      }

      @Override public void onResponse(Response response) throws IOException {
        if (!response.isSuccessful()) throw new IOException("Unexpected code " + response);

        Headers responseHeaders = response.headers();
        System.out.println(response.body().string());
      }
    });
}
使用过程很简单,创建一个OKHttpClient, 创建Request对象,使用同步方法顺序获取或者使用回调CallBack方法异步获取数据;执行的方法主要是client中newCall方法和enqueue方法,
——下面我们分析其中的源码:
/**
* Prepares the {@code request} to be executed at some point in the future.
*/
@Override
public Call newCall(Request request) {
   return RealCall.newRealCall(this, request, false /* for web socket */);
}
newCall 方法需要传一个Request,Request对象使用了构建者模式将请求方法,请求体,请求头进行了封装; newCall 获取到了Call 这个接口:
public interface Call extends Cloneable {
  /** 获取到最开始的request */
  Request request();

  /** 执行请求,获取到Response */
  Response execute() throws IOException;

  void enqueue(Callback responseCallback);

  void cancel();

  boolean isExecuted();

  boolean isCanceled();

  Call clone();

  interface Factory {
    Call newCall(Request request);
  }
}
而这个接口的 实现类只有 okhttp3.RealCall.class ,接下来我们看下他的excute() 方法:
  @Override public Response execute() throws IOException {
    synchronized (this) {
      if (executed) throw new IllegalStateException("Already Executed");
      executed = true;
    }
    captureCallStackTrace();
    eventListener.callStart(this);
    try {
      // 将本次请求添加到事件调度器中
      client.dispatcher().executed(this);

      // 今天的主角, 责任链获取到Response结果
      Response result = getResponseWithInterceptorChain();
      if (result == null) throw new IOException("Canceled");
      return result;
    } catch (IOException e) {
      eventListener.callFailed(this, e);
      throw e;
    } finally {
      client.dispatcher().finished(this);
    }
  }
—— Dispatcher
在讲解责任链之前,我们先看下Dispatcher调度器中有些什么?
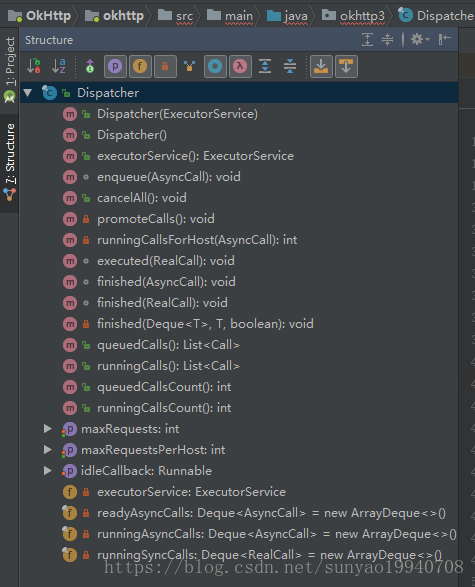
可以知道,它有三个双端队列,
// 双端队列,支持首尾两端 双向开口可进可出

    /**
     * 准备运行的异步队列
     *
     */
    private final Deque<AsyncCall> readyAsyncCalls = new ArrayDeque<>();

    // 正在运行的异步
    private final Deque<AsyncCall> runningAsyncCalls = new ArrayDeque<>();

    // 正在执行的同步队列
    private final Deque<RealCall> runningSyncCalls = new ArrayDeque<>();
队列中线程使用线程池:
    /**
     * 线程池的方式启动线程,使用懒加载的方式
     */
    private @Nullable ExecutorService executorService;

    public synchronized ExecutorService executorService() {
        if (executorService == null) {
            //TODO 线程池
            //TODO 核心线程 最大线程 非核心线程闲置60秒回收 任务队列
            executorService = new ThreadPoolExecutor(0, Integer.MAX_VALUE, 60, TimeUnit.SECONDS,
                    new SynchronousQueue<Runnable>(), Util.threadFactory("OkHttp Dispatcher",
                    false));
        }
        return executorService;
    }
而上面client执行调度器中的excute方法,实际上就是将当前请求直接添加到这个同步的双端队列中,等待线程池中的队列被执行!
—— getResponseWithInterceptorChain()
接下来就要执行拦截器了,而拦截器中就是使用了我们今天所知道的责任链模式,上面的责任链模式已经说的很清晰了,一环接着一环,一个对象持有下个对象的引用;我们看OKHttp中的责任链模式是怎样写的,点击进入该方法:
  Response getResponseWithInterceptorChain() throws IOException {
    // Build a full stack of interceptors.
    //责任链 实际上是像递归一样倒叙执行
    List<Interceptor> interceptors = new ArrayList<>();
    interceptors.addAll(client.interceptors());
    //5、重试与重定向
    interceptors.add(retryAndFollowUpInterceptor);
    // 4、请求头等信息
    interceptors.add(new BridgeInterceptor(client.cookieJar()));
    //3、缓存配置 根据条件(存在响应缓存并被设置为不变的或者响应在有效期内)返回缓存响应设置请求头(If-None-Match、If-Modified-Since等) 服务器可能返回304(未修改)
    interceptors.add(new CacheInterceptor(client.internalCache()));
    //2、连接
    interceptors.add(new ConnectInterceptor(client));
    if (!forWebSocket) {
      interceptors.addAll(client.networkInterceptors());
    }
    //1、流操作(写出请求体、获得响应数据)进行http请求报文的封装与请求报文的解析
    interceptors.add(new CallServerInterceptor(forWebSocket));

    Interceptor.Chain chain = new RealInterceptorChain(interceptors, null, null, null, 0,
        originalRequest, this, eventListener, client.connectTimeoutMillis(),
        client.readTimeoutMillis(), client.writeTimeoutMillis());

    return chain.proceed(originalRequest);
  }
可以看到,getResponseWithInterceptorChain() 方法,是将5个拦截器添加到链表中,再新建了一个RealInterceptorChain.class 类,然后执行了我们责任链中抽象处理类的处理方法 proceed,这里是使用了接口的形式:
public interface Interceptor {
  Response intercept(Chain chain) throws IOException;

  interface Chain {
    Request request();

    Response proceed(Request request) throws IOException;

    /**
     * Returns the connection the request will be executed on. This is only available in the chains
     * of network interceptors; for application interceptors this is always null.
     */
    @Nullable Connection connection();

    Call call();

    int connectTimeoutMillis();

    Chain withConnectTimeout(int timeout, TimeUnit unit);

    int readTimeoutMillis();

    Chain withReadTimeout(int timeout, TimeUnit unit);

    int writeTimeoutMillis();

    Chain withWriteTimeout(int timeout, TimeUnit unit);
  }
}
所以,责任现在都交给了RealInterceptorChain, 上面直接调用了Interceptor.Chain接口中的 proceed方法,我们看下他的实现:
 public Response proceed(Request request, StreamAllocation streamAllocation, HttpCodec httpCodec,
      RealConnection connection) throws IOException {

      .....

    // 创建新的拦截链,链中的拦截器集合index+1
    // Call the next interceptor in the chain.
    RealInterceptorChain next = new RealInterceptorChain(interceptors, streamAllocation, httpCodec,
        connection, index + 1, request, call, eventListener, connectTimeout, readTimeout,
        writeTimeout);
    //执行当前的拦截器 默认是:retryAndFollowUpInterceptor
    Interceptor interceptor = interceptors.get(index);
    Response response = interceptor.intercept(next);

    ......

    return response;
  }
主要是上面三行代码,首先拿到下一个 拦截器,上面添加的第一个拦截器是 retryAndFollowUpInterceptor (重试与重定向)拦截器,然后将下一个拦截器传入到重试与重定向拦截器中,看看intercept这个方法在实现类中做的操作:
@Override public Response intercept(Chain chain) throws IOException {
Request request = chain.request();
// 首先拿到当前真实的Interceptor 实现类
RealInterceptorChain realChain = (RealInterceptorChain) chain;
Call call = realChain.call();
EventListener eventListener = realChain.eventListener();
// 核心 协调连接、请求/响应以及复用
StreamAllocation streamAllocation = new StreamAllocation(client.connectionPool(),
createAddress(request.url()), call, eventListener, callStackTrace);
this.streamAllocation = streamAllocation;
int followUpCount = 0;
Response priorResponse = null;
while (true) {
if (canceled) {
streamAllocation.release();
throw new IOException("Canceled");
}
Response response;
boolean releaseConnection = true;
try {
//执行到一半,又去执行了RealInterceptorChain中的proceed方法
//实际上就是下一个拦截器
response = realChain.proceed(request, streamAllocation, null, null);
releaseConnection = false;
} catch (RouteException e) {
.....
}
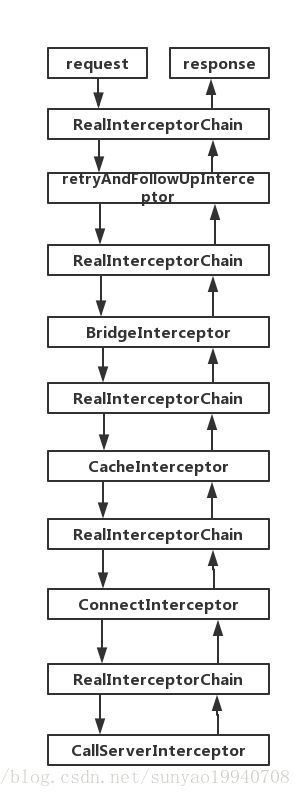
}这个过程其实就是递归的过程,而底就是CallServerInterceptor ,这里不对拦截器作详细的讲解,每个拦截器做的处理逻辑都差不多,下面我们看下这个过程的图解:
总结:
- OKHttp中使用拦截器对不同的业务进行区分,我们也可以使用自己的自定义拦截器
- 其中的责任链模式其实和我们设计模式中的有区别,这里是将分发处理给了接口,让其去处理