我们知道动画是基于绘制的,多次绘制贝塞尔的过程就会形成动画。流畅的动画效果会给用户带来不一样的使用体验,下面我们就让App开发中经常使用到的侧滑动画进行拆分详解。
效果图如下:

为侧滑动画封装一个slideMenuView
绘制侧滑动画需要下面几个步骤
- 1.添加模糊背景
#define menuBlankWidth 50
#define menuBtnHeight 40
#define buttonSpace 30

#import "slideMenuView.h"
#import "slideMenuBtn.h"

@implementation slideMenuView{
    UIVisualEffectView *blurView;
    UIView *helperSideView;
    UIView *helperCenterView;
    UIWindow *keyWindow;
    BOOL swiched;
    CGFloat diff;
    UIColor *menuColor;
    CADisplayLink *displayLink;
    NSInteger animationCount;
}

#pragma mark - lifeCycle
-(id)initWithBtnTitle:(NSArray *)btnTitles{

    self =[super init];
    if (self) {
        menuColor =[UIColor colorWithRed:0 green:0.722 blue:1 alpha:1];
        //将模糊背景添加到keyWindow上面,不会被遮挡
        keyWindow =[UIApplication sharedApplication].keyWindow;
        //灰色模糊背景
        blurView =[[UIVisualEffectView alloc]initWithEffect:[UIBlurEffect effectWithStyle:UIBlurEffectStyleDark]];
        blurView.frame = keyWindow.frame;
        blurView.alpha = 0.5;

        [keyWindow addSubview:self];

    }
    return self;
}- 2.滑入菜单栏
#define menuBlankWidth 50
#define menuBtnHeight 40
#define buttonSpace 30
#import "slideMenuView.h"
#import "slideMenuBtn.h"
@implementation slideMenuView{
UIVisualEffectView *blurView;
UIView *helperSideView;
UIView *helperCenterView;
UIWindow *keyWindow;
BOOL swiched;
CGFloat diff;
UIColor *menuColor;
CADisplayLink *displayLink;
NSInteger animationCount;
}
#pragma mark - lifeCycle
-(id)initWithBtnTitle:(NSArray *)btnTitles{
self =[super init];
if (self) {
menuColor =[UIColor colorWithRed:0 green:0.722 blue:1 alpha:1];
//将模糊背景添加到keyWindow上面,不会被遮挡
keyWindow =[UIApplication sharedApplication].keyWindow;
//灰色模糊背景
blurView =[[UIVisualEffectView alloc]initWithEffect:[UIBlurEffect effectWithStyle:UIBlurEffectStyleDark]];
blurView.frame = keyWindow.frame;
blurView.alpha = 0.5;
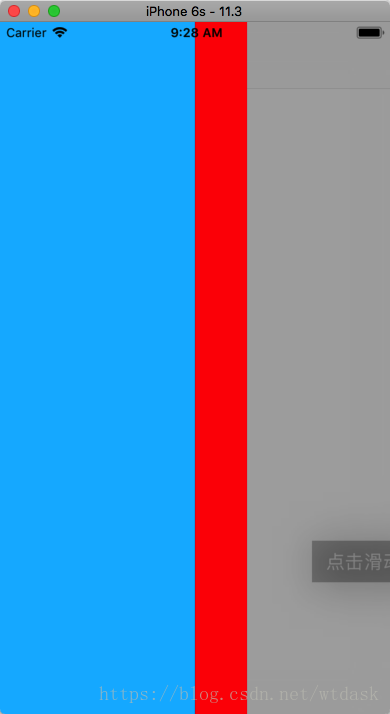
//这是贝塞尔曲线绘制的蓝色矩形下面的背景View
self.frame = CGRectMake(-(CGRectGetWidth(keyWindow.frame)/2+menuBlankWidth), 0, CGRectGetWidth(keyWindow.frame)/2+menuBlankWidth, CGRectGetHeight(keyWindow.frame));
self.backgroundColor =[UIColor clearColor];
[keyWindow addSubview:self];
}
return self;
}上面代码中的 self.frame设置的是下面图片中红色的背景View,它比蓝色弹出View多出menuBlankWidth的长度
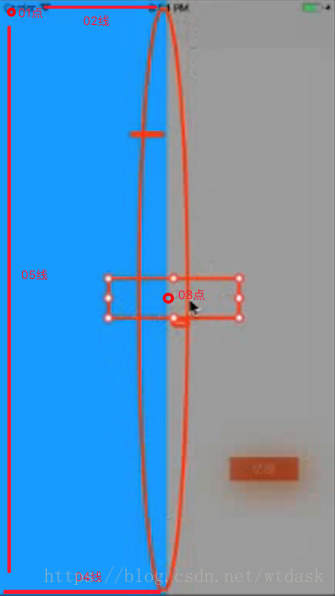
//绘制蓝色图层 贝塞尔曲线
-(void)drawRect:(CGRect)rect{
    UIBezierPath *path =[UIBezierPath bezierPath];
    //初始点 01点
    [path moveToPoint:CGPointMake(0, 0)];
    //绘制最上面的那条直线 02线
    [path addLineToPoint:CGPointMake(CGRectGetWidth(keyWindow.frame)/2, 0)];
    /*
     一阶曲线
     addQuadCurveToPoint终点位置,位于中间 03点
     controlPoint  控制点 位于中间 03点
     */
    [path addQuadCurveToPoint:CGPointMake(CGRectGetWidth(keyWindow.frame)/2, CGRectGetHeight(keyWindow.frame)) controlPoint:CGPointMake(CGRectGetWidth(keyWindow.frame)/2,  CGRectGetHeight(keyWindow.frame)/2)];
    //绘制最下面的那条直线 04线
    [path addLineToPoint:CGPointMake(0, CGRectGetHeight(keyWindow.frame))];
    //05线 没必要画,可以使用贝塞尔闭合
    [path closePath];//矩形绘画完毕

    //获取上下文,相当于一个画板
    CGContextRef context = UIGraphicsGetCurrentContext();
    CGContextAddPath(context, path.CGPath);

    //填充颜色-蓝色
    [menuColor set];
    CGContextFillPath(context);

    //矩形绘制好后,如何让它动起来?
}
下图是上面代码根据贝塞尔曲线绘制的几个点线位置图
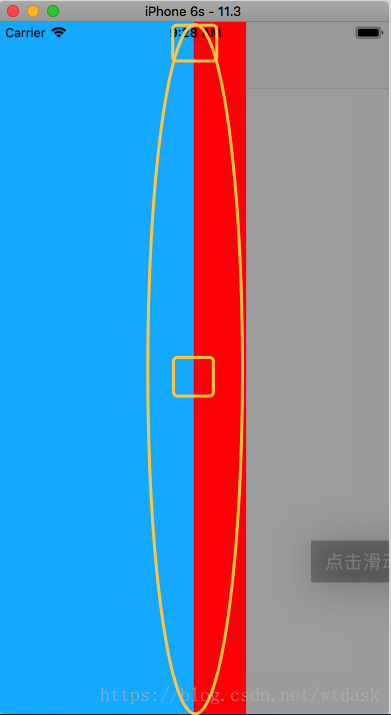
- 3.思考:那么我们如何让蓝色的View右边框有类似于弹簧动画的效果呢?
通过2个辅助view helperSideView helperCenterView,求出它们的差值,获取到一组动态的数据
我们需要借助两个小的view在固定区域内做弹簧动画
#pragma mark - lifeCycle
-(id)initWithBtnTitle:(NSArray *)btnTitles{

    self =[super init];
    if (self) {

        代码略...
        helperSideView =[[UIView alloc]initWithFrame:CGRectMake(-40, 0, 40, 40)];
        helperSideView.backgroundColor =[UIColor greenColor];
        helperCenterView = [[UIView alloc]initWithFrame:CGRectMake(-40, CGRectGetHeight(keyWindow.bounds)/2 -20, 40, 40)];
        helperCenterView.backgroundColor =[UIColor orangeColor];
        [keyWindow addSubview:helperSideView];
        [keyWindow addSubview:helperCenterView];
        [keyWindow insertSubview:self belowSubview:helperSideView];

    }
    return self;
}
#pragma mark -Action
//点击按钮
-(void)switchAcition{
if (!swiched) {
//1.添加模糊背景
[keyWindow insertSubview:blurView belowSubview:self];
//2.滑入菜单栏
//UIView的滑入动画
[UIView animateWithDuration:.3 animations:^{
//切换frame
self.frame = self.bounds;
}];
//3.添加弹簧动画
/*
Duration:持续时间
delay:延时
usingSpringWithDamping:弹簧阻力
initialSpringVelocity:弹簧的初始化速度
options:UIViewAnimationOptionBeginFromCurrentState:选项 动画选项从当前状态开始
completion:完成以后的操作
*/
[UIView animateWithDuration:.7 delay:0 usingSpringWithDamping:.5 initialSpringVelocity:.9 options:UIViewAnimationOptionBeginFromCurrentState animations:^{
//让helperSideView滑至整屏的中心点位置
self->helperSideView.center = CGPointMake(self->keyWindow.center.x, CGRectGetHeight(self->helperSideView.bounds)/2);
} completion:nil];
[UIView animateWithDuration:.7 delay:0 usingSpringWithDamping:.5 initialSpringVelocity:.9 options:UIViewAnimationOptionBeginFromCurrentState animations:^{
//让helperSideView滑至整屏的中心点位置
self->helperCenterView.center =self->keyWindow.center;
} completion:nil];
swiched = YES;
}else{
[self dismissView];
}
}
//消失
-(void)dismissView{
swiched = NO;
}- 添加模糊背景层手势,使view恢复,然后我们看下效果
#pragma mark - lifeCycle
-(id)initWithBtnTitle:(NSArray *)btnTitles{

    self =[super init];
    if (self) {
        省略代码...
        //添加手势
        UITapGestureRecognizer * tap =[[UITapGestureRecognizer alloc]initWithTarget:self action:@selector(dismissView)];
        [blurView addGestureRecognizer:tap];
    }
    return self;
}
//消失
-(void)dismissView{
swiched = NO;
//消失时同样有一个动画
[UIView animateWithDuration:.3 animations:^{
//回到初始位置
self.frame = CGRectMake(-(CGRectGetWidth(self->keyWindow.frame)/2+menuBlankWidth), 0, CGRectGetWidth(self->keyWindow.frame)/2+menuBlankWidth, CGRectGetHeight(self->keyWindow.frame));
self->blurView.alpha = 0;
self->helperSideView.center = CGPointMake(-20, 20);
self->helperCenterView.center = CGPointMake(-20, CGRectGetHeight(self->keyWindow.bounds)/2);
}];
}
- CADisplayLink 求差值
修改两个小的view的阻力和初始化速度,那么它们两个之间会产生x差值
[UIView animateWithDuration:.7 delay:0 usingSpringWithDamping:.5 initialSpringVelocity:.9 options:UIViewAnimationOptionBeginFromCurrentState animations:^{
            //让helperSideView滑至整屏的中心点位置
            self->helperSideView.center = CGPointMake(self->keyWindow.center.x, CGRectGetHeight(self->helperSideView.bounds)/2);
        } completion:nil];

        [UIView animateWithDuration:.7 delay:0 usingSpringWithDamping:.8 initialSpringVelocity:2 options:UIViewAnimationOptionBeginFromCurrentState animations:^{
            //让helperSideView滑至整屏的中心点位置
            self->helperCenterView.center =self->keyWindow.center;
        } completion:nil];
使用CADisplayLink类 类似于定时器,60次/进行绘制s
#pragma mark - func
//添加定时器
//CADisplayLink定时器获取差值
-(void)getDiff{
    if (!displayLink) {
        displayLink = [CADisplayLink displayLinkWithTarget:self selector:@selector(displayLinkAuction:)];
        //将displayLink添加到runLoop
        [displayLink addToRunLoop:[NSRunLoop mainRunLoop] forMode:NSDefaultRunLoopMode];
    }
}
-(void)displayLinkAuction:(CADisplayLink *)link{
    //presentationLayer 实时layer数据
    CALayer * layer1 = helperSideView.layer.presentationLayer;
    CALayer * layer2 = helperCenterView.layer.presentationLayer;

    //获取layer的frame
    CGRect r1 = [[layer1 valueForKeyPath:@"frame"] CGRectValue];
    CGRect r2 = [[layer2 valueForKeyPath:@"frame"] CGRectValue];

    //获取二者之间的差值
    diff = r1.origin.x - r2.origin.x;
}

#pragma mark -Action
//点击按钮
-(void)switchAcition{
    if (!swiched) {
        省略代码...
        //获取差值
        [self getDiff];

        swiched = YES;
    }else{
        [self dismissView];
    }
}- 使用差值,利用赛贝尔曲线进行绘制
-(void)displayLinkAuction:(CADisplayLink *)link{
    省略代码...
    //获取二者之间的差值
    diff = r1.origin.x - r2.origin.x;

    //重绘
    [self setNeedsDisplay];
}
-(void)drawRect:(CGRect)rect{
省略代码...
[path addQuadCurveToPoint:CGPointMake(CGRectGetWidth(keyWindow.frame)/2, CGRectGetHeight(keyWindow.frame)) controlPoint:CGPointMake(CGRectGetWidth(keyWindow.frame)/2 + diff, CGRectGetHeight(keyWindow.frame)/2)];
省略代码...
}
记得在动画完成时,移除定时器
#pragma mark - func
//移除定时器
-(void)removeDisplayLink{
    [displayLink invalidate];
    displayLink = nil;
}[UIView animateWithDuration:.7 delay:0 usingSpringWithDamping:.8 initialSpringVelocity:2 options:UIViewAnimationOptionBeginFromCurrentState animations:^{
//让helperSideView滑至整屏的中心点位置
self->helperCenterView.center =self->keyWindow.center;
} completion:^(BOOL finished){
[self removeDisplayLink];
}];- 添加按钮,并给按钮添加动画
#pragma mark - lifeCycle
-(id)initWithBtnTitle:(NSArray *)btnTitles{

    self =[super init];
    if (self) {
         省略代码...
        //添加按钮
        [self addBtnTitles:btnTitles];
    }
    return self;
}
#pragma mark - func
-(void)addBtnAnim{
for (int i=0; i< self.subviews.count; i++) {
UIView *btn = self.subviews[i];
btn.transform = CGAffineTransformMakeTranslation(-100, 0);
[UIView animateWithDuration:.7 delay:i *(0.3/self.subviews.count) usingSpringWithDamping:.6 initialSpringVelocity:0 options:UIViewAnimationOptionBeginFromCurrentState animations:^{
btn.transform = CGAffineTransformIdentity;
} completion:nil];
}
}
//添加按钮
-(void)addBtnTitles:(NSArray *)titles{
CGFloat space = (CGRectGetHeight(keyWindow.bounds)-titles.count * menuBtnHeight - (titles.count-1)*buttonSpace)/2;
for (int i=0; i < titles.count; i++) {
slideMenuBtn *btn =[[slideMenuBtn alloc]initWithTitle:titles[i]];
btn.center = CGPointMake(CGRectGetWidth(keyWindow.bounds)/4, space + menuBtnHeight*i + buttonSpace*i);
btn.bounds = CGRectMake(0, 0, CGRectGetWidth(keyWindow.bounds)/2 - 20* 2, menuBtnHeight);
btn.btnClickBlock=^(){
NSLog(@"%@",titles[i]);
};
[self addSubview:btn];
}
}#pragma mark -Action
//点击按钮
-(void)switchAcition{
if (!swiched) {
省略代码...
//获取差值
[self getDiff];
//添加按钮的动画
[self addBtnAnim];
swiched = YES;
}else{
[self dismissView];
}
}