Tensorflow运作方式
python基础: https://blog.csdn.net/leojuner/article/details/81294805
环境安装: https://blog.csdn.net/leojuner/article/category/7839014
1. 数据输入
placeholder_inputs() 生成 tf.placeholder()操作, 定义传入图标的shape参数,shape参数中包括batch_size值
# 1.训练的数据
# Make up some real data
x_data = np.linspace(-1,1,300)[:, np.newaxis]
noise = np.random.normal(0, 0.05, x_data.shape)
y_data = np.square(x_data) - 0.5 + noise  # 部分教程变量名为 y_
1.1 what’s placeholder
OFFCIAL:
     This tensor will produce an error if evaluated.
     Its value must be fed using the feed_dict optional argument to Session.run(), Tensor.eval(), or Operation.run().
官方文档:
    它的值必须在Session.run(), Tensor.eval(), Operation.run()中使用feed_dict可选参数进行赋值。
    在训练循环(training loop)后续步骤中, 占位符将会回填值. 代入batch_size的值, 使用feed_dict参数.
非官方:
    一个占位符,在搭建神经网络的步骤中占一个位置,为了之后运行的时候填入值使用,单独运行就会报错.
e.g.:

# 2.定义节点准备接收数据
# define placeholder for inputs to network
xs = tf.placeholder(tf.float32, [None, 1])
ys = tf.placeholder(tf.float32, [None, 1])


# 迭代 1000 次学习,sess.run optimizer
for i in range(1000):
   # training train_step 和 loss 都是由 placeholder 定义的运算,所以这里要用 feed 传入参数
   sess.run(train_step, feed_dict={xs: x_data, ys: y_data})
   if i % 50 == 0:
       # to see the step improvement
       print(sess.run(loss, feed_dict={xs: x_data, ys: y_data}))
   # print sess.run(y)  # ERROR: will fail because x was not fed.
1.2 Args
dtype: tf.DType, 即将填充的元素的数据类型. 例如: tf.float32shape: 将要回填的张量形状(可选), 如果没有给定, 那可以填入任意形状. 例如: [28, 28] ==> 28 x 28 的图像name: 给定一个名字, 生成可视化界面的时,方便理解与调用
1.3 Return
只是表示将要赋值这件事,不能直接赋值和处理.
2. 构建图表(Build the Graph)
2.1 inference() — 构建图表
2.1.1 what’s 神经网络
一般来讲,如图便是一个简单的神经网络. 每一个圆便是一个神经元.
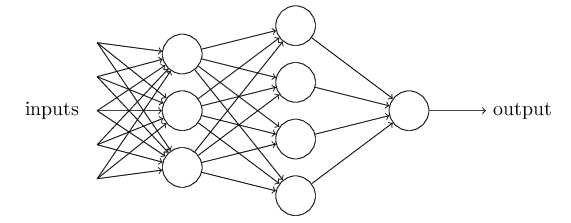
那么,计算机理解的神经网络中的神经元是由什么组成?
目前主流使用的神经元模型是1943年McCulloch 和 Pitts提出的 `M-P神经元模型` . Wx_plus_b = Weights * xs + baises
Weights : 每一神经元到下一个神经元的单根连线上代表权重值.
            (Question: 这个权重是什么意思呢? 代表着什么?)
baises: 偏置项
            (Question: 为什么建议bias不为0? 为什么要有bias?)
神经元干什么?
神经元将接收到的总值处理后与神经元的阈值作比较, 通过激活函数(也成为挤压函数)处理神经元的输出
非官方解释:
一般我们难以处理各种各样的关系的函数,简单情况例如函数不可导.所以通过激活函数f(a)将原函数f(x)的值压成激活函数的x域,也就是f(f(x)). f(a)例如典型的是阶跃函数,阶跃函数的变体. 典型的有: sigmoid, tanh, relu. f(a)的x域是[-∞,+∞], 而y域一般在(0,1). 这样就能很好的将f(x)通过01来判断优劣取舍了.
2.1.2定义神经层
'''
generally , we use linear function instead of custom function
define four parameters in function add_layer:
- inputs: the value to be input
- size: the size of the value
- out_size: the size of output value
- activation_function: the function of activation, we set it to use linear equations by default
'''
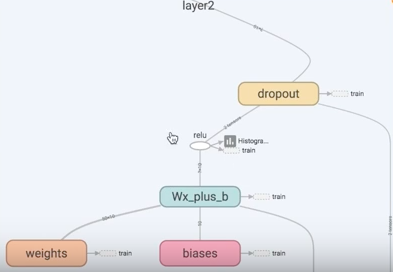
def add_layer(inputs, in_size, out_size, activation_function=None):
## normal_distribution is better than zeros ##
Layer_Weights = tf.Variable(tf.random_normal([in_size, out_size]))
## the bias , donnot recommend zero ##
biases = tf.Variable(tf.zeros([1, out_size]) + 0.1)
## the unactivatived value of the neural netework ##
Wx_plus_b = tf.matmul(inputs, Layer_Weights) + biases
if activation_function is None:
outputs = Wx_plus_b
else:
outputs = activation_function(Wx_plus_b)
return outputs
# 3.定义神经层:隐藏层和预测层
# add hidden layer 输入值是 xs,在隐藏层有 10 个神经元
l1 = add_layer(xs, 1, 10, activation_function=tf.nn.relu)
# add output layer 输入值是隐藏层 l1,在预测层输出 1 个结果
prediction = add_layer(l1, 10, 1, activation_function=None) (部分教程这里参数设置为y)总结:
隐藏层就是构建image 与 weight 的关系, 并且处理可能出现的bias ,进而通过激活函数(activation function) 使得该关系可求导,便于计算处理. 上面一大段代码可以浓缩为 :
hidden1_layer = tf.nn.relu(tf.matmul(input_images, weights) + biases)
TensorFlow 常用的activation function]()
2.2 loss() — 添加生成loss,和所需要的操作(option)
2.2.1 what’s loss
神经网络模型的效果及优化的目标是通过损失函数来定义的. 比较预测值与标准值的区别,判断哪些预测值符合标注.
也叫”代价函数”,”目标函数”
#the difference between prediction  and y_data  which is the norm(real) data #

loss = tf.reduce_mean(tf.reduce_sum(tf.square(ys - prediction),
                                    reduction_indices=[1]))
2.2.2 回归问题 和 分类问题(分类问题本处不介绍)
回归问题解决的是对具体数值的预测。比如房价预测、销量预测等都是回归问题。这些问题需要预测的不是一个事先定义好的类别,而是一个任意实数。解决回顾问题的神经网络一般只有一个输出节点,这个节点的输出值就是预测值。对于回归问题,最常用的损失函数是均方误差(MSE,mean squared error )
1. 使用reduce_sum(tf.quare()) 计算标注值(输入值,y_)与预测值(prediction,y)的均方
2. 然后,使用tf.reduce_mean函数,计算batch维度(第一维度)下交叉熵(cross entropy)的平均值,将将该值作为总损失。
多说一句: 为什么要引入二次的loss函数
因为正确识别的图像数量不是权重和偏移的平滑的函数. 对于大多数,权重和偏移的很小改变不会让正确识别的图像数量值有任何改变. 这就使得很难指出如何改变权重和偏移来提高性能。如果我们使用一个像二次型的平滑代价函数,它将很容易指出如何细微的改变权重和偏移来改进代价函数, 并且检测分类的准确性。
2.3 train() — 往损失图标中添加计算并应用梯度(gradient)和所需要的操作(operation)
2.3.1 优化器(Optimizer)
training()函数添加了通过梯度下降(gradient descent)将损失最小化所需的操作。
2.3.2 学习率(Learning_rate)
反向传播的过程中,控制模型的’学习进度’.
| 学习率 大 | 学习率 小 |
|---|---|
| 学习速度 | 快 |
| 使用时间点 | 刚开始训练时 |
| 副作用 | 1.易损失值爆炸;2.易振荡。 |
刚开始训练: 0.01~0.001 为宜
一定轮数: 逐渐减缓
接近结束: 衰减应该在100倍以上
| 轮数减缓 | 指数减缓 | 分数减缓 |
|---|---|---|
| 英文名 | step decay | exponential decay |
| 方法 | 每N轮学习率减半 | 学习率按训练轮数增长指数插值递减 |
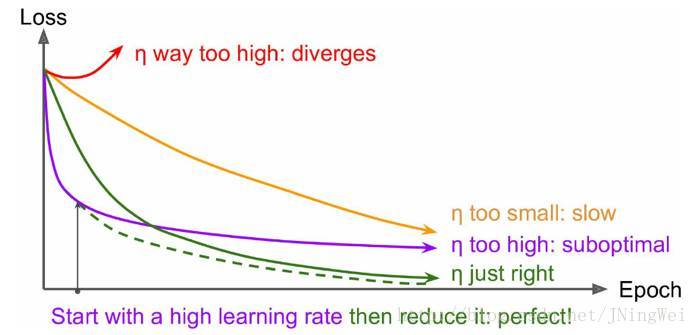
- 曲线初始时 上扬
[红线]:
Solution:初始学习率过大 导致振荡,应减小学习率,并从头 开始训练。 - 曲线初始时 强势下降 没多久 归于水平
[紫线]:
Solution:后期学习率过大 导致无法拟合,应减小学习率,并重新训练 后几轮。 - 曲线全程缓慢
[黄线]:
Solution:初始学习率过小 导致收敛慢,应增大学习率,并从头 开始训练。
2.3.3 定义反向传播
optimizer = tf.train.GradientDescentOptimizer(FLAGS.learning_rate)
global_step = tf.Variable(0, name='global_step', trainable=False)
train_op = optimizer.minimize(loss, global_step=global_step)
3. 训练
3.1 会话
完成全部的构建准备、生成全部所需的操作之后,我们就可以创建一个
tf.Session,用于运行图表。
sess = tf.Session()  # 使用本句, 最好结束后加上sess.close()

# 也可以使用with 代码块,限制作用域
with tf.Session() as sess:Session函数中没有传入参数,表明该代码将会依附于(如果还没有创建会话,则会创建新的会话)默认的本地会话。
init_op = tf.global_variables_initializer() —–> 调用各自初始化操作.
sess.run(init_op) —> 运行图表中与作为参数传入的操作相对应的完整子集
train_step = tf.train.GradientDescentOptimizer(0.1).minimize(loss)  ## learning rate. to minimize(reduce) the loss

init_op = tf.global_variables_initializer()

with tf.Session() as sess:
    ## now , start
    sess.run(init_op)
    for i in range(1000):

        sess.run(train_step, feed_dict={xs: x_data, ys: y_data})
        if i % 200 == 0:
            ## to see the improvement
            print(sess.run(loss, feed_dict={xs: x_data, ys: y_data}))