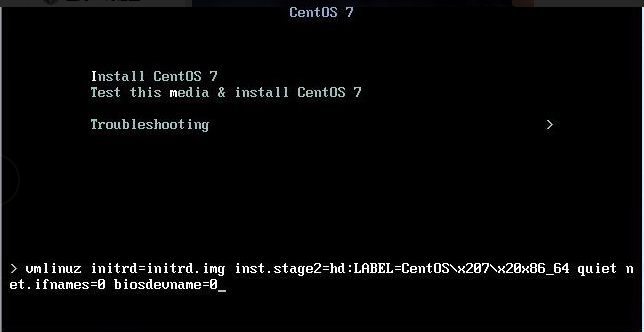
开启CPU虚拟化

按到install CentOS7 按下tab 输入net.ifnames=0 biosdevname=0


先来一段文档v1
===============================================================================================
1.1 修改网卡配置文件
# 第一个里程碑:重启完成之后,登录系统 #
[root@localhost ~]# vi /etc/sysconfig/network-scripts/ifcfg-eth0
TYPE=Ethernet
BOOTPROTO=dhcp
DEFROUTE=yes
PEERDNS=yes
PEERROUTES=yes
IPV4_FAILURE_FATAL=no
IPV6INIT=yes
IPV6_AUTOCONF=yes
IPV6_DEFROUTE=yes
IPV6_PEERDNS=yes
IPV6_PEERROUTES=yes
IPV6_FAILURE_FATAL=no
NAME=eth0
UUID=4bf2af89-5f6d-4979-83e9-df6ce1c3cc41
DEVICE=eth0
ONBOOT=no
# 第二个里程碑: 删掉多余的行,只留以下内容 #
TYPE=Ethernet
BOOTPROTO=dhcp
NAME=eth0
DEVICE=eth0
ONBOOT=no
# 第三个里程碑:在以上基础上,继续配置 #
# 红色为修改和增加部分
# 以下代码为优化后的网卡全部配置 #
TYPE=Ethernet
BOOTPROTO=none #取消dhcp
NAME=eth0
DEVICE=eth0
ONBOOT=yes #设置开机启动
IPADDR=10.0.0.11 #IP地址
NETMASK=255.255.255.0 #子网掩码
GATEWAY=10.0.0.254 #网关
DNS1=223.5.5.5 #DNS
# 第四个里程碑:重启网络服务 #
systemctl restart network
# 说明 :与/etc/init.d/network restart 效果一致
# 第五个里程碑:检查 ping 一下网关10.0.0.254测试网络连通性 #
ping 10.0.0.254 -c2
ping www.baidu.com
到这里,ok,可以愉快的使用xshell了
系统的优化
# 登录xshell开始优化 #
1.2 防火墙的优化
systemctl disable firewalld.service
systemctl stop firewalld
setenforce 0
1.3 Selinux的优化
sed -i 's#SELINUX=enforcing#SELINUX=disabled#g' /etc/selinux/config
1.4 ssh的优化
# 修改完成后为红色部分 #
vi /etc/ssh/sshd_config
79行: GSSAPIAuthentication no
115行: UseDNS no
# 重启ssh #
systemctl restart sshd
1.5 hosts的优化
vi /etc/hosts
# 增加2行
10.0.0.11 controller
10.0.0.31 compute1
1.6 修改主机名
hostnamectl set-hostname controller
1.7 yum源优化
# 使用光盘搭建本地yum源
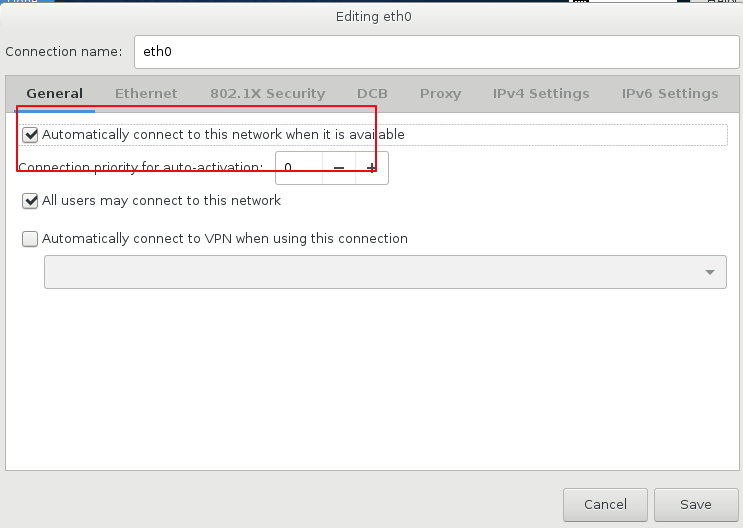
点击这个小的 
再单击连接
umount /mnt
cd /etc/yum.repos.d/
mkdir test -p
\mv *.repo test
echo '[local]
name=local
baseurl=file:///mnt
gpgcheck=0' >local.repo
mount /dev/cdrom /mnt
yum makecache
1.8 其他优化
# 关闭网卡图形化设置模式 #
systemctl stop NetworkManager.service
systemctl disable NetworkManager.service
# 下载tab补全命令 #
yum install -y bash-completion.noarch
# 下载 常用命令 #
yum install -y net-tools vim lrzsz wget tree screen lsof tcpdump
#禁用邮件服务
systemctl stop postfix.service
systemctl disable postfix.service

# 至此;模板机优化完成;关机开始克隆 #
shutdown -h now
===============================================================================================
至上可以重启完成后运行脚本 。可以再第一次重启完成后,连接上光盘,直接运行该脚本
脚本内容如下


 1 #-------------------------------------------------------------------------------
 2 #
 3 # 系统部署完毕后运行规范化脚本
 4 # Author:nod
 5 # Date:18-08-09
 6 # $1 ip $2 gateway $3 hostname
 7 # centOS 7.4
 8 #-------------------------------------------------------------------------------
 9
10 #-------------------------------------------------------------------------------
11 # 网卡优化
12 #-------------------------------------------------------------------------------
13 >/etc/sysconfig/network-scripts/ifcfg-eth0
14 cat >> /etc/sysconfig/network-scripts/ifcfg-eth0 <<EOF
15 TYPE=Ethernet
16 BOOTPROTO=none
17 NAME=eth0
18 DEVICE=eth0
19 ONBOOT=yes
20 IPADDR=$1
21 NETMASK=255.255.255.0
22 GATEWAY=$2
23 DNS1=223.5.5.5
24 EOF
25
26
27
28 #-------------------------------------------------------------------------------
29 # 关闭防火墙
30 #-------------------------------------------------------------------------------
31 systemctl disable firewalld.service
32 systemctl stop firewalld
33 setenforce 0
34 sed -i 's#SELINUX=enforcing#SELINUX=disabled#g' /etc/selinux/config
35
36
37 #-------------------------------------------------------------------------------
38 # 修改主机名
39 #-------------------------------------------------------------------------------
40 hostnamectl set-hostname $3
41
42
43
44
45 #-------------------------------------------------------------------------------
46 # yum优化
47 #-------------------------------------------------------------------------------
48 umount /mnt
49 cd /etc/yum.repos.d/
50 mkdir test -p
51 \mv *.repo test
52 echo '[local]
53 name=local
54 baseurl=file:///mnt
55 gpgcheck=0' >local.repo
56 mount /dev/cdrom /mnt
57 yum makecache
58 systemctl stop NetworkManager.service
59 systemctl disable NetworkManager.service
60 yum install -y bash-completion.noarch
61 yum install -y net-tools vim lrzsz wget tree screen lsof tcpdump
62 systemctl stop postfix.service
63 systemctl disable postfix.service
64
65 #-------------------------------------------------------------------------------
66 # ssh优化
67 #-------------------------------------------------------------------------------
68 sed -i 's@#UseDNS no@UseDNS no@g' /etc/ssh/sshd_config
69 sed -i 's#GSSAPIAuthentication yes#GSSAPIAuthentication no#g' /etc/ssh/sshd_config
70 systemctl restart sshd
71
72 #-------------------------------------------------------------------------------
73 # 重启后检查 没问题就关机 至此部署完毕
74 #-------------------------------------------------------------------------------
75 reboot