拦截请求
对每个请求进行细粒度安全性控制的关键在于重载configure(HttpSecurity)方法。如下的代码片段展现了重载的configure(HttpSecurity)方法,它为不同的URL路径有选择地应用安全性:
http
.authorizeRequests()
.antMatchers( "/spittles/me").authenticated()
.antMatchers(HttpMethod.POST,"/test/index").hasAnyAuthority("ROLE_USER")
.anyRequest().permitAll()
configure()方法中得到的HttpSecurity对象可以在多个方面配置HTTP的安全性。在这里,我们首先调用authorizeRequests(),然后调用该方法所返回的对象的方法来配置请求级别的安全性细节。其中,第一次调用antMatchers()指定了对“/spitters/me”路径的请求需要进行认证。第二次调用antMatchers()更为具体,说明对“/spittles”路径的HTTP POST请求必须要经过认证。最后对anyRequests()的调用中,说明其他所有的请求都是允许的,不需要认证和任何的权限。
antMatchers()方法中设定的路径支持Ant风格的通配符。在这里我们并没有这样使用,但是也可以使用通配符来指定路径,如下所示:
.antMatchers("/spitters/**").authenticated();
除了路径选择,我们还通过authenticated()和permitAll()来定义该如何保护路径。authenticated()要求在执行该请求时,必须已经登录了应用。如果用户没有认证的话,Spring Security的Filter将会捕获该请求,并将用户重定向到应用的登录页面。同时,permitAll()方法允许请求没有任何的安全限制。
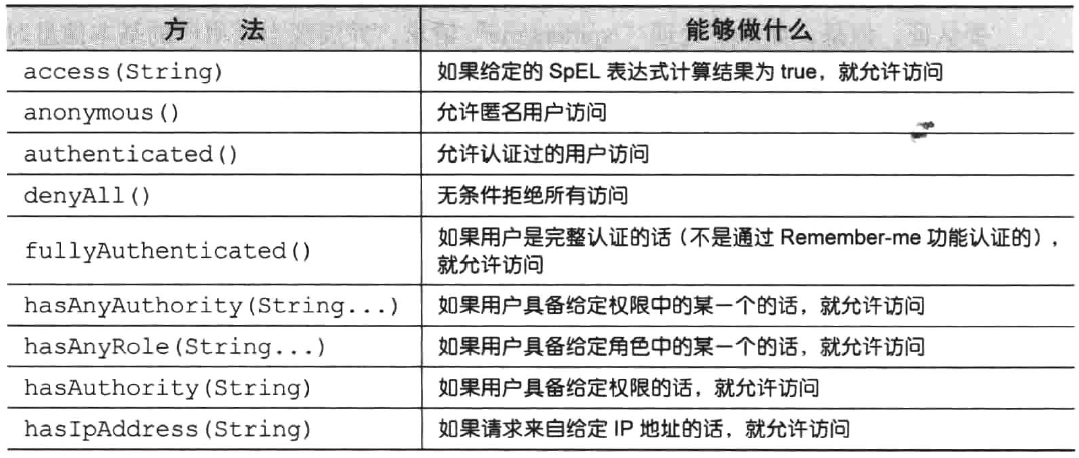
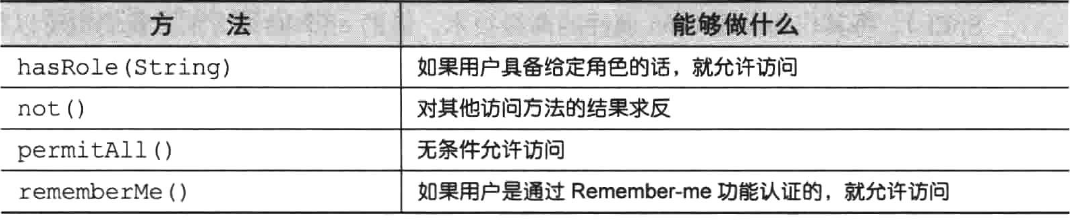
除了authenticated()和permitAll()以外,还有其他的一些方法能够用来定义该如何保护请求。表描述了所有可用的方案。
通过使用表中的方法,我们所配置的安全性能够不仅仅限于认证用户。例如,我们可以修改之前的configure()方法,要求用户不仅需要认证,还要具备ROLE_USER权限。
我们可以将任意数量的antMatchers()、regexMatchers()和anyRequest()连接起来,以满足Web应用安全规则的需要。但是,我们需要知道,这些规则会按照给定的顺序发挥作用。所以,很重要的一点就是将最为具体的请求路径放在前面,而最不具体的路径(如anyRequest())放在最后面。如果不这样做的话,那不具体的路径配置将会覆盖掉更为具体的路径配置。
认证用户
如果你使用程序清单9.1中最简单的Spring Security配置的话,那么就能无偿地得到一个登录页。实际上,在重写configure(HttpSecurity)之前,我们都能使用一个简单却功能完备的登录页。但是,一旦重写了configure(HttpSecurity)方法,就失去了这个简单的登录页面。
添加自定义的登录页
<html>
<head>
<title>login</title>
</head>
<body>
<div id="login">
<form id="loginForm" method="post" action="/login.do">
<div class="login_item"><span>用户名:</span><input type="text" name="username"/></div>
<div class="login_item"><span>密 码:</span><input type="password" name="password"/></div>
<input id="remember_me" name="remember-me" type="checkbox"/>
<label for="remember_me" class="inline">Remember me</label>
<input name="submit" type="submit" value="Login"/>
<security:csrfInput/>
</form>
</div>
</body>
</html>
需要注意的一个关键点是<form>提交到了什么地方。同时还需要注意username和password输入域,在你的登录页中,需要同样的输入域。最后,假设没有禁用CSRF的话,还需要保证包含了值为CSRFtoken的“_csrf”输入域。
启用自定义的登录页面的配置如下:
@Override
protected void configure(HttpSecurity http) throws Exception {
http.csrf().disable()//关闭CSRF
.formLogin()
.loginPage("/login").loginProcessingUrl("/login.do")
.failureUrl("/lError?error")
.usernameParameter("username")
.passwordParameter("password")
.defaultSuccessUrl("/welcome")
.and()
.authorizeRequests()
.antMatchers(HttpMethod.POST,"/spittles").authenticated()
.antMatchers("/test/index").hasAnyAuthority("ROLE_USER")
.anyRequest().permitAll();
}
使用基于内存的认证
因为我们的安全配置类扩展了WebSecurityConfigurerAdapter,因此配置用户存储的最简单方式就是重载configure()方法,并以AuthenticationManagerBuilder作为传入参数。AuthenticationManagerBuilder有多个方法可以用来配置Spring Security对认证的支持。通过inMemoryAuthentication()方法,我们可以启用、配置并任意填充基于内存的用户存储。
下面SecurityConfig.java类重载了configure()方法,并使用两个用户来配置内存用户存储。
//使用基于内存的认证
@Override
protected void configure(AuthenticationManagerBuilder auth) throws Exception {
//暂时使用基于内存的AuthenticationProvider
auth.inMemoryAuthentication().withUser("user").password("pass").roles("USER").and()
.withUser("admin").password("pass").authorities("ROLE_USER", "ROLE_ADMIN");
}
我们可以看到,configure()方法中的AuthenticationManagerBuilder使用构造者风格的接口来构建认证配置。通过简单地调用inMemoryAuthentication()就能启用内存用户存储。但是我们还需要有一些用户,否则的话,这和没有
用户并没有什么区别。
因此,我们需要调用withUser()方法为内存用户存储添加新的用户,这个方法的参数是username。withUser()方法返回的是UserDetailsManagerConfigurer.UserDetailsBuilder,这个对象提供了多个进一步配置用户的方法,包括设置用户密码的password()方法以及为给定用户授予一个或多个角色权限的roles()方法。
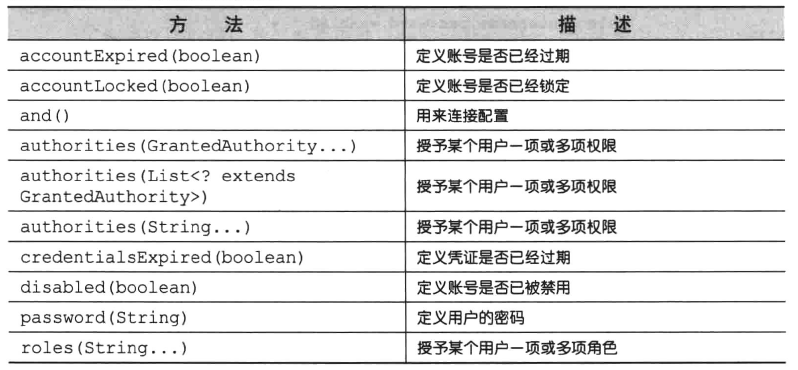
除了password()、roles()和and()方法以外,还有其他的几个方法可以用来配置内存用户存储中的用户信息。表描述了UserDetailsManagerConfigurer.UserDetailsBuilder对象所有可用的方法。
完整的SecurityConfig.java配置类如下:
@Configuration
@EnableWebSecurity
public class SecurityConfig extends WebSecurityConfigurerAdapter {


    //使用基于内存的认证,spring 实战第九章
    @Override
    protected void configure(AuthenticationManagerBuilder auth) throws Exception {
        //暂时使用基于内存的AuthenticationProvider
        auth.inMemoryAuthentication().withUser("user").password("pass").roles("USER").and()
                .withUser("admin").password("pass").authorities("ROLE_USER", "ROLE_ ADMIN");    }
    @Override
    public void configure(WebSecurity web) throws Exception {
        web.ignoring().antMatchers("/resources/**");
    }

    /**
     * Spring Security 4.0之后,引入了CSRF,默认是开启。不得不说,CSRF和RESTful技术有冲突。
     * CSRF默认支持的方法: GET|HEAD|TRACE|OPTIONS,不支持POST。
     * authenticated()  要求在执行该请求时必须已经登录了应用,未登录会重定向到登录页面。
     * permitAll()    允许请求没有任何的安全限制。
     */
    @Override
    protected void configure(HttpSecurity http) throws Exception {

        http.csrf().disable()//关闭CSRF
                .formLogin()
                .loginPage("/login").loginProcessingUrl("/login.do")
                .failureUrl("/lError?error")
                .usernameParameter("username")
                .passwordParameter("password")
                .defaultSuccessUrl("/welcome")
                .and()
                .authorizeRequests()
                .antMatchers(HttpMethod.POST,"/spittles").authenticated()
                .antMatchers("/test/index").hasAnyAuthority("ROLE_USER")
                .anyRequest().permitAll();

    }
}
welcome.jsp页面如下:
<%@ page contentType="text/html;charset=UTF-8" language="java" %>
<html><head>
<title>Title</title>
</head>
<body>
<a href="/test/index">Spi</a>
</body>
</html>
运行结果及工程目录:
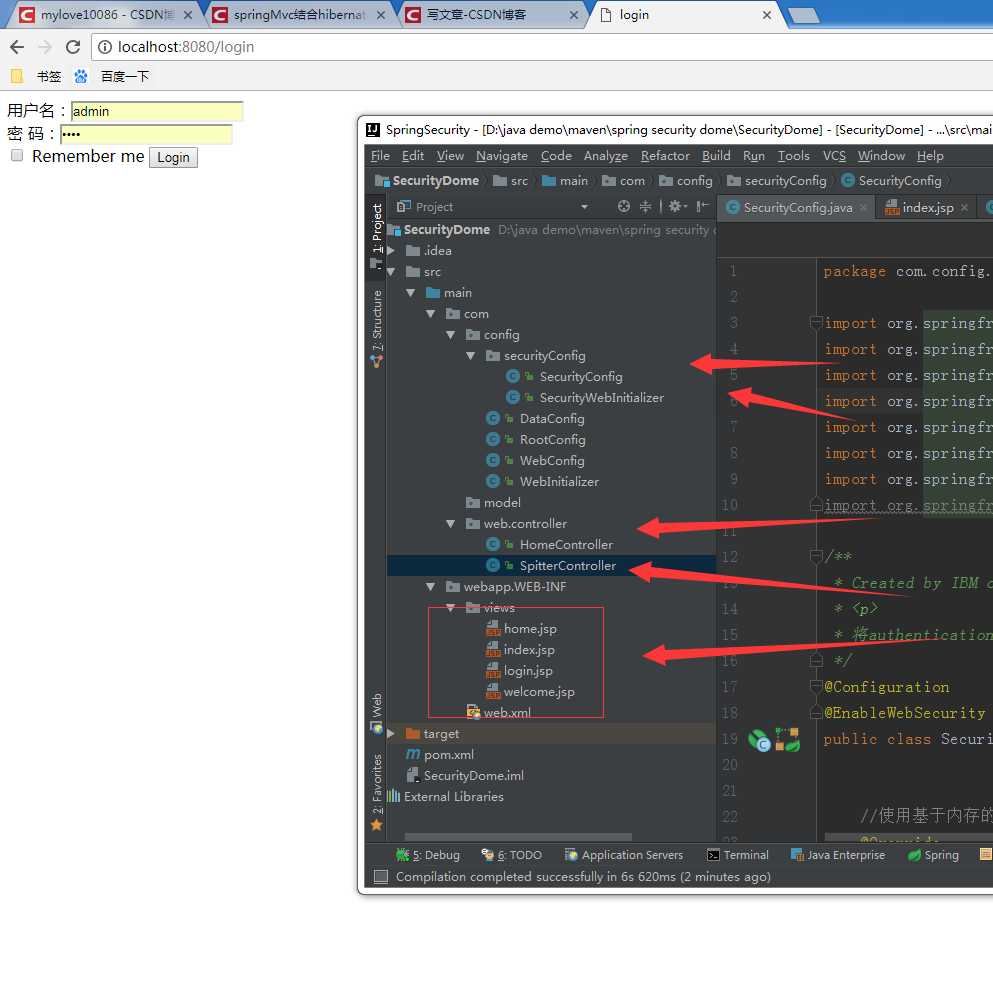
在没有登录时进入http://localhost:8080/test/index会跳转到登录页面。
源码地址:
https://download.csdn.net/download/u014572215/10412666https://download.csdn.net/download/u014572215/10412666 点击打开链接