Spring Security教程(二):自定义数据库查询
Spring Security自带的默认数据库存储用户和权限的数据,但是Spring Security默认提供的表结构太过简单了,其实就算默认提供的表结构很复杂,也不一定能满足项目对用户信息和权限信息管理的要求。那么接下来就讲解如何自定义数据库实现对用户信息和权限信息的管理。
一、自定义表结构
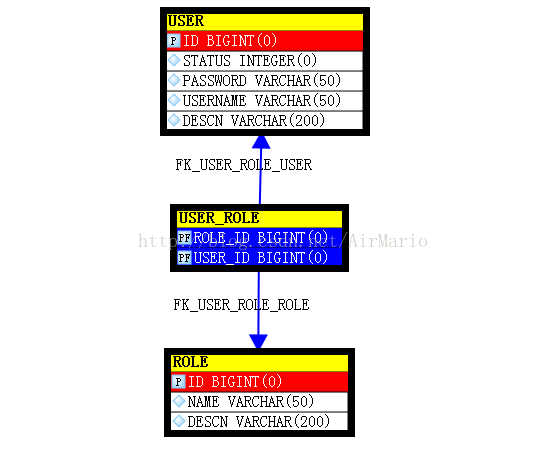
这里还是用的mysql数据库,所以pom.xml文件都不用修改。这里只要新建三张表即可,user表、role表、user_role表。其中user用户表,role角色表为保存用户权限数据的主表,user_role为关联表。user用户表,role角色表之间为多对多关系,就是说一个用户可以有多个角色。ER图如下所示:
建表语句:

-- 角色
create table role(
    id bigint,
    name varchar(50),
    descn varchar(200)
);
alter table role add constraint pk_role primary key(id);
alter table role alter column id bigint generated by default as identity(start with 1);

-- 用户
create table user(
    id bigint,
    username varchar(50),
    password varchar(50),
    status integer,
    descn varchar(200)
);
alter table user add constraint pk_user primary key(id);
alter table user alter column id bigint generated by default as identity(start with 1);

-- 用户角色连接表
create table user_role(
    user_id bigint,
    role_id bigint
);
alter table user_role add constraint pk_user_role primary key(user_id, role_id);
alter table user_role add constraint fk_user_role_user foreign key(user_id) references user(id);
alter table user_role add constraint fk_user_role_role foreign key(role_id) references role(id);
插入数据:
insert into user(id,username,password,status,descn) values(1,'admin','admin',1,'管理员');
insert into user(id,username,password,status,descn) values(2,'user','user',1,'用户');

insert into role(id,name,descn) values(1,'ROLE_ADMIN','管理员角色');
insert into role(id,name,descn) values(2,'ROLE_USER','用户角色');

insert into user_role(user_id,role_id) values(1,1);
insert into user_role(user_id,role_id) values(1,2);
insert into user_role(user_id,role_id) values(2,2);
二、修改Spring Security的配置文件(applicationContext.xml)
现在我们要在这样的数据结构基础上使用Spring Security,Spring Security所需要的数据无非就是为了处理两种情况,一是判断登录用户是否合法,二是判断登陆的用户是否有权限访问受保护的系统资源。因此我们所要做的工作就是在现有数据结构的基础上,为Spring Security提供这两种数据。
在jdbc-user-service标签中有这样两个属性:
1. users-by-username-query为根据用户名查找用户,系统通过传入的用户名查询当前用户的登录名,密码和是否被禁用这一状态。
2.authorities-by-username-query为根据用户名查找权限,系统通过传入的用户名查询当前用户已被授予的所有权限。
同时通过代码提示能看到这两个属性的sql语句格式:
从图中可以看到第一个属性要的是通过username来查询用户名、密码和是否可用;第二个属性是通过username来查询用户权限,所以在我们自定义的表结构的基础上对sql语句进行修改,得到如下语句:
select username,password,status as enabled from user where username = ?

select user.username,role.name from user,role,user_role
    where user.id=user_role.user_id and
    user_role.role_id=role.id and user.username=?
这样最终得到的配置文件如下:
<?xml version="1.0" encoding="UTF-8"?>
<beans xmlns="http://www.springframework.org/schema/beans"
       xmlns:security="http://www.springframework.org/schema/security"
       xmlns:xsi="http://www.w3.org/2001/XMLSchema-instance"
       xmlns:context="http://www.springframework.org/schema/context"
       xsi:schemaLocation="http://www.springframework.org/schema/beans http://www.springframework.org/schema/beans/spring-beans.xsd
       http://www.springframework.org/schema/context http://www.springframework.org/schema/context/spring-context.xsd
        http://www.springframework.org/schema/security http://www.springframework.org/schema/security/spring-security.xsd">

    <context:component-scan base-package="com.zy">
        <!--application父容器步扫描controller注解,这样两个配置文件各自各负责各自的-->
        <context:exclude-filter type="annotation" expression="org.springframework.stereotype.Controller"/>
    </context:component-scan>

    <!--数据库连接信息-->
    <bean id="dataSource" class="com.alibaba.druid.pool.DruidDataSource" init-method="init" destroy-method="close">
        <!-- 基本属性 url、user、password -->
        <property name="driverClassName" value="com.mysql.jdbc.Driver" />
        <property name="url" value="jdbc:mysql://localhost:3306/test" />
        <property name="username" value="root" />
        <property name="password" value="123456" />

        <!-- 配置监控统计拦截的filters -->
        <property name="filters" value="stat" />

        <!-- 配置初始化大小、最小、最大 -->
        <property name="maxActive" value="20" />
        <property name="initialSize" value="1" />
        <property name="minIdle" value="1" />

        <!-- 配置获取连接等待超时的时间 -->
        <property name="maxWait" value="60000" />

        <!-- 配置间隔多久才进行一次检测,检测需要关闭的空闲连接,单位是毫秒 -->
        <property name="timeBetweenEvictionRunsMillis" value="60000" />

        <!-- 配置一个连接在池中最小生存的时间,单位是毫秒 -->
        <property name="minEvictableIdleTimeMillis" value="300000" />

        <property name="testWhileIdle" value="true" />
        <property name="testOnBorrow" value="false" />
        <property name="testOnReturn" value="false" />

        <!-- 打开PSCache,并且指定每个连接上PSCache的大小 -->
        <property name="poolPreparedStatements" value="true" />
        <property name="maxOpenPreparedStatements" value="20" />
    </bean>

    <!--配置mybatis-->
    <!-- 配置SqlSessionFactoryBean -->
    <bean id="sqlsessionfactory" class="org.mybatis.spring.SqlSessionFactoryBean">
        <!-- 指定连接源 -->
        <property name="dataSource" ref="dataSource"/>
        <!-- 指定映射文件 -->
        <property name="mapperLocations" value="classpath:mapper/*.xml"/>
    </bean>
    <!-- 扫描指定包下的接口,自动生成代理类 -->
    <bean class="org.mybatis.spring.mapper.MapperScannerConfigurer">
    <property name="basePackage" value="com.zy.dao"/>
    </bean>

    <!--<bean id="userService" class="com.zy.service.UserServiceImpl"></bean>-->
    <!--security配置-->
    <security:http auto-config="true" use-expressions="true">
        <security:intercept-url pattern="/admin.jsp" access="hasAnyRole('ROLE_ADMIN')"/>
        <security:intercept-url pattern="/**" access="hasAnyAuthority('ROLE_ADMIN,ROLE_USER')"/>
        <security:form-login authentication-success-forward-url="/index.jsp"/>
    </security:http>
    <security:authentication-manager>
        <security:authentication-provider>

            <!--使用自定义的表结构-->
            <security:jdbc-user-service data-source-ref="dataSource" users-by-username-query="select username,password,status as enabled from user where username = ?"
                                        authorities-by-username-query="select user.username,role.name from user,role,user_role where user.id=user_role.user_id and
    user_role.role_id=role.id and user.username=?"/>

            <!--使用sucrity内置的内存数据库-->
            <!--<security:user-service>-->
                <!--<security:user name="admin" password="admin"  authorities="ROLE_ADMIN,ROLE_USER"/>-->
                <!--<security:user name="user" password="user"  authorities="ROLE_USER"/>-->
            <!--</security:user-service>-->
            <security:password-encoder ref="noOpPasswordEncoder"/>
        </security:authentication-provider>
    </security:authentication-manager>
    <bean id="noOpPasswordEncoder" class="org.springframework.security.crypto.password.NoOpPasswordEncoder"/>
</beans>
三、结果
Spring Security自带的默认数据库存储用户和权限的数据,但是Spring Security默认提供的表结构太过简单了,其实就算默认提供的表结构很复杂,也不一定能满足项目对用户信息和权限信息管理的要求。那么接下来就讲解如何自定义数据库实现对用户信息和权限信息的管理。
一、自定义表结构
这里还是用的mysql数据库,所以pom.xml文件都不用修改。这里只要新建三张表即可,user表、role表、user_role表。其中user用户表,role角色表为保存用户权限数据的主表,user_role为关联表。user用户表,role角色表之间为多对多关系,就是说一个用户可以有多个角色。ER图如下所示:
建表语句:
-- 角色
create table role(
    id bigint,
    name varchar(50),
    descn varchar(200)
);
alter table role add constraint pk_role primary key(id);
alter table role alter column id bigint generated by default as identity(start with 1);

-- 用户
create table user(
    id bigint,
    username varchar(50),
    password varchar(50),
    status integer,
    descn varchar(200)
);
alter table user add constraint pk_user primary key(id);
alter table user alter column id bigint generated by default as identity(start with 1);

-- 用户角色连接表
create table user_role(
    user_id bigint,
    role_id bigint
);
alter table user_role add constraint pk_user_role primary key(user_id, role_id);
alter table user_role add constraint fk_user_role_user foreign key(user_id) references user(id);
alter table user_role add constraint fk_user_role_role foreign key(role_id) references role(id);
插入数据:
insert into user(id,username,password,status,descn) values(1,'admin','admin',1,'管理员');
insert into user(id,username,password,status,descn) values(2,'user','user',1,'用户');

insert into role(id,name,descn) values(1,'ROLE_ADMIN','管理员角色');
insert into role(id,name,descn) values(2,'ROLE_USER','用户角色');

insert into user_role(user_id,role_id) values(1,1);
insert into user_role(user_id,role_id) values(1,2);
insert into user_role(user_id,role_id) values(2,2);
二、修改Spring Security的配置文件(applicationContext.xml)
现在我们要在这样的数据结构基础上使用Spring Security,Spring Security所需要的数据无非就是为了处理两种情况,一是判断登录用户是否合法,二是判断登陆的用户是否有权限访问受保护的系统资源。因此我们所要做的工作就是在现有数据结构的基础上,为Spring Security提供这两种数据。
在jdbc-user-service标签中有这样两个属性:
1. users-by-username-query为根据用户名查找用户,系统通过传入的用户名查询当前用户的登录名,密码和是否被禁用这一状态。
2.authorities-by-username-query为根据用户名查找权限,系统通过传入的用户名查询当前用户已被授予的所有权限。
同时通过代码提示能看到这两个属性的sql语句格式:
从图中可以看到第一个属性要的是通过username来查询用户名、密码和是否可用;第二个属性是通过username来查询用户权限,所以在我们自定义的表结构的基础上对sql语句进行修改,得到如下语句:
select username,password,status as enabled from user where username = ?

select user.username,role.name from user,role,user_role
    where user.id=user_role.user_id and
    user_role.role_id=role.id and user.username=?
这样最终得到的配置文件如下:
<?xml version="1.0" encoding="UTF-8"?>
<beans xmlns="http://www.springframework.org/schema/beans"
       xmlns:security="http://www.springframework.org/schema/security"
       xmlns:xsi="http://www.w3.org/2001/XMLSchema-instance"
       xmlns:context="http://www.springframework.org/schema/context"
       xsi:schemaLocation="http://www.springframework.org/schema/beans http://www.springframework.org/schema/beans/spring-beans.xsd
       http://www.springframework.org/schema/context http://www.springframework.org/schema/context/spring-context.xsd
        http://www.springframework.org/schema/security http://www.springframework.org/schema/security/spring-security.xsd">

    <context:component-scan base-package="com.zy">
        <!--application父容器步扫描controller注解,这样两个配置文件各自各负责各自的-->
        <context:exclude-filter type="annotation" expression="org.springframework.stereotype.Controller"/>
    </context:component-scan>

    <!--数据库连接信息-->
    <bean id="dataSource" class="com.alibaba.druid.pool.DruidDataSource" init-method="init" destroy-method="close">
        <!-- 基本属性 url、user、password -->
        <property name="driverClassName" value="com.mysql.jdbc.Driver" />
        <property name="url" value="jdbc:mysql://localhost:3306/test" />
        <property name="username" value="root" />
        <property name="password" value="123456" />

        <!-- 配置监控统计拦截的filters -->
        <property name="filters" value="stat" />

        <!-- 配置初始化大小、最小、最大 -->
        <property name="maxActive" value="20" />
        <property name="initialSize" value="1" />
        <property name="minIdle" value="1" />

        <!-- 配置获取连接等待超时的时间 -->
        <property name="maxWait" value="60000" />

        <!-- 配置间隔多久才进行一次检测,检测需要关闭的空闲连接,单位是毫秒 -->
        <property name="timeBetweenEvictionRunsMillis" value="60000" />

        <!-- 配置一个连接在池中最小生存的时间,单位是毫秒 -->
        <property name="minEvictableIdleTimeMillis" value="300000" />

        <property name="testWhileIdle" value="true" />
        <property name="testOnBorrow" value="false" />
        <property name="testOnReturn" value="false" />

        <!-- 打开PSCache,并且指定每个连接上PSCache的大小 -->
        <property name="poolPreparedStatements" value="true" />
        <property name="maxOpenPreparedStatements" value="20" />
    </bean>

    <!--配置mybatis-->
    <!-- 配置SqlSessionFactoryBean -->
    <bean id="sqlsessionfactory" class="org.mybatis.spring.SqlSessionFactoryBean">
        <!-- 指定连接源 -->
        <property name="dataSource" ref="dataSource"/>
        <!-- 指定映射文件 -->
        <property name="mapperLocations" value="classpath:mapper/*.xml"/>
    </bean>
    <!-- 扫描指定包下的接口,自动生成代理类 -->
    <bean class="org.mybatis.spring.mapper.MapperScannerConfigurer">
    <property name="basePackage" value="com.zy.dao"/>
    </bean>

    <!--<bean id="userService" class="com.zy.service.UserServiceImpl"></bean>-->
    <!--security配置-->
    <security:http auto-config="true" use-expressions="true">
        <security:intercept-url pattern="/admin.jsp" access="hasAnyRole('ROLE_ADMIN')"/>
        <security:intercept-url pattern="/**" access="hasAnyAuthority('ROLE_ADMIN,ROLE_USER')"/>
        <security:form-login authentication-success-forward-url="/index.jsp"/>
    </security:http>
    <security:authentication-manager>
        <security:authentication-provider>

            <!--使用自定义的表结构-->
            <security:jdbc-user-service data-source-ref="dataSource" users-by-username-query="select username,password,status as enabled from user where username = ?"
                                        authorities-by-username-query="select user.username,role.name from user,role,user_role where user.id=user_role.user_id and
    user_role.role_id=role.id and user.username=?"/>

            <!--使用sucrity内置的内存数据库-->
            <!--<security:user-service>-->
                <!--<security:user name="admin" password="admin"  authorities="ROLE_ADMIN,ROLE_USER"/>-->
                <!--<security:user name="user" password="user"  authorities="ROLE_USER"/>-->
            <!--</security:user-service>-->
            <security:password-encoder ref="noOpPasswordEncoder"/>
        </security:authentication-provider>
    </security:authentication-manager>
    <bean id="noOpPasswordEncoder" class="org.springframework.security.crypto.password.NoOpPasswordEncoder"/>
</beans>