Thrift是一个跨语言、高可用、高性能、轻量级的RPC框架
当然缺点也是比较明显,接口稍有改动就要重新生成代码,使用起来不是很方便
Linux Distribution:Ubuntu 14.04.4
Thrift:0.10.0
JDK:1.7.0_80
一,安装Thrift编译器
1,安装工具包和依赖库
由于使用ubuntu14,根据官方网站http://thrift.apache.org/docs/install/debian中的说明,安装工具包和依赖库的命令如下:
apt-get install automake bison flex g++ git libboost1.55-all-dev libevent-dev libssl-dev libtool make pkg-config在安装之前需要使用apt-get update检索一下安装包列表,避免在安装过程中无法找到相应的安装包
由于最终会生成Java代码,还需安装最低JDK7和Ant
apt-get install openjdk-7-jdk-headless ant如果系统版本较高,则需安装更高版本依赖库,如Ubuntu 16.04.2,就需要libboost1.58-all-dev及最低JDK8
2,安装编译器
从官网下载最新的压缩包thrift-0.10.0.tar.gz
root@ubuntu:/home/sean# tar -zxf thrift-0.10.0.tar.gz
root@ubuntu:/home/sean# cd thrift-0.10.0
root@ubuntu:/home/sean/thrift-0.10.0# ./configure --prefix=/usr/local/thrift
root@ubuntu:/home/sean/thrift-0.10.0# make
root@ubuntu:/home/sean/thrift-0.10.0# make install
安装结果如下
root@ubuntu:/usr/local/thrift# ll
total 24
drwxr-xr-x  6 root root 4096 Apr  6 19:16 ./
drwxr-xr-x 11 root root 4096 Apr  6 19:15 ../
drwxr-xr-x  2 root root 4096 Apr  6 19:15 bin/
drwxr-xr-x  3 root root 4096 Apr  6 19:15 include/
drwxr-xr-x  3 root root 4096 Apr  6 19:15 lib/
drwxr-xr-x  3 root root 4096 Apr  6 19:16 share/
如果感觉上面的过程太繁琐,可以使用apt-get直接安装Thrift编译器
apt-get intall thrift-compiler二,编写Thrift文件
官网的链接地址提供了一个很棒的tutorial.thrift文件来指导你编写自己的Thrift文件,链接地址如下
https://git-wip-us.apache.org/repos/asf/thrift/?p=thrift.git;a=tree;f=tutorial为了测试,写了一个非常简单的Thrift文件
namespace java com.sean

struct User {
        1:i32 id
        2:string name
        3:i32 age
}

service UserService {

        User getUserById(1:i32 id)
}
三,生成代码
1,Linux下生成代码
将test.thrift文件上传至/usr/local/thrift路径
运行如下命令
root@ubuntu:/usr/local/thrift# ./thrift --gen java test.thift之后会在/usr/local/thrift路径下生成一个gen-java文件夹,里面就是Thrift编译器根据Thrift文件自动生成的Java代码
服务端和客户端的代码也可参考官网上的示例
https://git-wip-us.apache.org/repos/asf/thrift/?p=thrift.git;a=tree;f=tutorial
2,Idea中使用插件生成
下载在Windows环境下可直接运行的thrift编译器
下载地址:https://mirrors.tuna.tsinghua.edu.cn/apache/thrift/,目前只提供了0.9.3和0.10.0两个版本可供下载
安装thrift插件,File -> Settings... -> Plugins,搜索Thrift Support(最新版本为v0.9.6)并安装,安装完成之后重启Idea
在Idea中配置thrift编译器,File -> Settings... -> Build,Execution,Deployment -> Compiler -> Thrift compiler,配置完成后执行Test以确认配置成功

配置项目Facet,File -> Project Structure... -> Facets,选择Add -> Thrift,配置时根据需要选择编译特性

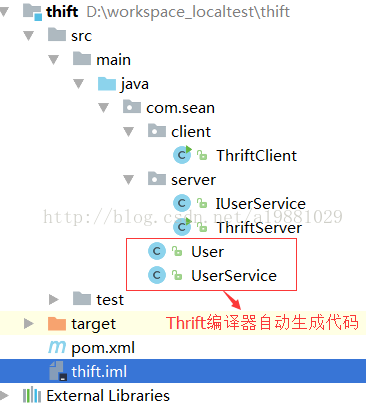
之后选中Thrift文件,右键选择Recompile即可在指定Output path下生成相应代码了,需要注意的是Thrift文件需要放在Sources文件夹下,放在Resources文件夹中将不会进行解析编译
3,Maven编译时生成
将可直接运行的thrift编译器所在路径加入系统环境变量
修改POM文件,添加编译Thrift文件部分
<project xmlns="http://maven.apache.org/POM/4.0.0"
         xmlns:xsi="http://www.w3.org/2001/XMLSchema-instance"
         xsi:schemaLocation="http://maven.apache.org/POM/4.0.0
         http://maven.apache.org/xsd/maven-4.0.0.xsd">
  <modelVersion>4.0.0</modelVersion>

  <groupId>com.sean</groupId>
  <artifactId>thrift</artifactId>
  <version>1.0-SNAPSHOT</version>
  <packaging>jar</packaging>

  <name>thrift</name>
  <url>http://maven.apache.org</url>

  <properties>
    <project.build.sourceEncoding>UTF-8</project.build.sourceEncoding>
  </properties>

  <dependencies>
    <dependency>
      <groupId>junit</groupId>
      <artifactId>junit</artifactId>
      <version>3.8.1</version>
      <scope>test</scope>
    </dependency>

    <dependency>
      <groupId>org.apache.thrift</groupId>
      <artifactId>libthrift</artifactId>
      <version>0.9.3</version>
    </dependency>
  </dependencies>

  <build>
    <plugins>
      <plugin>
        <groupId>org.apache.thrift.tools</groupId>
        <artifactId>maven-thrift-plugin</artifactId>
        <version>0.1.11</version>
        <configuration>
          <!-- 路径已加入系统环境变量 -->
          <thriftExecutable>thrift-0.9.3</thriftExecutable>
          <thriftSourceRoot>${project.basedir}/src/main/resource</thriftSourceRoot>
          <outputDirectory>${project.basedir}/src/main/java</outputDirectory>
        </configuration>
        <executions>
          <execution>
            <id>thrift-sources</id>
            <phase>generate-sources</phase>
            <goals>
              <goal>compile</goal>
            </goals>
          </execution>
        </executions>
      </plugin>
    </plugins>
  </build>
</project>
执行mvn compile即可
四,编写服务端代码
由于是Maven工程,需要引入相关依赖
<dependency>
	<groupId>org.apache.thrift</groupId>
	<artifactId>libthrift</artifactId>
	<version>0.10.0</version>
</dependency>
首先需要编写业务实现类IUserService
package com.sean.server;

import com.sean.User;
import com.sean.UserService;
import org.apache.thrift.TException;

/**
 * Created by seanzou on 2017/4/7.
 */
public class IUserService implements UserService.Iface {
    @Override
    public User getUserById(int id) throws TException {
        System.out.println("The id in request is :" + id);
        User user = new User();
        user.setId(id);
        user.setName("Sync");
        user.setAge(18);
        return user;
    }
}
服务端代码如下
package com.sean.server;

import com.sean.UserService;
import org.apache.thrift.server.TServer;
import org.apache.thrift.server.TSimpleServer;
import org.apache.thrift.transport.TServerSocket;

import java.net.ServerSocket;

/**
 * Created by seanzou on 2017/4/7.
 */
public class ThriftServer {
    public static void main(String[] args) throws Exception {
        TServerSocket socket = new TServerSocket(8081);

        IUserService iUserService = new IUserService();
        UserService.Processor processor = new UserService.Processor(iUserService);

        TServer.Args params = new TServer.Args(socket);
        params = params.processor(processor);

        TServer server = new TSimpleServer(params);
        server.serve();
    }
}
五,编写客户端代码
package com.sean.client;

import com.sean.User;
import com.sean.UserService;
import org.apache.thrift.protocol.TBinaryProtocol;
import org.apache.thrift.protocol.TProtocol;
import org.apache.thrift.transport.TSocket;

/**
 * Created by seanzou on 2017/4/7.
 */
public class ThriftClient {
    public static void main(String[] args) throws Exception {
        TSocket socket = new TSocket("localhost", 8081);
        socket.open();

        TProtocol protocol = new TBinaryProtocol(socket);
        UserService.Client client = new UserService.Client(protocol);

        User user = client.getUserById(100);
        System.out.println(user.getName() + ":" + user.getAge());

        socket.close();
    }
}