我们知道一个程序的瓶颈在于数据库,我们也知道内存的速度是大大快于硬盘的速度的。当我们需要重复地获取相同的数据的时候,我们一次又一次的请求数据库或者远程服务,导致大量的时间耗费在数据查询或者远程方法调用上,导致程序性能恶化,这便是数据缓存要解决的问题。
8.5.1 Spring 缓存支持
Spring 定义了一org.springframework.cache.CacheManager和org.springframework.cache.Cache接口用来统一不 同的缓存的技术。其中,CacheManager是Spring提供的各种缓存技术抽象接口,Cache接口包含缓存的各种操作(增加、删除、获得缓存,我们一般不会直接和此接口打交道)。
1.Spring支持的CacheManager
针对不同的缓存技术,需要实现不同的CacheManager,Spring定义了如表所示的CacheManager实现。
| CacheManager | 描述 |
|---|---|
| SimpleCacheManager | 使用简单的Collection来存储缓存,主要用来测试用途 |
| ConcurrentMapCacheManager | 使用ConcurrentMap来缓存 |
| NoOpCacheManager | 仅测试用途,不会实际存储缓存 |
| EhCacheCacheManager | 使用EhCache作为缓存技术 |
| GuavaCacheManager | 使用Google Guava的GuavaCache作为缓存技术 |
| HazelcastCacheManager | 使用Hazelcast作为缓存技术 |
| JCacheCacheManager | 支持JCache(jsr-107)标准的实现作为缓存技术,如Apache Commons JCS |
| RedisCacheManager | 使用Redis作为缓存技术 |
在我们使用任意一个实现的CacheManager的时候,需注册实现的CacheManager的Bean,例如:
@Bean
public EhCacheCacheManager cacheManager(CacheManager ehCacheCacheManager) {
  return new EhCacheCacheManager(ehCacheCacheManager);
}
当然每种缓存技术都有很多的额外配置,但配置cacheManager是必不可少的。
2.声名式缓存注解
Spring 提供了4个注解来声明缓存规则(又是使用注解式的AOP的一个生动例子)。这四个注解如表所示。
| 注解 | 解释 |
|---|---|
| @Cacheable | 在方法执行前Spring先查看缓存中是否有数据,如果有数据,则直接返回缓存数据;若没有数据,调用方法并将方法返回值放进缓存 |
| @CachePut | 无论怎样,都会将方法的返回值放到缓存中。@CachePut的属性与@Cacheable保持一致 |
| @CacheEvict | 将一条或多条数据从缓存中删除 |
| @Caching | 可以通过@Caching注解组合多个注解策略在一个方法上 |
3.开启声名式缓存支持
开启声名式缓存支持十分简单,只需在配置类上使用@EnableCaching注解即可,例如:
@Configuration
@EnableCaching
public class AppConfig{

}
8.5.2 Spring Boot的支持
在Spring 中使用缓存技术的关键是配置CacheManager,而Spring Boot为我们自动配置了多个CacheManager的实现。
Spring Boot 的CacheManager的自动配置放置在 org.sprinframework.boot.autoconfigure.cache包中,如图
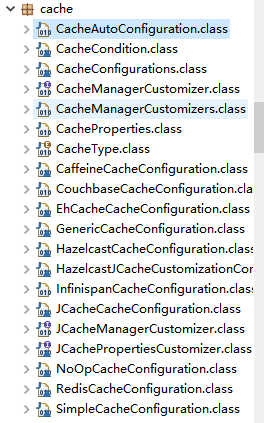
通过上图我们可以看出,Spring Boot为我们自动配置了EhCacheCacheConfiguration(使用EhCache)、GenericCacheConfiguration(使用Collection)、GuavaCacheConfiguration(使用Guava)、HazelcastCacheConfiguration(使用Hazelcast)、InfinispanCacheConfiguration(使用Infinispan)、JCacheCacheConfiguration(使用JCache)、NoOpCacheConfiguration(不使用存储)、RedisCacheConfiguration(使用Redis)、SimpleCacheConfiguration(使用ConcurrentMap)。在不做任何额外配置的情况下,默认使用的是SimpleCacheConfiguration,即使用ConcurrentMapCacheManager。Spring Boot支持以“spring.cache” 为前缀的属性来配置缓存。
spring.cache.type= # 可选generic,ehcache,hazelcast,infinispan,jcache,redis,guava,simple,none
spring.cache.cache-names=#程序启动时创建缓存名称
spring.cache.ehcache.config=#ehcache配置文件地址
spring.cache.hazelcast.config=#hazelcast配置文件地址
spring.cache.infinispan.config = # infinispan配置文件地址
spring.cache.jcache.config = # jcache 配置文件陡
spring.cache.jcache.provider = #当多个jcache实现在类路径中的时候,指定jcache实现
spring.cache.guava.spec = # guava specs
Spring Boot环境下,使用缓存技术只需在项目中导入相关缓存技术的依赖包,并在配置类使用@EnableCaching开启缓存支持即可。
8.5.3 实战
本例将以Spring Boot 默认的ConcurrentMapCacheManager作为缓存技术,演示@Cacheable、@CachePut、@CacheEvit,最后使用EhCache、Guava来替换缓存技术。
1.新建Spring Boot项目
新建Spring Boot项目,依赖为Cache(spring-boot-starter-cache)、JPA(spring-boot-starter-data-jpa)和Web(spring-boot-starter-web)。
项目信息:
groupId:com.wisely
arctifactId:ch8_5
package:com.wisely.ch8_5
添加Oracle JDBC驱动,并在application.properties配置相关属性,与上例保持一致。
2.实体类
package com.wisely.ch8_5.domain;

import javax.persistence.Entity;
import javax.persistence.GeneratedValue;
import javax.persistence.Id;

@Entity
public class Person {
	@Id
	@GeneratedValue
	private Long id;

	private String name;

	private Integer age;

	private String address;

	public Person() {
		super();
	}

	public Person(Long id, String name, Integer age, String address) {
		super();
		this.id = id;
		this.name = name;
		this.age = age;
		this.address = address;
	}

	public Long getId() {
		return id;
	}

	public void setId(Long id) {
		this.id = id;
	}

	public String getName() {
		return name;
	}

	public void setName(String name) {
		this.name = name;
	}

	public Integer getAge() {
		return age;
	}

	public void setAge(Integer age) {
		this.age = age;
	}

	public String getAddress() {
		return address;
	}

	public void setAddress(String address) {
		this.address = address;
	}


}
3.实体类Repository
package com.wisely.ch8_5.dao;

import org.springframework.data.jpa.repository.JpaRepository;

import com.wisely.ch8_5.domain.Person;

public interface PersonRepository extends JpaRepository<Person, Long> {

}
4.业务服务
(1)接口:
package com.wisely.ch8_5.service;

import com.wisely.ch8_5.domain.Person;

public interface DemoService {
	public Person save(Person person);

	public void remove(Long id);

	public Person findOne(Person person);

}
(2)实现类:
package com.wisely.ch8_5.service.impl;

import org.springframework.beans.factory.annotation.Autowired;
import org.springframework.cache.annotation.CacheEvict;
import org.springframework.cache.annotation.CachePut;
import org.springframework.cache.annotation.Cacheable;
import org.springframework.stereotype.Service;

import com.wisely.ch8_5.dao.PersonRepository;
import com.wisely.ch8_5.domain.Person;
import com.wisely.ch8_5.service.DemoService;

@Service
public class DemoServiceImpl implements DemoService {

	@Autowired
	PersonRepository personRepository;

	@Override
	@CachePut(value="people" , key="#person.id")   //@CachePut缓存新增的或更新的数据到缓存,其中缓存名称为people,数据的key是person的id。
	public Person save(Person person) {
		Person p = personRepository.save(person);
		System.out.println("为id、key为:"+p.getId()+"的数据做了缓存");
		return p;
	}

	@Override
	@CacheEvict(value="people",key="#person.id") //从缓存people中删除key为id的数据。
	public void remove(Long id) {
		System.out.println("删除了id、key为"+id+"的数据缓存");
		personRepository.deleteById(id);
	}

	@Override
	@CacheEvict(value="people",key="#id") //从缓存people中删除key为id的数据。
	public void remove(Long id) {

		System.out.println("删除了id、key为"+id+"的数据缓存");

	}

}
5. 控制器
package com.wisely.ch8_5.controller;

import org.springframework.beans.factory.annotation.Autowired;
import org.springframework.web.bind.annotation.RequestMapping;
import org.springframework.web.bind.annotation.RestController;

import com.wisely.ch8_5.domain.Person;
import com.wisely.ch8_5.service.DemoService;

@RestController
public class CacheController {

	@Autowired
	DemoService demoService;

	@RequestMapping("/put")
	public Person put(Person person) {
		return demoService.save(person);
	}

	@RequestMapping("/able")
	public Person cacheable(Person person) {
		return demoService.findOne(person);
	}

	@RequestMapping("/evit")
	public String evit(Long id) {
		demoService.remove(id);

		return "ok";
	}

}
6.开启缓存支持
package com.wisely.ch8_5;

import org.springframework.boot.SpringApplication;
import org.springframework.boot.autoconfigure.SpringBootApplication;
import org.springframework.cache.annotation.EnableCaching;

@SpringBootApplication
@EnableCaching      //开启缓存支持
public class Ch885Application {

	public static void main(String[] args) {
		SpringApplication.run(Ch885Application.class, args);
	}

}
7.运行
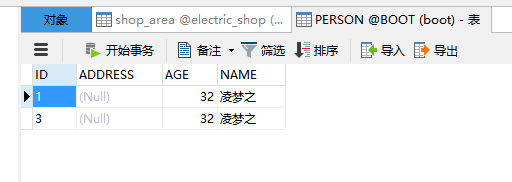
当我们对数据做了缓存之后,数据的获得将从缓存中得到,而不是从数据库中得到。当前的数据库的数据情况如图。
我们在每次运行测试情况下,都重启了应用程序。
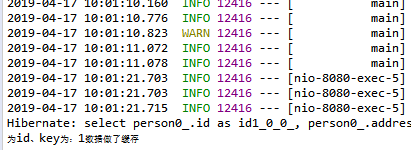
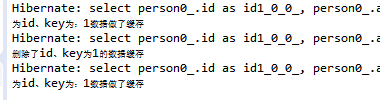
(1)测试@Cacheable
第一次访问http://localhost:8080/able?id=1,第一次将调用方法查询数据库,并将数据放到缓存people中。
此时控制台输出如下:
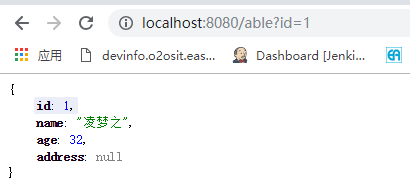
页面输出如下图

再次访问http://localhost:8080/able?id=1,此时控制台没有再次输出Hibernate的查询语句,以及“为id、key为:1数据做了缓存”字样,表示没有调用这个方法,页面直接从数据缓存中获得数据。
页面输出结果如图
(2)测试@CachePut
访问http://localhost:8080/put?name=cc&age=22&adress=成都,此时控制台输出如下:

页面输出如图
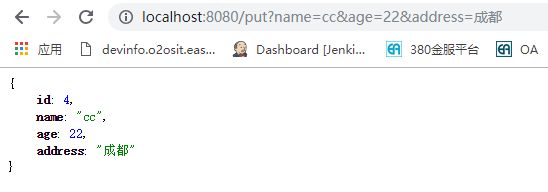
我们再次访问http://localhost:8080/able?id=4,控制台无输出,从缓存直接获得数据,页面显示与上图一致
(3)测试@CacheEvit
访问http://localhost:8080/able?id=1,为id为1的数据做缓存,再次访问http://localost:8080/able?id=1,确认数据已从缓存中获取。
访问http://localhost:8080/evit?id=1,从缓存中删除key为1的缓存数据

再次访问http://localhost:8080/able?id=1,观察控制台重新做了缓存:
8.5.4 切换缓存技术
切换缓存技术除了移入相关依赖包或者配置以外,使用方式和实战例子保持一致。下面简要讲解在Spring Boot下,EhCache和Guava作为缓存技术的方式,其余缓存技术也是类似的方式。
1.EhCache
当我们需要使用EhCache作为缓存技术的时候,我们只需在pom.xml中添加EhCache的依赖即可
		<dependency>
			<groupId>net.sf.ehcache</groupId>
			<artifactId>ehcache</artifactId>
		</dependency>
EhCache所需的配置文件ehcache.xml只需放在类路径下,Spring Boot会自动扫描,例如:
<?xml version="1.0" encoding="UTF-8"?>
<ehcache>
	<cache name="people" maxElementsInMemory="1000" />
</ehcache>
Spring Boot会给我们自动配置EhCacheCacheManager的Bean。
2.Guava
当我们需要使用guava作为缓存技术的时候,我们也只需在pom.xml中增加Guava的依赖即可:
		<dependency>
			<groupId>com.google.guava</groupId>
			<artifactId>guava</artifactId>
			<version>18.0</version>
		</dependency>
Spring Boot会给我们自动配置GuavaCacheManager这个Bean。
3.Redis
使用Redis,只需添加下面的依赖即可
		<dependency>
			<groupId>org.springframework.boot</groupId>
			<artifactId>spring-boot-starter-redis</artifactId>
		</dependency>
Spring Boot将会为我们 自动配置RedisCacheManager以及RedisTemplate的Bean。