上次使用 Faster R-CNN 训练了一个 VGG16 的网络,为了再提升识别的准确率,利用 ResNet 网络在同样的数据上面训练了多一次。
基本的过程和在训练 VGG16 网络时差不多,可参照 使用自己的数据训练 Faster R-CNN 的 VGG-16 模型
一、训练网络
(一)下载 ResNet-50 的 prototxt 文件
(二)相关文件修改
1.cd $FRCN_ROOT/lib/rpn/generate_anchors.py
# 在37行:
def generate_anchors(base_size=16, ratios=[0.5, 1, 2],
                     scales=2**np.arange(3, 6)):
# 修改为:
def generate_anchors(base_size=16, ratios=[0.5, 1, 2],
scales=2**np.arange(1, 6)):2.cd $FRCN_ROOT/lib/rpn/anchor_target_layer.py
# 在28行:
        anchor_scales = layer_params.get('scales', (8, 16, 32))
# 修改为:
anchor_scales = layer_params.get('scales', (2, 4, 8, 16, 32))3.cd $FRCN_ROOT/lib/rpn/proposal_layer.py
# 在29行:
        anchor_scales = layer_params.get('scales', (8, 16, 32))
# 修改为:
anchor_scales = layer_params.get('scales', (2, 4, 8, 16, 32))4.pascal_voc .py、imdb.py、train.prototxt、test.prototxt、.pt文件 的修改参考 使用自己的数据训练 Faster R-CNN 的 VGG-16 模型 。
5.因为我们使用了5个尺度的anchors,所以之前的9个anchors变成了3*5=15个。
修改prototxt和pt文件,将其中的18换成30。
layer {
  name: "rpn_cls_score"
  type: "Convolution"
  bottom: "rpn/output"
  top: "rpn_cls_score"
  param { lr_mult: 1.0 }
  param { lr_mult: 2.0 }
  convolution_param {
    num_output: 30   # 2(bg/fg) * 9(anchors)    ///将18换成30
    kernel_size: 1 pad: 0 stride: 1
    weight_filler { type: "gaussian" std: 0.01 }
    bias_filler { type: "constant" value: 0 }
  }
(三)下载 ImageNet 模型
下载 ImageNet 预训练文件:ResNet-50.v2.caffemodel
(四)清除缓存
删除缓存文件:
$FRCN_ROOT/data/VOCdevkit2007/annotations_cache/annots.pkl
$FRCN_ROOT/data/cache 下的 pkl 文件
如果不清除缓存可能会报错。
(五)开始训练
参照 VGG16 的训练命令:
cd $FRCN_ROOT
./experiments/scripts/faster_rcnn_end2end.sh 0 ResNet-50 pascal_voc

注意:第三个参数 ‘ResNet-50’,一定要和你的文件夹名字对应,比如我的文件放在$FRCN_ROOT/models/pascal_voc/ResNet-50 里面,所以我的第三个参数就为我目录的名称。
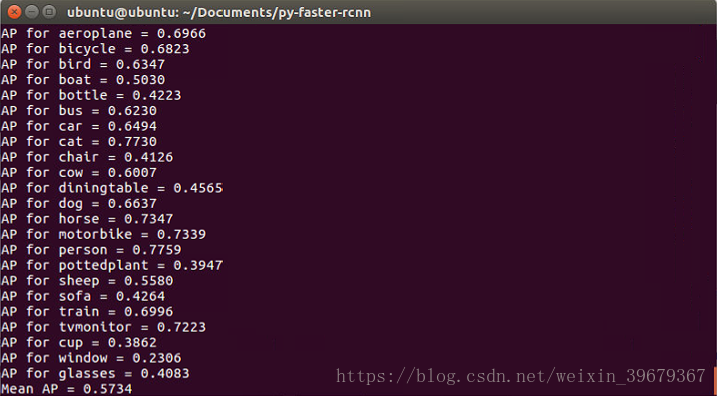
由于 ResNet-50 的网络更深,训练的时间也需要更久,每一次迭代大约需要 0.5s ,训练这个网络我用了大概10个小时,但效果会比用 VGG16 的好,主要是对小尺度的物体检测更加准确了。
这是我训练时各类的 AP :