一、原理篇
R-CNN的原理
全称是Region-CNN,它可以说是第一个成功地将深度学习应用到目标检测上的算法。
后面将要学习的Fast R-CNN, Faster R-CNN全部都是建立在R-CNN基础上的。
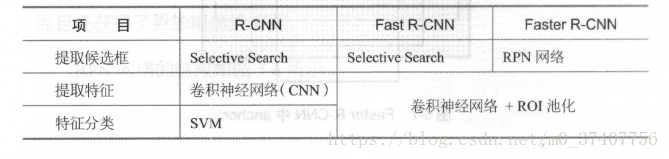
传统的目标检测方法大多以图像识别为基础。一般可以在图片上使用穷举去选出所有物体可能出现的区域框,对这些区域框提取特征并使用图像识别万法分类,得到所有分类成功的区域后,通过非极大值抑制(Non-maximum suppression)输出结果。 R-CNN遵循传统目标检测的思路,同样采用提取框、对每个框提取特征、图像分类、非极大值抑制四个步骤进行目标检测。只不过在提取特征这一步,将传统的特征(如SIFT, HOG特征等)换成了深度卷积网络提取的特征。
对于原始图像,首先使用Selective Search搜寻可能存在物体的区域。
Selcctivc Search可以从图像中启发式地搜索出可能包合物体的区域。相比穷举而言,Selective Search可以减少一部分计算量。
下一步,将取出的可能含有物体的区域送入CNN中提取特征。CNN通常是接受一个固定大小的图像,而取出的区域大小却各有不同。
对此,R-CNN的做法是将区域缩放到统一大小,再使用CNN提取特征。提取出特征后使用SVM进行分类,最后通过非极大值抑制输出结果。
R-CNN的训练可分成下白四步:
(1)在数据集上训练CNN 。R-CNN论文中使用的CNN网络是AlexNet,数据集为ImageNet 。
(2)在目标检测的数据集上,对训练好的CNN做微调。
(3)用Selective Search搜索候选区域,统一使用微调后的CNN对这些区域提取特征,并将提取到的特征存储起来。
(4)使用存储起来的特征,训练SVM分类器。
R-CNN的缺点是计算量太大。在一张图片中,通过Selective Search得到的有效区域往往在1000个以上,这意味着要重复计算1000多次神经网络非常耗时。另外,在训练阶段,还需要把所有特征保存起来。再通过SVM进行训练,这也是非常耗时且麻烦的。下面将要介绍的Fast R-CNN和Faster R-CNN在一定程度上改进了R-CNN计算量大的缺点,不仅速度变快不少,识别准确率也得到了提高。
SPPNet的原理
在学习R-CNN的改进版Fast R-CNN之前,作为前置知识。有必要学习SPPNet的原理。
SPPNet的英文全称是Spatial Pyramid Pooling Convolutional Networks,翻译成中文是“空间金字塔池化卷积网络”。
听起来十分高深,实际上原理并不难,简单来讲,SPPNet主要做了一件事情:
将CNN的输入从固定尺寸改进为任意尺寸。例如,在普通的CNN结构中,输入图像的尺寸往往是固定的(如224x224像素),输出可以看做是一个固定维数的向量。SIPPNet在普通的CNN结构中加入了ROI池化层(ROI Pooling ),使得网络的输入图像可以是任意尺寸的,输出则不变,同样是一个固定维数的向量。ROI池化层一般跟在卷积层后面,它的输入是任意大小的卷积,输出是固定维数的向量。

ROI池化层
为了说清楚为什么ROI池化层能够把任意大小的卷积特征转换成固定长度的向量,不妨设卷积层输出的宽度为w,高度为h,通道为c。不管输入的图像尺寸是多少,卷积层的通道数都不会变,也就是说c是一个常数。而w、h会随着输入图像尺寸的变化而变化,可以看作是两个变量。以上图中的ROI池化层为例,它首先把卷积层划分为4x4的网格,每个网格的宽是w/4、高是h/4、通道数为c。当不能整除时,需要取整。接着,对每个网格中的每个通道,都取出其最大值,换句话说,就是对每个网格内的特征做最大值池化(Max Pooling )。这个4x4的网格最终就形成了16c维的特征。接着,再把网络划分成2x2的网格,用同样的方法提取特征,提取的特征的长度为4c。再把网络划分为1x1的网格,提取的特征的长度就是c,最后的1x1的划分实际是取出卷积中每个通道的最大值。最后,将得到的特征拼接起来,得到的特征是16c+4c+c = 21c维的特征。很显然,这个输出特征的长度与w, h两个值是无关的,因此ROI池化层可以把任意宽度、高度的卷积特征转换为固定长度的向量。
应该怎么把ROI池化层用到目标检测中来呢,其实,可以这样考虑该问题:网络的输入是一张图像,中间经过若干卷积形成了卷积特征,这个卷积特征实际上和原始图像在位置上是有一定对应关系的。原始图像的目标会使得卷积特征在同样位置产生激活。因此,原始图像中的候选框,实际上也可以对应到卷积特征中相同位置的框。由于候选框的大小千变万化,对应到卷积特征的区域形状也各有不同,但是不用担心利用ROI池化层可以把卷积特征中的不同形状的区域对应到同样长度的向量特征。综合上述步骤,就可以将原始图像中的不同长宽的区域都对应到一个固定长度的向量特征,这就完成了各个区域的特征提取工作。
在R-CNN中,对于原始图像的各种候选区域框,必须把框中的图像缩放到统一大小,再对每一张缩放后的图片提取特征。使用ROI池化层后,就可以先对图像进行一遍卷积计算,得到整个图像的卷积特征;接着,对于原始图像中的各种候选框,只需要在卷积特征中找到对应的位置框,再使用ROI池化层对位置框中的卷积提取特征,就可以完成特征提取工作。
R-CNN和SPPNet的不同点在于,R-CNN要对每个区域计算卷积,而SPPNet只需要计算一次,因此SPPNet的效率比R-CNN高得多。
R-CNN和SPPNet的相同点在于,它们都遵循着提取候选框、提取特征、分类几个步骤。在提取特征后,它们都使用了SVM进行分类。
Fast R-CNN的原理
在SPPNet中,实际上特征提取和区域分类两个步掇还是分离的。只是使用ROI池化层提取了每个区域的特征,在对这些区域分类时,还是使用传统的SVM作为分类器。Fast R-CNN相比SPPNet更进一步,不再使用SVM作为分类器,而是使用神经网络进行分类,这样就可以同时训练特征提取网络和分类网络,从而取得比SPPNet更高的准确度。
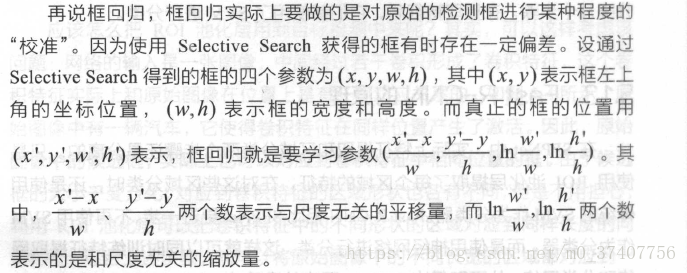
对于原始图片中的候选框区域,和SPPNet中的做法一样,都是将它映射到卷积特征的对应区域,然后使用ROI池化层对该区域提取特征。在这之后,SPPNet是使用SVM对特征进行分类,而Fast R-CNN则是直接使用全连接层。全连接层有两个输出,一个输出负责分类,另一个输出负责框回归。
先说分类,假设要在图像中检测K类物体,那么最终的输出应该是K+l个数,每个数都代表该区域为某个类别的概率。之所以是K+1个输出而不是K个输出,是因为还需要一类“背景类”,针对该区域无目标物体的情况。
Fast R-CNN与SPPNet最大的区别就在于,Fast R-CNN不再使用SVM进行分类,而是使用一个网络同时完成了提取特征、判断类别、框回归三项工作。
Faster R-CNN的原理
Fast R-CNN看似很完美了,但在Fast R-CNN中还存在着一个有点尴尬的问题:它需要先使用Selective Search提取框,这个方法比较慢,有时检测一张图片,大部分时间不是花在计算神经网络分类上,而是花在Selective Search提取框上。在Fast R-CNN升级版Faster R-CNN中,用RPN网络(Region Proposal Network)取代了Selective Search,不仅速度得到大大提高而且还获得了更加精确的结果。
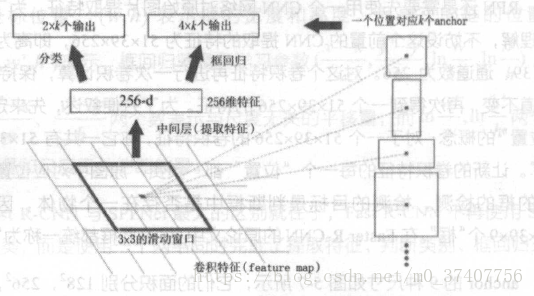
RPN还是需要先使用一个CNN网络对原始图片提取特征。为了方便读者理解,不妨设这个前置的CNN提取的特征为51 x39x256,即高为51、宽39、通道数为256。对这个卷积特征再进行一次卷积计算,保持宽、高、通道不变,再次得到一个51x39x256的特征。为了方便叙述,先来定义一个“位置”的概念:对于一个51x39x256的卷积特征,称它一共有51x39个“位置”。让新的卷积特征的每一个“位置”都“负责”原图中对应位置9种尺寸的框的检测,检测的目标是判断框中是否存在一个物体,因此共有51x39x9个“框”。在Faster R-CNN的原论文中,将这些框都统一称为“anchor".
ancho:的9种尺寸,它们的面积分别128*128, 256*256, 512*512。每种面积又分为3种长宽比,分别是2:1, 1:2, 1:1。 anchor的尺寸实际是属于可调的参数,不同任务可以选择不同的尺寸。
对于这51x39个位置和51x39x9个anchor,下图展示了接下来每个位置的计算步骤。设k为单个位置对应的ancho:的个数,此时k=9。首先使用一个3x3的滑动窗口,将每个位置转换为一个统一的256维的特征,这个特征对应了两部分的输出。一部分表示该位置的anchor为物体的概率,这部分的总输出长度为2xk(一个anchor对应两个输出:是物体的概率+不是物体的概率)。另一部分为框回归,框回归的含义与Fast R-CNN中一样。一个anchor对应4个框回归参数,因此框回归部分的总输出的长度为4xk。
Faster R-CNN使用RPN生成候选框后,剩下的网络结构和Fast R-CNN中的结构一模一样。在训练过程中,需要训练两个网络,一个是RPN网络一个是在得到框之后使用的分类网络。通常的做法是交替训练,即在一个batch内,先训练RPN网络一次,再训练分类网络一次。
二、实战篇
TensorFlow Object Detection API
2017年6月,Google公司开放了TensorFlow Object Detection API。这个项目使用"tensorFlow实现了大多数深度学习目标检测框架,其中就包括Faster R-CNN。首先介绍如何安装TensorFlow Object Detection API。再介绍如何使用已经训练好的模型进行物体检测,最后介绍如何训练自己的模型。
(1)安装TensorFlow Object Detection API
在GitHub上,TensorFlow Object Detection API是存放在tensorflow/models项目。
(地址:https://github.com/tensorflow/models)下的。可以通过git来下载tensorflow/models:
git clone https://github.com/tensorflow/models.git
下载tensorflow/models代码后,应该得到一个models文件夹。models交件夹中还有一个research文件夹。下面的安装命令都是以research文件夹为根目录执行的,所说的目录也都是以research文件夹为相对目录。
TensorFlow Object Detection API必须使用2.6.0以上的protoc进行编译,否则会报错。可以使用命令protoc --version查看protoc的版本。如果发现版本低于2.6.0或运行命令错误,就需要安装或升级protoc.
使用protoc对proto文件进行编译。具体来说,应当在research文件下,运行下面的命令:
protoc object_detection/protos/*.proto --python_out=.
运行完成后,可以检查object_ detection/protos/文件夹,如果每个proto文件都生成了对应的以py为后缀的python源代码,就说明编译成功了。
TensorFlow Object Detection API是以Slim为基础实现的,需要将Slim 的目录加入PYTHONPATH后才能正确运行。具体来说,还是在research文件夹下,执行下面的命令:
export PYTHONPATH=$PYTHONPATH:'pwd':'pwd'/slim
执行命令完成后,可以使用python命令打开一个python shell,如果运行import slim成功则说明已经正确设置好了。

安装完成测试:
在:esearch文件夹下,执行:
python3 object_detection/builders/model_builder_test.py

这条命令会自动检查TensorFlow Object Detection API是否正确安装,如果出现上面的信息,说明已安装成功。
遇到的问题:
ModuleNotFoundError: No module named 'nets'
解决:
export PYTHONPATH="$PYTHONPATH:/home/abc/21code/chapter_5/models/research/slim"
(2)执行已经训练好的模型
TensorFlow Object Detection API默认提供了5个预训练模型,它们都是使用COCO数据集训练完成的,结构分别为SSD+MobileNet,SSD+Inception,R-FCN+ResNet101、Faster RCNN+ResNet101、Faster RCNN+Inception-ResNet.
如何使用这些预训练模型呢,官方已经给了一个用Jupyter Notebook编写好的例子。首先在research文件夹下,运行命令:
jupyter-notebook
如果提示不存在该命令。可能是因为没有安装Jupyter Notebook,需要读者自行安装。
打开object_ detection文件夹,并单击object_ detection_ tutorial.ipynb运行示例文件。
首先我们载入一些会使用的库
import numpy as np
import os
import six.moves.urllib as urllib
import sys
import tarfile
import tensorflow as tf
import zipfile

from collections import defaultdict
from io import StringIO
from matplotlib import pyplot as plt
from PIL import Image

# This is needed since the notebook is stored in the object_detection folder.
sys.path.append("..")
from object_detection.utils import ops as utils_ops

if tf.__version__ < '1.4.0':
  raise ImportError('Please upgrade your tensorflow installation to v1.4.* or later!')
接下来进行环境设置
# This is needed to display the images.
%matplotlib inline
物体检测载入
from utils import label_map_util

from utils import visualization_utils as vis_util
准备模型
# What model to download.
MODEL_NAME = 'ssd_mobilenet_v1_coco_2017_11_17'
MODEL_FILE = MODEL_NAME + '.tar.gz'
DOWNLOAD_BASE = 'http://download.tensorflow.org/models/object_detection/'

# Path to frozen detection graph. This is the actual model that is used for the object detection.
PATH_TO_CKPT = MODEL_NAME + '/frozen_inference_graph.pb'

# List of the strings that is used to add correct label for each box.
PATH_TO_LABELS = os.path.join('data', 'mscoco_label_map.pbtxt')

NUM_CLASSES = 90
任何使用export_inference_graph.py工具输出的模型可以在这里载入,只需简单改变PATH_TO_CKPT指向一个新的.pb文件。
下载模型
opener = urllib.request.URLopener()
opener.retrieve(DOWNLOAD_BASE + MODEL_FILE, MODEL_FILE)
tar_file = tarfile.open(MODEL_FILE)
for file in tar_file.getmembers():
  file_name = os.path.basename(file.name)
  if 'frozen_inference_graph.pb' in file_name:
    tar_file.extract(file, os.getcwd())
Load a (frozen) Tensorflow model into memory.
detection_graph = tf.Graph()
with detection_graph.as_default():
  od_graph_def = tf.GraphDef()
  with tf.gfile.GFile(PATH_TO_CKPT, 'rb') as fid:
    serialized_graph = fid.read()
    od_graph_def.ParseFromString(serialized_graph)
    tf.import_graph_def(od_graph_def, name='')
载入标签图
label_map = label_map_util.load_labelmap(PATH_TO_LABELS)
categories = label_map_util.convert_label_map_to_categories(label_map, max_num_classes=NUM_CLASSES, use_display_name=True)
category_index = label_map_util.create_category_index(categories)
标签图将索引映射到类名称,当我们的卷积预测时,我们知道它对应飞机。
这里我们使用内置函数,但是任何返回将整数映射到恰当字符标签的字典都适用。
辅助代码
def load_image_into_numpy_array(image):
  (im_width, im_height) = image.size
  return np.array(image.getdata()).reshape(
      (im_height, im_width, 3)).astype(np.uint8)
检测
# For the sake of simplicity we will use only 2 images:
# image1.jpg
# image2.jpg
# If you want to test the code with your images, just add path to the images to the TEST_IMAGE_PATHS.
PATH_TO_TEST_IMAGES_DIR = 'test_images'
TEST_IMAGE_PATHS = [ os.path.join(PATH_TO_TEST_IMAGES_DIR, 'image{}.jpg'.format(i)) for i in range(1, 3) ]

# Size, in inches, of the output images.
IMAGE_SIZE = (12, 8)
with detection_graph.as_default():
with tf.Session(graph=detection_graph) as sess:
# Definite input and output Tensors for detection_graph
image_tensor = detection_graph.get_tensor_by_name('image_tensor:0')
# Each box represents a part of the image where a particular object was detected.
detection_boxes = detection_graph.get_tensor_by_name('detection_boxes:0')
# Each score represent how level of confidence for each of the objects.
# Score is shown on the result image, together with the class label.
detection_scores = detection_graph.get_tensor_by_name('detection_scores:0')
detection_classes = detection_graph.get_tensor_by_name('detection_classes:0')
num_detections = detection_graph.get_tensor_by_name('num_detections:0')
for image_path in TEST_IMAGE_PATHS:
image = Image.open(image_path)
# the array based representation of the image will be used later in order to prepare the
# result image with boxes and labels on it.
image_np = load_image_into_numpy_array(image)
# Expand dimensions since the model expects images to have shape: [1, None, None, 3]
image_np_expanded = np.expand_dims(image_np, axis=0)
# Actual detection.
(boxes, scores, classes, num) = sess.run(
[detection_boxes, detection_scores, detection_classes, num_detections],
feed_dict={image_tensor: image_np_expanded})
# Visualization of the results of a detection.
vis_util.visualize_boxes_and_labels_on_image_array(
image_np,
np.squeeze(boxes),
np.squeeze(classes).astype(np.int32),
np.squeeze(scores),
category_index,
use_normalized_coordinates=True,
line_thickness=8)
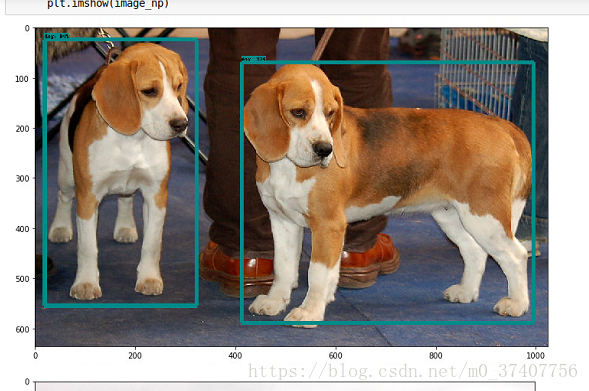
plt.figure(figsize=IMAGE_SIZE)
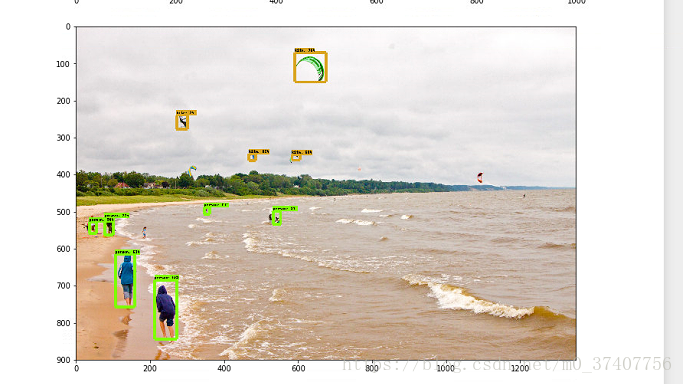
plt.imshow(image_np)在载入模型部分可以尝试不同的侦测模型以比较速度和准确度,将你想侦测的图片放入TEST_IMAGE_PATHS中运行即可。
结果:
三、训练自己的新模型
以VOC 2012数据集为例,介绍如何使用TensorFlow Object Detection APl 训练新的模型。
VOC 2012是VOC 2007数据集的升级版,一共有11530张图片,每张图片都有标注,标注的物体包括人、动物(如猫、狗、鸟等)、交通工具(如车、船飞机等)、家具(如椅子、桌子、沙发等)在内的20个类别。
(1)下载数据
首先下载数据集,并将其转换为tfrecord格式。
VOC 2012数据集的下载地址为:
http://host.robots.ox.ac.uk/pascal/VOC/voc2012/VOCtrainval_11-May-2012.tar
在object_ detection文件夹中,再新建一个voc文件夹,并将下载的数据集压缩包复制至voc/中。
解压后,就得到一个VOCdevkit文件夹,最终的文件夹结构应该为:
research/
object_detection/
voc/
VOCdevkit/
VOC2012/
JPEGImages/
2007_000027.jpg
2007_000032.jpg
....
Annotations/
2007_000027.xml
2007_000032.xml
.....
JPEGImages文件中存储了所有的图像数据。对于每一张图片,都有Annotations文件夹中有其物体框的标注。
在research文件夹中,执行以下命令可以将VOC 2012数据集转换为tfrecord格式,转换好的tfrecord保存在新建的voc文件夹下,分别为pascal_ train.record和pascal_ val.record:
python3 object_detection/create_pascal_tf_record.py
--data_dir object_detection/voc/VOCdevkit/
--year=VOC2012
--set=train
--output_path=object_detection/voc/pascal_train.record

产生:

create_pascal_tf_record.py代码:
# Copyright 2017 The TensorFlow Authors. All Rights Reserved.
#
# Licensed under the Apache License, Version 2.0 (the "License");
# you may not use this file except in compliance with the License.
# You may obtain a copy of the License at
#
#     http://www.apache.org/licenses/LICENSE-2.0
#
# Unless required by applicable law or agreed to in writing, software
# distributed under the License is distributed on an "AS IS" BASIS,
# WITHOUT WARRANTIES OR CONDITIONS OF ANY KIND, either express or implied.
# See the License for the specific language governing permissions and
# limitations under the License.
# ==============================================================================

r"""Convert raw PASCAL dataset to TFRecord for object_detection.

Example usage:
    ./create_pascal_tf_record --data_dir=/home/user/VOCdevkit \
        --year=VOC2012 \
        --output_path=/home/user/pascal.record
"""
from __future__ import absolute_import
from __future__ import division
from __future__ import print_function

import hashlib
import io
import logging
import os

from lxml import etree
import PIL.Image
import tensorflow as tf

from object_detection.utils import dataset_util
from object_detection.utils import label_map_util


flags = tf.app.flags
flags.DEFINE_string('data_dir', '', 'Root directory to raw PASCAL VOC dataset.')
flags.DEFINE_string('set', 'train', 'Convert training set, validation set or '
                    'merged set.')
flags.DEFINE_string('annotations_dir', 'Annotations',
                    '(Relative) path to annotations directory.')
flags.DEFINE_string('year', 'VOC2007', 'Desired challenge year.')
flags.DEFINE_string('output_path', '', 'Path to output TFRecord')
flags.DEFINE_string('label_map_path', 'object_detection/data/pascal_label_map.pbtxt',
                    'Path to label map proto')
flags.DEFINE_boolean('ignore_difficult_instances', False, 'Whether to ignore '
                     'difficult instances')
FLAGS = flags.FLAGS

SETS = ['train', 'val', 'trainval', 'test']
YEARS = ['VOC2007', 'VOC2012', 'merged']


def dict_to_tf_example(data,
                       dataset_directory,
                       label_map_dict,
                       ignore_difficult_instances=False,
                       image_subdirectory='JPEGImages'):
  """Convert XML derived dict to tf.Example proto.

  Notice that this function normalizes the bounding box coordinates provided
  by the raw data.

  Args:
    data: dict holding PASCAL XML fields for a single image (obtained by
      running dataset_util.recursive_parse_xml_to_dict)
    dataset_directory: Path to root directory holding PASCAL dataset
    label_map_dict: A map from string label names to integers ids.
    ignore_difficult_instances: Whether to skip difficult instances in the
      dataset  (default: False).
    image_subdirectory: String specifying subdirectory within the
      PASCAL dataset directory holding the actual image data.

  Returns:
    example: The converted tf.Example.

  Raises:
    ValueError: if the image pointed to by data['filename'] is not a valid JPEG
  """
  img_path = os.path.join(data['folder'], image_subdirectory, data['filename'])
  full_path = os.path.join(dataset_directory, img_path)
  with tf.gfile.GFile(full_path, 'rb') as fid:
    encoded_jpg = fid.read()
  encoded_jpg_io = io.BytesIO(encoded_jpg)
  image = PIL.Image.open(encoded_jpg_io)
  if image.format != 'JPEG':
    raise ValueError('Image format not JPEG')
  key = hashlib.sha256(encoded_jpg).hexdigest()

  width = int(data['size']['width'])
  height = int(data['size']['height'])

  xmin = []
  ymin = []
  xmax = []
  ymax = []
  classes = []
  classes_text = []
  truncated = []
  poses = []
  difficult_obj = []
  for obj in data['object']:
    difficult = bool(int(obj['difficult']))
    if ignore_difficult_instances and difficult:
      continue

    difficult_obj.append(int(difficult))

    xmin.append(float(obj['bndbox']['xmin']) / width)
    ymin.append(float(obj['bndbox']['ymin']) / height)
    xmax.append(float(obj['bndbox']['xmax']) / width)
    ymax.append(float(obj['bndbox']['ymax']) / height)
    classes_text.append(obj['name'].encode('utf8'))
    classes.append(label_map_dict[obj['name']])
    truncated.append(int(obj['truncated']))
    poses.append(obj['pose'].encode('utf8'))

  example = tf.train.Example(features=tf.train.Features(feature={
      'image/height': dataset_util.int64_feature(height),
      'image/width': dataset_util.int64_feature(width),
      'image/filename': dataset_util.bytes_feature(
          data['filename'].encode('utf8')),
      'image/source_id': dataset_util.bytes_feature(
          data['filename'].encode('utf8')),
      'image/key/sha256': dataset_util.bytes_feature(key.encode('utf8')),
      'image/encoded': dataset_util.bytes_feature(encoded_jpg),
      'image/format': dataset_util.bytes_feature('jpeg'.encode('utf8')),
      'image/object/bbox/xmin': dataset_util.float_list_feature(xmin),
      'image/object/bbox/xmax': dataset_util.float_list_feature(xmax),
      'image/object/bbox/ymin': dataset_util.float_list_feature(ymin),
      'image/object/bbox/ymax': dataset_util.float_list_feature(ymax),
      'image/object/class/text': dataset_util.bytes_list_feature(classes_text),
      'image/object/class/label': dataset_util.int64_list_feature(classes),
      'image/object/difficult': dataset_util.int64_list_feature(difficult_obj),
      'image/object/truncated': dataset_util.int64_list_feature(truncated),
      'image/object/view': dataset_util.bytes_list_feature(poses),
  }))
  return example


def main(_):
  if FLAGS.set not in SETS:
    raise ValueError('set must be in : {}'.format(SETS))
  if FLAGS.year not in YEARS:
    raise ValueError('year must be in : {}'.format(YEARS))

  data_dir = FLAGS.data_dir
  years = ['VOC2007', 'VOC2012']
  if FLAGS.year != 'merged':
    years = [FLAGS.year]

  writer = tf.python_io.TFRecordWriter(FLAGS.output_path)

  label_map_dict = label_map_util.get_label_map_dict(FLAGS.label_map_path)

  for year in years:
    logging.info('Reading from PASCAL %s dataset.', year)
    examples_path = os.path.join(data_dir, year, 'ImageSets', 'Main',
                                 'aeroplane_' + FLAGS.set + '.txt')
    annotations_dir = os.path.join(data_dir, year, FLAGS.annotations_dir)
    examples_list = dataset_util.read_examples_list(examples_path)
    for idx, example in enumerate(examples_list):
      if idx % 100 == 0:
        logging.info('On image %d of %d', idx, len(examples_list))
      path = os.path.join(annotations_dir, example + '.xml')
      with tf.gfile.GFile(path, 'r') as fid:
        xml_str = fid.read()
      xml = etree.fromstring(xml_str)
      data = dataset_util.recursive_parse_xml_to_dict(xml)['annotation']

      tf_example = dict_to_tf_example(data, FLAGS.data_dir, label_map_dict,
                                      FLAGS.ignore_difficult_instances)
      writer.write(tf_example.SerializeToString())

  writer.close()


if __name__ == '__main__':
tf.app.run()pascal_val.record:
python3 object_detection/create_pascal_tf_record.py
--data_dir object_detection/voc/VOCdevkit/
--year=VOC2012
--set=val
--output_path=object_detection/voc/pascal_val.record
此外,将pascal_ label_ map.pbtxt数据复制到voc文件夹下.
这里的转换代码是二为VOC2012数据集提前编写好的。
如果读者希望使用自己的数据集,有两种方法:
第一种方法是修改自己的数据集的标注格式.使其和VOC 2012一模一样,然后就可以直接使用create_pascal_ tf_record.py
脚本转换了.
另外一种方法是修改create_ pascal_ tf_record.py,对读取标签的代码进行修改。
(2)模型
这里以Faster R-CNN + Inception-ResNet_ v2模型为例进行介绍。
首先下载在COCO上预训练的Faster R-CNN+Inception_ ResNet_ v2模型。下载地址是:
http://download.tensorflow.org/models/object_detection/faster_rcnn_inception_resnet_v2_atrous_coco_11_06_2017.tar.gz
解压后得到:

在voc文件夹中新建一个pretrained并将这5个文件复制进去。
TensorFlow Object Detection API是依赖一个特殊的设置文件进行训练的。bject-detection/samples/configs/文件夹下,有一些设置文件的示例。可以参考faster-rcnn_ inception_resnet_ v2_ atrous_pets.config文件创建的设置交件。
先将faster_ rcnn-inception_ resnet_ v2_atrous_pets.config复制一份到voc文件夹下,并命名voc.config。
voc.config一共有7处需要修改的地方:
1..第一处为num_classes,需要将它改为VOC 2012中的物体类别数,即20类。

2.第二处为eval_config中的num_examples.
它表示在验证阶段需要执行的图片数量,改为VOC2012验证集的图片数5823
(可以在create_pascal_ tf_record.py中,输出对应的examples_list的长度,就可以知道这个大小)。
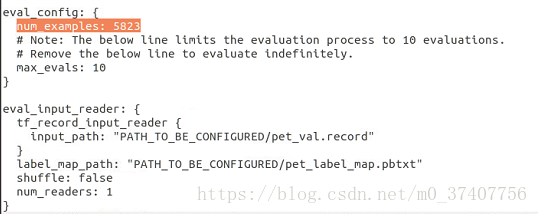
3.还有5处为所有含有PATH_TO_BE_CONFIGURED的地方。
这些地方需要修改为自己的目录。它们应该分别被修改为:

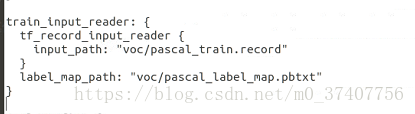

好像报错了,我在research文件下执行的,所以在所有目录上再加上object_detection。
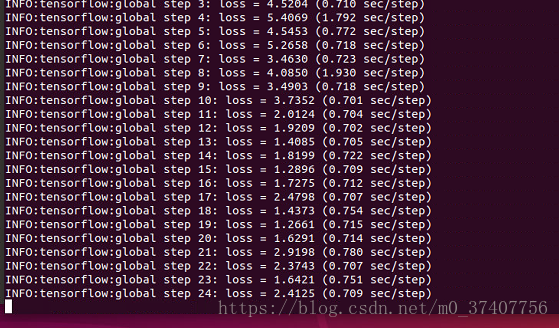
最后,在voc文件夹中新建一个tram_dir作为保存模型和日志的目录,使用下面的命令就可以开始训练了:
训练的日志和最终的模型都会被保存在train_di:中,因此,同样可以使用TensorBoard来监控训练情况:
训练:
python3 object_detection/train.py
--train_dir object_detection/voc/train_dir/
--pipeline_config_path object_detection/voc/voc.config
train.py代码 :
# Copyright 2017 The TensorFlow Authors. All Rights Reserved.
#
# Licensed under the Apache License, Version 2.0 (the "License");
# you may not use this file except in compliance with the License.
# You may obtain a copy of the License at
#
#     http://www.apache.org/licenses/LICENSE-2.0
#
# Unless required by applicable law or agreed to in writing, software
# distributed under the License is distributed on an "AS IS" BASIS,
# WITHOUT WARRANTIES OR CONDITIONS OF ANY KIND, either express or implied.
# See the License for the specific language governing permissions and
# limitations under the License.
# ==============================================================================

r"""Training executable for detection models.

This executable is used to train DetectionModels. There are two ways of
configuring the training job:

1) A single pipeline_pb2.TrainEvalPipelineConfig configuration file
can be specified by --pipeline_config_path.

Example usage:
    ./train \
        --logtostderr \
        --train_dir=path/to/train_dir \
        --pipeline_config_path=pipeline_config.pbtxt

2) Three configuration files can be provided: a model_pb2.DetectionModel
configuration file to define what type of DetectionModel is being trained, an
input_reader_pb2.InputReader file to specify what training data will be used and
a train_pb2.TrainConfig file to configure training parameters.

Example usage:
    ./train \
        --logtostderr \
        --train_dir=path/to/train_dir \
        --model_config_path=model_config.pbtxt \
        --train_config_path=train_config.pbtxt \
        --input_config_path=train_input_config.pbtxt
"""

import functools
import json
import os
import tensorflow as tf

from object_detection import trainer
from object_detection.builders import dataset_builder
from object_detection.builders import graph_rewriter_builder
from object_detection.builders import model_builder
from object_detection.utils import config_util
from object_detection.utils import dataset_util

tf.logging.set_verbosity(tf.logging.INFO)

flags = tf.app.flags
flags.DEFINE_string('master', '', 'Name of the TensorFlow master to use.')
flags.DEFINE_integer('task', 0, 'task id')
flags.DEFINE_integer('num_clones', 1, 'Number of clones to deploy per worker.')
flags.DEFINE_boolean('clone_on_cpu', False,
                     'Force clones to be deployed on CPU.  Note that even if '
                     'set to False (allowing ops to run on gpu), some ops may '
                     'still be run on the CPU if they have no GPU kernel.')
flags.DEFINE_integer('worker_replicas', 1, 'Number of worker+trainer '
                     'replicas.')
flags.DEFINE_integer('ps_tasks', 0,
                     'Number of parameter server tasks. If None, does not use '
                     'a parameter server.')
flags.DEFINE_string('train_dir', '',
                    'Directory to save the checkpoints and training summaries.')

flags.DEFINE_string('pipeline_config_path', '',
                    'Path to a pipeline_pb2.TrainEvalPipelineConfig config '
                    'file. If provided, other configs are ignored')

flags.DEFINE_string('train_config_path', '',
                    'Path to a train_pb2.TrainConfig config file.')
flags.DEFINE_string('input_config_path', '',
                    'Path to an input_reader_pb2.InputReader config file.')
flags.DEFINE_string('model_config_path', '',
                    'Path to a model_pb2.DetectionModel config file.')

FLAGS = flags.FLAGS


def main(_):
  assert FLAGS.train_dir, '`train_dir` is missing.'
  if FLAGS.task == 0: tf.gfile.MakeDirs(FLAGS.train_dir)
  if FLAGS.pipeline_config_path:
    configs = config_util.get_configs_from_pipeline_file(
        FLAGS.pipeline_config_path)
    if FLAGS.task == 0:
      tf.gfile.Copy(FLAGS.pipeline_config_path,
                    os.path.join(FLAGS.train_dir, 'pipeline.config'),
                    overwrite=True)
  else:
    configs = config_util.get_configs_from_multiple_files(
        model_config_path=FLAGS.model_config_path,
        train_config_path=FLAGS.train_config_path,
        train_input_config_path=FLAGS.input_config_path)
    if FLAGS.task == 0:
      for name, config in [('model.config', FLAGS.model_config_path),
                           ('train.config', FLAGS.train_config_path),
                           ('input.config', FLAGS.input_config_path)]:
        tf.gfile.Copy(config, os.path.join(FLAGS.train_dir, name),
                      overwrite=True)

  model_config = configs['model']
  train_config = configs['train_config']
  input_config = configs['train_input_config']

  model_fn = functools.partial(
      model_builder.build,
      model_config=model_config,
      is_training=True)

  def get_next(config):
    return dataset_util.make_initializable_iterator(
        dataset_builder.build(config)).get_next()

  create_input_dict_fn = functools.partial(get_next, input_config)

  env = json.loads(os.environ.get('TF_CONFIG', '{}'))
  cluster_data = env.get('cluster', None)
  cluster = tf.train.ClusterSpec(cluster_data) if cluster_data else None
  task_data = env.get('task', None) or {'type': 'master', 'index': 0}
  task_info = type('TaskSpec', (object,), task_data)

  # Parameters for a single worker.
  ps_tasks = 0
  worker_replicas = 1
  worker_job_name = 'lonely_worker'
  task = 0
  is_chief = True
  master = ''

  if cluster_data and 'worker' in cluster_data:
    # Number of total worker replicas include "worker"s and the "master".
    worker_replicas = len(cluster_data['worker']) + 1
  if cluster_data and 'ps' in cluster_data:
    ps_tasks = len(cluster_data['ps'])

  if worker_replicas > 1 and ps_tasks < 1:
    raise ValueError('At least 1 ps task is needed for distributed training.')

  if worker_replicas >= 1 and ps_tasks > 0:
    # Set up distributed training.
    server = tf.train.Server(tf.train.ClusterSpec(cluster), protocol='grpc',
                             job_name=task_info.type,
                             task_index=task_info.index)
    if task_info.type == 'ps':
      server.join()
      return

    worker_job_name = '%s/task:%d' % (task_info.type, task_info.index)
    task = task_info.index
    is_chief = (task_info.type == 'master')
    master = server.target

  graph_rewriter_fn = None
  if 'graph_rewriter_config' in configs:
    graph_rewriter_fn = graph_rewriter_builder.build(
        configs['graph_rewriter_config'], is_training=True)

  trainer.train(
      create_input_dict_fn,
      model_fn,
      train_config,
      master,
      task,
      FLAGS.num_clones,
      worker_replicas,
      FLAGS.clone_on_cpu,
      ps_tasks,
      worker_job_name,
      is_chief,
      FLAGS.train_dir,
      graph_hook_fn=graph_rewriter_fn)


if __name__ == '__main__':
tf.app.run() tensorboard --logdir voc/train_dir/

额,我遇到错误了,可能你没有,那就忽略这个就好:
Traceback (most recent call last):
  File "object_detection/train.py", line 184, in <module>
    tf.app.run()
  File "/home/abc/.local/lib/python3.6/site-packages/tensorflow/python/platform/app.py", line 126, in run
    _sys.exit(main(argv))
  File "object_detection/train.py", line 180, in main
    graph_hook_fn=graph_rewriter_fn)
  File "/home/abc/21code/chapter_5/models/research/object_detection/trainer.py", line 298, in train
    train_config.optimizer)
  File "/home/abc/21code/chapter_5/models/research/object_detection/builders/optimizer_builder.py", line 50, in build
    learning_rate = _create_learning_rate(config.learning_rate)
  File "/home/abc/21code/chapter_5/models/research/object_detection/builders/optimizer_builder.py", line 109, in _create_learning_rate
    learning_rate_sequence, config.warmup)
  File "/home/abc/21code/chapter_5/models/research/object_detection/utils/learning_schedules.py", line 169, in manual_stepping
    [0] * num_boundaries))
  File "/home/abc/.local/lib/python3.6/site-packages/tensorflow/python/ops/array_ops.py", line 2681, in where
    return gen_math_ops.select(condition=condition, x=x, y=y, name=name)
  File "/home/abc/.local/lib/python3.6/site-packages/tensorflow/python/ops/gen_math_ops.py", line 6699, in select
    "Select", condition=condition, t=x, e=y, name=name)
  File "/home/abc/.local/lib/python3.6/site-packages/tensorflow/python/framework/op_def_library.py", line 528, in _apply_op_helper
    (input_name, err))
ValueError: Tried to convert 't' to a tensor and failed. Error: Argument must be a dense tensor: range(0, 3) - got shape [3], but wanted [].
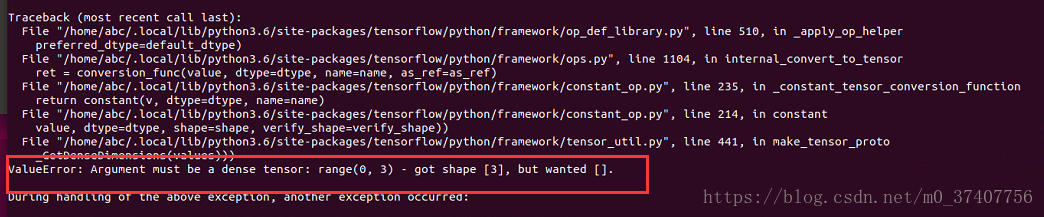
解决:
解决办法:把research/object_detection/utils/learning_schedules.py文件的 第167-169行由
# # 修改167-169
rate_index = tf.reduce_max(tf.where(tf.greater_equal(global_step, boundaries),
                                    range(num_boundaries),
                                    [0] * num_boundaries))
# # 成
rate_index = tf.reduce_max(tf.where(tf.greater_equal(global_step, boundaries),
                                    list(range(num_boundaries)),
                                    [0] * num_boundaries))
需要注意的是,如果发生内存和显存不足报错的情况,除了换用较小的模型进行训练外,还可以修改配置文件中的以下部分:
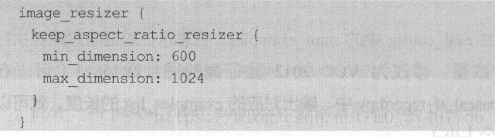
这个部分表示将输入图像进行等比例缩放再开始训练,缩放后最大边长为1024,最小边长为600。
可以将这两个数值改小(如分别改成512和300),使用的显存就会变小。
不过这样做也很有可能导致模型的精度下降,读者还需根据自己的情况选择适合的处理方法。
好,这篇博客就先说到这里,下一篇实现怎么导出模型并预测。