上一文讲解了 WindowManger 的基础知识,这一文将继续讲解 Camera 相关的知识点,还未了解 WindowManager 相关知识的,可以参考 Android 使用 WindowManager 实现悬浮窗监控 cpu 温度
概述
Android 框架支持设备的相机拍照和录像功能,你的应用可以直接调用系统相机应用来拍照或者录像,当然也可以利用 Android 提供的 API 开发自己的相机应用来拍照和录像,本篇文章主要实现的相机的预览拍照功能。
注意事项
To access the device camera, you must declare the CAMERA permission in your Android Manifest. Also be sure to include the manifest element to declare camera features used by your application. For example, if you use the camera and auto-focus feature, your Manifest should include the following:
参考官方文档指示,开发相机应用需要申请以下权限:
 <uses-permission android:name="android.permission.CAMERA" />
 <uses-feature android:name="android.hardware.camera" />
 <uses-feature android:name="android.hardware.camera.autofocus" />
开发步骤
根据官方文档,我们开发自己的相机,一般要经历如下几个步骤:
Obtain an instance of Camera from open(int). 获取 Camera 实例
Get existing (default) settings with getParameters(). 获取相机属性特性
If necessary, modify the returned Camera.Parameters object and call setParameters(Camera.Parameters). 配置自定义相性机属性特性
If desired, call setDisplayOrientation(int). 因为预览方向和实物方向不一致,设置预览角度
Important: Pass a fully initialized SurfaceHolder to setPreviewDisplay(SurfaceHolder). Without a surface, the camera will be unable to start the preview. 给相机设置预览界面
Important: Call startPreview() to start updating the preview surface. Preview must be started before you can take a picture. 调用 startPreview 开始预览
When you want, call takePicture(Camera.ShutterCallback, Camera.PictureCallback, Camera.PictureCallback, Camera.PictureCallback) to capture a photo. Wait for the callbacks to provide the actual image data. 调用 takePicture 拍照
After taking a picture, preview display will have stopped. To take more photos, call startPreview() again first. 拍照之后预览会停止,如果想继续预览,则再次调用 startPreview 启动预览功能
Call stopPreview() to stop updating the preview surface.调用 stopPreview 停止预览
Important: Call release() to release the camera for use by other applications. Applications should release the camera immediately in onPause() (and re-open() it in onResume()). 在 Activity 的 onPause 调用时调用相机的 release ,释放相机资源,方便其他应用访问相机资源
注意: 当你不在使用相机资源时,记得调用 Camera 的 release 方法来释放相机资源,否则其他应用甚至你自己的应用再次请求访问设备相机时会失败,并且crash 掉。
自定义相机
1.Detecting camera hardware 检测相机硬件是否存在
一般情况下我们需要在代码运行时检测相机硬件是否存在,如果存在,我们才去访问相机,示例代码如下:
    /** Check if this device has a camera */
    private boolean checkCameraHardware(Context context) {
        if (context.getPackageManager().hasSystemFeature(PackageManager.FEATURE_CAMERA)){
            // this device has a camera
            return true;
        } else {
            // no camera on this device
            return false;
        }
    }
2.Accessing cameras 访问相机设备
如果在你的应用中已经检测到了该设备有相机,那么你必须得到一个 Camera 类的实例才能访问相机。为了访问相机基本功能,可以使用 Camera 的 open() 方法来获得一个 Camera 的实例,示例代码如下:
/** A safe way to get an instance of the Camera object. */
    private  Camera getCameraInstance(){
        Camera c = null;
        try {
            c = Camera.open(); // attempt to get a Camera instance
        }
        catch (Exception e){
            // Camera is not available (in use or does not exist)
        }
        return c; // returns null if camera is unavailable
    }
注意: 在调用 Camera 的 open() 方法时总是要去捕获一个异常,以免打开相机设备失败导致整个应用 crash。
3.Checking camera features 获取相机的属性特性
当你可以成功访问相机设备,你可以使用 Camera 的 getParameters() 方法来获取相机参数信息,可以根据 返回值 Camera.Parameters 类来查看当前 camea 支持哪些参数设置等。当使用 API 9 或者更高时,你可以使用Camera.getCameraInfo() 静态方法来获取前后 camera 的 ID,以及 camera 数据流的方向和是否能禁止拍照快门声音标记。示例代码如下:
/**
     * get current camera info
     *
     * @param cameraId current camera id
     * @return camera info
     */
    public static Camera.CameraInfo getCameraInfo(int cameraId) {
        Camera.CameraInfo cameraInfo = new Camera.CameraInfo();
        Camera.getCameraInfo(cameraId, cameraInfo);
        return cameraInfo;
    }
5.Creating a preview class 创建一个预览类
为了有效的拍照或者录像,我们必须在屏幕上能看到相机的预览。一个相机预览类是由 SurfaceView 控件来实时显示来自 camera 的预览数据,如此我们才能看到每一帧数据和捕获图片或者视频。
如下示例代码演示了如何创建一个基本的 camera 预览类以及如何布局。该类继承SurfaceView.Callback 接口类,并且需要实现里面的接口方法以便监听SurfaceView 控件的创建以及销毁事件的回调,在回调方法中关联相机预览显示。
/** A basic Camera preview class */
public class CameraPreview extends SurfaceView implements SurfaceHolder.Callback {
    private static final String TAG = "Bradley";
    private SurfaceHolder mHolder;
    private Camera mCamera;

    public CameraPreview(Context context, Camera camera) {
        super(context);
        mCamera = camera;
        // Install a SurfaceHolder.Callback so we get notified when the
        // underlying surface is created and destroyed.
        mHolder = getHolder();
        mHolder.addCallback(this);
        // deprecated setting, but required on Android versions prior to 3.0
        mHolder.setType(SurfaceHolder.SURFACE_TYPE_PUSH_BUFFERS);
    }
    public void surfaceCreated(SurfaceHolder holder) {
        // The Surface has been created, now tell the camera where to draw the preview.
        try {
            mCamera.setPreviewDisplay(holder);
            mCamera.startPreview();
        } catch (IOException e) {
            Log.d(TAG, "Error setting camera preview: " + e.getMessage());
        }
    }
    public void surfaceDestroyed(SurfaceHolder holder) {
        // empty. Take care of releasing the Camera preview in your activity.
    }
    public void surfaceChanged(SurfaceHolder holder, int format, int w, int h) {
        // If your preview can change or rotate, take care of those events here.
        // Make sure to stop the preview before resizing or reformatting it.
        if (mHolder.getSurface() == null){
            // preview surface does not exist
            return;
        }
        // stop preview before making changes
        try {
            mCamera.stopPreview();
        } catch (Exception e){
            // ignore: tried to stop a non-existent preview
        }
        // set preview size and make any resize, rotate or
        // reformatting changes here
        // start preview with new settings
        try {
            mCamera.setPreviewDisplay(mHolder);
            mCamera.startPreview();
        } catch (Exception e){
            Log.d(TAG, "Error starting camera preview: " + e.getMessage());
        }
    }
}
7.Placing preview in a layout 预览添加到布局中
我们需要创建一个布局来加载 camera 预览类,在该例子中,FrameLayout 作为camera 预览类的父容器。示例代码如下:
<?xml version="1.0" encoding="utf-8"?>
<LinearLayout xmlns:android="http://schemas.android.com/apk/res/android"
    android:orientation="horizontal"
    android:layout_width="fill_parent"
    android:layout_height="fill_parent"
    >
  <FrameLayout
    android:id="@+id/camera_preview"
    android:layout_width="fill_parent"
    android:layout_height="fill_parent"
    android:layout_weight="1"
    />
  <Button
    android:id="@+id/button_capture"
    android:text="Capture"
    android:layout_width="wrap_content"
    android:layout_height="wrap_content"
    android:layout_gravity="center"
    />
</LinearLayout>
注意:“Camera 的预览并不一定是横屏的,在 Android 2.2 之后,可以使用setDisplayOrientation() 方法设置预览的方向。为了改变预览方向,请在surfaceChanged() 方法中显示调用 Camera 的 stopPreview() 来停止预览,改变方向以后再次调用 Camera#stratPreview() 启动预览。
首先在 activity 中创建 CameraPreview 预览,然后将 camera 预览添加到布局FrameLayout 中。你必须确保在 camera activity 的 onPause 或者应用退出时去释放 camera 资源。如下示例代码演示怎么将 CameraPreview 预览加载到布局中去显示。
public class CameraActivity extends Activity {
    private Camera mCamera;
    private CameraPreview mPreview;
    @Override
    public void onCreate(Bundle savedInstanceState) {
        super.onCreate(savedInstanceState);
        setContentView(R.layout.main);
        // Create an instance of Camera
        mCamera = getCameraInstance();
        // Create our Preview view and set it as the content of our activity.
        mPreview = new CameraPreview(this, mCamera);
        FrameLayout preview = (FrameLayout) findViewById(R.id.camera_preview);
        preview.addView(mPreview);
    }
}
检测相机特性是否可用
首先你要知道,并不是所有 android 设备都支持全部的 camera 特性功能,因此在应用总使用 camera 特性功能需要先检测是否支持,然后在去使用。否则你使用了不支持的 camera 特性功能将会报错。
在应用中可以通过得到 camera 的参数 parameters 类,然后通过该类中的一些方法来检测当前设备是否支持 camea 特性功能。如下代码示例演示了如何获得一个Camera.Parameters 对象且检测 camera 是否支持自动对焦特性:
// get Camera parameters
Camera.Parameters params = mCamera.getParameters();
List<String> focusModes = params.getSupportedFocusModes();
if (focusModes.contains(Camera.Parameters.FOCUS_MODE_AUTO)) {
  // Autofocus mode is supported
}
使用相机的特性功能
大部分 Android 相机特性功能都可以通过 Camera.Parameters 类来控制。首先你可以获得一个 Camera 实例,然后调用 Camera.getParameters() 方法的返回值来得到 Caemra.Parameters 实例,之后就可以通过 Parameters.setxxx() 系列方法来设置一些参数使用相机的一些特性功能。以下是实例代码:
// get Camera parameters
Camera.Parameters params = mCamera.getParameters();
// set the focus mode
params.setFocusMode(Camera.Parameters.FOCUS_MODE_AUTO);
// set Camera parameters
mCamera.setParameters(params);
相机的所有参数都可以通过类似以上方法来设置,一般在打开相机成功以后就可以设置相机的基本参数。
注意:相机的一些特性不能再任意时刻改变,比如改变预览的尺寸和方向时,首先需要停止preview,修改预览尺寸之后再次重启 preview。自从 Android4.0 以后修改预览方向以后无需 再次重启preview。
官方推荐的相机预览方向适配做法
Camera 的预览有时是横屏的,可以使用 setDisplayOrientation() 方法设置预览的方向,下面是 Camera.setDisplayOrientation 的注释文档:
Set the clockwise rotation of preview display in degrees. This affects the preview frames and the picture displayed after snapshot. This method is useful for portrait mode applications. Note that preview display of front-facing cameras is flipped horizontally before the rotation, that is, the image is reflected along the central vertical axis of the camera sensor. So the users can see themselves as looking into a mirror.
This does not affect the order of byte array passed in onPreviewFrame(byte[], Camera), JPEG pictures, or recorded videos. This method is not allowed to be called during preview.
注释中的第二段,描述了这个 API 修改的仅仅是 Camera 的预览方向而已,并不会影响到 PreviewCallback 回调、生成的 JPEG 图片和录像文件的方向,这些数据的方向依然会跟图像 Sensor 的方向一致。
通过 orientation 属性的含义可以知道,我们可以用它和应用的方向来做相机预览方向的适配,下面代码是官方网站推荐的。
    public static void setCameraDisplayOrientation(Activity activity,
                                                   int cameraId, android.hardware.Camera camera) {
        android.hardware.Camera.CameraInfo info =
                new android.hardware.Camera.CameraInfo();
        android.hardware.Camera.getCameraInfo(cameraId, info);
        int rotation = activity.getWindowManager().getDefaultDisplay()
                .getRotation();
        int degrees = 0;
        switch (rotation) {
            case Surface.ROTATION_0: degrees = 0; break;
            case Surface.ROTATION_90: degrees = 90; break;
            case Surface.ROTATION_180: degrees = 180; break;
            case Surface.ROTATION_270: degrees = 270; break;
        }
        int result;
        if (info.facing == Camera.CameraInfo.CAMERA_FACING_FRONT) {
            result = (info.orientation + degrees) % 360;
            result = (360 - result) % 360;  // compensate the mirror
        } else {  // back-facing
            result = (info.orientation - degrees + 360) % 360;
        }
        camera.setDisplayOrientation(result);
    }
SurfaceView 预览图像、拍摄照片拉伸变形
说明这个问题之前,同样先说一下几个跟相机有关的尺寸。
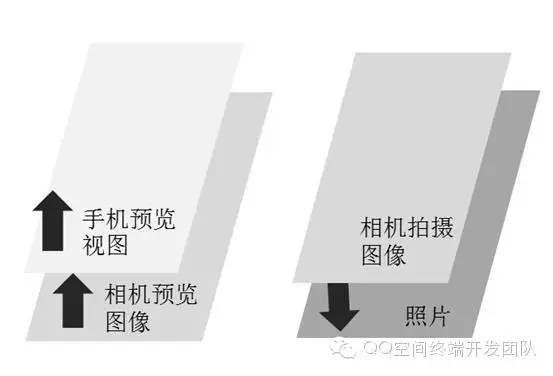
* SurfaceView 尺寸:即自定义相机应用中用于显示相机预览图像的 View 的尺寸,当它铺满全屏时就是屏幕的大小。这里 surfaceview 显示的预览图像暂且称作手机预览图像。
* Previewsize:相机硬件提供的预览帧数据尺寸。预览帧数据传递给 SurfaceView,实现预览图像的显示。这里预览帧数据对应的预览图像暂且称作相机预览图像。
* Picturesize:相机硬件提供的拍摄帧数据尺寸。拍摄帧数据可以生成位图文件,最终保存成 .jpg 或者 .png 等格式的图片。这里拍摄帧数据对应的图像称作相机拍摄图像。图4说明了以上几种图像及照片之间的关系。手机预览图像是直接提供给用户看的图像,它由相机预览图像生成,拍摄照片的数据则来自于相机拍
下面说下我在开发过程中遇到的三种拉伸变形现象:
1. 手机预览画面中物体被拉伸变形。
2. 拍摄照片中物体被拉伸变形。
3. 点击拍照瞬间,手机预览画面会停顿下,此时的图像是拉伸变形的,然后预览画面恢复后图像又正常了。
现象1的原因是 SurfaceView 和 Previewsize 的长宽比率不一致。因为手机预览视图的图像是由相机预览图像根据 SurfaceView 大小缩放得来的,当长宽比不一致时必然会导致图像变形。
后两个现象的原因则是 Previewsize 和 Picturesize 的长宽比率不一致所致,查了相关的资料,发现其具体原因跟某些手机相机硬件的底层实现有关。
总之为了避免以上几种变形现象的发生,在开发时最好将 SurfaceView、PreviewSize、PictureSize 三个尺寸保证长宽比例一致。具体实现可以先通过 camera.getSupportedPreviewSizes() 和 camera.getSupportedPictureSizes() 获得相机硬件支持的所有预览和拍摄尺寸,然后在里面筛选出和 SurfaceView 的长宽比一致并且大小合适的尺寸,通过 camera.setPrameters 来更新设置。注意:市场上手机相机硬件支持的尺寸一般都是主流的 4:3 或者 16:9,所以 SurfaceView 尺寸不能太奇葩,最好也设置成这样的长宽比。
happy a nice day!
参考链接:
Android Camera开发之基础知识篇
Android相机开发和遇到的坑
Camera Guides
Camera API 文档