pthread
pthread 简介
pthread 是一套通用的多线程的 API,可以在Unix / Linux / Windows/Mac OS/iOS等系统跨平台使用,使用 C 语言编写,需要程序员自己管理线程的生命周期,使用难度较大,我们在 iOS 开发中几乎不使用,但是还是来可以了解一下的。
pthread 使用
#import "ViewController.h"
#import <pthread.h>//导入头文件
@interface ViewController ()

@end
@implementation ViewController
- (void)viewDidLoad {
    [super viewDidLoad];
    //创建线程变量
    pthread_t thread;
    //创建线程
//    int pthread_create(pthread_t _Nullable * _Nonnull __restrict,
//                       const pthread_attr_t * _Nullable __restrict,
//                       void * _Nullable (* _Nonnull)(void * _Nullable),
//                       void * _Nullable __restrict);
    /*
     第一个参数:线程对象 传递地址
     第二个参数:线程的属性 NULL
     第三个参数:指向函数的指针
     第四个参数:函数需要接受的参数
     */
    pthread_create(&thread, NULL, task, NULL);
}
void * task(){
    //当前操作在刚创建的子线程中进行
    for (NSInteger i = 0; i<10000; i++) {
        NSLog(@"%zd----%@",i,[NSThread currentThread]);
    }
    return NULL;
}
- (void)didReceiveMemoryWarning {
    [super didReceiveMemoryWarning];
    // Dispose of any resources that can be recreated.
}
@end
pthread_create(&thread, NULL, test, NULL); 中各项参数含义:
- 第一个参数&thread是线程对象,指向线程标识符的指针
- 第二个是线程属性,可赋值NULL
- 第三个run表示指向函数的指针(run对应函数里是需要在新线程中执行的任务)
- 第四个是运行函数的参数,可赋值NULL
pthread 相关调用函数
pthread_create()创建一个线程pthread_exit()终止当前线程pthread_cancel()中断另外一个线程的运行pthread_join()阻塞当前的线程,直到另外一个线程运行结束pthread_attr_init()初始化线程的属性pthread_attr_setdetachstate()设置脱离状态的属性(决定这个线程在终止时是否可以被结合)pthread_attr_getdetachstate()获取脱离状态的属性pthread_attr_destroy()删除线程的属性pthread_kill()向线程发送一个信号
可参考博客: pthread
NSThread
NSThread简介
NSThread封装性差,最偏向于底层,主要基于thread使用,OC语言,需要程序员自己管理生命周期. 每一个NSThread对象代表着一个线程,理解NSThread更有利于理解多线程的含义.NSThread API
线程创建
有返回值初始化方法有3种:- (instancetype)init API_AVAILABLE(macos(10.5), ios(2.0), watchos(2.0), tvos(9.0)) NS_DESIGNATED_INITIALIZER;- (instancetype)initWithTarget:(id)target selector:(SEL)selector object:(nullable id)argument API_AVAILABLE(macos(10.5), ios(2.0), watchos(2.0), tvos(9.0));- (instancetype)initWithBlock:(void (^)(void))block API_AVAILABLE(macosx(10.12), ios(10.0), watchos(3.0), tvos(10.0));+ (void)detachNewThreadWithBlock:(void (^)(void))block API_AVAILABLE(macosx(10.12), ios(10.0), watchos(3.0), tvos(10.0));+ (void)detachNewThreadSelector:(SEL)selector toTarget:(id)target withObject:(nullable id)argument;线程操作
NSThread给线程提供的主要操作方法有启动,睡眠,取消,退出.线程启动
我们使用init方法将线程创建出来之后,线程并不会立即运行,只有我们手动调用-start方法才会启动线程- (void)start API_AVAILABLE(macos(10.5), ios(2.0), watchos(2.0), tvos(9.0));线程睡眠
+ (void)sleepUntilDate:(NSDate *)date;//线程休眠(阻塞),休眠到指定日期时间+ (void)sleepForTimeInterval:(NSTimeInterval)ti;//线程休眠(阻塞),休眠到指定日期时长- sleepUntilDate:相当于执行一个sleep的任务。在执行过程中,即使有其他任务传入runloop,runloop也不会立即响应,必须sleep任务完成之后,才会响应其他任务
- runUntilDate:虽然会阻塞线程,阻塞过程中并不妨碍新任务的执行。当有新任务的时候,会先执行接收到的新任务,新任务执行完之后,如果时间到了,再继续执行runUntilDate:之后的代码
例子:
-(void)touchesBegan:(NSSet<UITouch *> *)touches withEvent:(UIEvent *)event{
    self.view.backgroundColor = [UIColor yellowColor];
    [self createWithDetach];
}

- (void)createWithDetach{
     //隐式创建
    [NSThread detachNewThreadSelector:@selector(delay:) toTarget:self withObject:@"date"];
    __weak typeof(self)weakSlef = self;
    [NSThread detachNewThreadWithBlock:^{
        NSLog(@"ssss");
        [weakSlef delay:nil];
    }];
}
- (void)delay:(id)parm{
    if ([@"date" isEqual:parm]) {
        [NSThread sleepForTimeInterval:10];//该方法后面的代码,10秒后执行
        NSLog(@"暂停10秒执行");
    }else{
        [NSThread sleepForTimeInterval:2];
        NSLog(@"暂停2秒执行");
    }
}
线程取消
- (void)cancel API_AVAILABLE(macos(10.5), ios(2.0), watchos(2.0), tvos(9.0));@property (readonly, getter=isCancelled) BOOL cancelled API_AVAILABLE(macos(10.5), ios(2.0), watchos(2.0), tvos(9.0));- 不过大家千万不要被它的名字迷惑,调用
cancel方法并不会立刻取消线程,它仅仅是将cancelled属性设置为YES。cancelled也仅仅是一个用于记录状态的属性。线程取消的功能需要我们在main函数中自己实现 - 要实现取消.的功能,我们需要自己在线程的main函数中定期检查
isCancelled状态来判断线程是否需要退出,当isCancelled为YES的时候,我们手动退出。如果我们没有在main函数中检查isCancelled状态,那么调用cancel将没有任何意义.
线程退出
+ (void)exit;exit调用之后会立即终止线程,即使任务还没有执行完成也会中断。这就非常有可能导致内存泄露等严重问题,所以一般不推荐使用。- 对于有runloop的线程,可以使用CFRunLoopStop()结束runloop配合-cancel结束线程
线程状态
executing是否正在执行,finished是否已经结束,cancelled是否已经取消了
@property (readonly, getter=isExecuting) BOOL executing API_AVAILABLE(macos(10.5), ios(2.0), watchos(2.0), tvos(9.0));//线程是否正在执行@property (readonly, getter=isFinished) BOOL finished API_AVAILABLE(macos(10.5), ios(2.0), watchos(2.0), tvos(9.0));//线程是否已经结束@property (readonly, getter=isCancelled) BOOL cancelled API_AVAILABLE(macos(10.5), ios(2.0), watchos(2.0), tvos(9.0));//线程是否已经取消主线程,当前线程,多线程判断或获取
isMainThread是否是主线程,mainThread获取主线程,class修饰的属性表示是一个类属性([NSThread isMainThread])
@property (readonly) BOOL isMainThread API_AVAILABLE(macos(10.5), ios(2.0), watchos(2.0), tvos(9.0));@property (class, readonly) BOOL isMainThread API_AVAILABLE(macos(10.5), ios(2.0), watchos(2.0), tvos(9.0)); // reports whether current thread is main@property (class, readonly, strong) NSThread *mainThread API_AVAILABLE(macos(10.5), ios(2.0), watchos(2.0), tvos(9.0));currentThread获取当前线程
@property (class, readonly, strong) NSThread *currentThread;isMultiThreaded是否是多线程
+ (BOOL)isMultiThreaded;线程设置(名称,优先级)
name线程名称,主要用于debug快速定位对应出哪个线程出现的问题
@property (nullable, copy) NSString *name API_AVAILABLE(macos(10.5), ios(2.0), watchos(2.0), tvos(9.0));threadPriority设置和获取线程优先级,范围0.0-1.0优先级越高越先执行,默认是0.5,iOS8之后新增了qualityOfService枚举属性,大家可以通过枚举值设置优先级- 线程在创建后会放在线程调度池里,当开启线程时会根据设置的优先级去优先调哪个线程,所以设置优先级一点要在调
start方法开启之前设置.
+ (double)threadPriority;+ (BOOL)setThreadPriority:(double)p;
@property double threadPriority API_AVAILABLE(macos(10.6), ios(4.0), watchos(2.0), tvos(9.0)); // To be deprecated; use qualityOfService below@property NSQualityOfService qualityOfService API_AVAILABLE(macos(10.10), ios(8.0), watchos(2.0), tvos(9.0)); // read-only after the thread is started优先级NSQualityOfService主要有5个枚举值,优先级别从高到低排布:
typedef NS_ENUM(NSInteger, NSQualityOfService) {
    NSQualityOfServiceUserInteractive = 0x21,
    NSQualityOfServiceUserInitiated = 0x19,
    NSQualityOfServiceDefault = -1,
    NSQualityOfServiceUtility = 0x11,
    NSQualityOfServiceBackground = 0x09
} API_AVAILABLE(macos(10.10), ios(8.0), watchos(2.0), tvos(9.0));NSQualityOfServiceUserInteractive:最高优先级,主要用于提供交互UI的操作,比如处理点击事件,绘制图像到屏幕上NSQualityOfServiceUserInitiated:次高优先级,主要用于执行需要立即返回的任务NSQualityOfServiceDefault:默认优先级,当没有设置优先级的时候,线程默认优先级NSQualityOfServiceUtility:普通优先级,主要用于不需要立即返回的任务NSQualityOfServiceBackground:后台优先级,用于完全不紧急的任务
例子:
//线程优先级
- (void)threadPriority{
    NSThread * t1 = [[NSThread alloc]initWithBlock:^{
        NSLog(@"%@",[NSThread currentThread]);
    }];
    t1.threadPriority = 0.3;
    t1.name = @"t1";
    NSThread * t2 = [[NSThread alloc]initWithBlock:^{
        NSLog(@"%@",[NSThread currentThread]);
    }];
    t2.threadPriority = 0.6;
    t2.name = @"t2";
    NSThread * t3 = [[NSThread alloc]initWithBlock:^{
        NSLog(@"%@",[NSThread currentThread]);
    }];
    t3.threadPriority = 0.5;
    t3.name = @"t3";

    NSThread * t4 = [[NSThread alloc]initWithBlock:^{
        NSLog(@"%@",[NSThread currentThread]);
    }];
    t4.qualityOfService = NSQualityOfServiceUserInteractive;//最高优先级
    t4.name = @"t4";

    [t1 start];
    [t2 start];
    [t3 start];
    [t4 start];
}
结果可见:优先级越高越先执行
线程通知
NSThread有三个线程相关的通知,
FOUNDATION_EXPORT NSNotificationName const NSWillBecomeMultiThreadedNotification;
FOUNDATION_EXPORT NSNotificationName const NSDidBecomeSingleThreadedNotification;
FOUNDATION_EXPORT NSNotificationName const NSThreadWillExitNotification;NSWillBecomeMultiThreadedNotification:由当前线程派生出第一个其他线程时发送,一般一个线程只发送一次
NSDidBecomeSingleThreadedNotification:这个通知目前没有实际意义,可以忽略
NSThreadWillExitNotification线程退出之前发送这个通知
线程通讯
完成一些操作需要多线程会更加的有效,不同的线程做不同任务,互相有一些依赖,这就需要线程之间进行通讯.NSThread头文件中有一个NSObject的NSThreadPerformAdditions分类,只要继承NSObject的类都可以用里面的方法进行通讯,共5个方法:
NSObject的分类NSThreadPerformAdditions提供了5个线程通信的API
@interface NSObject (NSThreadPerformAdditions)- 去主线程执行
aSelector里面的任务
- (void)performSelectorOnMainThread:(SEL)aSelector withObject:(nullable id)arg waitUntilDone:(BOOL)wait modes:(nullable NSArray<NSString *> *)array;
——————————————————————————————————————————————————————————————————————————————————
- (void)performSelectorOnMainThread:(SEL)aSelector withObject:(nullable id)arg waitUntilDone:(BOOL)wait;- 去指定线程执行
aSelector里面的任务
- (void)performSelector:(SEL)aSelector onThread:(NSThread *)thr withObject:(nullable id)arg waitUntilDone:(BOOL)wait modes:(nullable NSArray<NSString *> *)array API_AVAILABLE(macos(10.5), ios(2.0), watchos(2.0), tvos(9.0));
——————————————————————————————————————————————————————————————————————————————————
- (void)performSelector:(SEL)aSelector onThread:(NSThread *)thr withObject:(nullable id)arg waitUntilDone:(BOOL)wait API_AVAILABLE(macos(10.5), ios(2.0), watchos(2.0), tvos(9.0));- 开启一个后台子线程,并执行
aSelector里的任务.
- (void)performSelectorInBackground:(SEL)aSelector withObject:(nullable id)arg API_AVAILABLE(macos(10.5), ios(2.0), watchos(2.0), tvos(9.0));wait参数表示是否阻塞,YES是阻塞的,等线程中的方法执行完才会去执行对应线程中的方法,NO就是不阻塞,直接执行对应线程中的方法;如果本身是主线程有调用了performSelectorOnMainThread方法,wait参数是无效的,不论是设置为YES还是NO都会立即执行.- 线程间通信示例:开启多个子线程去下载图片,图片下载完后回主线程刷新UI;
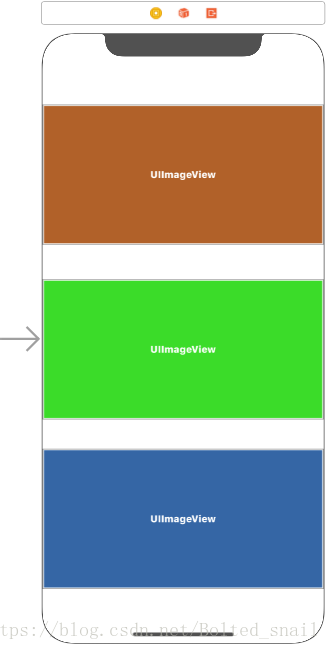
Main.storyboard中添加三个UIImageView
#import "ViewController.h"
@interface ViewController ()
@property (weak, nonatomic) IBOutlet UIImageView *redImageV;
@property (weak, nonatomic) IBOutlet UIImageView *greenImageV;
@property (weak, nonatomic) IBOutlet UIImageView *blueImageV;
@end
@implementation ViewController
- (void)viewDidLoad {
    [super viewDidLoad];
    //分离新的子线程,该方法会自动启动线程
    [NSThread detachNewThreadSelector:@selector(downLoad) toTarget:self withObject:nil];
    __weak typeof(self)weakSelf = self;
    [NSThread detachNewThreadWithBlock:^{//iOS10.0以后才能用
        [weakSelf downLoad1];
    }];
    NSThread * thread = [[NSThread alloc]initWithBlock:^{//iOS10.0以后才能用
        [weakSelf downLoad2];
    }];
    [thread start];
}
-(void)downLoad{
    //获取图片url
    NSURL * url = [NSURL URLWithString:@"http://pic.ibaotu.com/00/32/60/42c888piCQhw.jpg-0.jpg!ww700"];
    //根据url获取图片二进制数据
    NSData * data = [NSData dataWithContentsOfURL:url];
    //转换为图片
    UIImage * iamge = [UIImage imageWithData:data];
    NSLog(@"%@",[NSThread currentThread]);
    //图片获取到后去主线程设置图片刷新ui
    [self.redImageV performSelectorOnMainThread:@selector(setImage:) withObject:iamge waitUntilDone:YES];
    NSLog(@"end1");
}
//计算代码执行时间方法1
-(void)downLoad1{
    //获取图片url
    NSURL * url = [NSURL URLWithString:@"http://58pic.ooopic.com/58pic/15/87/48/60c58PICR2A_1024.jpg"];
    NSDate * startTime = [NSDate date];
    //根据url获取图片二进制数据
    NSData * data = [NSData dataWithContentsOfURL:url];
    //转换为图片
    UIImage * iamge = [UIImage imageWithData:data];
    NSDate * endTime = [NSDate date];
    NSLog(@"1.时间差为:%f",[endTime timeIntervalSinceDate:startTime]);
    //图片获取到后去主线程设置图片刷新ui
    [self performSelectorOnMainThread:@selector(showImage:) withObject:iamge waitUntilDone:YES];
    NSLog(@"end2");
}
-(void)showImage:(UIImage *)image{
    self.greenImageV.image = image;
    NSLog(@"%@",[NSThread currentThread]);
}
//计算代码执行时间方法2
-(void)downLoad2{
    //获取图片url
    NSURL * url = [NSURL URLWithString:@"https://ss1.bdstatic.com/70cFuXSh_Q1YnxGkpoWK1HF6hhy/it/u=2585485106,1388364231&fm=27&gp=0.jpg"];
    CFTimeInterval startTime = CFAbsoluteTimeGetCurrent();
    //根据url获取图片二进制数据
    NSData * data = [NSData dataWithContentsOfURL:url];
    //转换为图片
    UIImage * iamge = [UIImage imageWithData:data];
    CFTimeInterval endTime = CFAbsoluteTimeGetCurrent();//CFTimeInterval 本为double类型
    NSLog(@"2.时间差为:%f",endTime - startTime);

    //NSLog(@"%@",[NSThread currentThread]);
    //图片获取到后去主线程设置图片刷新ui
    [self.blueImageV performSelectorOnMainThread:@selector(setImage:) withObject:iamge waitUntilDone:YES];
    NSLog(@"end3");
}
@end
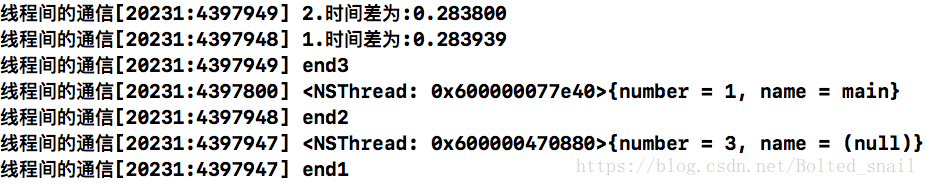
结果可见:子线程并发的去下载图片,然后回到主线程去显示图片,该示例可以看出下载图片的时间大概是0.2838秒,跟图片大小和网络等有关。
线程安全
线程安全解决方案:可以给线程加锁,在一个线程执行该操作的时候,不允许其他线程进行操作。iOS 实现线程加锁有很多种方式。@synchronized、 NSLock、NSRecursiveLock、NSCondition、NSConditionLock、pthread_mutex、dispatch_semaphore、OSSpinLock、atomic(property) set/ge等等各种方式。
//synchronized同步锁
#import "ViewController.h"
@interface ViewController ()
/** 售票员A */
@property (nonatomic, strong) NSThread *threadA;
/** 售票员B */
@property (nonatomic, strong) NSThread *threadB;
/** 售票员C */
@property (nonatomic, strong) NSThread *threadC;

@property (nonatomic, assign) NSInteger totalCount;
@end
@implementation ViewController
-(void)touchesBegan:(NSSet<UITouch *> *)touches withEvent:(UIEvent *)event{
    //设置中票数
    self.totalCount = 20;
    self.threadA = [[NSThread alloc]initWithTarget:self selector:@selector(saleTicket) object:nil];
    self.threadB = [[NSThread alloc]initWithTarget:self selector:@selector(saleTicket) object:nil];
    self.threadC = [[NSThread alloc]initWithTarget:self selector:@selector(saleTicket) object:nil];
    self.threadA.name = @"售票员A";
    self.threadB.name = @"售票员B";
    self.threadC.name = @"售票员C";
    //启动线程
    [self.threadA start];
    [self.threadB start];
    [self.threadC start];
}
-(void)saleTicket{
    //锁:必须是全局唯一的
    //1.注意枷锁的位置
    //2.注意枷锁的前提条件,多线程共享同一块资源
    //3.注意加锁是需要代价的,需要耗费性能的
    //4.加锁的结果:线程同步
    while (1) {
        @synchronized(self){
            if (self.totalCount > 0) {
                self.totalCount -= 1;
                //卖出去一张票
                NSLog(@"%@卖出去了一张票,还剩下%zd张票", [NSThread currentThread].name,self.totalCount);
            }else{
                NSLog(@"票卖完了");
                break;
            }
        }

    }
}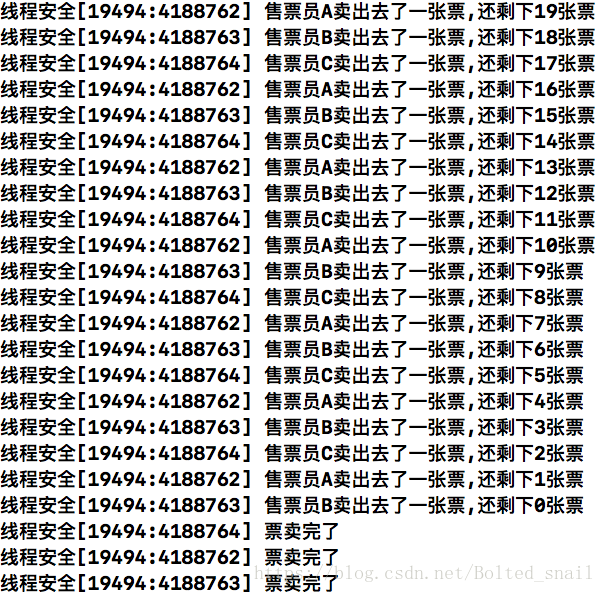
结果可见:售票数据正确,加同步锁可以保证线程安全。
- synchronized 这个主要是考虑多线程的程序,这个指令可以将{ } 内的代码限制在一个线程执行,如果某个线程没有执行完,其他的线程如果需要执行就得等着。
- @synchronized的作用是创建一个互斥锁,保证此时没有其它线程对self对象进行修改。这个是objective-c的一个锁定令牌,防止self对象在同一时间内被其它线程访问,起到线程的保护作用。 一般在公用变量的时候使用,如单例模式或者操作类的static变量中使用。
- 指令@synchronized()需要一个参数。该参数可以使任何的Objective-C对象,包括self。这个对象就是互斥信号量。他能够让一个线程对一段代码进行保护,避免别的线程执行该段代码。针对程序中的不同的关键代码段,我们应该分别使用不同的信号量。只有在应用程序编程执行多线程之前就创建好所有需要的互斥信号量对象来避免线程间的竞争才是最安全的。
正确取消线程举例
#import <Foundation/Foundation.h>
@interface JThread : NSThread
- (void)cancelThread;
@end

#import "JThread.h"
@implementation JThread
//结束线程的时候,我们可以使用CFRunLoopStop()配合-cancel来结束线程
-(void)cancelThread{
    [[NSThread currentThread] cancel];
    CFRunLoopStop(CFRunLoopGetCurrent());
}
@end
————————————————————————————————————————————————————————————————————
@interface ViewController ()
@property(nonatomic ,copy) JThread * customThread;
@end
@implementation ViewController
-(void)touchesBegan:(NSSet<UITouch *> *)touches withEvent:(UIEvent *)event{
    [self threadExample];
}
- (void)threadExample{
    [self.customThread start];//启动线程
    [self performSelector:@selector(handleTimeConsumingOperation) onThread:self.customThread withObject:nil waitUntilDone:NO];//线程间通讯
}
//懒加载自定义线程
-(NSThread *)customThread
{
    if (!_customThread) {
        _customThread = [[JThread alloc]initWithTarget:self selector:@selector(threadTest:) object:@"创建一个新的线程"];//创建
        _customThread.name = @"customThread";//设置名称
        _customThread.qualityOfService = NSQualityOfServiceDefault;//设置优先级
    }
    return _customThread;
}
//给线程添加RunLoop
- (void)threadTest:(id)pram{
    NSRunLoop * runLoop = [NSRunLoop currentRunLoop];//给当前线程添加runLoop
    [runLoop addPort:[NSMachPort port] forMode:NSDefaultRunLoopMode];//给runLoop添加数据源
    while (![[NSThread currentThread] isCancelled]) {//10秒后runLoop退出,线程退出
        [runLoop runMode:NSDefaultRunLoopMode beforeDate:[NSDate dateWithTimeIntervalSinceNow:10]];
    }
}
//处理耗时操作
- (void)handleTimeConsumingOperation{

    for (int i = 0; i < 10000; i++) {
        NSLog(@"%@:%zd",[NSThread currentThread],i);
        if (i == 500) {
            [self.customThread cancelThread];//取消线程
            NSLog(@"在当前线程中的方法取消线程,当前方法任然继续执行,但后面再添加方法到取消的线程中执行,则不会执行了");
            [self performSelector:@selector(test) onThread:self.customThread withObject:nil waitUntilDone:NO];//因为此时线程取消后,再用当前取消的线程去执行test任务是不能执行的
            self.customThread = nil;
            break;
        }
    }
}
- (void)test{
    NSLog(@"不会再执行了");
}
@end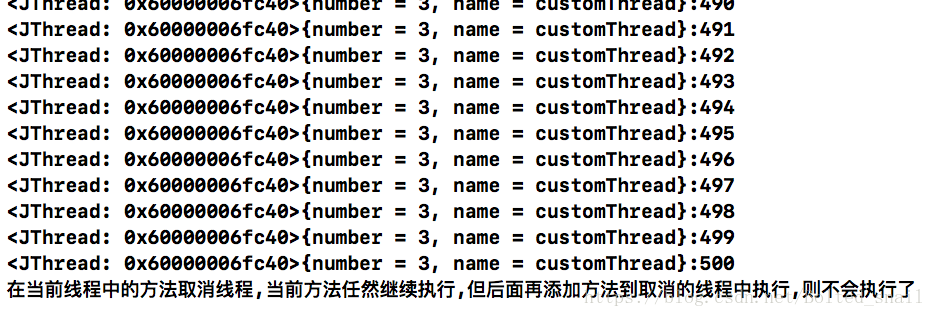
结果可见:test方法没有调用,是因为执行该方法的线程在执行该方法之前已经取消了,所以不能往下执行任务了。
iOS多线程相关文章:
iOS多线程简述
iOS多线程-pthread、NSThread
iOS多线程-GCD
iOS多线程-NSOperation, NSOperationQueue
iOS多线程-RunLoop
OC单例模式详解