由于本人手机没有root所以不使用Andriod单机实现方式,需要一台辅助电脑用于控制手机
同时由于本人只是闲暇时间所写,所以代码质量与精度上问题比较大,主要分享思路
以及代码,任何问题欢迎支出。
本人邮箱[email protected]有见解欢迎发邮件告知。
一、主体思路
首先我们需要将手机上QQ点赞页面的图片截取,并且上传到我们的电脑。
使用python语言实现上面过程,由于之前动手做过跳一跳的自动刷所以,在这里我同样使用adb工具去做控制这一块有想过使用python-adb的这个库,但是看看之后,安装尝试之后直接gg了,首先我的电脑总是安装不成功,有一个支持库的版本不对。具体实现
通过adb命令我们能用电脑控制我们的手机去截取我们的屏幕,然后上传到我们的电脑上
接下来,使用opencv读取图片,其实所谓opencv在这一次中间使用仅仅是用到了出片处理一点点东西,使用matplotlib也是可以的由于我一开始的想法是使用神经网络去寻找其中的点击点。所以使用了opencv
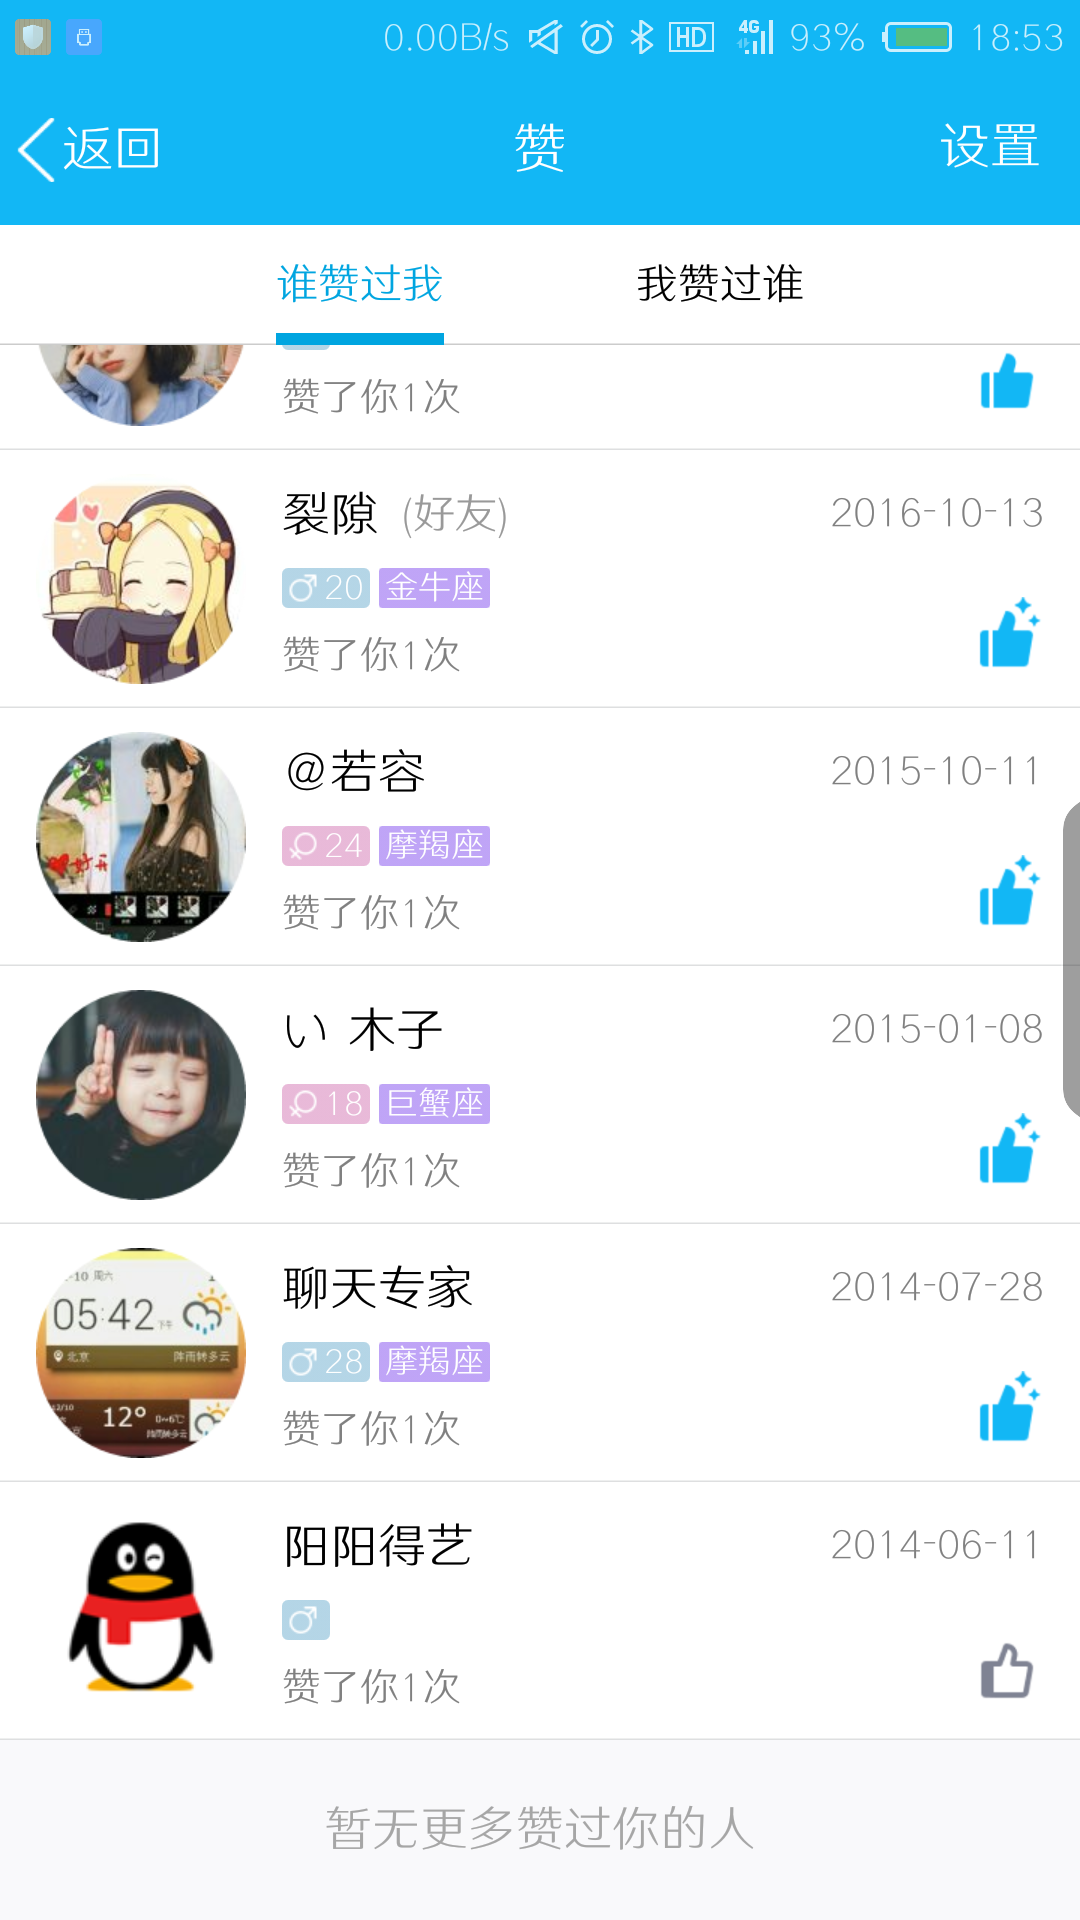
首先,我们得到图片之后,会如图所示:
我的思路是使用一种方法将图片中的每个小图分割出来,这个想法当然不仅仅是为了QQ点赞来的,实现这个可以做别的很多事。经过一番努力,我完成这个方法。
标记完成之后会如图所示

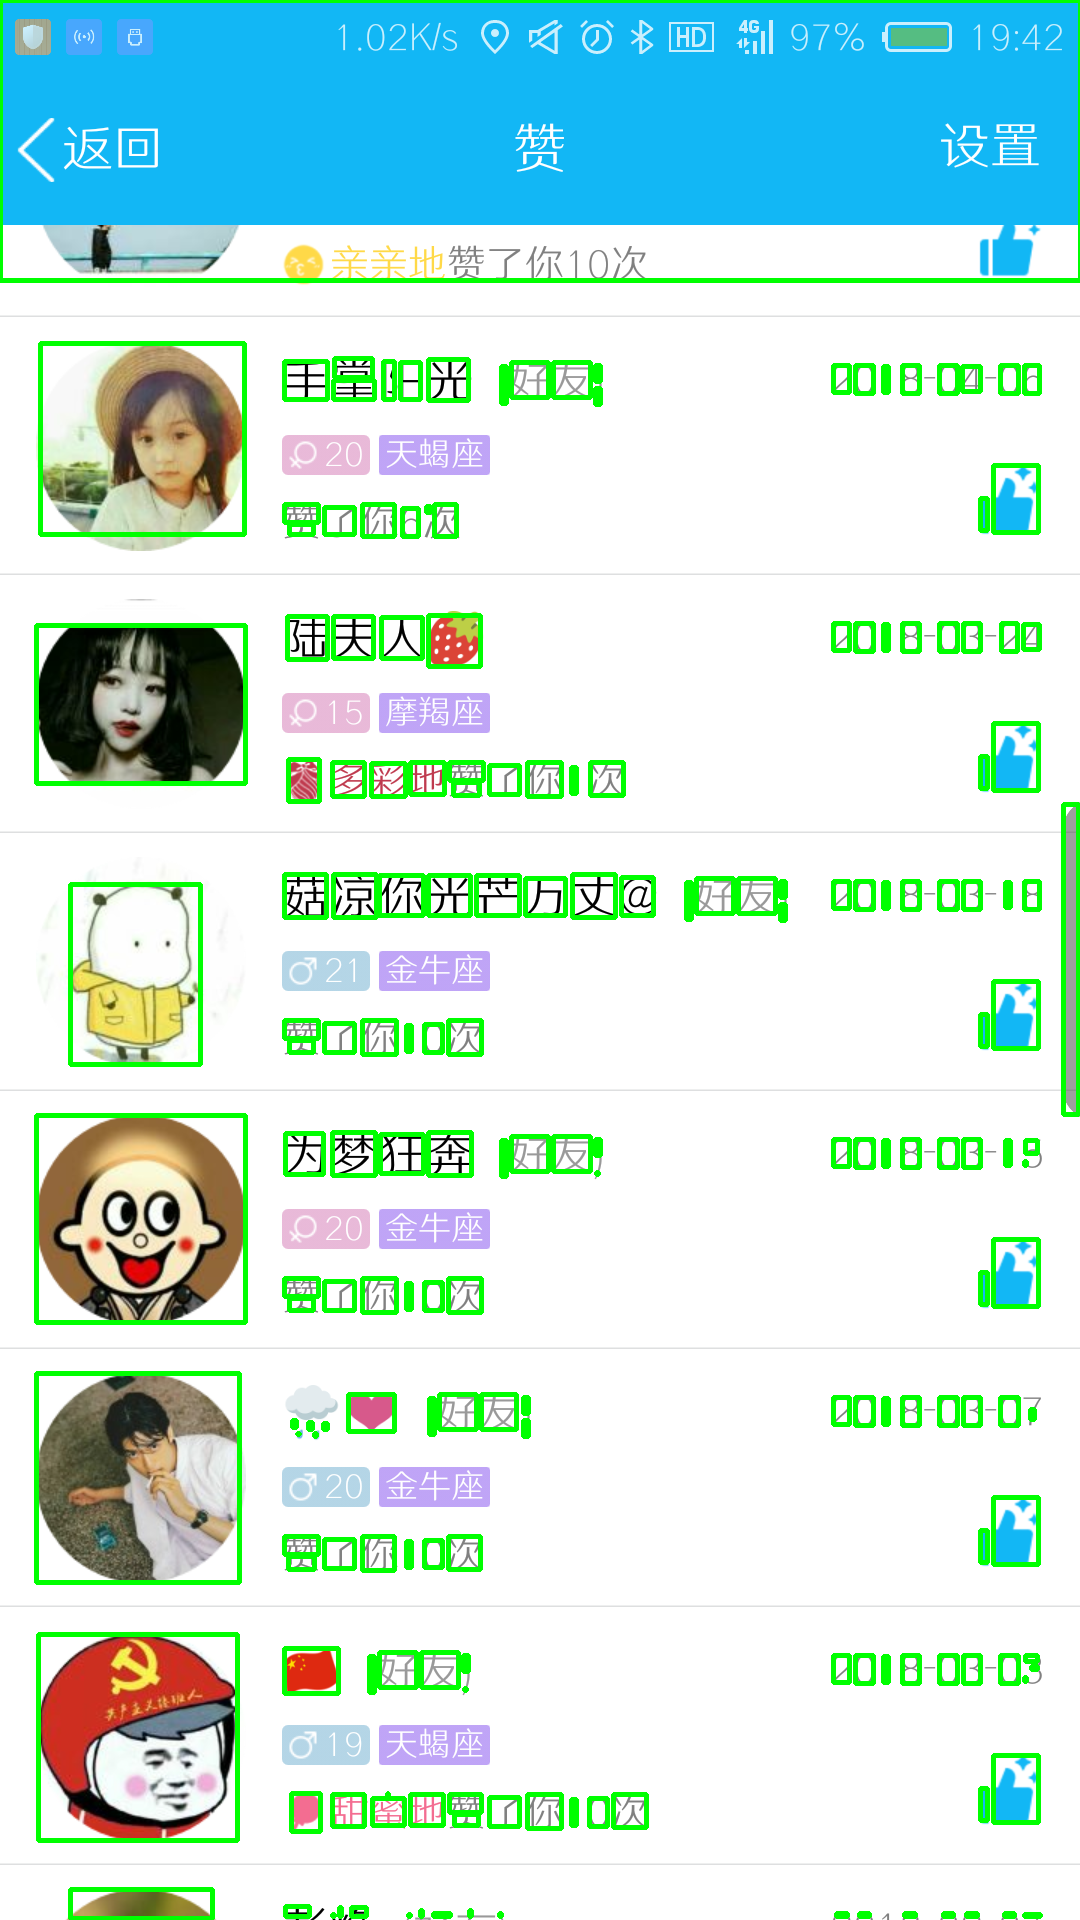
这个是通过截取后的到图形画图后制作的。
最后找到我们需要点击的位置之后,我们需要去通过这个位置使用adb命令进行点击。
接下来附上代码:
#!/usr/bin/python
# *_* coding:utf-8 *_*

import adb
import cv2
import numpy as np
import math

"""
if you see this code, first you should to kown the img's point in the opencv
and kown the phone's point
"""

def one_to_two(img):
    left_img = img[0:img.shape[0], 0:img.shape[1] / 2]
    right_img = img[0: img.shape[0], img.shape[1] / 2:img.shape[1]]
    cv2.imshow("left_img", left_img)
    cv2.imshow("right_img", right_img)
    cv2.waitKey()
    print(" ")

def get_aim_img():
    adb.adb("shell screencap -p /sdcard/screen.png")
#     adb.adb("pull /sdcard/DCIM/Camera/2.jpg")
    adb.adb("pull /sdcard/screen.png")

def get_col_img(temp, img, cut, len_lin):
    img = img[0:len_lin, cut[0]:cut[1]]

    if img.shape[0] > 0 and img.shape[1] > 0:
        cv2.imwrite("cut_img/" + str(cut[0]) + ".png", img)
#         print(temp[0] + 0, temp[1] + cut[0])
#         cv2.imshow("img", img)
#         cv2.waitKey()
        if need.shape[0] == img.shape[0] and need.shape[1] == img.shape[1]:
            cmd_str = "shell input tap " + str(temp[1] + cut[0] + 20) + " " + str(temp[0] + 0 + 30)
            print(cmd_str)
            for c in range(5):
                adb.adb(cmd_str)

        one_cut_img = []
        one_cut_img.append(temp[0] + 0)
        one_cut_img.append(temp[1] + cut[0])
        one_cut_img.append(img)
        one_cut_img.append(img.shape[0])
        one_cut_img.append(img.shape[1])

        temp_cut_img.append(one_cut_img)

def get_lin_img(temp, img, cut, len_col):
    img = img[cut[0]:cut[1], 0:len_col]

    if img.shape[0] > 0 and img.shape[1] > 0:
        cv2.imwrite("cut_img/" + str(cut[0]) + ".png", img)
        if need.shape[0] == img.shape[0] and need.shape[1] == img.shape[1]:
#             print(temp[0] + cut[0], temp[1] + 0)
#             cv2.imshow("img", img)
#             cv2.waitKey()
            cmd_str = "shell input tap " + str(temp[1] + 0 + 20) + " " + str(temp[0] + cut[0] + 20)
            print(cmd_str)
            for c in range(10):
                adb.adb(cmd_str)
        one_cut_img = []
        one_cut_img.append(temp[0] + cut[0])
        one_cut_img.append(temp[1] + 0)
        one_cut_img.append(img)
        one_cut_img.append(img.shape[0])
        one_cut_img.append(img.shape[1])

        temp_cut_img.append(one_cut_img)

def how_cut(f, temp, lin, col, img_color):
    cut_one = [0,0]
    is_cut = False
    for x in range(len(lin) - 1):
#         print(x, len(lin) - 1)
        if lin[x] == 0 and lin[x + 1] is not 0:
            cut_one[0] = x + 1
            continue
        if (lin[x] is not 0 and lin[x + 1] == 0):
            cut_one[1] = x
            f(temp, img_color, cut_one, len(col))
#             print(cut_one)
            is_cut = True
            cut_one = [0,0]

        if (cut_one[0] is not 0) and x == (len(lin) - 2):
            cut_one[1] = x
            f(temp, img_color, cut_one, len(col))
#             print(cut_one)
            is_cut = True
            cut_one = [0,0]
    return is_cut

def one_cut(img, img_color):
    col = np.sum(img, axis = 0)
    lin = np.sum(img, axis = 1)
#     print(img)
#     print(len(col))
#     print(len(lin))
    temp = temp_cut_img.pop()
#     print(img)
#     input("nihao")
    lin_ok = how_cut(get_lin_img, temp, lin, col, img_color)
    col_ok = how_cut(get_col_img, temp, col, lin, img_color)
    if lin_ok == False and col_ok == False:
        all_cut_img.append(temp)


def main(img_color):
    img = cv2.cvtColor(img_color, cv2.COLOR_BGR2GRAY)
#     cv2.imshow("imgg", img)
#     cv2.waitKey()
    ret, dst = cv2.threshold(img, 180, 255, 1)
#     print(dst)
#     cv2.imshow("new_aim", dst)
#     cv2.waitKey()
    one_cut(dst, img_color)

need = cv2.imread("data/72.png", cv2.IMREAD_GRAYSCALE)
print(need.shape)
all_cut_img = []
temp_cut_img = []
while True:
    get_aim_img()
    img_name = "screen.png"
    one = [0,0]
    img_read = cv2.imread(img_name)
    print(img_read.shape)
    one.append(img_read)
    one.append(img_read.shape[0])
    one.append(img_read.shape[1])
    temp_cut_img.append(one)
    while len(temp_cut_img) is not 0:
        main(temp_cut_img[len(temp_cut_img) - 1][2])
    img_read_c = cv2.imread(img_name)
    j = 0
    f = open("img.txt", "w")
    for i in all_cut_img:
        cv2.rectangle(img_read_c,(i[1],i[0]),(i[1] + i[4],i[0] + i[3]),(0,255,0),3)
        cv2.imwrite("img/" + str(j) + ".png", i[2])
        f.write(str(i[0]) + "    " + str(i[1]) + "    "\
                + str(i[3]) + "    " + str(i[4]) + "\n")
        j +=1
    f.close()
#     cv2.imshow("img_read.png", img_read_c)
#     cv2.waitKey()
    cv2.imwrite("test.png", img_read_c)
    img_read_c = []
    adb.adb("shell input swipe 250 1200 250 800")
代码写的很拙劣,没办法,本人也有些懒,然后也是接触python这方面都是自学。忘多多见谅。
最后,这个是主要代码。附上完成代码传送门两个:
https://github.com/Yaque/Auto 这个是github的
项目是在eclipse上继承pydev开发的
https://download.csdn.net/download/qq_20081893/10430660
还有,希望大家能慷慨点,有积分的尽量也去下载一下这个博客上的资源,给博主一点支持,真的舍不得充钱。
最后来个小视频展示一下效果
好吧,发现上传不了。