用Canvas在SurfaceView上绘制一个雷达扫描动画
目录
为什么选择SurfaceView
其实普通的View也可以实现,但是由于扫描动画绘制过程会比较耗时,除了SurfaceView一般的View需要在主线程绘制会导致主线程卡顿,所以选择用SurfaceView以避免造成主线程的卡顿.
准备工作
构建MySurfaceView
为了获得良好的性能及避免不必要的资源浪费,这次依旧使用HandlerThread来优化SurfaceView,所以依照博客性能优化 – 优化SurfaceView的线程调用创建一个MySurfaceView类如下
package com.yxf.usefullib;

import android.content.Context;
import android.graphics.Canvas;
import android.os.Handler;
import android.os.HandlerThread;
import android.os.Message;
import android.util.AttributeSet;
import android.util.Log;
import android.view.SurfaceHolder;
import android.view.SurfaceView;

public class MySurfaceView extends SurfaceView implements SurfaceHolder.Callback, Handler.Callback {

    public static final String TAG = "MySurfaceView";

    public static final int MESSAGE_DRAW = 0;

    private boolean isQuitHandlerThreadWhenDestroy = true;

    private HandlerThread handlerThread;
    private WeakHandler handler;


    public MySurfaceView(Context context, AttributeSet attrs, int defStyleAttr) {
        super(context, attrs, defStyleAttr);
        getHolder().addCallback(this);
    }

    public MySurfaceView(Context context, AttributeSet attrs) {
        this(context, attrs, 0);
    }

    public MySurfaceView(Context context) {
        this(context, null);
    }

    public void refresh() {
        if (handler == null) {
            return;
        }
        Message message = Message.obtain();
        message.what = MESSAGE_DRAW;
        handler.removeMessages(MESSAGE_DRAW);
        handler.sendMessage(message);
    }

    public WeakHandler getThreadHandler() {
        return handler;
    }

    public WeakHandler setHandlerThread(HandlerThread thread) {
        return setHandlerThread(thread, null);
    }

    protected WeakHandler setHandlerThread(HandlerThread thread, Handler.Callback callback) {
        if (thread == null) {
            Log.w(TAG, "the HandlerThread set is null");
            return null;
        }
        return initHandler(thread, callback, null);
    }

    private WeakHandler initHandler(HandlerThread thread, Handler.Callback callback, WeakHandler h) {
        this.handlerThread = thread;
        if (handlerThread.getLooper() == null) {
            handlerThread.start();
        }
        if (callback == null) {
            callback = this;
        }
        if (h == null) {
            handler = new WeakHandler(thread.getLooper(), callback);
        } else {
            handler = h;
        }
        return handler;
    }


    @Override
    public void surfaceCreated(SurfaceHolder holder) {
        if (handlerThread == null) {
            handlerThread = new HandlerThread(TAG);
            initHandler(handlerThread, null, null);
            isQuitHandlerThreadWhenDestroy = true;
        }
        refresh();
    }

    @Override
    public void surfaceChanged(SurfaceHolder holder, int format, int width, int height) {

    }

    @Override
    public void surfaceDestroyed(SurfaceHolder holder) {
        handler.removeMessages(MESSAGE_DRAW);
        if (isQuitHandlerThreadWhenDestroy) {
            handlerThread.quitSafely();
            handlerThread = null;
        }
    }

    @Override
    public boolean handleMessage(Message msg) {
        switch (msg.what) {
            case MESSAGE_DRAW:
                Canvas canvas = getHolder().lockCanvas();
                if (canvas != null) {
                    drawFrame(canvas);
                    getHolder().unlockCanvasAndPost(canvas);
                }
                return true;
        }
        return false;
    }

    public void drawFrame(Canvas canvas) {

    }
}
下载WeakHandler
由于MySurfaceView依赖于WeakHandler,所以也需要将性能优化 – 如何优雅的防止Handler引发的内存泄漏篇中的WeakHandler下载下来.
创建usefullib
因为上述两个文件复用性比较高,所以将其放在一个通用模块usefullib下
然后我也加了一个YxfLog的log工具
创建雷达扫描动画的SurfaceView
创建RadarView继承于MySurfaceView
添加基础代码
然后先做一些必要的初始化代码,如下
package com.yxf.radarview;

import android.content.Context;
import android.graphics.Canvas;
import android.graphics.Color;
import android.graphics.Paint;
import android.util.AttributeSet;
import android.view.SurfaceHolder;

import com.yxf.usefullib.MySurfaceView;

public class RadarView extends MySurfaceView {
    private int mSize;
    private int mScanPeriod;
    private int mPadding;
    private int mCenterX, mCenterY;
    private int mRadius;
    private int mWidth, mHeight;

    private Paint mBackgroundCirclePaint = new Paint();
    private int mBackgroundCircleColor = getResources().getColor(android.R.color.holo_blue_dark);

    private Paint mRingPaint = new Paint();
    private int mRingColor = Color.WHITE;

    private Paint mCrossPaint = new Paint();
    private int mCrossColor = Color.WHITE;

    private Paint mScanPaint = new Paint();


    public RadarView(Context context, AttributeSet attrs, int defStyleAttr) {
        super(context, attrs, defStyleAttr);
        initialize();
    }

    public RadarView(Context context, AttributeSet attrs) {
        super(context, attrs);
        initialize();
    }


    public RadarView(Context context) {
        super(context);
        initialize();
    }

    private void initialize() {
        mBackgroundCirclePaint.setColor(mBackgroundCircleColor);

        mRingPaint.setColor(mRingColor);
        mRingPaint.setStrokeWidth(2);
        mRingPaint.setStyle(Paint.Style.STROKE);
        mRingPaint.setAntiAlias(true);

        mCrossPaint.setColor(mCrossColor);
        mCrossPaint.setStrokeWidth(2);
        mRingPaint.setAntiAlias(true);

        mBackgroundCirclePaint.setAntiAlias(true);

        mScanPaint.setAntiAlias(true);

        setScanPeriod(3000);
        setPadding(20);

    }

    @Override
    public void drawFrame(Canvas canvas) {
        super.drawFrame(canvas);
    }

    @Override
    public void surfaceChanged(SurfaceHolder holder, int format, int width, int height) {
        super.surfaceChanged(holder, format, width, height);
        this.mHeight = height;
        this.mWidth = width;
        initializeShapeProperties();
    }

    private void initializeShapeProperties() {
        mSize = Math.min(mHeight - mPadding * 2, mWidth - mPadding * 2);
        mCenterX = mWidth / 2;
        mCenterY = mHeight / 2;
        mRadius = mSize / 2;
        mCenterX = mWidth / 2;
        mCenterY = mHeight / 2;
        refresh();
    }

    public void setScanPeriod(int mScanPeriod) {
        this.mScanPeriod = mScanPeriod;
    }

    public void setPadding(int padding) {
        this.mPadding = padding;
        initializeShapeProperties();
    }
}
在上面代码中创建了很多Paint,这个做个说明,这是一种牺牲空间换效率的策略.
如果只使用一两个Paint时,需要频繁设置Paint的属性,或者频繁新建对象,这样影响执行效率,而且容易频繁触发GC,容易导致内存抖动,界面卡顿.当然创建那么多的Paint缺点是牺牲了很多内存空间,不过这点空间对于现在的Android设备而言应该微不足道.

在优化程序性能时,很多时候都要权衡时间和空间价值.
绘制雷达部件
雷达可以分成如下几个部件来绘制
- 圆形背景
- 维度圆环
- 正交线
- 扫描动画
绘制简单的部分
除了扫描动画部分,其他三个可以说都是很简单的,先将这三个部分绘制出来添加如下代码
    @Override
    public void drawFrame(Canvas canvas) {
        super.drawFrame(canvas);
        drawBackgroundCircle(canvas);
        drawRing(canvas);
        drawCross(canvas);
    }

    private void drawBackgroundCircle(Canvas canvas) {
        canvas.drawCircle(mCenterX, mCenterY, mRadius, mBackgroundCirclePaint);
    }

    private void drawRing(Canvas canvas) {
        canvas.drawCircle(mCenterX, mCenterY, mRadius / 5 * 2, mRingPaint);
        canvas.drawCircle(mCenterX, mCenterY, mRadius / 5 * 4, mRingPaint);
    }

    private void drawCross(Canvas canvas) {
        canvas.drawLine(mCenterX, mCenterY - mRadius, mCenterX, mCenterY + mRadius, mCrossPaint);
        canvas.drawLine(mCenterX - mRadius, mCenterY, mCenterX + mRadius, +mCenterY, mCrossPaint);
    }
运行程序将获得一个如下的图形
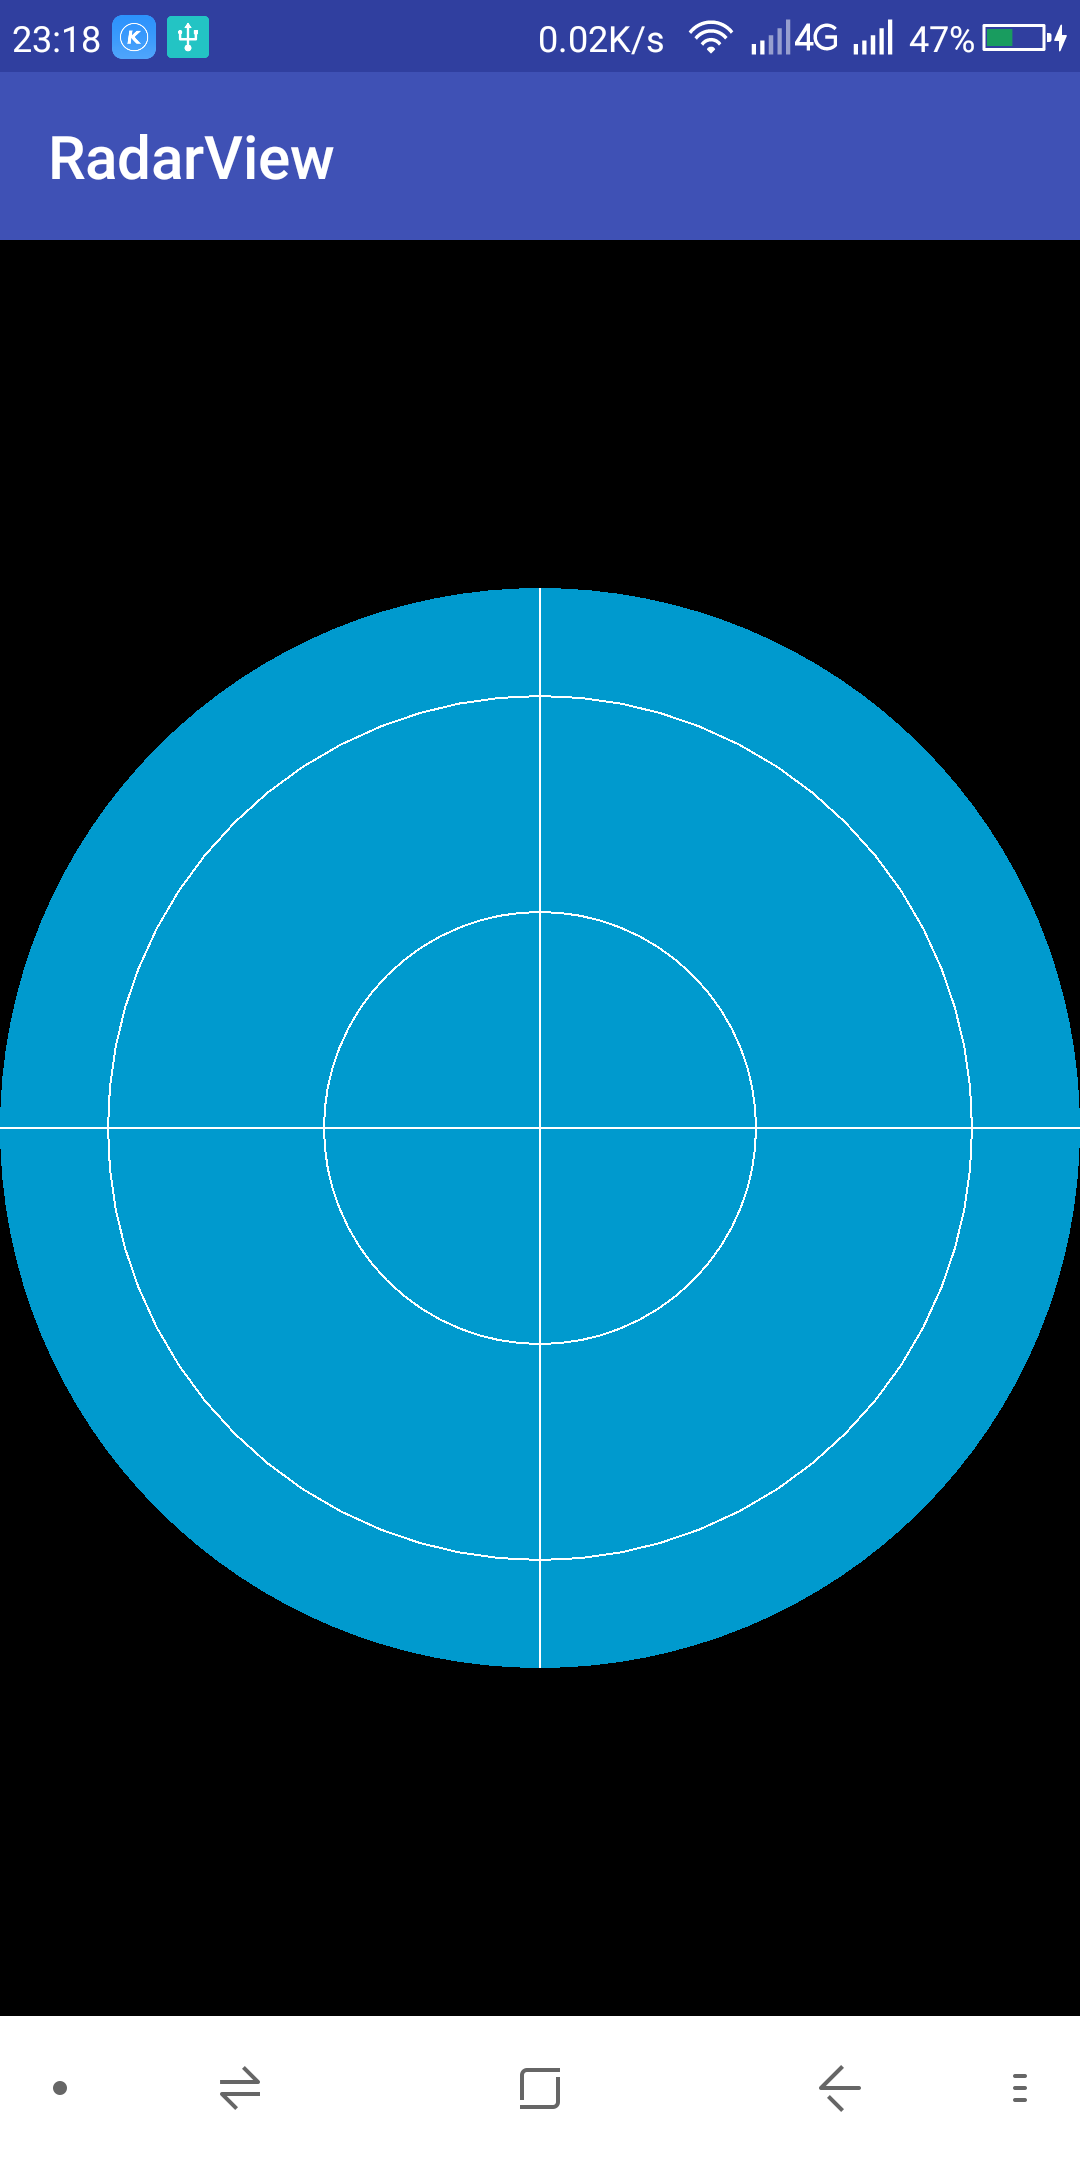
这样一个基础的雷达就成型了
绘制扫描部分
然后开始绘制扫描部分
雷达的扫描过程可以说是一个扇形的渐变过程
那么如何去实现这个渐变过程呢?
在此可以利用Paint的Shader
Android的Shader着色器是一个基类
然后Android自带5个子类分别是
BitmapShader
ComposeShader
LinearGradient
RadialGradient
SweepGradient
若不熟悉可以参考文章Android Paint之Shader渲染详解
这边文章对Shader的解释还是非常清楚的
在本文所需要用到的是SweepGradient
借助SweepGradient可以实现扇形的颜色渐变效果,从而实现扫描的效果
先做一个尝试试试效果
创建drawScanning方法如下
    private void drawScanning(Canvas canvas) {
        SweepGradient gradient = new SweepGradient(mCenterX, mCenterY,
                new int[]{Color.TRANSPARENT, Color.TRANSPARENT, mBackgroundCircleColor,
                        Color.argb(0x88, 0x00, 0xcc, 0x44),Color.WHITE},
                new float[]{0f, 0.375f, 0.375f, 0.875f, 1f});
        mScanPaint.setShader(gradient);
        canvas.drawCircle(mCenterX, mCenterY, mRadius, mScanPaint);
}在drawFrame中的drawBackgroundCircle(canvas)后添加drawScanning(canvas),绘制顺序千万不能搞错哦
重新运行程序,可获得如下效果
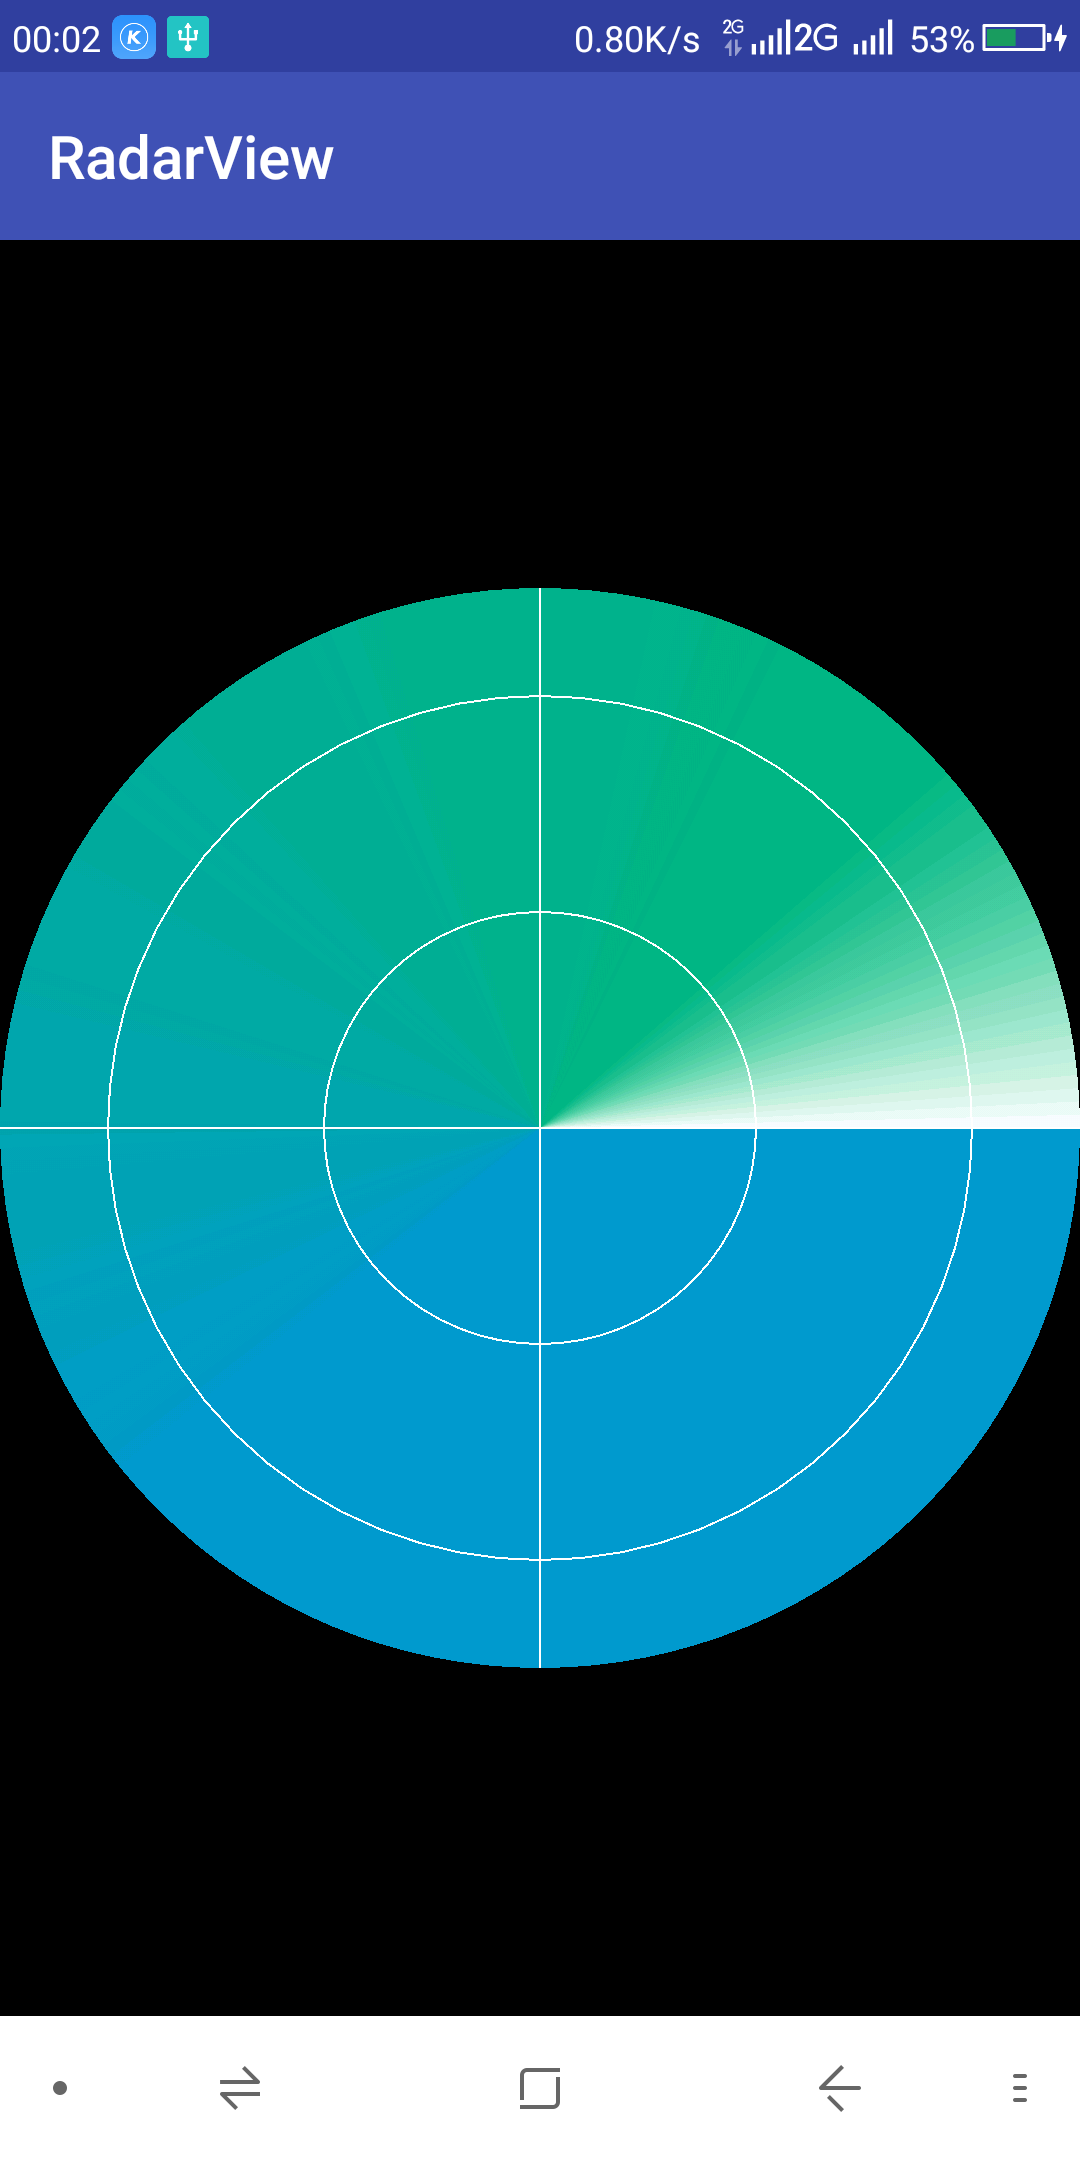
扫描的效果已经出来了,然而它不会动,此时可以借助属性动画来让扫描图像动起来
属性动画控制什么呢?
控制一个扫描角度即可,然后在drawScanning中根据这个扫描角度来实现动画效果
为了实现上述方案,先创建一个类将SweepGradient的颜色(color)和和位置(position)联系起来
    private static class ColorPosition {
        float position = 0f;
        int color = 0;

        public ColorPosition(float position, int color) {
            this.position = position;
            this.color = color;
        }
}在RadarView中添加成员变量
    private List<ColorPosition> mColorPositionList = new ArrayList<>();

private float mScanDegree;然后添加一个属性变量来改变这个mScanDegree来实现扫描的动画效果,当mScanDegree改变时,颜色值对应的position也应当做出改变才能真正的实现动画效果.
在使用属性动画之前,先介绍一个属性动画的特征,属性动画会在start时会使用Handler运行于当前线程,所以在主线程中使用Handler完全没有问题,但是在子线程中使用,而且这个线程没有Loop对象的话,就会抛出异常.
然后RadarView正好是做过线程优化的,它内部维护了一个HandlerThread,所以它的绘制子线程中有Loop对象可以使用属性动画.那么有个问题,属性动画到底应该放在主线程还是RadarView的子线程呢?使用子线程的话,根本不需要考虑mScanDegree的线程同步问题,以及可能会遇到的线程安全问题,也可以减少主线程的执行压力,使主线程不易卡顿.
在RadarView中添加成员变量mScanAnimator
private ValueAnimator mScanAnimator添加常量
    private static final int MESSAGE_START_ANIMATOR = 1;
    private static final int MESSAGE_CANCEL_ANIMATOR = 2;
然后添加如下代码
    @Override
    public void surfaceCreated(SurfaceHolder holder) {
        super.surfaceCreated(holder);
        WeakHandler handler = getThreadHandler();
        handler.sendEmptyMessage(MESSAGE_START_ANIMATOR);
    }

    @Override
    public void surfaceDestroyed(SurfaceHolder holder) {
        WeakHandler handler = getThreadHandler();
        handler.sendEmptyMessage(MESSAGE_CANCEL_ANIMATOR);
        super.surfaceDestroyed(holder);
    }

    @Override
    public boolean handleMessage(Message msg) {
        switch (msg.what) {
            case MESSAGE_START_ANIMATOR:
                mScanAnimator = ValueAnimator.ofFloat(0f, 360f);
                mScanAnimator.setDuration(mScanPeriod);
                mScanAnimator.addUpdateListener(new ValueAnimator.AnimatorUpdateListener() {
                    @Override
                    public void onAnimationUpdate(ValueAnimator animation) {
                        mScanDegree = (Float) animation.getAnimatedValue();
                        onScanDegreeChanged();
                    }
                });
                mScanAnimator.setInterpolator(new LinearInterpolator());
                mScanAnimator.setRepeatCount(ValueAnimator.INFINITE);
                mScanAnimator.start();
                return true;
            case MESSAGE_CANCEL_ANIMATOR:
                mScanAnimator.cancel();
                WeakHandler handler = getThreadHandler();
                handler.removeCallbacksAndMessages(null);
                return true;
        }
        return super.handleMessage(msg);
    }

    private void onScanDegreeChanged() {

}属性动画的start需要在执行线程上调用,所以这里使用了Handler来实现,在surfaceCreate中启动,在surfaceDestroy时停止,应当注意的是,在MySurfaceView中的surfaceDestroy中是有个线程退出的操作的,不过使用的是HandlerThread.quitSafely();和直接HandlerThread.quit()不同,quitSafely会消耗掉Handler中的消息,并且不会再接收新的消息和延时消息,处理完消息后停止才真正的quit.具体可参见源码注释
    /**
     * Quits the handler thread's looper safely.
     * <p>
     * Causes the handler thread's looper to terminate as soon as all remaining messages
     * in the message queue that are already due to be delivered have been handled.
     * Pending delayed messages with due times in the future will not be delivered.
     * </p><p>
     * Any attempt to post messages to the queue after the looper is asked to quit will fail.
     * For example, the {@link Handler#sendMessage(Message)} method will return false.
     * </p><p>
     * If the thread has not been started or has finished (that is if
     * {@link #getLooper} returns null), then false is returned.
     * Otherwise the looper is asked to quit and true is returned.
     * </p>
     *
     * @return True if the looper looper has been asked to quit or false if the
     * thread had not yet started running.
     */
    public boolean quitSafely() {
        Looper looper = getLooper();
        if (looper != null) {
            looper.quitSafely();
            return true;
        }
        return false;
    }
由于以上特性,在RadarView中,销毁操作应当放在super.surfaceDestroyed(holder);之前
属性动画部分已经实现,继续实现让属性动画带动扫描运动.
修改onScanDegreeChanged并添加getDegreePosition方法
    private void onScanDegreeChanged() {
        mColorPositionList.clear();
        mColorPositionList.add(new ColorPosition(getDegreePosition(mScanDegree), Color.WHITE));
        mColorPositionList.add(new ColorPosition(getDegreePosition(mScanDegree - 45), Color.argb(0x88, 0x00, 0xcc, 0x44)));
        mColorPositionList.add(new ColorPosition(getDegreePosition(mScanDegree - 225), mBackgroundCircleColor));
        mColorPositionList.add(new ColorPosition(getDegreePosition(mScanDegree - 225), Color.TRANSPARENT));
        mColorPositionList.add(new ColorPosition(getDegreePosition(mScanDegree - 359), Color.TRANSPARENT));
        Collections.sort(mColorPositionList, new Comparator<ColorPosition>() {
            @Override
            public int compare(ColorPosition o1, ColorPosition o2) {
                return o1.position - o2.position > 0f ? 1 : -1;
            }
        });
        refresh();
    }

    private float getDegreePosition(float scanDegree) {
        if (scanDegree < 0) {
            scanDegree = scanDegree + 360;
        } else if (scanDegree > 360) {
            scanDegree = scanDegree - 360;
        }
        float position = scanDegree / (float) 360;
        return position;
}这里根据mScanDegree更新了颜色值和位置的List数据,接下来需要做的急速根据这些更新的数据来实现扫描的旋转.
修改drawScanning方法如下
    private void drawScanning(Canvas canvas) {
        int[] colors;
        float[] positions;
        int size = mColorPositionList.size();
        if (size < 2) {
            return;
        }
        colors = new int[size];
        positions = new float[size];
        for (int i = 0; i < size; i++) {
            colors[i] = mColorPositionList.get(i).color;
            positions[i] = mColorPositionList.get(i).position;
        }
        SweepGradient gradient = new SweepGradient(mCenterX, mCenterY, colors, positions);
        mScanPaint.setShader(gradient);
        canvas.drawCircle(mCenterX, mCenterY, mRadius, mScanPaint);
    }
运行程序
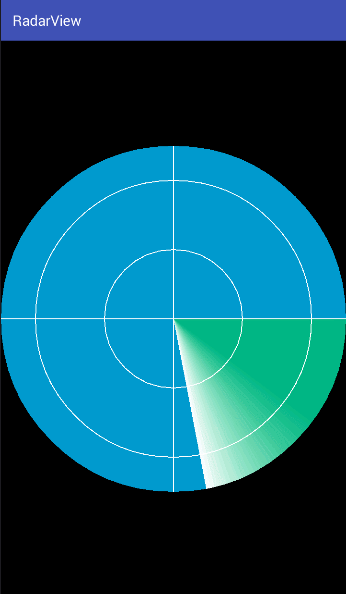
扫描动画动起来了,但是仔细看会发现在扫描到X正轴直线时会有断层,这是由于在mScanDegree变化时,生成的SweepGradient没有考虑首尾的颜色连接,为了消除上面的情况,需要增加两个混合首尾颜色值的颜色放在position 为0和position为1的地方,使颜色平滑过渡
添加两个用于获得首尾中间颜色的方法如下
    private int getMiddleColor(int startColor, int endColor, float percent) {
        int a = getMiddleValue(startColor >> 24 & 0xff, endColor >> 24 & 0xff, percent);
        int r = getMiddleValue(startColor >> 16 & 0xff, endColor >> 16 & 0xff, percent);
        int g = getMiddleValue(startColor >> 8 & 0xff, endColor >> 8 & 0xff, percent);
        int b = getMiddleValue(startColor & 0xff, endColor & 0xff, percent);
        return Color.argb(a, r, g, b);
    }

    private int getMiddleValue(int start, int end, float percent) {
        return (int) (start + (end - start) * percent);
}然后修改onScanDegreeChanged方法如下
    private void onScanDegreeChanged() {
        mColorPositionList.clear();
        mColorPositionList.add(new ColorPosition(getDegreePosition(mScanDegree), Color.WHITE));
        mColorPositionList.add(new ColorPosition(getDegreePosition(mScanDegree - 45), Color.argb(0x88, 0x00, 0xcc, 0x44)));
        mColorPositionList.add(new ColorPosition(getDegreePosition(mScanDegree - 225), mBackgroundCircleColor));
        mColorPositionList.add(new ColorPosition(getDegreePosition(mScanDegree - 225), Color.TRANSPARENT));
        mColorPositionList.add(new ColorPosition(getDegreePosition(mScanDegree - 359), Color.TRANSPARENT));
        Collections.sort(mColorPositionList, new Comparator<ColorPosition>() {
            @Override
            public int compare(ColorPosition o1, ColorPosition o2) {
                return o1.position - o2.position > 0f ? 1 : -1;
            }
        });
        ColorPosition start = mColorPositionList.get(mColorPositionList.size() - 1);
        ColorPosition end = mColorPositionList.get(0);
        int middleColor = getMiddleColor(start.color, end.color, (1 - start.position) / (1 + end.position - start.position));
        mColorPositionList.add(new ColorPosition(1f, middleColor));
        mColorPositionList.add(0, new ColorPosition(0f, middleColor));
        refresh();
    }
再运行程序
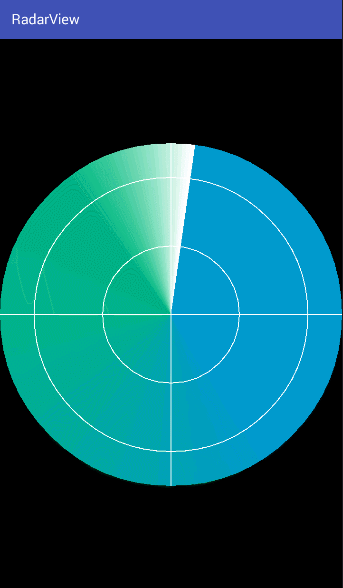
此时断层已经消失了,至此扫描雷达绘制完毕.