第四章学习笔记
一、线程
1、Java中线程的状态:
NEW:初始状态
RUNNABLE:运行状态
BLOCKED:阻塞状态
WAITING:等待状态
TIME_WAITING:超时等待状态
TERMINATED:终止状态
注意:将运行和就绪两个状态合并为运行状态。
阻塞状态是线程进入同步锁(synchronized修饰的方法或代码块)时的状态,但是阻塞在java.concurrent包中的Lock接口的线程状态是等待状态。
2、Daemon线程
是一种支持型线程,主要用作程序中后台调度以及支持性工作。当JVM中不存在非Daemon线程的时候,JVM将会退出。可以调用Thread.setDaemon(true)设置线程为Daemon线程。
public class Daemon {
    public static void main(String[] args){
        Thread thread=new Thread(new DaemonRunner(),"DaemonRunner");
        thread.setDaemon(true);
        thread.start();
    }
    static class DaemonRunner implements Runnable{
        @Override
        public void run(){
            try{
                Thread.sleep(10);
            } catch (InterruptedException e) {
                //
            } finally {
                System.out.println("DaemonThread finally run.");
            }
        }
    }
}
//运行后,没有任何输出
//原因:main线程(非Daemon线程)在启动了线程DaemonRunner之后随着main方法执行完毕而终止,JVM中没有非Daemon线程,JVM退出
因此,在构建Daemon线程时,不能依靠finally块中的内容来确保执行关闭或清理资源的逻辑。
3、线程的操作:启动和终止线程
在启动之前构造线程实例对象,构造时需要提供线程的属性(所属的线程组、线程的优先级、是否是Daemon线程等)。
private void init(ThreadGroup g, Runnable target, String name,
                      long stackSize, AccessControlContext acc,
                      boolean inheritThreadLocals) {
        if (name == null) {
            throw new NullPointerException("name cannot be null");
        }

        this.name = name;

        Thread parent = currentThread();//当前线程是该线程的父线程
        SecurityManager security = System.getSecurityManager();
        if (g == null) {
            if (security != null) {
                g = security.getThreadGroup();
            }
            if (g == null) {
                g = parent.getThreadGroup();
            }
        }
        g.checkAccess();
        if (security != null) {
            if (isCCLOverridden(getClass())) {
                security.checkPermission(SUBCLASS_IMPLEMENTATION_PERMISSION);
            }
        }

        g.addUnstarted();

        this.group = g;
        //将daemon、priority设置为父线程的对应属性
        this.daemon = parent.isDaemon();
        this.priority = parent.getPriority();
        if (security == null || isCCLOverridden(parent.getClass()))
            this.contextClassLoader = parent.getContextClassLoader();
        else
            this.contextClassLoader = parent.contextClassLoader;
        this.inheritedAccessControlContext =
                acc != null ? acc : AccessController.getContext();
        this.target = target;
        setPriority(priority);
        //将父线程的InheritThreadLocal复制
        if (inheritThreadLocals && parent.inheritableThreadLocals != null)
            this.inheritableThreadLocals =
                ThreadLocal.createInheritedMap(parent.inheritableThreadLocals);
        this.stackSize = stackSize;
        //分配一个线程ID
        tid = nextThreadID();
}至此,一个线程对象就初始化好了,在堆内存中等待运行。
启动线程:初始化完成后,调用start()启动线程。
中断线程:调用该线程的interrupt()对其中断;调用静态方法Thread.interrupted()对当前线程的中断标识位进行复位。
示例:
import java.util.concurrent.TimeUnit;

public class Interrupted {
    public static void main(String[] args) throws Exception{
        //sleepThread不停的尝试睡眠
        Thread sleepThread=new Thread(new SleepRunner(),"SleepThread");
        sleepThread.setDaemon(true);
        //busyThread不停的运行
        Thread busyThread=new Thread(new BusyRunner(),"BusyThread");
        busyThread.setDaemon(true);
        sleepThread.start();
        busyThread.start();
        TimeUnit.SECONDS.sleep(5);
        sleepThread.interrupt();
        busyThread.interrupt();
        System.out.println("SleepThread interrupted is "+sleepThread.isInterrupted());
        System.out.println("BusyThread interrupted is "+busyThread.isInterrupted());
        //防止sleepThread、busyThread立刻退出
        Thread.sleep(2);
    }
    static class SleepRunner implements Runnable{
        @Override
        public void run(){
            while(true){
                try {
                    Thread.sleep(10);
                } catch (InterruptedException e) {
                    e.printStackTrace();
                }
            }
        }
    }
    static class BusyRunner implements Runnable {
        @Override
        public void run() {
            while (true) {
            }
        }
    }
}

//输出结果
//java.lang.InterruptedException: sleep interrupted
    at java.lang.Thread.sleep(Native Method)
    ....
//SleepThread interrupted is false
//BusyThread interrupted is true
从结果可以看出,抛出InterruptedException的线程SleepThread,其中断标识位被清除了,而一直忙碌运作的线程BusyThread,中断标识位没有被清除。
暂停(suspend())、恢复(resume())、停止(stop())这些线程的操作已经过期!
4、线程间的通信
4.1 volatile关键字:让所有的线程感知到变化,不可过多使用,会降低程序执行的效率
4.2 synchronized关键字:修饰方法或同步块,主要确保多个线程在同一时刻,只能有一个线程处于方法或者同步块中,保证了线程对变量的可见性和排他性。
监视器(Monitor)、同步队列(synchronized queue)和被synchronized保护的对象(Object)的关系:
任意线程对Object的访问,首先要获取其的Monitor。若获取失败,则线程进入同步队列,线程的状态变为BLOCKED。当Object的前驱(获得锁的线程)释放锁,则此释放操作唤醒阻塞在同步队列中的线程,使其重新尝试对Monitor的获取。
4.3 等待/通知机制
等待/通知的相关方法:
notify():通知在一个对象上等待的线程,使其从wait()方法返回,而返回的前提是该线程获取到了对象的锁
notifyAll():通知所有等待在对象上的线程
wait():使线程进入WAITING状态,只有其他线程的通知或被状态才会返回,调用wait()方法后,会释放对象的锁
wait(long):超时等待一段时间(参数是毫秒)若没有通知就超时返回
wait(long,int):对超时返回的更细粒度的控制,可以达到纳秒
示例:
package ThreadDemo;

import java.text.SimpleDateFormat;
import java.util.Date;
import java.util.concurrent.TimeUnit;

public class WaitNotify {
    static boolean flag=true;
    static Object lock=new Object();
    public static void main(String[] args) throws Exception{
        Thread waitThread =new Thread(new Wait(),"WaitThread");
        waitThread.start();
        TimeUnit.SECONDS.sleep(1);
        Thread notifyThread=new Thread(new Notify(),"NotifyThread");
        notifyThread.start();
    }
    static class Wait implements Runnable{
        public void run(){
            synchronized (lock){
                while(flag){
                    try {
                        System.out.println(Thread.currentThread() + "flag is true.wait @ " +
                                new SimpleDateFormat("HH:mm:ss").format(new Date()));
                        lock.wait();
                    }catch (InterruptedException e){
                    }
                }
                //条件满足时,完成工作
                System.out.println(Thread.currentThread()+"flag is false.running@ "+
                new SimpleDateFormat("HH:mm:ss").format(new Date()));
            }
        }
    }
    static class Notify implements Runnable{
        public void run(){
            synchronized (lock){
                System.out.println(Thread.currentThread()+"hold lock.notify @ "+
                new SimpleDateFormat("HH:mm:ss").format(new Date()));
                lock.notifyAll();
                flag=false;
                try {
                    Thread.sleep(5);
                } catch (InterruptedException e) {
                    e.printStackTrace();
                }
            }
            //再次加锁
            synchronized (lock){
                System.out.println(Thread.currentThread()+"hold lock.notify @ "+
                        new SimpleDateFormat("HH:mm:ss").format(new Date()));
                try {
                    Thread.sleep(5);
                } catch (InterruptedException e) {
                    e.printStackTrace();
                }
            }
        }
    }
}
//输出结果:
//Thread[WaitThread,5,main]flag is true.wait @ 22:56:59
//Thread[NotifyThread,5,main]hold lock.notify @ 22:57:00
//Thread[NotifyThread,5,main]hold lock.notify @ 22:57:00
//Thread[WaitThread,5,main]flag is false.running@ 22:57:00
//第三、四行输出可能会互换。
说明:
1)wait()、notify()、notifyAll()需要先调用对象的锁
2)调用wait()方法后,线程状态由RUNNING变为WAITING,并将线程放入对象的等待队列
3)notify()、notifyAll()调用后,等待线程不会从wait()返回,需要调用notify()、notifyAll()的线程释放锁后,等待线程才会从wait()返回
4)notify()将一个等待线程从等待队列中移到同步队列中,而notifyAll()是将等待队列中所有的线程移到同步队列中,被移动的线程从WAITING变为BLOCKED
5)从wait()返回的前提是获得了调用对象的锁。
等待/通知的经典范式:
等待方:
1)获取对象的锁
2)如果条件不满足,那么调用对象的wait()方法,被通知后仍要检查条件
3)条件满足则执行对应的逻辑,伪代码如下:synchronized(对象){ while(条件不满足){ 对象.wait(); } 对应的处理逻辑 }通知方:
1)获得对象的锁
2)改变条件
3)通知所有等待在对象的线程,伪代码如下:synchronized(对象){ 改变条件 对象.notifyAll(); }
4.4 管道输入/输出流
用于线程间的数据传输,传输的媒介是内存。
具体实现有四种:PipedOutputStream、PipedInputStream(面向字节)、PipedReader和PipedWriter(面向字符)
示例:
import java.io.IOException;
import java.io.PipedReader;
import java.io.PipedWriter;

public class Piped {
    public static void main(String[] args) throws Exception{
        PipedWriter out=new PipedWriter();
        PipedReader in=new PipedReader();
        out.connect(in);
        Thread printThread=new Thread(new Print(in),"printThread");
        printThread.start();
        int receive=0;
        try{
            while((receive=System.in.read())!=-1){
                out.write(receive);
            }
        }finally {
            out.close();
        }
    }
    static class Print implements Runnable{
        private PipedReader in;
        public Print(PipedReader in){
            this.in=in;
        }
        public void run(){
            int receive=0;
            try{
                while((receive=in.read())!=-1){
                    System.out.print((char)receive);
                }
            }catch (IOException ex){

            }
        }
    }
}
//运行时输入一行,就原样输出一行
必须进行绑定。
4.5 Thread.join():
线程A执行了Thread.join(),其含义是:当前线程A等待thread线程终止后才从thread.join()返回。还有两个具备超时特性的方法。
ThreadLocal,是线程变量,一个以ThreadLocal对象为键、任意对象为值的存储结构。这个结构被附带在线程上,即一个线程可以根据一个ThreadLocal对象查询到绑定在这个线程上的一个值。示例:
import java.util.concurrent.TimeUnit;

public class Profiler {
    private static final ThreadLocal<Long> TIME_THREADLOCAL=new ThreadLocal<Long>(){
        protected Long initialValue(){
            return System.currentTimeMillis();
        }
    };
    public static final void begin(){
        TIME_THREADLOCAL.set(System.currentTimeMillis());
    }
    //end()方法是返回从begin()方法调用开始到end()方法被调用时的时间差,单位是毫秒
    public static final long end(){
        return System.currentTimeMillis()-TIME_THREADLOCAL.get();
    }
    public static void main(String[] args) throws Exception{
        Profiler.begin();
        TimeUnit.SECONDS.sleep(1);
        System.out.println("Cost: "+Profiler.end()+" mills");
    }
}
//输出结果:
//Cost: 1003 mills
//(每次运行结果不同)Cost: 1001 mills
Profiler可以被复用在方法调用耗时统计的功能上,在方法入口时执行begin方法,在方法调用后执行end()方法。在AOP中,可以在方法调用前的切入点执行begin()方法,在方法调用后执行end()。
二、线程应用的实例
1、等待超时模式
场景:调用一个方法时等待一段时间(给定的一个时间段),如果该方法在给定的时间段之内得到结果,那么返回结果;如果超时返回默认结果
对经典的等待/通知范式改变如下:
假设超时时间段是T,那么推出时间now+T之后就会超时。
定义变量如下:
-等待持续时间:REMAINING=T
-超时时间:FUTURE=now+T
仅需要wait(REMAINING)即可,在wait(REMAINING) 返回之后会将执行:REMAINING=FUTURE-now。如果REMAINING小于等于0,表示已经超时,直接退出,否则将执行wait(REMAINING)。
伪代码如下:
public synchronized Object get(long mills) throws InterruptedException{
   long future=System.currentTimeMills()+mills;
   long remaining=mills;
   //当超时大于0并且result返回值不满足要求
   while((result==null)&&remaining>0){
       wait(remaining);
       remaining=future-System.currentTimeMills();
   }
   return result;
}
2、一个简单的数据库连接池示例
使用等待超时模式来构造一个简单的数据库连接池,在示例中模拟从连接池中获取、使用和释放连接的过程,而客户端获取连接的过程被设定为等待超时的模式,也就是在1000毫秒内如果无法获取到可用连接,将会返回给客户端一个null。设定连接池的大小为10个,然后通过调节客户端的线程数来模拟无法获取连接的场景。
连接池:通过构造函数初始化连接的最大上限,通过一个双向队列来维护连接,调用方需要先调用fetchConnection(long)方法来指定在多少毫秒内超时获取连接;
当连接使用完成后,需要调用releaseConnection(Connection)方法将连接放回线程池。
示例如:
public class ConnectionPoolTest {
    static ConnectionPool pool=new ConnectionPool(10);
    //保证所有ConnecRunner能够同时开始
    static CountDownLatch start=new CountDownLatch(1);
    //main线程将会等待所有ConnectionRunner结束后才能继续执行
    static CountDownLatch end;

    public static void main(String[] args)throws Exception{
        //线程数量,可以修改线程数量进行观察
        int threadCount=20;
        end=new CountDownLatch(threadCount);
        int count=20;
        AtomicInteger got=new AtomicInteger();
        AtomicInteger notGot=new AtomicInteger();
        for(int i=0;i<threadCount;i++){
            Thread thread=new Thread(new ConnectionRunner(count,got,notGot),
                    "ConnectionRunnerThread");
            thread.start();
        }
        start.countDown();
        end.await();
        System.out.println("total invoke:"+(threadCount*count));
        System.out.println("got connection:"+got);
        System.out.println("not got connection:"+notGot);
    }
    static class ConnectionRunner implements Runnable{
        int count;
        AtomicInteger got;
        AtomicInteger notGot;
        public ConnectionRunner(int count,AtomicInteger got,AtomicInteger notGot){
            this.count=count;
            this.got=got;
            this.notGot=notGot;
        }
        public void run(){
            try{
                start.await();
            }catch (Exception ex){

            }
            while(count>0){
                try{
                    //从线程池中获取连接,如果1000ms内无法获取到,将会返回null
                    //分别统计连接获取的数量got和为获取到的数量notGot
                    Connection connection=pool.fetchConnection(1000);
                    if(connection!=null){
                        try{
                            connection.createStatement();
                            connection.commit();
                        }finally {
                            pool.releaseConnection(connection);
                            got.incrementAndGet();
                        }
                    }else{
                        notGot.incrementAndGet();
                    }
                }catch (Exception ex){

                }finally {
                    count--;
                }
            }
            end.countDown();
        }
    }
}
//运行结果:
//threadCount=10时   total invoke:200
//got connection:200
//not got connection:0
//threadCount=20时   total invoke:400
//got connection:395
//not got connection:5
//threadCount=30时   total invoke:600
//got connection:553
//not got connection:47
//threadCount=40时   total invoke:800
//got connection:699
//not got connection:101
//threadCount=50时   total invoke:1000
//got connection:827
//not got connection:173

public class ConnectionPool {
    private LinkedList<Connection> pool=new LinkedList<Connection>();

    public ConnectionPool(int initialSize){
        if(initialSize>0){
            for(int i=0;i<initialSize;i++){
                pool.addLast(ConnectionDriver.createConnection());
            }
        }
    }
    public void releaseConnection(Connection connection){
        if(connection!=null){
            synchronized (pool){
                //连接释放后需要进行通知,这样其他消费者能够感知到连接池中已经归还了一个连接
                pool.addLast(connection);
                pool.notifyAll();
            }
        }
    }
    //在mills内无法获取到连接,将会返回null
    public Connection fetchConnection(long mills)throws  InterruptedException{
        synchronized (pool){
            //完全超时
            if(mills<=0){
                while(pool.isEmpty()){
                    pool.wait();
                }
                return pool.removeFirst();
            }else{
                long future=System.currentTimeMillis()+mills;
                long remaining=mills;
                while(pool.isEmpty()&&remaining>0){
                    pool.wait(remaining);
                    remaining=future-System.currentTimeMillis();
                }
                Connection result=null;
                if(!pool.isEmpty()){
                    result=pool.removeFirst();
                }
                return result;
            }
        }
    }
}

public class ConnectionDriver {
    static class ConnectionHandler implements InvocationHandler{
        public Object invoke(Object proxy,Method method,Object[] args)throws Throwable{
            if(method.getName().equals("commit")){
                TimeUnit.MILLISECONDS.sleep(100);
            }
            return null;
        }
    }
    //创建一个Connection的代理,在commits时休眠100毫秒
    public static final Connection createConnection(){
        return (Connection) Proxy.newProxyInstance(ConnectionDriver.class.getClassLoader(),
                new Class<?>[] {Connection.class},new ConnectionHandler());
    }
}
也就是说,在资源获取的场景中,针对昂贵资源的获取都应该加以超时限制。
3、线程池技术及其示例
解决的问题:对于服务端的程序,经常面对的是客户端传入的短小(执行时间短、工作内容较为单一)任务,需要服务端快速处理并返回结果。如果服务端每次接受到一个任务,创建一个线程,然后进行执行,这在原型阶段是个不错的选择,但是面对成千上万的任务递交进服务器时,如果还是采用一个任务一个线程的方式,那么将会创建数以万记的线程,这不是一个好的选择。因为这会使操作系统频繁的进行线程上下文切换,无故增加系统的负载,而线程的创建和消亡都是需要耗费系统资源的,也无疑浪费了系统资源。
线程池:预先创建了若干数量的线程,并且不能由用户直接对线程的创建进行控制,在这个前提下重复使用固定或较为固定数目的线程来完成任务的执行。
线程池的好处是:
1)消除了频繁创建和消亡线程的系统资源开销;
2)面对过量任务的提交能够平缓的劣化。
示例如下:
public interface ThreadPool<Job extends Runnable> {
    // 执行一个Job,这个Job需要实现Runnable
    void execute(Job job);//将job提交到线程池执行
    // 关闭线程池
    void shutdown();
    // 增加工作者线程
    void addWorkers(int num);
    // 减少工作者线程
    void removeWorker(int num);
    // 得到正在等待执行的任务数量
    int getJobSize();
}
//实现这个接口
public class DefaultThreadPool<Job extends Runnable> implements ThreadPool<Job> {
    // 线程池最大限制数
    private static final int    MAX_WORKER_NUMBERS    = 10;
    // 线程池默认的数量
    private static final int    DEFAULT_WORKER_NUMBERS = 5;
    // 线程池最小的数量
    private static final int    MIN_WORKER_NUMBERS    = 1;
    // 这是一个工作列表,将会向里面插入工作
    private final LinkedList<Job> jobs = new LinkedList<Job>();
    // 工作者列表
    private final List<Worker> workers    = Collections.synchronizedList(new
            ArrayList<Worker>());
    // 工作者线程的数量
    private int    workerNum    = DEFAULT_WORKER_NUMBERS;
    // 线程编号生成
    private AtomicLong threadNum    = new AtomicLong();
    public DefaultThreadPool() {
        initializeWokers(DEFAULT_WORKER_NUMBERS);
    }
    public DefaultThreadPool(int num) {
        workerNum = num > MAX_WORKER_NUMBERS?MAX_WORKER_NUMBERS : num < MIN_WORKER_NUMBERS?MIN_WORKER_NUMBERS : num;
        initializeWokers(workerNum);
    }
    public void execute(Job job) {
        if (job != null) {
            // 添加一个工作,然后进行通知
            synchronized (jobs) {
                jobs.addLast(job);
                jobs.notify();//比使用notifyAll()获得更小的开销(避免将等待队列中的线程全部移动到阻塞队列中)
            }
        }
    }
    //调用execute(Job)方法时,会不断地向任务列表jobs中添加job
    public void shutdown() {
        for (Worker worker : workers) {
            worker.shutdown();
        }
    }
    public void addWorkers(int num) {
        synchronized (jobs) {
            // 限制新增的Worker数量不能超过最大值
            if (num + this.workerNum > MAX_WORKER_NUMBERS) {
                num = MAX_WORKER_NUMBERS - this.workerNum;
            }
            initializeWokers(num);
            this.workerNum += num;
        }
    }
    public void removeWorker(int num) {
        synchronized (jobs) {
            if (num >= this.workerNum) {
                throw new IllegalArgumentException("beyond workNum");
            }
            // 按照给定的数量停止Worker
            int count = 0;
            while (count < num) {
                Worker worker = workers.get(count);
                if (workers.remove(worker)) {
                    worker.shutdown();
                    count++;
                }
            }
            this.workerNum -= count;
        }
    }
    public int getJobSize() {
        return jobs.size();
    }
    // 初始化线程工作者
    private void initializeWokers(int num) {
        for (int i = 0; i < num; i++) {
            Worker worker = new Worker();
            workers.add(worker);
            Thread thread = new Thread(worker, "ThreadPool-Worker-" + threadNum.
                    incrementAndGet());
            thread.start();
        }
    }
    // 工作者,负责消费任务
    class Worker implements Runnable {
        // 是否工作
        private volatile boolean    running    = true;
        public void run() {
            while (running) {
                Job job = null;
                synchronized (jobs) {
                    // 如果工作者列表是空的,那么就wait
                    while (jobs.isEmpty()) {
                        try {
                            jobs.wait();
                        } catch (InterruptedException ex) {
                            // 感知到外部对WorkerThread的中断操作,返回
                            Thread.currentThread().interrupt();
                            return;
                        }
                    }
                    // 取出一个Job
                    job = jobs.removeFirst();
                }
                if (job != null) {
                    try {
                        job.run();
                    } catch (Exception ex) {
                        // 忽略Job执行中的Exception
                    }
                }
            }
        }
        //工作者线程会不断地从jobs上取出一个Job进行执行,当jobs为空时,工作者线程进入等待状态
        public void shutdown() {
            running = false;
        }
    }
}线程池的本质就是使用了一个线程安全的工作队列连接工作者线程和客户端线程,客户端线程将任务放入工作队列后便返回,而工作者线程则不断地从工作队列上取出工作并执行。当工作队列为空时,所有的工作者线程均等待在工作队列上,当有客户端提交了一个任务之后会通知任意一个工作者线程,随着大量的任务被提交,更多的工作者线程会被唤醒。
常用的Java Web服务器,如Tomcat、Jetty,在其处理请求的过程中都使用到了线程池技术。
4、一个基于线程池技术的简单Web服务器
如果Web服务器是单线程的,那么多线程的浏览器没有用,因为服务器还是一个一个顺序处理请求的。
使用前一节中的线程池来构造一个简单的Web服务器,这个Web服务器用来处理HTTP请求,目前只能处理简单的文本和JPG图片内容。这个Web服务器使用main线程不断地接受客户端Socket的连接,将连接以及请求提交给线程池处理,这样使得Web服务器能够同时处理多个客户端请求
示例如下:
package webServiceDemo;
import threadpool.DefaultThreadPool;
import threadpool.ThreadPool;
import java.io.*;
import java.net.ServerSocket;
import java.net.Socket;
public class SimpleHttpServer {
// 处理HttpRequest的线程池
static ThreadPool<HttpRequestHandler> threadPool = new DefaultThreadPool<HttpRequestHandler>(1);
// SimpleHttpServer的根路径
static String basePath;
static ServerSocket serverSocket;
// 服务监听端口
static int port = 8080;
public static void setPort(int port) {
if (port > 0) {
SimpleHttpServer.port = port;
}
}
public static void setBasePath(String basePath) {
if (basePath != null && new File(basePath).exists() && new File(basePath).
isDirectory()) {
SimpleHttpServer.basePath = basePath;
}
}
// 启动SimpleHttpServer
public static void start() throws Exception {
serverSocket = new ServerSocket(port);
Socket socket = null;
while ((socket = serverSocket.accept()) != null) {
// 接收一个客户端Socket,生成一个HttpRequestHandler,放入线程池执行
threadPool.execute(new HttpRequestHandler(socket));
}
serverSocket.close();
}
static class HttpRequestHandler implements Runnable {
private Socket socket;
public HttpRequestHandler(Socket socket) {
this.socket = socket;
}
@Override
public void run() {
String line = null;
BufferedReader br = null;
BufferedReader reader = null;
PrintWriter out = null;
InputStream in = null;
try {
reader = new BufferedReader(new InputStreamReader(socket.getInputStream()));
String header = reader.readLine();
// 由相对路径计算出绝对路径
String filePath = basePath + header.split(" ")[1];
out = new PrintWriter(socket.getOutputStream());
// 如果请求资源的后缀为jpg或者ico,则读取资源并输出
if (filePath.endsWith("jpg") || filePath.endsWith("ico")) {
in = new FileInputStream(filePath);
ByteArrayOutputStream baos = new ByteArrayOutputStream();
int i = 0;
while ((i = in.read()) != -1) {
baos.write(i);
}
byte[] array = baos.toByteArray();
out.println("HTTP/1.1 200 OK");
out.println("Server: Molly");
out.println("Content-Type: image/jpeg");
out.println("Content-Length: " + array.length);
out.println("");
socket.getOutputStream().write(array, 0, array.length);
} else {
br = new BufferedReader(new InputStreamReader(new
FileInputStream(filePath)));
out = new PrintWriter(socket.getOutputStream());
out.println("HTTP/1.1 200 OK");
out.println("Server: Molly");
out.println("Content-Type: text/html; charset=UTF-8");
out.println("");
while ((line = br.readLine()) != null) {
out.println(line);
}
}
out.flush();
} catch (Exception ex) {
out.println("HTTP/1.1 500");
out.println("");
out.flush();
} finally {
close(br, in, reader, out, socket);
}
}
}
// 关闭流或者Socket
private static void close(Closeable... closeables) {
if (closeables != null) {
for (Closeable closeable : closeables) {
try {
closeable.close();
} catch (Exception ex) {
}
}
}
}
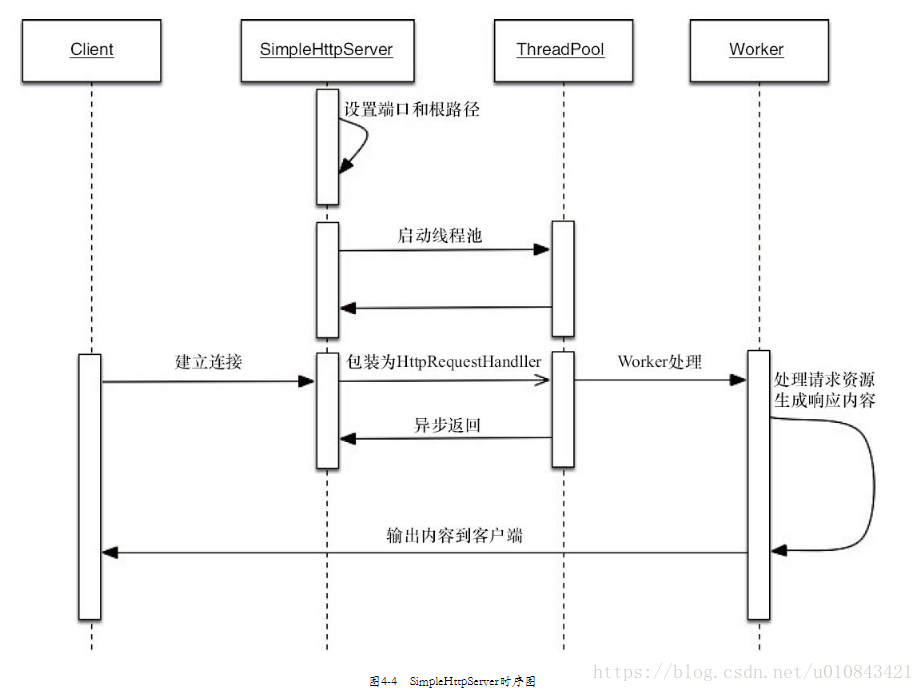
}该Web服务器处理用户请求的时序图如:
测试页面代码:
<html>
    <head>
        <title>测试页面</title>
    </head>
    <body >
        <h1>第一张图片</h1>
        <img src="1.jpg"  />
        <h1>第二张图片</h1>
        <img src="2.jpg"  />
        <h1>第三张图片</h1>
        <img src="3.jpg"  />
    </body>
</html>
将SimpleHttpServer的根目录设定到该HTML页面所在目录,并启动SimpleHttpServer,通过Apache HTTP server benchmarking tool(版本2.3)来测试不同线程数下,SimpleHttpServer的吞吐量表现。