目录
第一步:安装必要的包WorldCloud(安装好并且没有出错的可跳过这一步)
第一步:安装必要的包WorldCloud(安装好并且没有出错的可跳过这一步)
pip install wordcloud如果出现错误,那么看看是什么错误:
- 提示pip“不是内部命令”,那就先安装pip吧;
- 提示其他“某某某 is required”,那么意思就是“某某某”是安装worldcloud时必须安装的东西,缺什么就安装什么就好了;
- 提示其他无法安装的问题,那么试试下面这个办法:
--安装whl文件
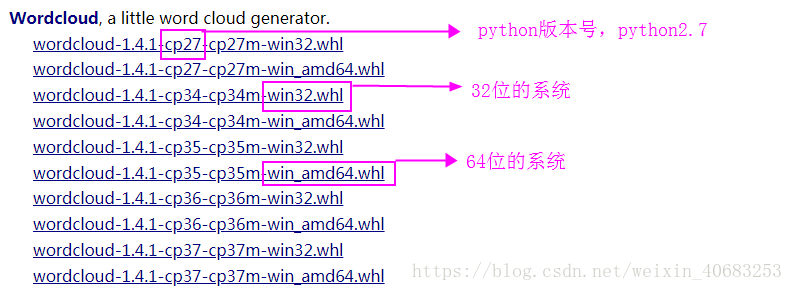
找到对应的版本下载就好,我电脑是64位的,但是下载的64的包也报错,但是下载的32位的包却没有报错,给参考。
--下载完成以后打开cmd,安装wheel 执行命令
pip install wheel--安装完wheel之后,安装whl文件,install后面跟的一大串其实就是你下载的worldcloud的文件名
pip install wordcloud-1.3.3-cp27-cp27m-win32.whl--最后再pip一次就好
pip install wordcloud第二步:准备文件,词云图的图片和文章,按照自己喜好准备吧
我准备的是罗伊·克里夫特的《爱》,很喜欢,来一句感受一下:
I love you,
Not only for what you are,
But for what I am
When I am with you.
第三步:Python实现-源码
from os import path
from PIL import Image
import numpy as np
import matplotlib.pyplot as plt
from wordcloud import WordCloud, STOPWORDS

# 读取本地文件
d = 'F:\huanghaixia'
text = open(path.join(d, 'test.txt')).read()#读取文章
test_mask = np.array(Image.open(path.join(d, "lover.png")))#读取背景图片

#设置
stopwords = set(STOPWORDS)
stopwords.add("end")#设置结束字符
wc = WordCloud(background_color="black", max_words=9999, mask=test_mask,
               stopwords=stopwords)#设置背景颜色是黑色,最大字符数是9999
wc.generate(text)

# 画词云图
plt.imshow(wc, interpolation='bilinear')
plt.axis("off")

#词云图的背景图,即原图。可以选择不展示
plt.figure()
plt.imshow(test_mask, cmap=plt.cm.gray, interpolation='bilinear')
plt.axis("off")


plt.show()

#存储
wc.to_file(path.join(d, "love.png"))
词云图:
