截止日前2017-08-27, ConstraintLayout的版本为1.0.2
compile ‘com.android.support.constraint:constraint-layout:1.0.2’
也许你需要先了解一下ConstraintLayout
一些xml属性的归纳
相对位置约束属性
layout_constraintLeft_toLeftOf
layout_constraintLeft_toRightOf
layout_constraintRight_toLeftOf
layout_constraintRight_toRightOf
layout_constraintTop_toTopOf
layout_constraintTop_toBottomOf
layout_constraintBottom_toTopOf
layout_constraintBottom_toBottomOf
layout_constraintBaseline_toBaselineOf
layout_constraintStart_toEndOf
layout_constraintStart_toStartOf
layout_constraintEnd_toStartOf
layout_constraintEnd_toEndOf
Margins约束属性
android:layout_marginStart
android:layout_marginEnd
android:layout_marginLeft
android:layout_marginTop
android:layout_marginRight
android:layout_marginBottom
<!--当约束目标被设置Gone时, 使用这个属性顶替-->
layout_goneMarginStart
layout_goneMarginEnd
layout_goneMarginLeft
layout_goneMarginTop
layout_goneMarginRight
layout_goneMarginBottom如何横向居中?
<android.support.constraint.ConstraintLayout ...>
             <Button android:id="@+id/button" ...
                 app:layout_constraintLeft_toLeftOf="parent"
                 app:layout_constraintRight_toRightOf="parent/>
         </>
<!--居中是左右50%, 可以通过下面的属性, 调整这个比例-->
layout_constraintHorizontal_bias
layout_constraintVertical_bias等高属性
<Button android:layout_width="wrap_content"
                   android:layout_height="0dp"
                   app:layout_constraintDimensionRatio="1:1" />
<!--默认是W:H 你也可以指定为 H:W-->
<Button android:layout_width="0dp"
android:layout_height="0dp"
app:layout_constraintDimensionRatio="H,16:9"
app:layout_constraintBottom_toBottomOf="parent"
app:layout_constraintTop_toTopOf="parent"/>Chain 链
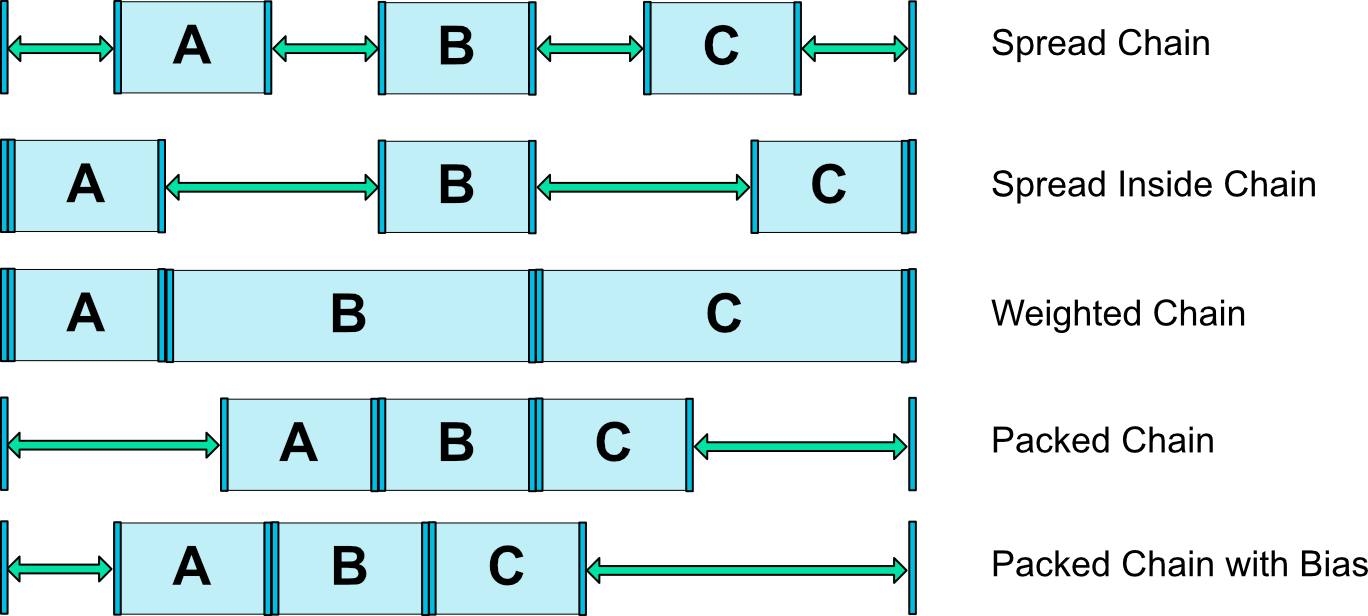
CHAIN_SPREAD -- the elements will be spread out (default style)
Weighted chain -- in CHAIN_SPREAD mode, if some widgets are set to MATCH_CONSTRAINT, they will split the available space
CHAIN_SPREAD_INSIDE -- similar, but the endpoints of the chain will not be spread out
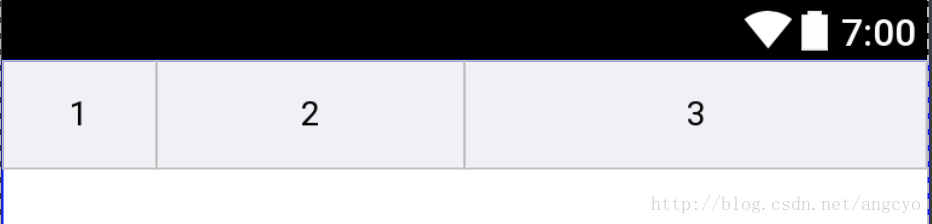
CHAIN_PACKED -- the elements of the chain will be packed together. The horizontal or vertical bias attribute of the child will then affect the positioning of the packed elements1:使用ConstraintLayout布局出LinearLayout的效果
水平方向和竖直方向都有各自属性对应, 使用对应的属性, 就可以横竖切换
<!--所有app命名空间开头的属性, 都是必不可少的.-->
<?xml version="1.0" encoding="utf-8"?>
<android.support.constraint.ConstraintLayout
    xmlns:android="http://schemas.android.com/apk/res/android"
    xmlns:app="http://schemas.android.com/apk/res-auto"
    android:layout_width="match_parent"
    android:layout_height="match_parent">

    <com.angcyo.uidemo.layout.demo.view.AutoHideButton
        android:id="@+id/button1"
        android:layout_width="wrap_content"
        android:layout_height="wrap_content"
        android:text="Button1"
        app:layout_constraintHorizontal_chainStyle="packed"
        app:layout_constraintLeft_toLeftOf="parent"
        app:layout_constraintRight_toLeftOf="@+id/button2"/>

    <com.angcyo.uidemo.layout.demo.view.AutoHideButton
        android:id="@+id/button2"
        android:layout_width="wrap_content"
        android:layout_height="wrap_content"
        android:text="Button2"
        app:layout_constraintLeft_toRightOf="@+id/button1"
        app:layout_constraintRight_toLeftOf="@+id/button3"/>

    <com.angcyo.uidemo.layout.demo.view.AutoHideButton
        android:id="@+id/button3"
        android:layout_width="wrap_content"
        android:layout_height="wrap_content"
        android:text="Button3"
        app:layout_constraintLeft_toRightOf="@id/button2"
        app:layout_constraintRight_toLeftOf="parent"/>

</android.support.constraint.ConstraintLayout>
效果图:

1.1:如何实现宽度平分?
<!--需要参与平分计算的View android:layout_width必须=0dp-->
<?xml version="1.0" encoding="utf-8"?>
<android.support.constraint.ConstraintLayout
    xmlns:android="http://schemas.android.com/apk/res/android"
    xmlns:app="http://schemas.android.com/apk/res-auto"
    android:layout_width="match_parent"
    android:layout_height="match_parent">

    <com.angcyo.uidemo.layout.demo.view.AutoHideButton
        android:id="@+id/button1"
        android:layout_width="0dp"
        android:layout_height="wrap_content"
        android:text="Button1Button1"
        app:layout_constraintHorizontal_chainStyle="spread"
        app:layout_constraintLeft_toLeftOf="parent"
        app:layout_constraintRight_toLeftOf="@+id/button2"/>

    <com.angcyo.uidemo.layout.demo.view.AutoHideButton
        android:id="@+id/button2"
        android:layout_width="0dp"
        android:layout_height="wrap_content"
        android:text="222222Button2"
        app:layout_constraintLeft_toRightOf="@+id/button1"
        app:layout_constraintRight_toLeftOf="@+id/button3"/>

    <com.angcyo.uidemo.layout.demo.view.AutoHideButton
        android:id="@+id/button3"
        android:layout_width="0dp"
        android:layout_height="wrap_content"
        android:text="Button3"
        app:layout_constraintLeft_toRightOf="@id/button2"
        app:layout_constraintRight_toRightOf="parent"/>

</android.support.constraint.ConstraintLayout>
效果图
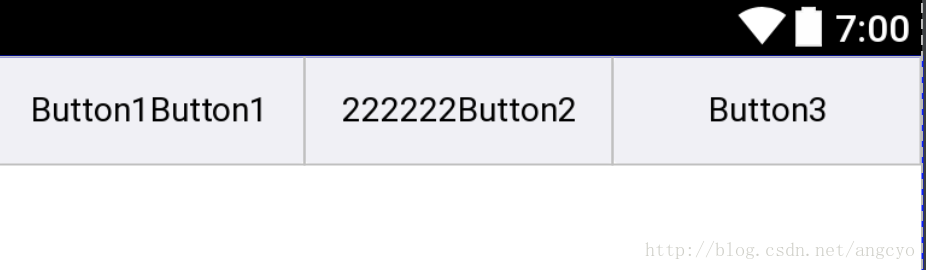
你也可以用过app:layout_constraintHorizontal_weight="3"属性, 控制比例
2:使用ConstraintLayout布局出RelativeLayout的效果
layout_constraintLeft_toLeftOf
layout_constraintLeft_toRightOf
layout_constraintRight_toLeftOf
layout_constraintRight_toRightOf
layout_constraintTop_toTopOf
layout_constraintTop_toBottomOf
layout_constraintBottom_toTopOf
layout_constraintBottom_toBottomOf
layout_constraintBaseline_toBaselineOf
layout_constraintStart_toEndOf
layout_constraintStart_toStartOf
layout_constraintEnd_toStartOf
layout_constraintEnd_toEndOf
有这些属性, 相对布局的效果 分分钟就可以模仿出来.
未完待续….
联系作者
请使用QQ扫码加群, 小伙伴们在等着你哦!

关注我的公众号, 每天都能一起玩耍哦!