Scrapy的安装请参见:Python3 --- Scrapy安装
一、创建Scrapy项目
通过如下命令,创建Scrapy项目:
scrapy startproject mySpider项目创建完成后,目录结构如下:
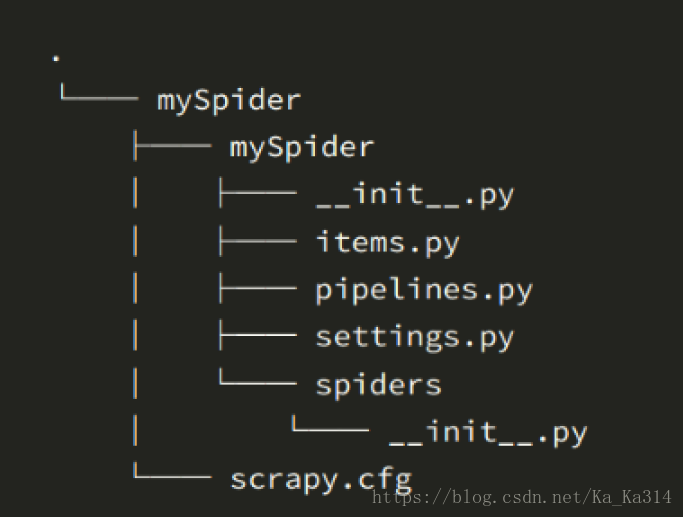
目录说明:
- scrapy.cfg :项目的配置文件
- mySpider/ :项目的Python模块,将会从这里引用代码
- mySpider/items.py :项目的目标文件
- mySpider/pipelines.py :项目的管道文件
- mySpider/settings.py :项目的设置文件
- mySpider/spiders/ :存储爬虫代码目录
二、创建Scrapy爬虫
在当前目录下输入命令,将在mySpider/spider目录下创建一个名为testSpider的爬虫,并指定爬取域的范围:
scrapy genspider test "test.cn"打开 mySpider/spider目录里的 testSpider.py,默认增加了下列代码:
import scrapy

class TestSpider(scrapy.Spider):
    name = "test"
    allowed_domains = ["test.cn"]
    start_urls = (
        'http://www.test.cn/',
    )

    def parse(self, response):
        pass
要建立一个Spider, 你必须用scrapy.Spider类创建一个子类,并确定了三个强制的属性 和 一个方法:
- name = "" :这个爬虫的识别名称,必须是唯一的,在不同的爬虫必须定义不同的名字。
- allow_domains = [] 是搜索的域名范围,也就是爬虫的约束区域,规定爬虫只爬取这个域名下的网页,不存在的URL会被忽略。
- start_urls = () :爬取的URL元祖/列表。爬虫从这里开始抓取数据,所以,第一次下载的数据将会从这些urls开始。其他子URL将会从这些起始URL中继承性生成。多个url用逗号隔开
- parse(self, response) :解析的方法,每个初始URL完成下载后将被调用,调用的时候传入从每一个URL传回的Response对象来作为唯一参数,主要作用如下:1、负责解析返回的网页数据(response.body),提取结构化数据(生成item)。2、生成需要下一页的URL请求。
三、Scrapy入门案例
items.py:
# -*- coding: utf-8 -*-

# Define here the models for your scraped items
#
# See documentation in:
# https://doc.scrapy.org/en/latest/topics/items.html

import scrapy

class testItem(scrapy.Item):
    # 姓名
    name = scrapy.Field()
    # 职称
    title = scrapy.Field()
    # 个人简历
    info = scrapy.Field()
testSpider.py:
import scrapy
from mySpider.items import testItem

# 创建一个爬虫类
class testSpider(scrapy.Spider):
    # 爬虫名
    name = "test"
    # 允许爬虫作用的范围
    allowd_domains = ["http://www.test.cn/"]
    # 爬虫起始的url
    start_urls = ["http://www.test.cn/channel/teacher.shtml"]

    def parse(self, response):
        # 通过scrapy自带的xpath匹配出所有老师的根节点列表集合
        teacher_list = response.xpath("//div[@class='li_txt']")

        # 遍历根节点集合
        for each in teacher_list:

            item = testItem()

            # .extract()将匹配出来的结果转换成为Unicode字符串,
            # 如果没加.extract()匹配出来的结果是xpath对象
            name = each.xpath("./h3/text()")[0].extract()
            title = each.xpath("./h4/text()")[0].extract()
            info = each.xpath("./p/text()")[0].extract()

            #print(name)
            #print(title)
            #print(info)

            item['name'] = name
            item['title'] = title
            item['info'] = info

            # 将获取的数据交给pipelines,pipelines在settings.py中定义
            yield item
设置项目管道:
ITEM_PIPELINES = {
    'mySpider.pipelines.TestPipeline': 300,
}
pipelines.py:
# -*- coding: utf-8 -*-

# Define your item pipelines here
#
# Don't forget to add your pipeline to the ITEM_PIPELINES setting
# See: https://doc.scrapy.org/en/latest/topics/item-pipeline.html

import json

class TestPipeline(object):
    # __init__方法,作为类的初始化方法,可选
    def __init__(self):
        # 创建一个文件
        self.filename = open("teacher.json","w")

    # 处理item数据的,方法名不可变
    def process_item(self, item, spider):
        jsonText = json.dumps(dict(item),ensure_ascii=False) + "\n"
        self.filename.write(jsonText)

    # close_spider方法,process_item执行结束时调用的方法,方法名不可变,可选方法
    def close_spider(self,spider):
        self.filename.close()
运行Scrapy,执行如下命令:
# 运行Scrapy
scrapy crawl test

# 运行Scrapy,并保存成json格式,默认为Unicode编码
scrapy crawl test -o teachers.json

# 运行Scrapy,并保存成json lines格式,默认为Unicode编码
scrapy crawl test -o teachers.jsonl

# 运行Scrapy,并保存成csv 逗号表达式,可用Excel打开
scrapy crawl test -o teachers.csv

# 运行Scrapy,并保存成xml格式
scrapy crawl test -o teachers.xml
此test必须与testSpider中的name一致,也就是genspider中指定的唯一爬虫名
参考资料:
Scrapy爬虫入门教程一 安装和基本使用
Scrapy爬虫入门教程二 官方提供Demo
Scrapy爬虫入门教程三 命令行工具介绍和示例
Scrapy爬虫入门教程四 Spider(爬虫)
Scrapy爬虫入门教程五 Selectors(选择器)
Scrapy爬虫入门教程六 Items(项目)
Scrapy爬虫入门教程七 Item Loaders(项目加载器)
Scrapy爬虫入门教程八 交互式 shell 方便调试
Scrapy爬虫入门教程九 Item Pipeline(项目管道)
Scrapy爬虫入门教程十 Feed exports(导出文件)
Scrapy爬虫入门教程十一 Request和Response(请求和响应)
Scrapy爬虫入门教程十二 Link Extractors(链接提取器)