学习中需要应用到跨域请求的问题,找了资料,也自己写了一个简单的demo,应用到fetch方法或axios方法,前提都需要配置proxyTable,特别感谢:Web前端网站教程-米斯特吴老师提供的案例和请求接口。
(一)安装vue-cli2.x脚手架
如果还没安装的,或安装过程不熟的,可以参考这篇文章教程,写的很详细——Vue2.0史上最全入坑教程(上)—— 搭建Vue脚手架(vue-cli)
(二)配置proxyTable跨域请求
1.找到config文件夹下的index.js文件打开,找到proxyTable配置项:
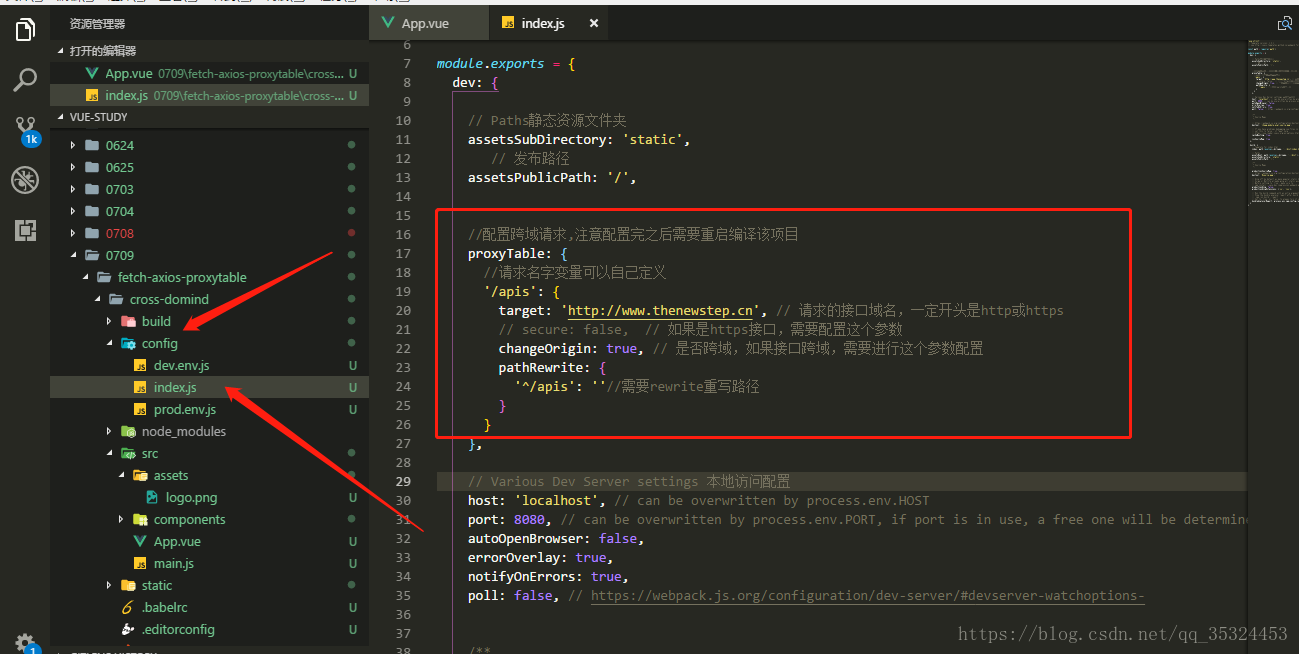
2.配置代码参考如下:
    //配置跨域请求,注意配置完之后需要重启编译该项目
    proxyTable: {
      //请求名字变量可以自己定义
      '/apis': {
        target: 'http://www.thenewstep.cn', // 请求的接口域名或IP地址,开头是http或https
        // secure: false,  // 如果是https接口,需要配置这个参数
        changeOrigin: true, // 是否跨域,如果接口跨域,需要进行这个参数配置
        pathRewrite: {
          '^/apis': ''//表示需要rewrite重写路径
        }
      }
},注意:可能你的接口地址原本是 http://www.thenewstep.cn/test/test.html,但是为了匹配代理地址,需要在前面加一个 /apis(自己定义的请求接口变量名), 因此接口地址需要写成这样的即可生效 /apis/test/test.html。
(三)使用fetch实现跨域请求
1.在App.vue中添加以下代码即可:
<template>
  <div id="app">
    <img src="./assets/logo.png">
    <HelloWorld/>
  </div>
</template>

<script>
import HelloWorld from './components/HelloWorld'

export default {
  name: 'App',
  components: {
    HelloWorld
  },
  created(){
    // fetch方法,注意apis对应config/index.js中的proxyTable设置的请求名字变量
    fetch("/apis/test/testToken.php",{
      method:"post",//设置请求类型
      headers:{
        "Content-type":"application/json",
        token:"f4c902c9ae5a2a9d8f84868ad064e706"//请求验证,根据请求方接口需要的
      },
      body:JSON.stringify({username:"test",password:"test"}),//设置发送请求的内容
    }).then(result=>{
      // console.log(result);
      //使用json解析请求成功的body内容
      return result.json();
    }).then(data=>{
      console.log(data);//查看打印出请求成功的内容
      if(data.success==1){
        console.log(data.msg);
      }
    });

  }
}
</script>

<style>
#app {
  font-family: 'Avenir', Helvetica, Arial, sans-serif;
  -webkit-font-smoothing: antialiased;
  -moz-osx-font-smoothing: grayscale;
  text-align: center;
  color: #2c3e50;
  margin-top: 60px;
}
</style>
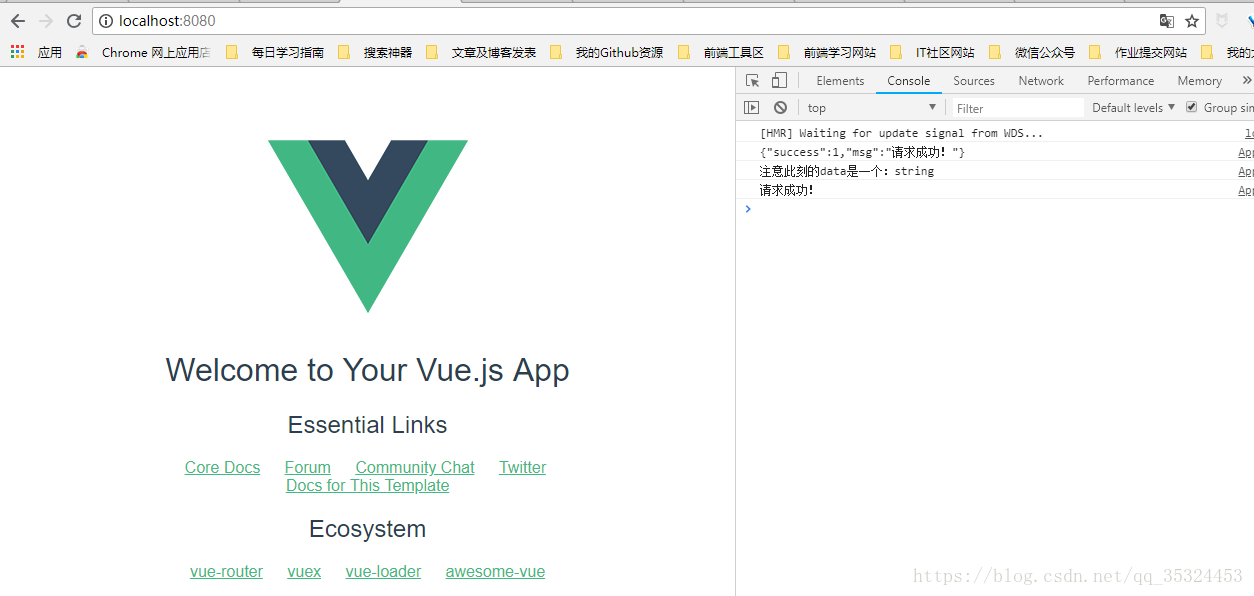
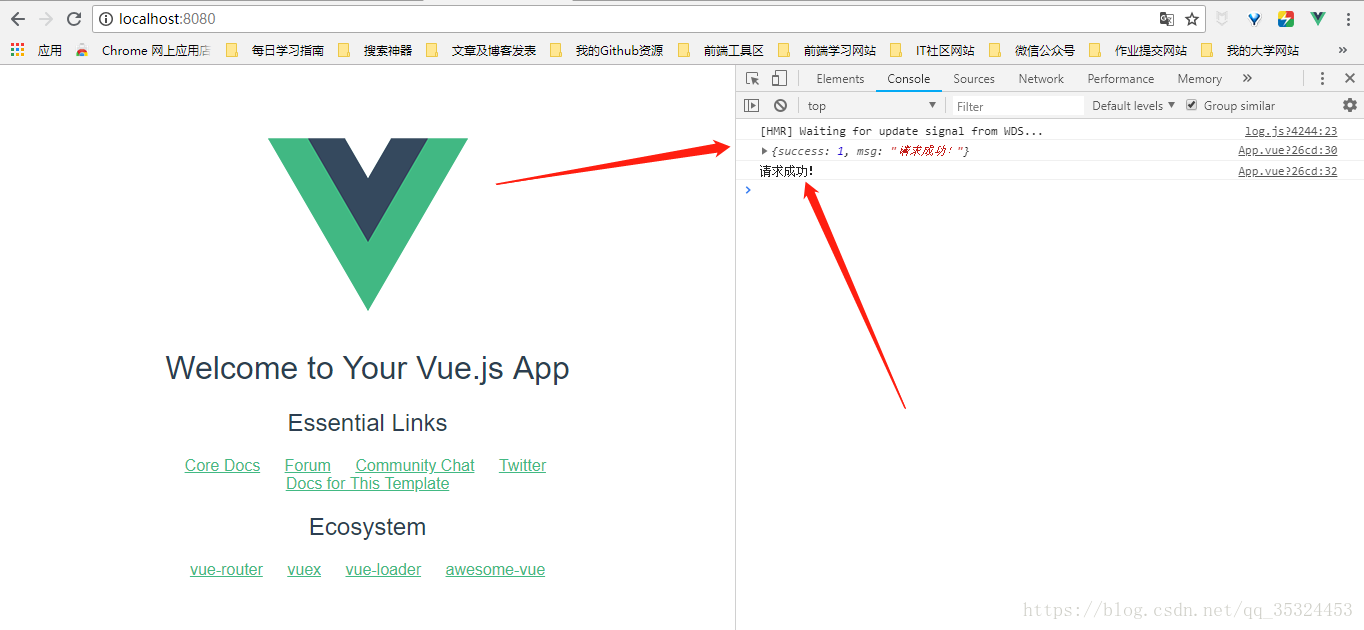
2.运行结果
(四)使用axios方法跨域请求
1.安装axios:npm install axios;
2.在main.js文件引入axios模块并全局使用;
import Vue from 'vue'
import App from './App'
import axios from 'axios'//引入axios模块文件

Vue.config.productionTip = false;

Vue.prototype.$axios=axios;//设置全局引用
//配置请求的设置
axios.defaults.headers.post['Content-type']="application/json";
axios.defaults.headers.common['token']="f4c902c9ae5a2a9d8f84868ad064e706";//配置参数,请求验证,根据请求方接口需要的

/* eslint-disable no-new */
new Vue({
  el: '#app',
  render: h => h(App)
})
3.修改App.vue组件代码为:
<template>
<div id="app">
    <img src="./assets/logo.png">
    <HelloWorld/>
</div>
</template>

<script>
import HelloWorld from './components/HelloWorld'

export default {
    name: 'App',
    components: {
        HelloWorld
    },
    created() {
        //axios方法
        this.$axios.post("/apis/test/testToken.php", {
            username: "test",
            password: "test"
        }).then(result => {
            // return JSON.parse(JSON.stringify(result));
            return JSON.stringify(result.data);

            // console.log(data);
        }).then(data => {
            console.log(data);
            console.log("注意此刻的data是一个:" + typeof data);
            data = JSON.parse(data);
            if (data.success == 1) {
                console.log(data.msg);
            }
        });

    }
}
</script>

<style>
#app {
    font-family: 'Avenir', Helvetica, Arial, sans-serif;
    -webkit-font-smoothing: antialiased;
    -moz-osx-font-smoothing: grayscale;
    text-align: center;
    color: #2c3e50;
    margin-top: 60px;
}
</style>
4.运行结果: