转载请标明出处:
http://blog.csdn.net/xmxkf/article/details/52457893
本文出自:【openXu的博客】
在上一篇文章《 Activtiy完全解析(一、Activity的创建过程)》中,我们探讨了Activity的启动,从startActivity()到进程创建,再到activity的创建,最后调用onCreate()方法。本篇博客我们接着onCreate()方法继续研究Activity加载layout的过程。我们写好layout布局后,在onCreate()方法中调用setContentView(layoutID)就能将我们的布局加载显示。这一过程到底做了什么?布局中的控件是怎样被加载并显示出来的?我们从setContentView()方法开始一步步分析 。(参考源码版本为API23 )
step1.Activity.setContentView()
通常我们的做法是在OnCreate()方法中设置布局资源ID,Activity提供了三个设置视图的方法,如下:
@Override
protected void onCreate(Bundle savedInstanceState) {
    super.onCreate(savedInstanceState);
    setContentView(R.layout.activity);
    //setContentView(new TextView(this));
    //setContentView(new TextView(this),new ViewGroup.LayoutParams(...));
}再看看Activity中的调用关系:
public class Activity ...{
    private Window mWindow;

    //三个设置视图的方法
    public void setContentView(@LayoutRes int layoutResID) {
        getWindow().setContentView(layoutResID);
        //初始化ActionBar
        initWindowDecorActionBar();
    }
    public void setContentView(View view) {
        getWindow().setContentView(view);
        initWindowDecorActionBar();
    }
    public void setContentView(View view, ViewGroup.LayoutParams params) {
        getWindow().setContentView(view, params);
        initWindowDecorActionBar();
    }

    final void attach(...) {
        ...
        //初始化mWindow
        mWindow = new PhoneWindow(this);
        ...
    }
    public Window getWindow() {
        return mWindow;
    }
} 原来Activity中调用setContentView()方法最终调用的是PhoneWindow对象mWindow 的setContentView(...)方法。
mWindow是在Activity创建的时候在attach()方法中初始化的,attach()方法上一篇博客http://blog.csdn.net/xmxkf/article/details/52452218 中有讲解。
每一个Activity组件都有一个关联的Window的实现类PhoneWindow的对象mWindow ,用来描述一个应用程序窗口,它封装了顶层窗口的外观和行为策略,它提供了标准的用户界面策略,如背景、标题区域、默认键处理等。PhoneWindow管理着整个屏幕的内容,不包括屏幕最顶部的系统状态条。所以,PhoneWindow或者Window是与应用的一个页面所相关联。下面我们查看PhoneWindow.setContentView()方法:
step2. PhoneWindow.setContentView()
@Override
public void setContentView ( int layoutResID){
    if (mContentParent == null) {
        installDecor();
    } else if (!hasFeature(FEATURE_CONTENT_TRANSITIONS)) {
        //移除该mContentParent内所有的所有子View
        mContentParent.removeAllViews();
    }
    if (hasFeature(FEATURE_CONTENT_TRANSITIONS)) {
        final Scene newScene = Scene.getSceneForLayout(mContentParent, layoutResID,
                getContext());
        transitionTo(newScene);
    } else {
        //将我们的资源文件通过LayoutInflater对象转换为View树,并且添加至mContentParent中
        mLayoutInflater.inflate(layoutResID, mContentParent);
    }
    mContentParent.requestApplyInsets();
    final Callback cb = getCallback();
    if (cb != null && !isDestroyed()) {
        cb.onContentChanged();
    }
}

@Override
public void setContentView (View view){
    setContentView(view, new ViewGroup.LayoutParams(MATCH_PARENT, MATCH_PARENT));
}

@Override
public void setContentView (View view, ViewGroup.LayoutParams params){
    //此处判断mContentParent是否为null,如果是null,则是第一次调用setContentView
    if (mContentParent == null) {
        //第一次需要初始化窗口和根布局(id为content的)
        installDecor();
    } else if (!hasFeature(FEATURE_CONTENT_TRANSITIONS)) {
        //如果不是第一次调用,需要清空根布局中的内容
        mContentParent.removeAllViews();
    }
    if (hasFeature(FEATURE_CONTENT_TRANSITIONS)) {
        view.setLayoutParams(params);
        final Scene newScene = new Scene(mContentParent, view);
        transitionTo(newScene);
    } else {
        mContentParent.addView(view, params);
    }
    mContentParent.requestApplyInsets();
    final Callback cb = getCallback();
    if (cb != null && !isDestroyed()) {
        cb.onContentChanged();
    }
} PhoneWindow中setContentView(view)接着调用setContentView(view, layoutParams),而setContentView(layoutResID)和setContentView(view, layoutParams)方法中的步骤是差不多的,唯一的区别就是setCOntentView(layoutResID)中是通过mLayoutInflater.inflate(layoutResID, mContentParent)将布局填充到mContentParent上,而setContentView(view, layoutParams)是将传过来的view直接 add到mContentParent中 。到这一步我们发现,我们为某个activity写的layout视图最终是添加到一个叫mContentParent的ViewGroup中了。
在加入mContentParent中之前,首先判断如果mContentParent==null时,执行了installDecor()方法,我们猜想,installDecor()的作用大概就是初始化mContentParent,如果mContentParent已经初始化,而且窗口不是透明的,就清除mContentParent中的所有视图。mContentParent只会实例化一次,所以如果我们在Activity中多次调用setContentView()只是改变了mContentParent的子视图(也就是我们写的布局文件)。接着看看installDecor():
step3. PhoneWindow.installDecor()
上一步我们猜测installDecor()方法的作用是实例化mContentParent,接下来我们深入PhoneWindow中验证这个猜测对不对,下面是PhoneWindow的关键代码:
public class PhoneWindow extends Window implements MenuBuilder.Callback {
    //id为content的容器,这个容器就是用于盛放我们写的layout视图的
    private ViewGroup mContentParent;
    //mContentRoot是整个界面内容,包括title和content等等
    private ViewGroup mContentRoot;
    //窗口顶层FrameLayout,用于盛放mContentRoot
    private DecorView mDecor;

    /**
     * DecorView是FrameLayout的子类
     */
    private final class DecorView extends FrameLayout{
        ...
    }

    //实例化了一个DecorView对象
    protected DecorView generateDecor() {
        return new DecorView(getContext(), -1);
    }

    /**
     * 初始化顶层窗口mDecor和根布局mContentParent
     */
    private void installDecor() {
        if (mDecor == null) {
            //①.初始化窗口
            mDecor = generateDecor();
            mDecor.setDescendantFocusability(ViewGroup.FOCUS_AFTER_DESCENDANTS);
            mDecor.setIsRootNamespace(true);
            ...
        }
        if (mContentParent == null) {
            //②.如果根布局
            mContentParent = generateLayout(mDecor);
            //③.初始化title和一些设置
            if (decorContentParent != null) {
                mDecorContentParent = decorContentParent;
                mDecorContentParent.setWindowCallback(getCallback());
                if (mDecorContentParent.getTitle() == null) {
                    mDecorContentParent.setWindowTitle(mTitle);
                }
                ...
            } else {
                mTitleView = (TextView) findViewById(R.id.title);
                if (mTitleView != null) {
                    mTitleView.setLayoutDirection(mDecor.getLayoutDirection());
                    if ((getLocalFeatures() & (1 << FEATURE_NO_TITLE)) != 0) {
                        ...
                    } else {
                        mTitleView.setText(mTitle);
                    }
                }
            }

            if (mDecor.getBackground() == null && mBackgroundFallbackResource != 0) {
                mDecor.setBackgroundFallback(mBackgroundFallbackResource);
            }
            ...
        }
    }
} PhoneWindow中引用了一个DecorView的对象,DecorView是FrameLayout的子类,相信你们应该多多少少知道Activity的顶层窗口是一个FramLayout,也正是这个DevorView的对象mDecor。在installDecor()方法中,第①步就是判断mDecor是否为null,如果为null,将会调用generateDecor()方法实例化一个DecorView对象,紧接着第②步判断mContentParent是否为null,如果为null,将调用generateLayout(mDecor)方法初始化mContentParent。现在就有一个疑问了,mDecor和mContentParent都是容器,他们是什么关系?各自代表的是屏幕中那一块的内容?带着问题我们看看generateLayout(mDecor)方法:
step 4. PhoneWindow.generateLayout(mDecor )
/**
 * 初始化根布局mContentParent
 */
protected ViewGroup generateLayout(DecorView decor) {
    //①.获取AndroidManifest.xml中指定的themes主题
    TypedArray a = getWindowStyle();
    //设置当前窗口是否有标题
    if (a.getBoolean(R.styleable.Window_windowNoTitle, false)) {
        //请求指定Activity窗口的风格类型
        requestFeature(FEATURE_NO_TITLE);
    } else if (a.getBoolean(R.styleable.Window_windowActionBar, false)) {
        requestFeature(FEATURE_ACTION_BAR);
    }
    ...
    //设置窗口是否全屏
    if (a.getBoolean(R.styleable.Window_windowFullscreen, false)) {
        setFlags(FLAG_FULLSCREEN, FLAG_FULLSCREEN & (~getForcedWindowFlags()));
    }
    ...

    //②.根据上面设置的窗口属性Features, 设置相应的修饰布局文件layoutResource,这些xml文件位于frameworks/base/core/res/res/layout下
    int layoutResource;
    int features = getLocalFeatures();
    if ((features & (1 << FEATURE_SWIPE_TO_DISMISS)) != 0) {
        layoutResource = R.layout.screen_swipe_dismiss;
    } else if
        ...

    mDecor.startChanging();
    //③.将第2步选定的布局文件inflate为View树,这也是整个窗口的内容(包括title、content等等)
    View in = mLayoutInflater.inflate(layoutResource, null);
    //④.将整个窗口内容添加到根mDecor中
    decor.addView(in, new ViewGroup.LayoutParams(MATCH_PARENT, MATCH_PARENT));
    //⑤.将整个窗口内容赋值给mContentRoot
    mContentRoot = (ViewGroup) in;

    //⑥.将窗口修饰布局文件中id="@android:id/content"的View赋值给mContentParent
    ViewGroup contentParent = (ViewGroup) findViewById(ID_ANDROID_CONTENT);
    if (contentParent == null) {
        throw new RuntimeException("Window couldn't find content container view");
    }
    ...

    mDecor.finishChanging();

    return contentParent;
}- 在
generateLayout()中,第①步是初始化了一些样式属性值,我们发现有一个很熟悉的类TypedArray,没错,这在之前讲解自定义控件属性的时候用到过,其实此处也是一样的,之前自定义控件的属性是用来描述我们自定义的View,而这里的样式属性是用来描述窗口,而我们知道窗口实质上也是View,唯一的区别就是,控件的属性是在layout中设置,而窗口的属性是在AndroidManifest.xml中配置的,通过getWindowStyle()获取当前Window在theme中定义的属性,window支持的属性可以参考\frameworks\base\core\res\res\values\attrs.xml 中的<declare-styleable name="Window">。获取到属性值之后有与大堆代码是调用setFlags()和requestFeature()给当前window设置属性值,这就是为什么我们一般在Activity的onCreate()中设置全屏等属性需要在setContentView()之前设置,因为setContentView()之后installDecor()方法已经执行完毕,所以设置是没有效的。 - 第①步执行完后,
Window的相关属性已经设置完毕,比如是否是全屏?是否有标题等等。然后第②步就是根据Window的各种属性,设置相应的布局文件,如果是全屏layoutResource(布局文件ID)是多少,如果有标题…; - 确定
layoutResource之后,第③步就是mLayoutInflater解析出layoutResource对应的视图in; - 第④步将in这个视图add到
mDecor顶层窗口中; - 第⑤步将in赋值给mContentRoot;
- 第⑥步调用
findViewById()找到id为content的View赋值给mContentParent。
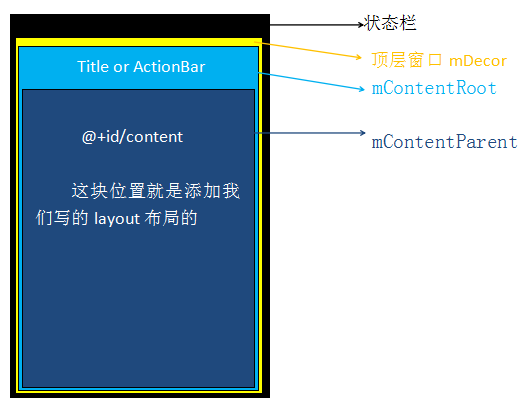
通过generateLayout ()方法,我们发现了三个比较重要的视图对象mDecor 、mContentRoot 、mContentParent 。他们的关系如下:
mDecor是Activity的顶层窗体,他是FramLayout的子类对象;mContentRoot是根据设置给窗体加载的整个Activity可见的视图,这个视图包含标题栏(如果主题设置有标题),用于容纳我们自定义layout的id为content的容器,mContentRoot被添加到了顶层窗口mDecor中;mContentParent是mContentRoot中id为content的容器,这个容器就是用来添加我们写的layout布局文件的,mContentParent是嵌套在mContentRoot中,mContentRoot嵌套在mDecor。所以在上面第⑥步可以直接调用findViewById()找到mContentParent。(跟踪findViewById()方法,发现调用的是PhoneWindow中mDecor这个顶层窗口的findViewById()方法 )
关系图如下:
step5. LayoutInflater.inflate()
经过上面的步骤,Activity的顶层窗口mDecor和用于容纳我们写的layout的容器mContentParent已经初始化完毕,接下来就是将我们的布局layout添加到mContentParent中,先把step2 中的PhoneWindow.setContentView(int layoutResID)方法贴出来:
@Override
public void setContentView ( int layoutResID){
    if (mContentParent == null) {
        installDecor();
    } else if (!hasFeature(FEATURE_CONTENT_TRANSITIONS)) {
        //移除该mContentParent内所有的所有子View
        mContentParent.removeAllViews();
    }
    if (hasFeature(FEATURE_CONTENT_TRANSITIONS)) {
        final Scene newScene = Scene.getSceneForLayout(mContentParent, layoutResID,
                getContext());
        transitionTo(newScene);
    } else {
        //将我们的资源文件通过LayoutInflater对象转换为View树,并且添加至mContentParent中
        mLayoutInflater.inflate(layoutResID, mContentParent);
    }
    mContentParent.requestApplyInsets();
    final Callback cb = getCallback();
    if (cb != null && !isDestroyed()) {
        cb.onContentChanged();
    }
} 在分析PhoneWindow.setContentView()方法的过程中,我们穿插讲解了installDecor()方法,接着有一个判断hasFeature(FEATURE_CONTENT_TRANSITIONS),这个属性是Android5.0引入的,这篇博客中参照的是API23的源码 ,他的意思根据设置的主题属性,判断当前窗口内容变化的过程是否需要动画,如果有动画标志,将执行动画。Scene是场景,这个对象中引用了mSceneRoot和mlayout两个视图,mSceneRoot就是mContentParent,而mLayout就是我们的布局视图。我们发现另一个setContentView(view)方法中直接将view传递进去了Scene newScene = new Scene(mContentParent, view);,而setContentView(layoutResID)是将layoutResID传递进去,可以想象在Scene中也会根据此layoutResID将我们的布局layout加载并赋值给mLayout。由于我们主要研究的是View的加载过程,所以就不深入讲解动画了。直接看下面的mLayoutInflater.inflate(layoutResID, mContentParent),这一步的目的就是解析我们的布局layout,并将布局视图挂载到mContentParent上,那下面看看LayoutInflater.inflate()方法:
public View inflate(@LayoutRes int resource, @Nullable ViewGroup root) {
    return inflate(resource, root, root != null);
}
public View inflate(@LayoutRes int resource, @Nullable ViewGroup root, boolean attachToRoot) {
    final Resources res = getContext().getResources();
    if (DEBUG) {
        Log.d(TAG, "INFLATING from resource: \"" + res.getResourceName(resource) + "\" ("
                + Integer.toHexString(resource) + ")");
    }

    final XmlResourceParser parser = res.getLayout(resource);
    try {
        return inflate(parser, root, attachToRoot);
    } finally {
        parser.close();
    }
}
这个方法有三个参数:
resource:需要解析的布局layout的idroot:解析layout之后得到的视图层级的父视图attachToRoot:是否将解析出来的视图添加到父视图中,如果传入true,并且root不为null,这个方法返回的是root,而且将解析出的视图添加到root中。而我们看到inflate(resource)方法在inflate(resource,root,attachToRoot)方法时,传入的attachToRoot是root!=null,所以inflate返回的是已经将布局layout视图添加到mContentParent后的mContentParent。
inflate(resource,root,attachToRoot )方法中通过res.getLayout(resource)将layout关联到一个XmlResourceParser中(Android内置的pull解析器),然后调用inflate(parser,root,attachToRoot )方法:
/**
 * 将layout解析为view树,并附加到root(mContentParent)中
 */
public View inflate(XmlPullParser parser, ViewGroup root, boolean attachToRoot) {
    synchronized (mConstructorArgs) {
        Trace.traceBegin(Trace.TRACE_TAG_VIEW, "inflate");

        final Context inflaterContext = mContext;
        final AttributeSet attrs = Xml.asAttributeSet(parser);
        Context lastContext = (Context) mConstructorArgs[0];
        mConstructorArgs[0] = inflaterContext;
        //①.将最终返回的View初始化为root(也就是mContentParent)
        View result = root;
        try {
            int type;
            //②.循环直到解析到开始标签<>或者结尾标签</>
            while ((type = parser.next()) != XmlPullParser.START_TAG &&
                    type != XmlPullParser.END_DOCUMENT) {
                // Empty
            }
            //第一次解析到的不是开始标签<>,说明layout文件没有<>标签,xml格式错误
            if (type != XmlPullParser.START_TAG) {
                throw new InflateException(parser.getPositionDescription()
                        + ": No start tag found!");
            }

            //③.找到第一个开始标签,这个标签对应的name就是整个layout最外层的父控件
            final String name = parser.getName();
            ...
            if (TAG_MERGE.equals(name)) {
                if (root == null || !attachToRoot) {
                    throw new InflateException("<merge /> can be used only with a valid "
                            + "ViewGroup root and attachToRoot=true");
                }
                rInflate(parser, root, inflaterContext, attrs, false);
            } else {
                // Temp is the root view that was found in the xml
                //★④.根据layout中第一个开始标签的名称创建一个View对象temp,temp就是整个xml中的根控件
                final View temp = createViewFromTag(root, name, inflaterContext, attrs);

                ViewGroup.LayoutParams params = null;
                if (root != null) {
                    // Create layout params that match root, if supplied
                    // 根据父控件获取布局参数,后面将解析的view树添加到root中是要使用
                    params = root.generateLayoutParams(attrs);
                    //如果不需要附加到root父控件中
                    if (!attachToRoot) {
                        // Set the layout params for temp if we are not
                        // attaching. (If we are, we use addView, below)
                        //为temp设置布局参数如果我们不附加。(如果我们是,我们使用addView,下同)
                        temp.setLayoutParams(params);
                    }
                }
                // Inflate all children under temp against its context.
                //★⑤.调用rInflateChildren递归解析temp中的所有子控件,通过这行代码整个layout就被解析为view树了
                rInflateChildren(parser, temp, attrs, true);

                //★⑥.如果root不为空,将view树添加到root中
                //此处root为mContentParent,也就是将layout布局添加到mContentParent中了
                if (root != null && attachToRoot) {
                    root.addView(temp, params);
                }
                if (root == null || !attachToRoot) {
                    //如果不用附加到root中,直接返回解析的view树
                    result = temp;
                }
            }
        } catch (XmlPullParserException e) {
            InflateException ex = new InflateException(e.getMessage());
            ex.initCause(e);
            throw ex;
        } catch (Exception e) {
            InflateException ex = new InflateException(
                    parser.getPositionDescription()
                            + ": " + e.getMessage());
            ex.initCause(e);
            throw ex;
        } finally {
            // Don't retain static reference on context.
            mConstructorArgs[0] = lastContext;
            mConstructorArgs[1] = null;
        }

        Trace.traceEnd(Trace.TRACE_TAG_VIEW);

        return result;
    }
} 这个方法的作用就是将layout填充到一个view树上,然后将view树附加到root(也就是mContentParent)中,然后返回root。
方法中有6个重要步骤,上面注释已经写得很清楚了,注意签名带★的步骤是很重要的。在①-④步是将layout最外层的控件解析出来,在第④步中调用了createViewFromTag()方法(请看step6) 根据name实例化一个View对象,然后第⑤步调用rInflateChildren()方法,将剩余的控件解析出来后填充进最外层控件,这样就完成了整个layout的填充,最后第⑥步将解析出来的view树添加到root中。我们发现真正完成inflate的并不是这个方法,这个方法只是解析了在外层的控件,剩余的控件是由rInflateChildren()方法完成的,而rInflateChildren()中调用的是rInflate()方法(请看step7)
step6. LayoutInflater.createViewFromTag()
/**
 * 根据控件名实例化控件对象
 * @param parent 父控件
 * @param name 控件名
 * @param context
 * @param attrs
 * @param ignoreThemeAttr
 * @return
 */
View createViewFromTag(View parent, String name, Context context, AttributeSet attrs,
                       boolean ignoreThemeAttr) {
    if (name.equals("view")) {
        name = attrs.getAttributeValue(null, "class");
    }

    // Apply a theme wrapper, if allowed and one is specified.
    if (!ignoreThemeAttr) {
        final TypedArray ta = context.obtainStyledAttributes(attrs, ATTRS_THEME);
        final int themeResId = ta.getResourceId(0, 0);
        if (themeResId != 0) {
            context = new ContextThemeWrapper(context, themeResId);
        }
        ta.recycle();
    }

    if (name.equals(TAG_1995)) {
        // Let's party like it's 1995!
        return new BlinkLayout(context, attrs);
    }

    try {
        View view;
        if (mFactory2 != null) {
            view = mFactory2.onCreateView(parent, name, context, attrs);
        } else if (mFactory != null) {
            view = mFactory.onCreateView(name, context, attrs);
        } else {
            view = null;
        }

        if (view == null && mPrivateFactory != null) {
            view = mPrivateFactory.onCreateView(parent, name, context, attrs);
        }

        if (view == null) {
            final Object lastContext = mConstructorArgs[0];
            mConstructorArgs[0] = context;
            try {
                //先判断name中是否有'.'字符,如果没有,此控件为android自带的View,此时会在name的前面加上包名"android.view."
                if (-1 == name.indexOf('.')) {
                    view = onCreateView(parent, name, attrs);
                } else {
                    //如果有这个'.',则认为是自定义View,因为自定义View在使用的时候使用的全名,所以直接创建
                    view = createView(name, null, attrs);
                }
            } finally {
                mConstructorArgs[0] = lastContext;
            }
        }

        return view;
    } catch (InflateException e) {
        throw e;

    } catch (ClassNotFoundException e) {
        final InflateException ie = new InflateException(attrs.getPositionDescription()
                + ": Error inflating class " + name);
        ie.initCause(e);
        throw ie;

    } catch (Exception e) {
        final InflateException ie = new InflateException(attrs.getPositionDescription()
                + ": Error inflating class " + name);
        ie.initCause(e);
        throw ie;
    }
}
step7. LayoutInflater.rInflate()
/**
 * 解析layout最外层parent中的所有子控件
 * 此方法为递归方法,layout中有多少个ViewGroup就会递归调用多少次
 * 每一次调用就会完成layout中某一个ViewGroup中所有的子控件的解析
 */
final void rInflateChildren(XmlPullParser parser, View parent, AttributeSet attrs,
                            boolean finishInflate) throws XmlPullParserException, IOException {
    rInflate(parser, parent, parent.getContext(), attrs, finishInflate);
}
void rInflate(XmlPullParser parser, View parent, Context context,
              AttributeSet attrs, boolean finishInflate) throws XmlPullParserException, IOException {
    final int depth = parser.getDepth();
    int type;
    //如果遇到结束标签(</>)就结束,说明此parent中所有的子view已经解析完毕
    while (((type = parser.next()) != XmlPullParser.END_TAG ||
            parser.getDepth() > depth) && type != XmlPullParser.END_DOCUMENT) {
        if (type != XmlPullParser.START_TAG) {
            continue;
        }
        //1.找到开始标签<>
        final String name = parser.getName();
        //2.根据name类型分别解析
        if (TAG_REQUEST_FOCUS.equals(name)) {
            parseRequestFocus(parser, parent);
        } else if (TAG_TAG.equals(name)) {
            parseViewTag(parser, parent, attrs);
        } else if (TAG_INCLUDE.equals(name)) {
            if (parser.getDepth() == 0) {
                throw new InflateException("<include /> cannot be the root element");
            }

            /*
             * 如果是<include />,调用parseInclude方法用于解析<include/>标签:
             * ①.根据include标签的name属性找到对应的layout的id
             * ②.遍历开始标签解析layout中的view
             * ③.调用rInflateChildren(childParser, view, childAttrs, true)解析view中的子控件
             * ④.将view添加(add)进parent中
             */
            parseInclude(parser, context, parent, attrs);
        } else if (TAG_MERGE.equals(name)) {
            throw new InflateException("<merge /> must be the root element");
        } else {
            //如果是普通View,调用createViewFromTag创建view对象
            final View view = createViewFromTag(parent, name, context, attrs);
            final ViewGroup viewGroup = (ViewGroup) parent;
            final ViewGroup.LayoutParams params = viewGroup.generateLayoutParams(attrs);
            //★递归调用rInflateChildren解析view中的子控件
            //如果view不是ViewGroup,rInflateChildren()会在while的第一次循环结束
            //如果view是ViewGroup,并且里面有子控件,通过这行代码view中的所有子控件就被挂到view上了
            rInflateChildren(parser, view, attrs, true);
            //将view树添加到viewGroup中,到此为止完成一个view及其所有子控件的填充
            viewGroup.addView(view, params);
        }
    }
    if (finishInflate) {
        /*
         * ★parent的所有子控件都inflate完毕后调用onFinishInflate方法
         * 这个方法在自定义ViewGroup的时候经常用到,自定义ViewGroup中
         * 不能在构造方法中find子控件,因为构造方法中并没有完成子控件的实例化,
         * 只能在onFinishInflate回调方法中findViewById来初始化子控件
         */
        parent.onFinishInflate();
    }
} rInflate()方法无非就是根据剩余的xml找到开始标签的name,然后根据name的类型分别解析,如果判断是普通控件,调用createViewFromTag()创建一个控件view,接着递归调用rInflateChildren()解析view中的所有子控件(如果view是ViewGroup),最后将view添加到parent中。rInflateChildren()递归调用执行完毕后,整个layout就被填充为view树了,最后在inflate()中,layout的view树会被add到root中,也就是mContentParent中,整个窗体的view树mDecor就算是填充完毕。
总结一下这篇博客的内容,这篇博客分析的是View的加载填充原理,也就是从调用setContentView()方法开始,我们的布局layout是怎样填充为整个View树,并被挂载到Activity上的。其中有几个重要的知识点如下:
- 每一个
Activity组件都有一个关联的Window的实现类PhoneWindow的对象mWindow,mWindow管理着整个屏幕的内容,不包括屏幕最顶部的系统状态条 ,它描述一个应用程序窗口,它封装了顶层窗口的外观和行为策略,它提供了标准的用户界面策略,如背景、标题区域、默认键处理等; Activity的setContentView()方法里面调用的是PhoneWindow的setContentView()方法;PhoneWindow中引用了mDecor(顶层窗口,FramLayout的子类)、mContentRoot(整个Activity的内容,包括TitleActionBar等)、mContentParent(mContentRoot中id为content的容器,用于放置我们的layout的容器);他们三者的关系是mDecor嵌套mContentRoot,mContentRoot嵌套mContentParent;- 如果
mContentParent不为null,将清空其中的内容,然后重新加载layout到mContentParent中 ; 如果mContentParent为null说明是第一次调用setContentView,这时候需要调用installDecor()为Activity加载一个顶层窗口mDecor,mContentParent; installDecor()方法中初始化了mDecor,然后调用generateLayout(mDecor);generateLayout(mDecor)中首先设置了window的主题样式,并根据这些样式设置为Activity加载一个合适的布局视图,并将这个视图赋值给mContentRoot,然后将此视图add到mDecor顶层窗口中;然后通过mDecor.findViewById(R.id.content)初始化mContentParent。通过②-⑥步,Activity中的顶层窗体的View树算是搭建完毕了;setContentView(layoutId)中完成上面步骤后紧接着调用LayoutInflater.inflate()将我们传入的layoutId填充为View树,inflate()只是解析了layout布局的最外层父控件,里面的子控件是通过rInflateChildren()方法递归解析完成的。在解析的过程中如果遇到开始<>标签会调用createViewFromTag()方法实例化一个View对象,并解析为view设置的属性attrs。inflate()方法执行完毕后,layout就被映射为View树了,然后将此View树add到mContentParent中,整个Activity的view树就形成了。
下一篇博客我们讲解
Activity的显示过程(Activtiy中的View是怎样显示出来的)。