环境情况:window7 x64,cuda9,cudnn7,pycharm
这个整理了网上很多的资料,并且进行代码修改后,得出的制作自己的训练数据很方便的的方法。
整体的代码在GitHub:https://github.com/yangdashi88/Mask_RCNN-master--TrainOwerDatset
记得给个星,你的星就是我的动力。
一、运行环境的安装:
1、下载好cuda9跟cudnn7,然后在安装好后,cuda其会自动添加到环境变量里,所以使用keras进行GPU加速的时候会自动使用这些库。
2、TensorFlow-gpu版本的安装,这个安装方法有三种,
第一种是直接在pycharm里的安装库里安装。
第二种就是使用conda来安装,这个在安装的时候可以指定安装的版本。例如:
conda install tensorflow-gpu==1.8.0第三种就是使用pip来安装,这个安装的的时候可以指定安装的版本,例如:
pip install tensorflow-gpu==1.8.0如果使用pip安装失败的话,则应当升级pip,如果使用pip来升级自身的识别的话,就可以使用conda来安装一个最新的pip来解决这个问题。
3、然后就安装keras就可以了。使用指令
conda install keras4、接着就是安装那个labelme打标工具。使用指令:
pip install pyqt5
pip install labelme
然后直接在cmd终端里输入指令:
labelme5、进行样本打标
(3) 点击“open”,打开需要标注的图像,选择对目标区域进行标注
假如你要标注的对象为人和狗,在画掩码过程中,一幅图像中如果有多个person、dog,命名规则为person1、person2…… dog1、dog2……。因为labelme生成的标签为一个label.png文件,这个文件只有一通道,在你标注时同一标签mask会被给予一个标签位,而mask要求不同的实例要放在不同的层中。最终训练索要得到的输入为一个w*h*n的ndarray,其中n为该图片中实例的个数
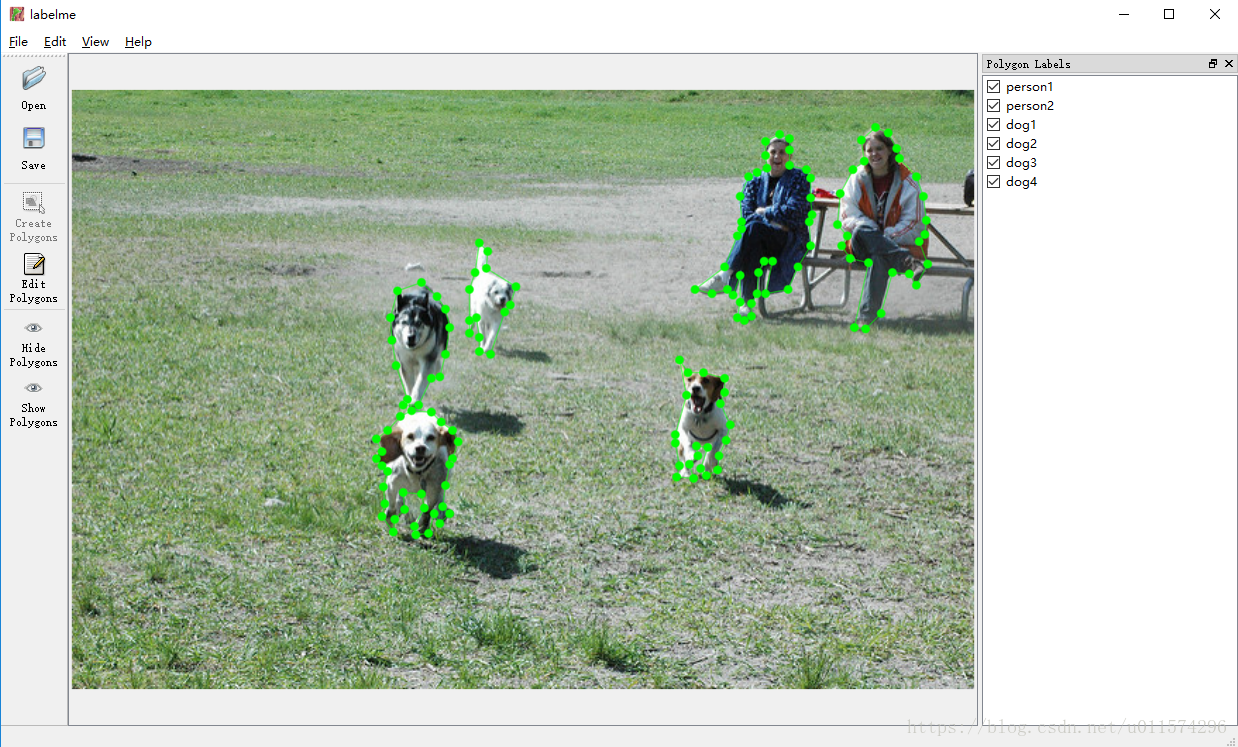
这里的打标的时候不要求每张图片按着类别顺序来进行打标,主要打标的区域选对类别即可。其打标后会生成一个json文件,这个文件里记录了打标的顺序,其中生成的mask图像会按打标顺序分别赋值从1开始的值。其记录的是打标顺序。
6、把打标后的jison文件转换为对应的五个文件。其中的代码文件是:labelme_json_to_dataset.py,使用的代码是:
import argparse
import json
import os
import os.path as osp
import warnings
import os.path
import subprocess
import numpy as np
import PIL.Image
import yaml
import cv2
import yaml
from labelme import utils


def main():
     #改为自己的打标好存放jison文件的路径
    json_file = 'C:/Users/QJ/Desktop/hh/total'
    list = os.listdir(json_file)
    for i in range(0, len(list)):
        path = os.path.join(json_file, list[i])
        if os.path.isfile(path):
            data = json.load(open(path))
            img = utils.img_b64_to_array(data['imageData'])
            lbl, lbl_names = utils.labelme_shapes_to_label(img.shape, data['shapes'])

            captions = ['%d: %s' % (l, name) for l, name in enumerate(lbl_names)]
            lbl_viz = utils.draw_label(lbl, img, captions)
            out_dir = osp.basename(list[i]).replace('.', '_')
            out_dir = osp.join(osp.dirname(list[i]), out_dir)
            out_dir=json_file+"/"+out_dir
            if not osp.exists(out_dir):
                os.mkdir(out_dir)

            PIL.Image.fromarray(img).save(osp.join(out_dir, 'img.png'))
            # PIL.Image.fromarray(lbl).save()
            labelpath = osp.join(out_dir, 'label.png')
            # PIL.Image.fromarray(lbl).save(labelpath)
            # opencvimg16 = cv2.imread(labelpath)
            # opencvimg.convertTo(opencvimg6,)
            lbl8u=np.zeros((lbl.shape[0],lbl.shape[1]),dtype=np.uint8)
            for i in range(lbl.shape[0]):
                for j in range(lbl.shape[1]):
                    lbl8u[i,j]=lbl[i,j]
            PIL.Image.fromarray(lbl8u).save(labelpath);
            # Alllabelpath="%s"

        PIL.Image.fromarray(lbl_viz).save(osp.join(out_dir, 'label_viz.png'))

        with open(osp.join(out_dir, 'label_names.txt'), 'w') as f:
            for lbl_name in lbl_names:
                f.write(lbl_name + '\n')

        warnings.warn('info.yaml is being replaced by label_names.txt')
        info = dict(label_names=lbl_names)
        with open(osp.join(out_dir, 'info.yaml'), 'w') as f:
            yaml.dump(info, f, default_flow_style=False)

        fov=open(osp.join(out_dir,'info.yaml'),'w')
        for key in info:
            fov.writelines(key)
            fov.write(':\n')
        for k,v in lbl_names.items():
            fov.write('  ')
            fov.write(k)
            fov.write(':\n')

        fov.close()
        print('Saved to: %s' % out_dir)


if __name__ == '__main__':
    main()
其要修改的代码位置是:
json_file = 'C:/Users/QJ/Desktop/hh/total'把这个改为自己的打标好的json文件路径即可。
7、接着就可以使用模型进行训练了,其训练的文件是train_shapes.py.
其中需要修改的为
a、在类DrugDataset()里的
    def load_shapes(self, count, height, width, img_floder, mash_floder, imglist, dataset_root_path):
        # 修改为自己的类别
        self.add_class("shapes", 1, "yellow")
        self.add_class("shapes", 2, "white")
        self.add_class("shapes", 3, "back")
修改为自己的类别顺序
b、在类ShapeConfig()里的
    NUM_CLASSES = 1 + 3  # background + 3 shapes

    # Use small images for faster training. Set the limits of the small side
    #这里改为自己的输入样本的尺寸大小,这个最大的值一定要能被64整除,否则训练的时候会报错
    IMAGE_MIN_DIM = 128
    IMAGE_MAX_DIM = 128
修改为自己的类别跟输入图像的最大、最小图像尺寸
c、修改数据根目录,这个代码为:
dataset_root_path = "C:/Users/QJ/Desktop/hh/"
img_floder = dataset_root_path + "rgb"# 修改为自己的网络输入大小
width = 128
height = 128把这个修改为自己的输入图片大小。
到此位置。修改完成,既可以启动进行训练。
8、在训练完后就可以选取一个训练模型进行测试。其中的代码是:test_shape.py
a、修改的代码是:
# 修改为自己的识别类别
class_names = ['BG', 'yellow', 'white','back']
width=128
height=128
b、把类别里的ShapeConfig里的代码
    NUM_CLASSES = 1 + 3  # background + 3 shapes

    # Use small images for faster training. Set the limits of the small side
    # the large side, and that determines the image shape.
    IMAGE_MIN_DIM = 128
    IMAGE_MAX_DIM = 128
设置类别跟训练图像最大、最小变化范围。
c、修改自己选取的模型路径:
# Local path to trained weights file
COCO_MODEL_PATH = os.path.join(ROOT_DIR, "mask_rcnn_shapes_0005.h5")
到此就可以测试自己训练的模型结果了。
9、最后的测试结果如下:
