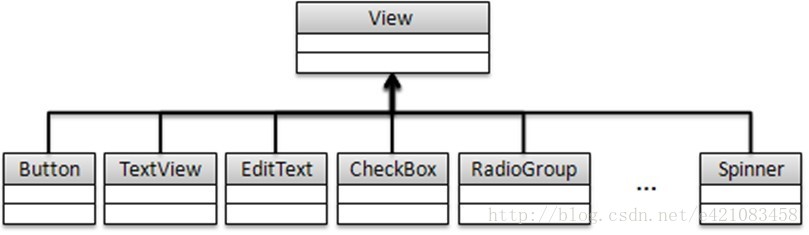
View组件简介
Android中的View组件包含了几乎所有的图形显示组件,像之前所使用到的TextView和Button实际上都是View类的子类。
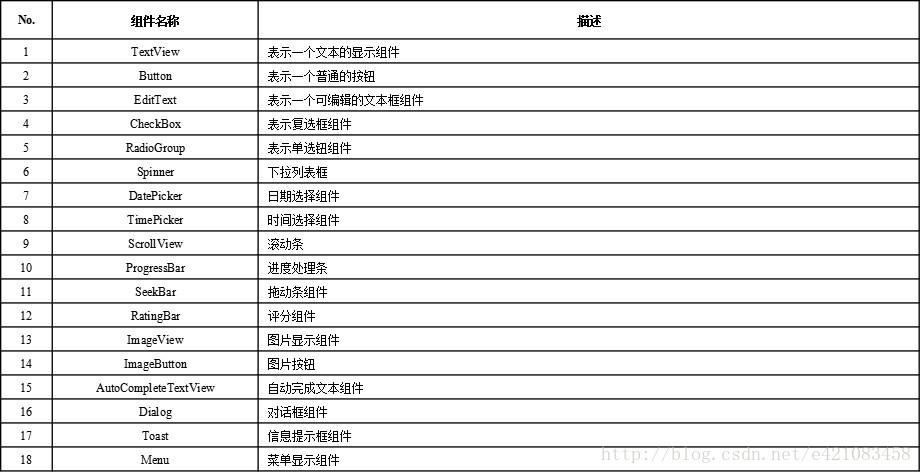
部分图形组件
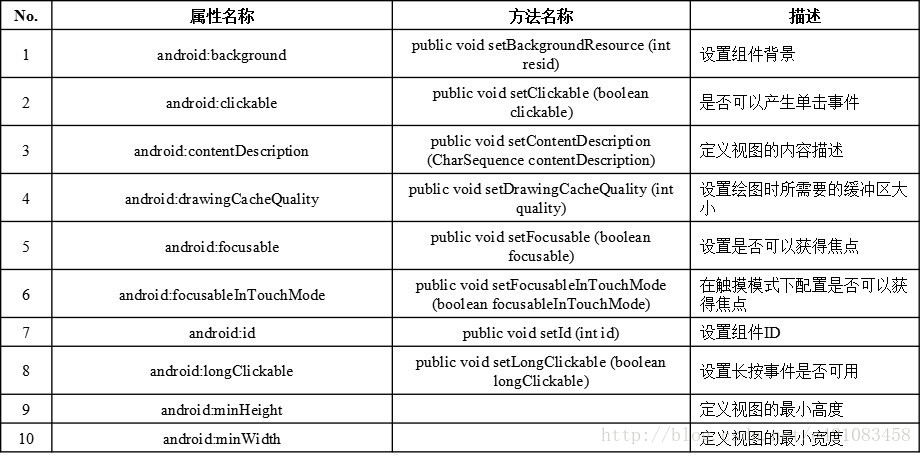
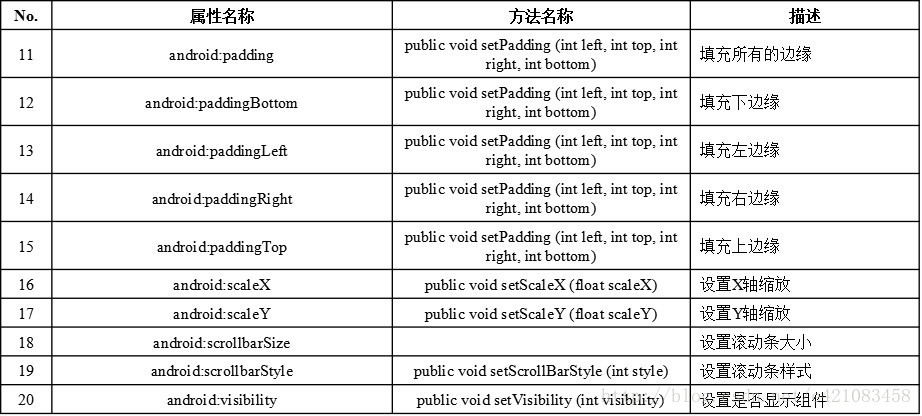
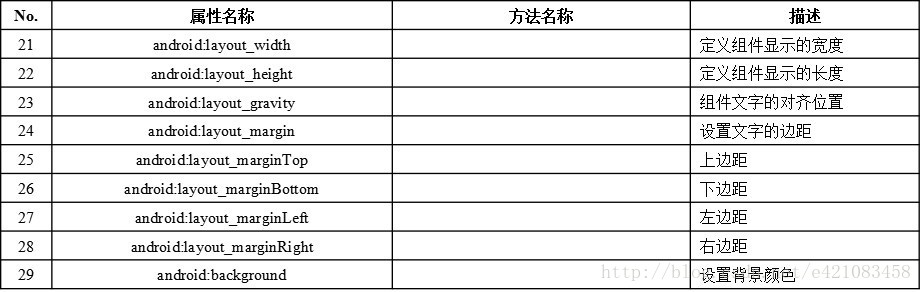
View组件常用属性及对应方法
TextView
TextView组件的主要功能是用于显示文本,实际上这种控件主要就是提供了一个标签的显示操作,此类定义如下:
java.lang.Object
↳android.view.View
↳android.widget.TextView
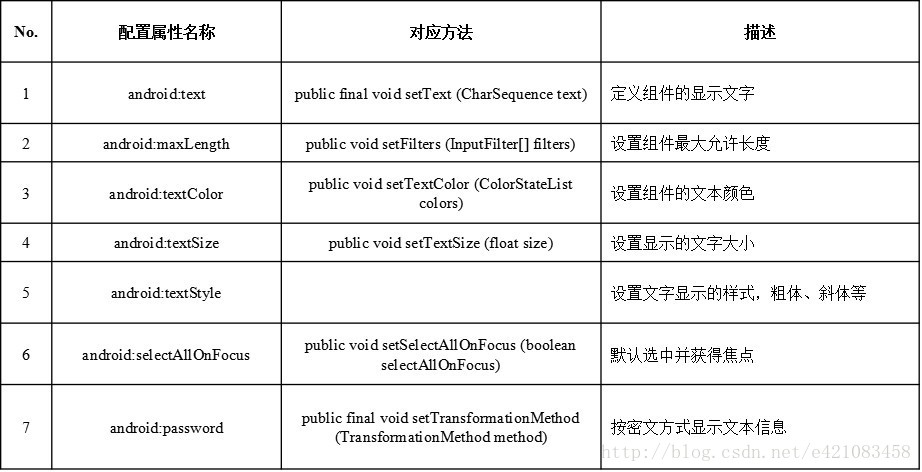
<TextView>组件的常用属性及对应方法
配置不使用样式表例子:
- <LinearLayout xmlns:android="http://schemas.android.com/apk/res/android"
- android:layout_width="fill_parent"
- android:layout_height="wrap_content"
- android:orientation="vertical" >
-
- <TextView
- android:id="@+id/mytext1"
- android:layout_width="fill_parent"
- android:layout_height="wrap_content"
- android:layout_marginLeft="20dip"
- android:layout_marginTop="20dip"
- android:text="牛儿吃草的博客"
- android:textColor="#000000"
- android:textSize="12pt" />
-
- <TextView
- android:id="@+id/mytext2"
- android:layout_width="fill_parent"
- android:layout_height="wrap_content"
- android:layout_marginLeft="20dip"
- android:layout_marginTop="10dip"
- android:text="博客:http://blog.csdn.net/e421083458" />
-
- <TextView
- android:id="@+id/mytext3"
- android:layout_width="fill_parent"
- android:layout_height="wrap_content"
- android:layout_marginLeft="20dip"
- android:maxLength="8"
- android:text="richard" />
-
- <TextView
- android:id="@+id/mytext4"
- android:layout_width="200dip"
- android:layout_height="29dip"
- android:background="@drawable/img_100"
- android:gravity="center_horizontal|center_vertical"
- android:text="这是在背景上的文字信息"
- android:textColor="#000000"
- android:textStyle="bold" />
-
- </LinearLayout>
使用样式表:
样式表文件:res/values/styles.xml
- <resources xmlns:android="http://schemas.android.com/apk/res/android">
-
- <!--
- Base application theme, dependent on API level. This theme is replaced
- by AppBaseTheme from res/values-vXX/styles.xml on newer devices.
- -->
- <style name="AppBaseTheme" parent="android:Theme.Light">
- <!--
- Theme customizations available in newer API levels can go in
- res/values-vXX/styles.xml, while customizations related to
- backward-compatibility can go here.
- -->
- </style>
-
-
- <style name="AppTheme" parent="AppBaseTheme">
-
- </style>
- <style name="msg_style">
- <item name="android:textSize">45px</item>
- <item name="android:textColor">#FFFF00</item>
- <item name="android:autoLink">all</item>
- <item name="android:layout_width">fill_parent</item>
- <item name="android:layout_height">wrap_content</item>
- </style>
- </resources>
布局文件:
- <LinearLayout xmlns:android="http://schemas.android.com/apk/res/android"
- android:layout_width="fill_parent"
- android:layout_height="wrap_content"
- android:orientation="vertical" >
-
- <TextView
- android:id="@+id/msg"
- android:layout_width="fill_parent"
- android:layout_height="fill_parent"
- android:autoLink="all"
- android:textColor="#FFFF00"
- android:textSize="45px"
- android:text="博客:http://blog.csdn.net/e421083458"
- />
- <TextView
- android:id="@+id/msg"
- style="@style/msg_style"
- android:text="网址:http://hi.baidu.com/amenmen" />
-
- </LinearLayout>
按钮组件:Button
按钮在人机交互截面上使用的是最多的,当提示用户进行某些选择的时候,就可以通过按钮的操作来接收用户的选择。在Android使用“<Button>”组件可以定义出一个显示的按钮,并且可以在按钮上指定相应的显示文字,Button类的继承结构如下:
java.lang.Object
↳ android.view.View
↳ android.widget.TextView
↳ android.widget.Button
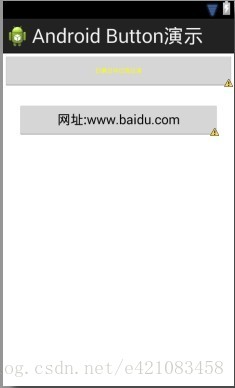
例子:
- <LinearLayout xmlns:android="http://schemas.android.com/apk/res/android"
- android:layout_width="fill_parent"
- android:layout_height="fill_parent"
- android:orientation="vertical" >
- <Button
- android:id="@+id/mybut1"
- android:layout_width="fill_parent"
- android:layout_height="wrap_content"
- android:textColor="#FFFF00"
- android:textSize="12px"
- android:text="日事日毕日高日清" />
- <Button
- android:id="@+id/mybut2"
- android:layout_width="fill_parent"
- android:layout_height="wrap_content"
- android:text="网址:www.baidu.com"
- android:layout_margin="30px"
- />
-
- </LinearLayout>
效果:
编辑框:EditText
文本显示组件(TextView)的功能只是显示一些基础的文字信息,而如果用户要想定义可以输入的文本组件以达到很好的人机交互操作,则只能使用编辑框:EditText完成,此类的定义如下:
java.lang.Object
↳ android.view.View
↳ android.widget.TextView
↳ android.widget.EditText
例子:
- <LinearLayout xmlns:android="http://schemas.android.com/apk/res/android"
- android:layout_width="fill_parent"
- android:layout_height="fill_parent"
- android:orientation="vertical" >
- <Button
- android:id="@+id/mybut2"
- android:layout_width="fill_parent"
- android:layout_height="wrap_content"
- android:text="网址:www.baidu.com"
- android:layout_margin="30px"
- />
- <EditText
- android:id="@+id/myet1"
- android:layout_width="fill_parent"
- android:layout_height='wrap_content'
- android:text="牛儿吃草"
- android:selectAllOnFocus="true"
- />
- <EditText
- android:id="@+id/myet2"
- android:layout_width="fill_parent"
- android:layout_height="wrap_content"
- android:text="网址:http://www.baidu.com/"
- />
- <EditText
- android:id="@+id/myet3"
- android:layout_width="fill_parent"
- android:layout_height="wrap_content"
- android:password="true"
- android:text="用户登录密码"
- />
- <EditText
- android:id="@+id/myet4"
- android:layout_width="fill_parent"
- android:layout_height="wrap_content"
- android:text="1234567890"
- android:numeric="integer"
- />
- </LinearLayout>
单选钮:RadioGroup
单选钮在开发中提供了一种多选一的操作模式,也是经常见到的一种组件,例如:在选择文件编码的时候只能从多种编码中选择一种,或者是选择性别的时候只能从“男”或“女”之中选择一个,而在Android中可以使用RadioGroup来定义单选钮组件,此类的定义如下:
java.lang.Object
↳ android.view.View
↳ android.view.ViewGroup
↳ android.widget.LinearLayout
↳ android.widget.RadioGroup
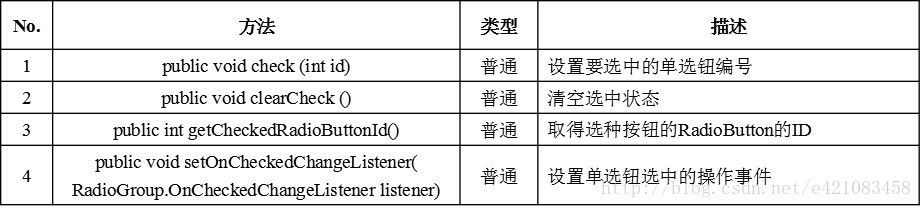
RadioGroup类的常用操作方法
RadioButton类
RadioGroup提供的只是一个单选钮的容器,只有在此容器之中配置多个按钮组件之后才可以使用,而要想设置单选钮的内容,则需要使用RadioButton类,此类定义如下:
java.lang.Object
↳ android.view.View
↳ android.widget.TextView
↳ android.widget.Button
↳ android.widget.CompoundButton
↳ android.widget.RadioButton
RadioGroup与RadioButton联合举例:
- <LinearLayout xmlns:android="http://schemas.android.com/apk/res/android"
- android:layout_width="fill_parent"
- android:layout_height="fill_parent"
- android:orientation="vertical" >
- <TextView
- android:id="@+id/encinfo"
- android:layout_width="fill_parent"
- android:layout_height="wrap_content"
- android:textSize="20px"
- android:layout_margin="10px"
- android:text="请选择要使用的文字编码"
- />
- <RadioGroup
- android:id="@+id/encoding"
- android:layout_width="fill_parent"
- android:layout_height="wrap_content"
- android:orientation="vertical"
- android:checkedButton="@+id/gbk"
- >
- <RadioButton
- android:id="@+id/utf"
- android:text="UTF编码"/>
- <RadioButton
- android:id="@+id/gbk"
- android:text="GBK编码"
- />
- </RadioGroup>
- </LinearLayout>
复选框:CheckBox
CheckBox的主要功能是完成复选框的操作,在用户输入信息的时候,可以一次性选择多个内容,例如:用户在选择个人兴趣爱好的时候一定会存在多个,则此时就直接使用CheckBox即可完成功能。
在Android中如果要想定义复选框,可以使用android.widget.CheckBox类,此类定义如下:
java.lang.Object
↳ android.view.View
↳ android.widget.TextView
↳ android.widget.Button
↳ android.widget.CompoundButton
↳ android.widget.CheckBox
CheckBox类的常用方法

定义复选框 —— main.xml
- <LinearLayout xmlns:android="http://schemas.android.com/apk/res/android"
- android:layout_width="fill_parent"
- android:layout_height="fill_parent"
- android:orientation="vertical" >
-
- <TextView
- android:id="@+id/info"
- android:text="您经常浏览的网站是:"
- android:textSize="20px"
- android:layout_width="fill_parent"
- android:layout_height="wrap_content"
- />
- <CheckBox
- android:id="@+id/url1"
- android:text="www.baidu.com"
- android:layout_width="fill_parent"
- android:layout_height="wrap_content"
- />
- <CheckBox
- android:id="@+id/url2"
- android:text="www.csdn.net"
- android:layout_width="fill_parent"
- android:layout_height="wrap_content"
- android:checked="true"
- />
- <CheckBox
- android:id="@+id/url3"
- android:text="www.google.com"
- android:layout_width="fill_parent"
- android:layout_height="wrap_content"
- />
-
- </LinearLayout>
通过程序操作复选框组件
- package com.richard.radiogroup;
-
- import android.os.Bundle;
- import android.app.Activity;
- import android.view.Menu;
- import android.widget.CheckBox;
-
- public class MainActivity extends Activity {
- private CheckBox box = null;
-
- @Override
- protected void onCreate(Bundle savedInstanceState) {
- super.onCreate(savedInstanceState);
- setContentView(R.layout.main);
- this.box = (CheckBox) super.findViewById(R.id.url3);
- box.setChecked(true);
- box.setText("www.iokokok.com");
- }
-
- @Override
- public boolean onCreateOptionsMenu(Menu menu) {
-
- getMenuInflater().inflate(R.menu.main, menu);
- return true;
- }
-
- }
下拉列表框Spinner
下拉列表框也是一种常见的图形组件,它可以为用户提供列表的选则方式,与复选框或单选钮相比还可以节省手机的屏幕空间,在Android中可以使用android.widget.Spinner类实现,此类定义如下:
java.lang.Object
↳ android.view.View
↳ android.view.ViewGroup
↳ android.widget.AdapterView<T extends android.widget.Adapter>
↳ android.widget.AbsSpinner
↳ android.widget.Spinner
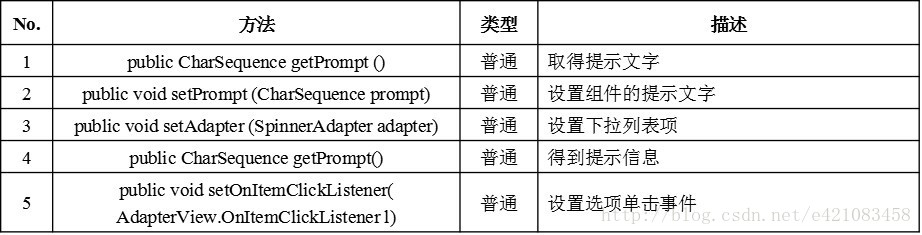
Spinner类的常用方法
配置列表项
在Android中,可以直接在main.xml文件中定义“<Spinner>”节点,但是在定义此元素的时候却不能直接设置其显示的列表项,关于下拉列表框中的列表项有以下两种方式进行配置:
方式一:直接通过资源文件配置;
创建资源文件:values/city_data.xml
- <resources>
- <string-array name="city_labels">
- <item>北京</item>
- <item>上海</item>
- <item>南京</item>
- </string-array>
- </resources>
创建布局文件:
- <LinearLayout xmlns:android="http://schemas.android.com/apk/res/android"
- android:layout_width="fill_parent"
- android:layout_height="fill_parent"
- android:orientation="vertical" >
-
- <TextView
- android:id="@+id/info_city"
- android:layout_width="fill_parent"
- android:layout_height="wrap_content"
- />
- <Spinner
- android:id="@+id/mycity"
- android:prompt="@string/city_prompt"
- android:layout_width="fill_parent"
- android:layout_height="wrap_content"
- android:entries="@array/city_labels"
- />
- </LinearLayout>
方式二:通过android.widget.ArrayAdapter类读取资源文件或者是指定具体设置的数据;
首先创建资源文件:values/color_data.xml
- <resources>
- <string-array name="color_labels">
- <item>红色</item>
- <item>绿色</item>
- <item>蓝色</item>
- </string-array>
- </resources>
再创建布局文件:
- <LinearLayout xmlns:android="http://schemas.android.com/apk/res/android"
- android:layout_width="fill_parent"
- android:layout_height="fill_parent"
- android:orientation="vertical" >
-
- <TextView
- android:id="@+id/info_city"
- android:layout_width="fill_parent"
- android:layout_height="wrap_content"
- android:text="请选择佻喜欢的颜色"
- />
- <Spinner
- android:id="@+id/color_city"
- android:layout_width="fill_parent"
- android:layout_height="wrap_content"
- />
- <TextView
- android:id="@+id/myedu"
- android:layout_width="fill_parent"
- android:layout_height="wrap_content"
- android:text="请选择您的学历"
- />
- <Spinner
- android:id="@+id/edu_data"
- android:layout_width="fill_parent"
- android:layout_height="wrap_content"
- />
- </LinearLayout>
编写Activity程序
- package com.richard.spinner;
-
- import java.util.ArrayList;
- import java.util.List;
-
- import android.os.Bundle;
- import android.app.Activity;
- import android.view.Menu;
- import android.widget.ArrayAdapter;
- import android.widget.Spinner;
-
- public class MainActivity extends Activity {
- private Spinner spiColor = null;
- private ArrayAdapter<CharSequence> adapterColor = null;
- private Spinner spiEdu = null;
- private ArrayAdapter<CharSequence> adapterEdu = null;
- private List<CharSequence> dataEdu = null;
-
- @Override
- protected void onCreate(Bundle savedInstanceState) {
- super.onCreate(savedInstanceState);
- setContentView(R.layout.activity_main);
- this.spiColor = (Spinner) super.findViewById(R.id.color_city);
- this.spiColor.setPrompt("请选择您喜欢的颜色");
- this.adapterColor = ArrayAdapter.createFromResource(this, R.array.color_labels, android.R.layout.select_dialog_item);
- this.adapterColor.setDropDownViewResource(android.R.layout.simple_spinner_dropdown_item);
- this.spiColor.setAdapter(this.adapterColor);
-
- this.dataEdu = new ArrayList<CharSequence>();
- this.dataEdu.add("大学");
- this.dataEdu.add("研究生");
- this.dataEdu.add("高中");
- this.spiEdu = (Spinner) super.findViewById(R.id.edu_data);
- this.spiEdu.setPrompt("请选择您喜欢的学历");
- this.adapterEdu = new ArrayAdapter<CharSequence>(this, android.R.layout.simple_spinner_item, this.dataEdu);
- this.adapterEdu.setDropDownViewResource(android.R.layout.simple_spinner_dropdown_item);
- this.spiEdu.setAdapter(this.adapterEdu);
-
- }
-
- @Override
- public boolean onCreateOptionsMenu(Menu menu) {
-
- getMenuInflater().inflate(R.menu.main, menu);
- return true;
- }
-
- }
ImageView组件
ImageView组件的主要功能是为图片展示提供一个容器,android.widget.ImageView类的定义如下:
java.lang.Object
↳ android.view.View
↳ android.widget.ImageView
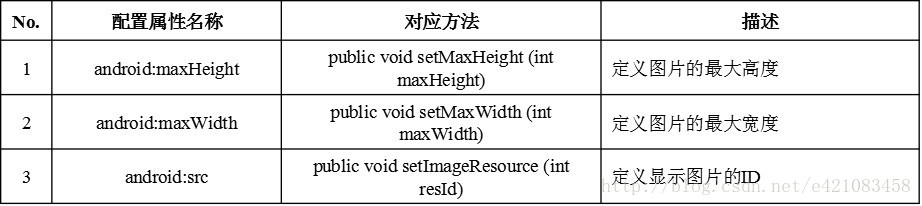
ImageView定义的属性及操作方法
编写main.xml文件,定义ImageView组件
- <RelativeLayout xmlns:android="http://schemas.android.com/apk/res/android"
- xmlns:tools="http://schemas.android.com/tools"
- android:layout_width="match_parent"
- android:layout_height="match_parent"
- android:paddingBottom="@dimen/activity_vertical_margin"
- android:paddingLeft="@dimen/activity_horizontal_margin"
- android:paddingRight="@dimen/activity_horizontal_margin"
- android:paddingTop="@dimen/activity_vertical_margin"
- tools:context=".MainActivity" >
-
- <ImageView
- android:id="@+id/img"
- android:src="@drawable/ic_launcher"
- android:layout_width="fill_parent"
- android:layout_height="wrap_content"
- />
- </RelativeLayout>
这里讲一下src=@drawable/ic_launcher,这里的ic_launcher其实是res/drawable-hdpi/ic_launcher.png,大家只要知道在这里就行了。
图片按钮:ImageButton
与按钮组件(Button)类似,在Android中又提供了一个图片按钮,可以直接使用ImageButton定义,此类定义如下:
java.lang.Object
↳ android.view.View
↳ android.widget.ImageView
↳ android.widget.ImageButton
在main.xml文件中定义ImageButton组件
- <LinearLayout xmlns:android="http://schemas.android.com/apk/res/android"
- android:layout_width="fill_parent"
- android:layout_height="fill_parent"
- android:orientation="vertical" >
-
- <ImageButton
- android:id="@+id/rig"
- android:src="@drawable/ic_launcher"
- android:layout_width="wrap_content"
- android:layout_height="wrap_content"
- />
-
-
- </LinearLayout>
时间选择器:TimePicker
在Android中使用TimePicker(时间选择器),可以进行时间的快速调整,此类定义如下:
java.lang.Object
↳ android.view.View
↳ android.view.ViewGroup
↳ android.widget.FrameLayout
↳ android.widget.TimePicker
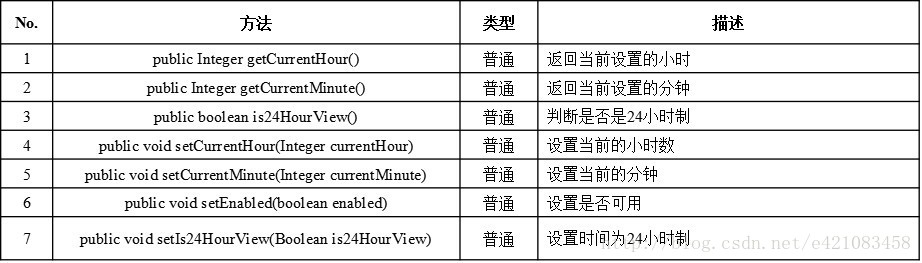
TimePicker的常用方法
日期选择器:DatePicker
与时间选择器对应的还有一个日期选择器(DatePicker),可以完成年、月、日的设置,此类定义如下:
java.lang.Object
↳ android.view.View
↳ android.view.ViewGroup
↳ android.widget.FrameLayout
↳ android.widget.DatePicker
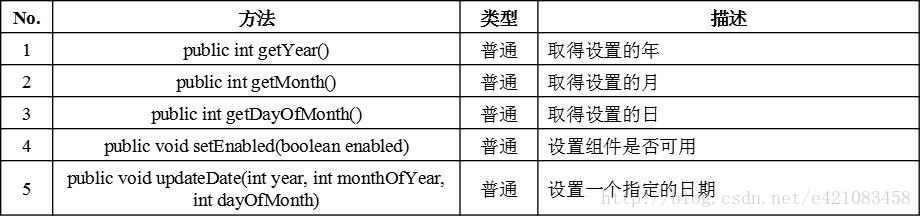
DatePicker类的常用方法
TimePicker和DatePicker合并展示的例子:
- <LinearLayout xmlns:android="http://schemas.android.com/apk/res/android"
- android:layout_width="fill_parent"
- android:layout_height="fill_parent"
- android:orientation="vertical" >
-
- <TimePicker
- android:id="@+id/tpl"
- android:layout_width="wrap_content"
- android:layout_height="wrap_content" />
- <TimePicker
- android:id="@+id/tp2"
- android:layout_width="wrap_content"
- android:layout_height="wrap_content" />
- <DatePicker
- android:id="@+id/dp1"
- android:layout_width="wrap_content"
- android:layout_height="wrap_content"/>
- <DatePicker
- android:id="@+id/dp2"
- android:layout_width="wrap_content"
- android:layout_height="wrap_content"/>
- </LinearLayout>
编写Activity程序,将时间变为24小时制 ,设置一个日期 :
- package com.richard.timepicker;
-
- import android.os.Bundle;
- import android.app.Activity;
- import android.view.Menu;
- import android.widget.DatePicker;
- import android.widget.TimePicker;
-
- public class MainActivity extends Activity {
-
- private TimePicker mytp = null;
- private DatePicker mydp = null;
-
- @Override
- protected void onCreate(Bundle savedInstanceState) {
- super.onCreate(savedInstanceState);
- setContentView(R.layout.activity_main);
- this.mytp = (TimePicker) super.findViewById(R.id.tp2);
- this.mytp.setIs24HourView(true);
- this.mytp.setCurrentHour(18);
- this.mytp.setCurrentMinute(30);
-
- this.mydp = (DatePicker) super.findViewById(R.id.dp2);
- this.mydp.updateDate(1998,7,27);
-
- }
-
- @Override
- public boolean onCreateOptionsMenu(Menu menu) {
-
- getMenuInflater().inflate(R.menu.main, menu);
- return true;
- }
-
- }