Spring Boot实战
第一章 入门
Spring Boot最重要的四个核心:
- 自动配置:针对很多Spring应用程序常见的应用功能,Spring Boot能自动提供相关配置。
- 起步依赖:告诉Spring Boot需要什么功能,它就能引入需要的库。
- 命令行界面:这是Spring Boot可选特性,借此你只需要写代码就能完成完整的应用程序,无需传统项目构建。
- Actuator:它让你能够深入运行中的Spring Boot应用程序,一探究竟。
Actuator有能做什么:
- Spring应用程序上下文里配置的Bean。
- Spring Boot的自动配置做的决策
- 应用程序收到的环境变量、系统属性、配置属性和命令行参数
- 应用程序里线程的当前状态
- 应用程序最近处理过的HTTP请求的追踪情况
- 各种和内存用量、垃圾回收、Web请求以及数据源用量相关的指标
第二章 开发第一个App
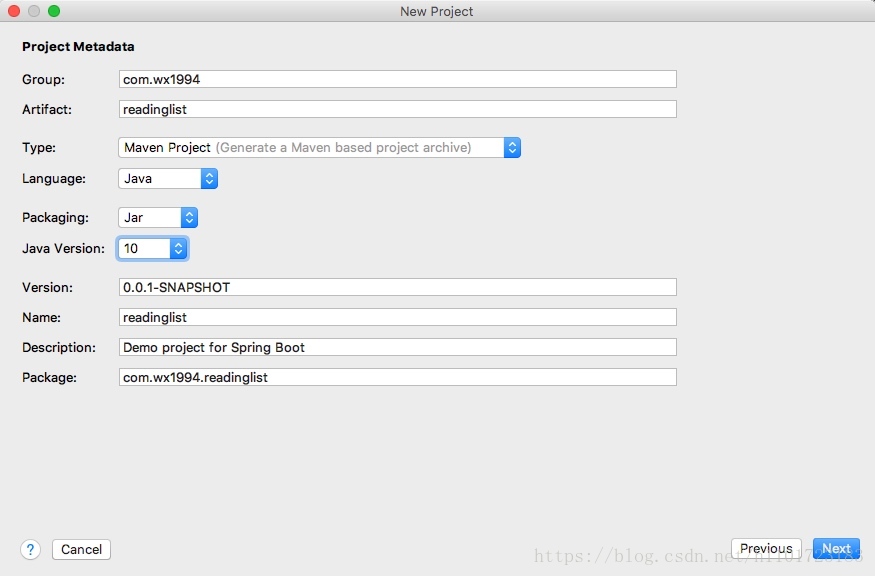
创建Spring Boot应用
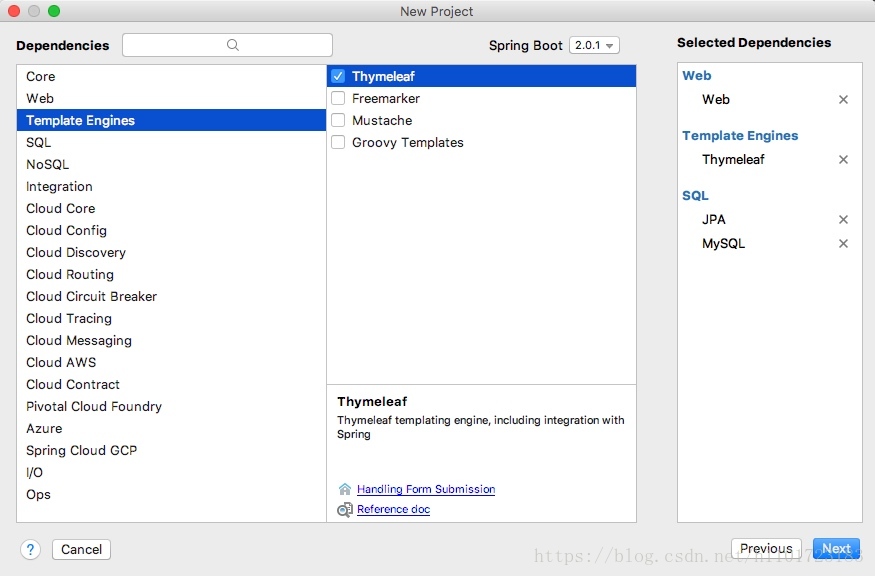
添加对应的依赖
按照步骤,完成创建项目。
启动引导Spring
- ReadinglistApplication在Spring Boot应用程序里有两个作用:配置和启动引导。
@SpringBootApplication // 开启组件扫描和自动配置
public class ReadinglistApplication {

    public static void main(String[] args) {
        SpringApplication.run(ReadinglistApplication.class, args); // 负责启动引导应用程序
    }
}
@SpringBootApplication开启了Spring的组件扫描和Spring Boot的自动配置功能。 @SpringBootApplication将三个有用的注解组合在一起。
- Spring的@Configuration:标明该类使用Spring基于Java的配置。
- Spring的@ComponentScan:启动组件扫描,编写的Web控制器类和其他组件才能被自动发现并注册为Spring应用程序上下文里的Bean。
- Spring Boot的@EnableAutoConfiguration: 也可以称为@Abracadabra,配置开启Spring Boot自动配置的魔力。
创建Book类
/* * * Created by wangxinhuang on 2018/4/18. */ @Entity public class Book { @Id @GeneratedValue(strategy = GenerationType.AUTO) private Long id; private String reader; private String isbn; private String title; private String author; private String description; public Long getId() { return id; } public void setId(Long id) { this.id = id; } public String getReader() { return reader; } public void setReader(String reader) { this.reader = reader; } public String getIsbn() { return isbn; } public void setIsbn(String isbn) { this.isbn = isbn; } public String getTitle() { return title; } public void setTitle(String title) { this.title = title; } public String getAuthor() { return author; } public void setAuthor(String author) { this.author = author; } public String getDescription() { return description; } public void setDescription(String description) { this.description = description; } }- @Entity注解标明它是一个JPA实体
- id属性加了@Id和@GeneratedValue注解,说明这个字段是实体的唯一标识,并且这个字段的值是自动生成的。
定义仓库接口
public interface ReadingListRepository extends JpaRepository<Book, Long> { List<Book> findByReader(String reader); }- 通过扩展JpaRepository,ReadingListRepository直接继承18个执行常用持久化操作的方法。
- JpaRepository是一个泛型接口,有两个参数:仓库操作的领域对象类型,及其ID属性的类型。
创建阅读列表控制器
@Controller @RequestMapping("/") public class ReadingListController { @Autowired private ReadingListRepository readingListRepository; @GetMapping(value = "/{reader}") public String readersBooks(@PathVariable("reader") String reader, Model model) { List<Book> readingList = readingListRepository.findByReader(reader); if (readingList != null) { model.addAttribute("books", readingList); } return "readingList"; } @PostMapping(value = "/{reader}") public String addToReadingList(@PathVariable("reader") String reader, Book book) { book.setReader(reader); readingListRepository.save(book); return "redirect:/{reader}"; } }- @Controller会自动将注册为Spring应用程序上下文里的一个Bean。
- @RequestMapping将所有的处理器方法都映射到了”/”这个URL路径上
- readersBooks():处理/{reader}上的HTTP Get请求,根据路径里指定的读者,从(通过控制器的构造器注入的)仓库获取Book列表。然后将这个列表塞入模型,最后返回readingList作为呈现模型的视图逻辑名称。
- addToReadingList():处理/{reader}上的HTTP Post请求,将请求正文里的数据绑定到一个Book对象上。 该方法把Book对象的reader属性设置为读者的姓名,虽有通过仓库的save()方法保存修改后的Book对象,最后重定向到/{reader}。
创建Thymeleaf模板 src/resources/templates/readingList.html
<!DOCTYPE html>
<html lang="en" xmlns:th="http://www.w3.org/1999/xhtml">
<head>
    <meta charset="UTF-8">
    <link rel="stylesheet" th:href="@{/style.css}"/>
    <title>阅读列表</title>
</head>
<body>
<h2>你的阅读列表</h2>
<div th:unless="${#lists.isEmpty(books)}">
    <dl th:each="book : ${books}">
        <dt class="bookHeadline">
            <span th:text="${book.title}">标题</span>
            <span th:text="${book.author}">作者</span>
            (ISBN: <span th:text="${book.isbn}">ISBN</span>)
        </dt>
        <dd class="bookDescription">
            <span th:if="${book.description}" th:text="${book.description}">描述</span>
            <span th:if="${book.description eq null}">暂无描述</span>
        </dd>
    </dl>
</div>
<div th:if="${#lists.isEmpty(books)}">
    <p>您的书架上没有书本</p>
</div>

<hr/>

<h3>添加书籍</h3>
<form method="post">
    <label for="title">标题:</label>
    <input type="text" name="title" size="50"><br/>
    <label for="author">作者:</label>
    <input type="text" name="author" size="50"><br/>
    <label for="isbn">ISBN:</label>
    <input type="text" name="isbn" size="15"><br/>
    <label for="description">描述:</label><br/>
    <textarea name="description" cols="80" rows="5"></textarea>
    <input type="submit">
</form>
</body>
</html>
新增css样式 src/resources/static/style.css
body {
    background-color: #cccccc;
}

.bookHeadline {
    font-size: 12pt;
    font-weight: bold;
}

.bookDescription {
    font-size: 10pt;
}

label {
    font-weight: bold;
}
在application.yml增加相关配置
server:
  port: 8000

spring:
  datasource:
    driver-class-name: com.mysql.jdbc.Driver
    url: jdbc:mysql://127.0.0.1:3307/book?characterEncoding=UTF-8&useSSL=false
    username: root
    password: root


  thymeleaf:
    mode: HTML
    encoding: UTF-8
    servlet:
      content-type: text/html
    # 开发时关闭缓存,不然没法看到实时页面
    cache: false

  jpa:
    hibernate:
      dialect: org.hibernate.dialect.MySQL5Dialect
      ddl-auto: update
      show-sql: true
第三章 自定义配置
添加spring-boot-starter-security依赖
<dependency>
    <groupId>org.springframework.boot</groupId>
    <artifactId>spring-boot-starter-security</artifactId>
</dependency>
创建读者Reader对象
@Entity public class Reader implements UserDetails { private static final long serialVersionUID = 1L; @Id private String username; private String fullname; private String password; // 授予READER权限 @Override public Collection<? extends GrantedAuthority> getAuthorities() { return Arrays.asList(new SimpleGrantedAuthority("READER")); } // 不过期 @Override public boolean isAccountNonExpired() { return true; } // 不加锁 @Override public boolean isAccountNonLocked() { return true; } @Override public boolean isCredentialsNonExpired() { return true; } // 不禁用 @Override public boolean isEnabled() { return true; } @Override public String getUsername() { return username; } public void setUsername(String username) { this.username = username; } public String getFullname() { return fullname; } public void setFullname(String fullname) { this.fullname = fullname; } @Override public String getPassword() { return password; } public void setPassword(String password) { this.password = password; } }- username字段有@Id注解,表明是实体的ID
- Reader实现了UserDetails接口以及方法,这样Reader就能代表Spring Security里的用户。
- getAuthorities()始终会为用户授予READER权限。
- isAccountNonExpired()、isAccountNonLocked()、isCredentialsNonExpired()、isEnabled()都返回true,这样账户就不会过期,不会被锁定,不会被撤销,不会被禁用。
创建ReaderRepository仓库接口
public interface ReaderRepository extends JpaRepository<Reader, String> {
    public Reader findByUsername(String username);
}
覆盖自动配置的显式安全配置
@Configuration @EnableWebSecurity public class SecurityConfig extends WebSecurityConfigurerAdapter { @Autowired private ReaderRepository readerRepository; @Override protected void configure(HttpSecurity http) throws Exception { http.authorizeRequests() .antMatchers("/") .access("hasRole('READER')") // 要求登录者有READER角色 .antMatchers("/**") .permitAll() .and() .formLogin() .loginPage("/login") // 设置登录表单的路径 .failureUrl("/login?error=true"); } @Override protected void configure(AuthenticationManagerBuilder auth) throws Exception { auth.userDetailsService(new UserDetailsService() { @Override public UserDetails loadUserByUsername(String username) throws UsernameNotFoundException { return readerRepository.findByUsername(username); } }); } }- configure(HttpSecurity http)方法指明, 请求只有经过身份认证且拥有READER角色的用户才能访问,其他的所有请求路径向所有用户开放了权限。这里还将登录页和登录失败页(带有一个error属性)指定到/login。
- configure(AuthenticationManagerBuilder auth)设置了一个自定义的UserDetailsService,这个服务可以任意实现了UserDetailsService的类,用于查找指定用户名的用户。
Spring Boot应用程序有多种设置途径,能从多种属性源获得属性,包括
- 命令行参数
- java:comp/env里的JNDI属性
- JVM系统属性
- 操作系统环境变量
- 随机生成的带random.*前缀的属性
- 应用程序以外的application.properties或者application。yml文件
- 打包在应用程序内的application.properties或application。yml文件
- 通过@PropertySource标注的属性源
- 默认属性
- 这个列表按照优先级排序。
- 任何在高优先级属性源里设置的属性都会覆盖低优先级的相同属性。
- 命令行参数会覆盖其他属性源里的属性。
- application.properties和application.yml文件能放在以下四个位置
- 外置,在相对于应用程序运行目录的/config子目录里
- 外置,在应用程序运行的目录里
- 内置,在config包内
- 内置,在Classpath根目录
- 列表按照优先级排序,/config子目录里的application.properties会覆盖应用程序Classpath里的application。properties中的相同属性。
自动配置微调
- Thymeleaf模板默认缓存,在开发中我们要实时看到变更的效果,需要禁用掉Thymeleaf模板缓存
spring:
  thymeleaf:
    # 开发时关闭缓存,不然没法看到实时页面,生产环境要去掉
    cache: false
配置日志
- Spring Boot默认使用Logback来记录日志,如果我们需要使用Log4j2先排除根起步依赖传入的默认日志起步依赖
<dependency> <groupId>org.springframework.boot</groupId> <artifactId>spring-boot-starter</artifactId> <exclusions> <exclusion> <groupId>org.springframework.boot</groupId> <artifactId>spring-boot-starter-logging</artifactId> </exclusion> </exclusions> </dependency>- 添加Log4j依赖
<dependency> <groupId>org.springframework.boot</groupId> <artifactId>spring-boot-starter-log4j2</artifactId> </dependency>- 新增src/main/resources/logback.xml文件
<configuration>

    <!--定义日志文件的存储地址 勿在 LogBack 的配置中使用相对路径-->
    <property name="LOG_HOME" value="/developer/logs" />

    <!-- 控制台输出 -->
    <appender name="STDOUT" class="ch.qos.logback.core.ConsoleAppender">
        <encoder class="ch.qos.logback.classic.encoder.PatternLayoutEncoder">
            <!--格式化输出:%d表示日期,%thread表示线程名,%-5level:级别从左显示5个字符宽度%msg:日志消息,%n是换行符-->
            <pattern>%d{yyyy-MM-dd HH:mm:ss.SSS} [%thread] %-5level %logger{50} - %msg%n</pattern>
        </encoder>
    </appender>

    <!-- 按照每天生成日志文件 -->
    <appender name="FILE" class="ch.qos.logback.core.rolling.RollingFileAppender">
        <rollingPolicy class="ch.qos.logback.core.rolling.TimeBasedRollingPolicy">
            <!--日志文件输出的文件名-->
            <FileNamePattern>${LOG_HOME}/TestWeb.log.%d{yyyy-MM-dd}.log</FileNamePattern>
            <!--日志文件保留天数-->
            <MaxHistory>30</MaxHistory>
        </rollingPolicy>

        <encoder class="ch.qos.logback.classic.encoder.PatternLayoutEncoder">
            <!--格式化输出:%d表示日期,%thread表示线程名,%-5level:级别从左显示5个字符宽度%msg:日志消息,%n是换行符-->
            <pattern>%d{yyyy-MM-dd HH:mm:ss.SSS} [%thread] %-5level %logger{50} - %msg%n</pattern>
        </encoder>

        <!--日志文件最大的大小-->
        <triggeringPolicy class="ch.qos.logback.core.rolling.SizeBasedTriggeringPolicy">
            <MaxFileSize>10MB</MaxFileSize>
        </triggeringPolicy>
    </appender>

    <!-- 日志输出级别 -->
    <!-- Strictly speaking, the level attribute is not necessary since -->
    <!-- the level of the root level is set to DEBUG by default.       -->
    <root level="INFO">
        <appender-ref ref="STDOUT" />
    </root>

</configuration>
应用程序Bean的配置外置
- 增加spring-boot-configuration-processor依赖
<dependency> <groupId>org.springframework.boot</groupId> <artifactId>spring-boot-configuration-processor</artifactId> </dependency>- 创建单独的Bean命名AmazonProperties,添加@ConfigurationProperties是注解。
@Component @ConfigurationProperties("amazon") // 注入带amazon前缀的属性 public class AmazonProperties { private String associateId; public String getAssociateId() { return associateId; } public void setAssociateId(String associateId) { this.associateId = associateId; } }- 在application.yml中配置参数
amazon:
  associateId: habuma-20
使用Profile进行配置
- 使用特定的Profile的属性文件,遵循application-{profile}.yml
- application-development.yml
- application-production.yml
- 在application.yml中设置
spring: profiles: active: production- 也可以使用配置@Profile(“production”)进行配置
@Profile("production")- 使用特定的Profile的属性文件,遵循application-{profile}.yml
定制应用程序错误页面
- 创建src/main/resources/templates/error.html
<!DOCTYPE html>
<html lang="en" xmlns:th="http://www.thymeleaf.org">
<head>
    <meta charset="UTF-8">
    <title>错误页面</title>
</head>
<body>
    <div class="errorPage">
        <img th:src="@{/icon_error.png}"></img>
        <p>There seems to be a problem with the page you requested(<span th:text="${path}"></span>).</p>
        <p th:text="${'Details: ' + message}"></p>
    </div>
</body>
</html>
部署到服务器
构建War文件
- 修改pom.xml中的packaging
<packaging>war</packaging>- 创建SpringBootServletInitializer子类ReadingListServletInitializer
public class ReadingListServletInitializer extends SpringBootServletInitializer {

    @Override
    protected SpringApplicationBuilder configure(SpringApplicationBuilder builder) {
        return builder.sources(Application.class);
    }
}