1.开发步骤
- 创建SpringBoot应用,选择需要的模块
- SpringBoot已经默认将场景配置好了,只需要在配置中指定少量配置即可运行
- 自己编写业务代码
自动配置原理需掌握清楚:如帮我们配置了什么;可以修改吗;能修改哪些;能不能扩展。。。
xxxAutoConfiguration:给容器中自动配置组件
xxxProperties:配置类来封装配置文件的内容
2.SpringBoot对静态资源的映射规则
@ConfigurationProperties(prefix = "spring.resources", ignoreUnknownFields = false)
public class ResourceProperties implements ResourceLoaderAware, InitializingBean {
    //可以设置和静态资源相关的参数,缓存时间等
public void addResourceHandlers(ResourceHandlerRegistry registry) {
if (!this.resourceProperties.isAddMappings()) {
logger.debug("Default resource handling disabled");
} else {
Integer cachePeriod = this.resourceProperties.getCachePeriod();
if (!registry.hasMappingForPattern("/webjars/**")) {
this.customizeResourceHandlerRegistration(registry.addResourceHandler(new String[]{"/webjars/**"}).addResourceLocations(new String[]{"classpath:/META-INF/resources/webjars/"}).setCachePeriod(cachePeriod));
}
String staticPathPattern = this.mvcProperties.getStaticPathPattern();
if (!registry.hasMappingForPattern(staticPathPattern)) {
this.customizeResourceHandlerRegistration(registry.addResourceHandler(new String[]{staticPathPattern}).addResourceLocations(this.resourceProperties.getStaticLocations()).setCachePeriod(cachePeriod));
}
}
}1. 所有的/webjars/**,都去classpath:/META-INF/resources/webjars/找资源;
webjars:以jar包的方式引入静态资源 引入maven配置
例子:
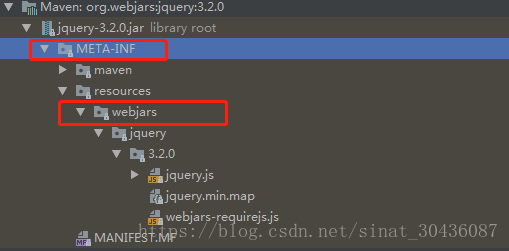
如果要访问:localhost:8080/webjars/jquery/3.2.0/jquery.js
<!--引入jquery-->当访问的时候只需要访问webjars下的资源名称即可
        <dependency>
            <groupId>org.webjars</groupId>
            <artifactId>jquery</artifactId>
            <version>3.2.0</version>
        </dependency>
2. “/” : 访问当前项目的任何资源(静态资源的文件夹)
"classpath:/META-INF/resources/"
"classpath:/resources/"
"classpath:/static/"
"classpath:/public/"
"/ : 当前项目根路径"如果访问localhost:8080/abc 择会默认去静态资源文件夹中找abc
3. 欢迎页面:静态资源文件夹下所有的index.html页面;被“/**”映射
localhost:8080/ 找 index页面
        @Bean
        public WebMvcAutoConfiguration.WelcomePageHandlerMapping welcomePageHandlerMapping(ResourceProperties resourceProperties) {
            return new WebMvcAutoConfiguration.WelcomePageHandlerMapping(resourceProperties.getWelcomePage(), this.mvcProperties.getStaticPathPattern());
        }
4. 所有的**/favicon.icon 都在静态资源文件夹下找
3.模板引擎
Jsp,Freemarker,Velocity,Thymeleaf

SpringBoot推荐Thymeleaf;语法简单,功能强大
1. 引入Thymeleaf
         <dependency>
            <groupId>org.springframework.boot</groupId>
            <artifactId>spring-boot-starter-thymeleaf</artifactId>
        </dependency>默认引入的是2.1.6的版本,太低
<properties>
    <!--引入thymeleaf3-->
    <thymeleaf.version>3.0.9.RELEASE</thymeleaf.version>
    <!--布局功能支持 同时支持thymeleaf3主程序 layout2.0以上版本  -->
    <thymeleaf-layout-dialect.version>2.2.2</thymeleaf-layout-dialect.version>
</properties>
2.Thymeleaf使用和语法
@ConfigurationProperties(prefix = "spring.thymeleaf")
public class ThymeleafProperties {

   private static final Charset DEFAULT_ENCODING = Charset.forName("UTF-8");

   private static final MimeType DEFAULT_CONTENT_TYPE = MimeType.valueOf("text/html");

   public static final String DEFAULT_PREFIX = "classpath:/templates/";

   public static final String DEFAULT_SUFFIX = ".html";
   //只要把HTML文件放在类路径下的template文件夹下(classpath:/templates/),thymeleaf自动渲染
只要把HTML文件放在类路径下的template文件夹下(classpath:/templates/),thymeleaf自动渲染
使用方法:
1、导入thymeleaf的名称空间
<html xmlns:th="http://www.thymeleaf.org">
2、使用thymeleaf语法(使用thymeleaf模板不能用@RestController标注类,用@Controller才可以)
@RequestMapping("/success")
public String success(Map<String,String> map) {
map.put("hello", "你好");
return "success";
}
<!DOCTYPE html>
<html lang="en" xmlns:th="http://www.thymeleaf.org">
<head>
<meta charset="UTF-8" />
<title>success</title>
</head>
<body>
<h1>success</h1>
<!--th:text 将div里面的文本内容设置为引用的-->
<div th:text="${hello}">前端写的</div>
</body>
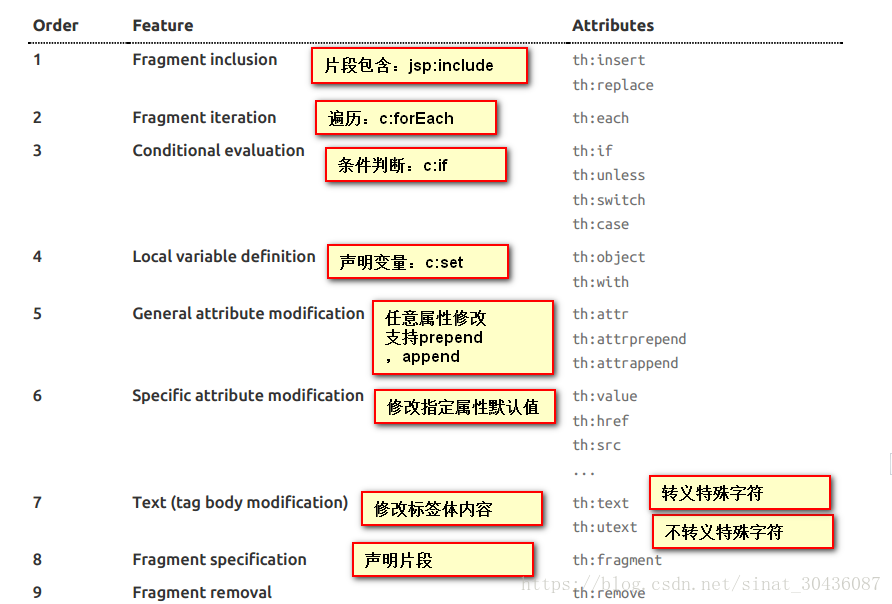
</html>3、语法规则
(1)th: text :改变当前元素里面的文本内容
th: 任意的html标签:可以使用任意标签来替换原生的任何属性
官方文档
(2)表达式
Simple expressions:(表达式语法)
    Variable Expressions: ${...}  #获取变量值:ONGL
        1、获取对象属性、调用方法
        2、使用内置基本对象:
            #ctx : the context object.
            #vars: the context variables.
            #locale : the context locale.
            #request : (only in Web Contexts) the HttpServletRequest object.
            #response : (only in Web Contexts) the HttpServletResponse object.
            #session : (only in Web Contexts) the HttpSession object.
            #servletContext : (only in Web Contexts) the ServletContext object.
         3、内置一些工具对象
            #execInfo : information about the template being processed.
            #messages : methods for obtaining externalized messages inside variables expressions, in the same way as they would be obtained using #{…} syntax.
            #uris : methods for escaping parts of URLs/URIs
            #conversions : methods for executing the configured conversion service (if any).
            #dates : methods for java.util.Date objects: formatting, component extraction, etc.
            #calendars : analogous to #dates , but for java.util.Calendar objects.
            #numbers : methods for formatting numeric objects.
            #strings : methods for String objects: contains, startsWith, prepending/appending, etc.
            #objects : methods for objects in general.
            #bools : methods for boolean evaluation.
            #arrays : methods for arrays.
            #lists : methods for lists.
            #sets : methods for sets.
            #maps : methods for maps.
            #aggregates : methods for creating aggregates on arrays or collections.
            #ids : methods for dealing with id attributes that might be repeated (for example, as a result of an iteration).
    Selection Variable Expressions: *{...} //选择表达式:和${}功能一样,补充功能配合th:object使用,object=${object} 以后获取就可以使用*{a}  相当于${object.a}
        <div th:object="${session.user}">
            <p>Name: <span th:text="*{firstName}">Sebastian</span>.</p>
            <p>Surname: <span th:text="*{lastName}">Pepper</span>.</p>
            <p>Nationality: <span th:text="*{nationality}">Saturn</span>.</p>
        </div>
    Message Expressions: #{...} //获取国际化内容
    Link URL Expressions: @{...} //定义URL链接<a href="details.html" th:href="@{/order/details(orderId=${o.id})}">view</a>
    Fragment Expressions: ~{...}//片段引用表达式

Literals(字面量)
    Text literals: 'one text' , 'Another one!' ,…
    Number literals: 0 , 34 , 3.0 , 12.3 ,…
    Boolean literals: true , false
    Null literal: null
    Literal tokens: one , sometext , main ,…
Text operations:(文本操作)
    String concatenation: +
    Literal substitutions: |The name is ${name}|
Arithmetic operations:(数学运算)
    Binary operators: + , - , * , / , %
    Minus sign (unary operator): -
Boolean operations:(布尔运算)
    Binary operators: and , or
    Boolean negation (unary operator): ! , not
Comparisons and equality:(比较运算)
    Comparators: > , < , >= , <= ( gt , lt , ge , le )
    Equality operators: == , != ( eq , ne )
Conditional operators:(条件运算)
    If-then: (if) ? (then)
    If-then-else: (if) ? (then) : (else)
    Default: (value) ?: (defaultvalue)
Special tokens:(空操作)
    No-Operation: _
在标签里面的写法inline
[[]] -->th:text
[()] -->th:utext
4.SpringMVC自动配置
1.SpringMVC的自动导入
spring框架官方文档
SpringBoot自动配置好了mvc
以下是SpringBoot对SpringMVC的默认:(WebMvcAutoConfiguration)
- Inclusion of
ContentNegotiatingViewResolverandBeanNameViewResolverbeans.
- 自动配置了ViewResolver(视图解析器:根据方法的返回值得到视图对象(View),视图对象决定如何渲染(转发?重定向?))
- ContentNegotiatingViewResolver::组合所有视图解析器
- 如何定制:我们可以自己给容器中添加一个视图解析器;自动将其整合进来
- Support for serving static resources, including support for WebJars (see below).静态资源文件夹路径,webjars
- 自动注册 了
Converter,GenericConverter,Formatterbeans.
- Converter:转换器 类型转换 文本转为字面量 public String hell(User)
- Formatter :格式化器 转换后格式转换
@Bean
@ConditionalOnProperty(prefix = "spring.mvc", name = "date-format")//在文件配置入职格式化的规则
public Formatter<Date> dateFormatter() {
   return new DateFormatter(this.mvcProperties.getDateFormat());//日期格式化组件
}
自己添加的格式化转换器,只需要放在容器中即可
- Automatic registration of MessageCodesResolver (see below).
- Static index.html support.静态首页访问
- Custom Favicon support (see below).favicon图标
- Support for
HttpMessageConverters(see below).
HttpMessageConverters:springmvc中转换HTTP转换和响应:User - jsonHttpMessageConverters:是从容器中确定;获取所有的HttpMessageConverters ;
import org.springframework.boot.autoconfigure.web.HttpMessageConverters;
import org.springframework.context.annotation.*;
import org.springframework.http.converter.*;

@Configuration
public class MyConfiguration {

    @Bean
    public HttpMessageConverters customConverters() {
        HttpMessageConverter<?> additional = ...
        HttpMessageConverter<?> another = ...
        return new HttpMessageConverters(additional, another);
    }

}
要给容器添加HTTPMessageConvert,需要将自己的组件注册在容器中@Bean @Component
Automatic registration of MessageCodesResolver (see below).定义错误代码生成规则
Automatic use of a ConfigurableWebBindingInitializer bean (see below).
@Override
protected ConfigurableWebBindingInitializer getConfigurableWebBindingInitializer() {
   try {
      return this.beanFactory.getBean(ConfigurableWebBindingInitializer.class);
   }
   catch (NoSuchBeanDefinitionException ex) {
      return super.getConfigurableWebBindingInitializer();
   }
}
可以配置ConfigurableWebBindingInitializer替换默认(添加到容器)
初始化webDataBinder
请求数据 绑定到javaBean
2.扩展SpringMVC
<mvc:view-controller path="/hello" view-name="success"/>
    <mvc:interceptors>
        <mvc:interceptor>
            <mvc:mapping path="/hello"/>
            <bean></bean>
        </mvc:interceptor>
    </mvc:interceptors>
编写一个配置类(@Configuration),类型是WebMvcConfigurerAdapter(继承),使用WebMvcConfigurerAdapter可以扩展,不能标注@EnableWebMvc;既保留了配置,也能拓展我们自己的应用
既保留了自动配置,也能拓展我们的配置
//使用WebMvcConfigurerAdapter扩展SpringMVC的功能
@Configuration
public class MyMvcConfig extends WebMvcConfigurerAdapter {
    @Override
    public void addViewControllers(ViewControllerRegistry registry) {
//        super.addViewControllers(registry);
        //浏览器发送/jay请求来到success
        registry.addViewController("/jay").setViewName("success");
    }
}
原理:
1)WebMvcAutoConfiguration是SpringMVC的自动配置
2)在做其他自动配置时会导入@Import(EnableWebMvcConfiguration.class)
@Configuration
public static class EnableWebMvcConfiguration extends DelegatingWebMvcConfiguration {
    private final WebMvcConfigurerComposite configurers = new WebMvcConfigurerComposite();

    //从容器中获取所有webMVCconfigurer
    @Autowired(required = false)
    public void setConfigurers(List<WebMvcConfigurer> configurers) {
        if (!CollectionUtils.isEmpty(configurers)) {
            this.configurers.addWebMvcConfigurers(configurers);

                @Override
                protected void addViewControllers(ViewControllerRegistry registry) {
                    this.configurers.addViewControllers(registry);
                }
            //一个参考实现,将所有的webMVCconfigurer相关配置一起调用(包括自己的配置类)
                @Override
               // public void addViewControllers(ViewControllerRegistry registry) {
                   // for (WebMvcConfigurer delegate : this.delegates) {
                 //delegate.addViewControllers(registry);
                    //}
                }
        }
    }
3)容器中所有的webMVCconfigurer都会一起起作用
4)我们的配置类也会被调用
效果:SpringMVC的自动配置和我们的扩展配置都会起作用
3.全面接管SpringMVC
不需要SpringBoot对SpringMVC的自动配置,所有的都自己配置
所有的SpringMVC的的自动配置都失效了
在配置类中添加@EnableWebMvc
//使用WebMvcConfigurerAdapter扩展SpringMVC的功能
@EnableWebMvc
@Configuration
public class MyMvcConfig extends WebMvcConfigurerAdapter {
    @Override
    public void addViewControllers(ViewControllerRegistry registry) {
//        super.addViewControllers(registry);
        //浏览器发送/jay请求来到success
        registry.addViewController("/jay").setViewName("success");
    }
}
原理:
为什么@EnableWebMvc注解,SpringBoot对SpringMVC的控制就失效了
1)EnableWebMvc核心
@Import(DelegatingWebMvcConfiguration.class)
public @interface EnableWebMvc {
}
2)DelegatingWebMvcConfiguration.class
@Configuration
public class DelegatingWebMvcConfiguration extends WebMvcConfigurationSupport {
3)WebMvcAutoConfiguration.class
@Configuration
@ConditionalOnWebApplication
@ConditionalOnClass({ Servlet.class, DispatcherServlet.class,
      WebMvcConfigurerAdapter.class })
//容器没有这个组件的时候,这个自动配置类才生效
@ConditionalOnMissingBean(WebMvcConfigurationSupport.class)
@AutoConfigureOrder(Ordered.HIGHEST_PRECEDENCE + 10)
@AutoConfigureAfter({ DispatcherServletAutoConfiguration.class,
      ValidationAutoConfiguration.class })
public class WebMvcAutoConfiguration {
4)@EnableWebMvc将WebMvcConfigurationSupport导入进来
5)导入的WebMvcConfigurationSupport只是SpringMVC最基本的功能
5.如何修改SpringBoot的默认配置
模式:
1.SpringBoot在自动配置很多组件的时候,先看容器中有没有用户自己配置的(@Bean、@Component)如果有就用用户配置的,如果没有,才自动配置;如果有些组件可以有多个(ViewResolver)将用户配置的和自己默认的组合起来;
2.在SpringBoot中会有很多xxxConfigurer帮助我们扩展配置。