web开发
1)、创建SpringBoot应用,选中我们需要的模块;
2)、SpringBoot已经默认将这些场景已经配置好了,只需要在配置文件中指定少量配置就可以运行起来
3)、自己编写业务代码;
自动配置原理?
这个场景SpringBoot帮我们配置了扫码?能不能修改?能不能改哪些配置?能不能扩展?xxx
xxxAutoConfiguration:帮我们给容器中自动配置组件;
xxxProperties:配置类来 封装配置文件的内容;
2、SpringBoot对静态资源的 映射规则
@ConfigurationProperties(prefix="spring.resources",ignoreUnknownFields=false)
public class ResourceProperties implements ResourceLoaderAware{
//可以设置和静态资源又关的的 参数,缓存时间


 1 public void addResourceHandlers(ResourceHandlerRegistry registry) {
 2     if (!this.resourceProperties.isAddMappings()) {
 3         logger.debug("Default resource handling disabled");
 4     } else {
 5         Duration cachePeriod = this.resourceProperties.getCache().getPeriod();
 6         CacheControl cacheControl = this.resourceProperties.getCache().getCachecontrol().toHttpCacheControl();
 7         if (!registry.hasMappingForPattern("/webjars/**")) {
 8             this.customizeResourceHandlerRegistration(registry.addResourceHandler(new String[]{"/webjars/**"}).addResourceLocations(new String[]{"classpath:/META-INF/resources/webjars/"}).setCachePeriod(this.getSeconds(cachePeriod)).setCacheControl(cacheControl));
 9         }
10
11         String staticPathPattern = this.mvcProperties.getStaticPathPattern();
12         if (!registry.hasMappingForPattern(staticPathPattern)) {
13             this.customizeResourceHandlerRegistration(registry.addResourceHandler(new String[]{staticPathPattern}).addResourceLocations(getResourceLocations(this.resourceProperties.getStaticLocations())).setCachePeriod(this.getSeconds(cachePeriod)).setCacheControl(cacheControl));
14         }
15
16     }
17 }
//配置欢迎页的映射
 1 @Bean
 2 public WelcomePageHandlerMapping welcomePageHandlerMapping(ApplicationContext applicationContext) {
 3     return new WelcomePageHandlerMapping(new TemplateAvailabilityProviders(applicationContext), applicationContext, this.getWelcomePage(), this.mvcProperties.getStaticPathPattern());
 4 }
 5
 6 @Configuration
 7 @ConditionalOnProperty(
 8     value = {"spring.mvc.favicon.enabled"},
 9     matchIfMissing = true
10 )
11 public static class FaviconConfiguration implements ResourceLoaderAware {
12     private final ResourceProperties resourceProperties;
13     private ResourceLoader resourceLoader;
14
15     public FaviconConfiguration(ResourceProperties resourceProperties) {
16         this.resourceProperties = resourceProperties;
17     }
18
19     public void setResourceLoader(ResourceLoader resourceLoader) {
20         this.resourceLoader = resourceLoader;
21     }
22
23     @Bean
24     public SimpleUrlHandlerMapping faviconHandlerMapping() {
25         SimpleUrlHandlerMapping mapping = new SimpleUrlHandlerMapping();
26         mapping.setOrder(-2147483647);
27 //所有 **/favicon.ico
28         mapping.setUrlMap(Collections.singletonMap("**/favicon.ico", this.faviconRequestHandler()));
29         return mapping;
30     }
31
32     @Bean
33     public ResourceHttpRequestHandler faviconRequestHandler() {
34         ResourceHttpRequestHandler requestHandler = new ResourceHttpRequestHandler();
35         requestHandler.setLocations(this.resolveFaviconLocations());
36         return requestHandler;
37     }
//配置喜欢的图标
    private List<Resource> resolveFaviconLocations() {
        String[] staticLocations = WebMvcAutoConfiguration.WebMvcAutoConfigurationAdapter.getResourceLocations(this.resourceProperties.getStaticLocations());
        List<Resource> locations = new ArrayList(staticLocations.length + 1);
        Stream var10000 = Arrays.stream(staticLocations);
        ResourceLoader var10001 = this.resourceLoader;
        this.resourceLoader.getClass();
        var10000.map(var10001::getResource).forEach(locations::add);
        locations.add(new ClassPathResource("/"));
        return Collections.unmodifiableList(locations);
    }
}
1)、所有/webjars/**,都去classpath:/META-INF/resources/webjars/
找资源;
webjars:以jar包的 方式引入静态资源;
参考:http://www.webjars.org/
http://localhost:8080/webjars/jquery/3.3.1-1/jquery.js
<!--引入jquery-webjar--> 在访问的时候只需要写webjars下面资源的名称即可
<dependency>
   <groupId>org.webjars</groupId>
   <artifactId>jquery</artifactId>
   <version>3.3.1-1</version>
</dependency>
2)、"/**"访问当前项目的任何资源,(静态资源的文件夹)
"classpath:/META-INF/resources/",
"classpath:/resources/",
"classpath:/static/",
"classpath:/public/"
"/":当前项目的根路径;
localhsot:8080/abc====去静态资源文件夹里面去找abc
3)、欢迎页;静态资源文件夹下面的所有index.html文件;被"/**"映射;
localhost:8080/ 找index页面
4)、所有的**/favicon.ico都是在静态资源文件下找;
3、模版引擎
JSP、Velocity、Freemarker、Thymeleaf;
SpringBoot推荐的Thymeleaf;
语法更简单,功能更强大;
1、引入thymeleaf;
<dependency>
   <groupId>org.springframework.boot</groupId>
   <artifactId>spring-boot-starter-thymeleaf</artifactId>
</dependency>
切换thymeleaf版本
<properties>
<thymeleaf.version>3.0.9.RELEASE</thymeleaf.version>
<!--布局功能的支持程序 thymeleaf3主程序  layout2以上版本-->
<!--thymeleaf2  layout1-->
<thymeleaf-layout-dialect.version>2.2.2</thymeleaf-layout-dialect.version>
</properties>
2、Thymeleaf使用方法
只要我们把html页面放在classpath:/templates/,thymeleaf就能自动渲染;
使用:
1、导入thymleaf的名称空间;
<html lang="en" xmlns:th="http://www.thymeleaf.org">
2、使用thymeleaf的语法;
<!DOCTYPE html>
<html lang="en" xmlns:th="http://www.thymeleaf.org">
<head>
    <meta charset="UTF-8">
    <title>Title</title>
</head>
<body>
    <h1>成功!</h1>
    <!--th:text将div里面的文本内容设置为-->
    <div th:text="${hello}">这是显示欢迎信息</div>
</body>
</html>
3、语法规则
1)、th:text;改变当前元素里面的文本内容;
th:任意html属性;来替换原生属性的值;
参考官方文档:https://www.thymeleaf.org/documentation.html pdf
2)、表达式?
4 Standard Expression Syntax
We will take a small break in the development of our grocery virtual store to learn about one of the most important
parts of the Thymeleaf Standard Dialect: the Thymeleaf Standard Expression syntax.
We have already seen two types of valid attribute values expressed in this syntax: message and variable expressions:
<p th:utext="#{home.welcome}">Welcome to our grocery store!</p>
<p>Today is: <span th:text="${today}">13 february 2011</span></p>
But there are more types of expressions, and more interesting details to learn about the ones we already know. First,
let’s see a quick summary of the Standard Expression features:
Simple expressions:(表达式语法)
Variable Expressions: ${...}:获取变量值;OGNL;
1)、获取对象的属性、调用方法;
2)、使用内置的基本对象;
#ctx : the context object.
#vars: the context variables.
#locale : the context locale.
#request : (only in Web Contexts) the HttpServletRequest object.
#response : (only in Web Contexts) the HttpServletResponse object.
#session : (only in Web Contexts) the HttpSession object.
#servletContext : (only in Web Contexts) the ServletContext object.
${param.foo}
3)、内置的一些工具对象
#execInfo : information about the template being processed.
#messages : methods for obtaining externalized messages inside variables expressions, in the same way as they
would be obtained using #{…} syntax.
#uris : methods for escaping parts of URLs/URIs
#conversions : methods for executing the configured conversion service (if any).
#dates : methods for java.util.Date objects: formatting, component extraction, etc.
#calendars : analogous to #dates , but for java.util.Calendar objects.
#numbers : methods for formatting numeric objects.
#strings : methods for String objects: contains, startsWith, prepending/appending, etc.
#objects : methods for objects in general.
#bools : methods for boolean evaluation.
#arrays : methods for arrays.
#lists : methods for lists.
#sets : methods for sets.
#maps : methods for maps.
#aggregates : methods for creating aggregates on arrays or collections.
#ids : methods for dealing with id attributes that might be repeated (for example, as a result of an iteration).
Selection Variable Expressions: *{...}:选择表达式;和${}在功能上是一样的;
补充:配合 th:object="${session.user}"
<div th:object="${session.user}">
<p>Name: <span th:text="*{firstName}">Sebastian</span>.</p>
<p>Surname: <span th:text="*{lastName}">Pepper</span>.</p>
<p>Nationality: <span th:text="*{nationality}">Saturn</span>.</p>
</div>
Message Expressions: #{...}获取国际化内容的;
Link URL Expressions: @{...}:定义URL;
@{/order/process(execId=${execId},execType='FAST')}
Fragment Expressions: ~{...}:片段引用表达式;
<div th:insert="~{commons :: main}">...</div>
Literals(字面量)
Text literals: 'one text' , 'Another one!' ,…
Number literals: 0 , 34 , 3.0 , 12.3 ,…
Boolean literals: true , false
Null literal: null
Literal tokens: one , sometext , main ,…
Text operations:(文本操作)
String concatenation: +
Literal substitutions: |The name is ${name}|
Arithmetic operations:(数学运算)
Binary operators: + , - , * , / , %
Minus sign (unary operator): -
Boolean operations:(布尔运算)
Binary operators: and , or
Boolean negation (unary operator): ! , not
Comparisons and equality:(比较运算)
Comparators: > , < , >= , <= ( gt , lt , ge , le )
Equality operators: == , != ( eq , ne )
Conditional operators:条件运算(三元运算符)
If-then: (if) ? (then)
If-then-else: (if) ? (then) : (else)
Default: (value) ?: (defaultvalue)
Special tokens:
No-Operation: _
4、SpringMVC自动配置
Spring Boot 自动配置好了SpringMVC
以下是SpringBoot对SpringMVC的默认配置:
Inclusion of ContentNegotiatingViewResolver and BeanNameViewResolver beans.
自动配置了 ViewResolver(视图解析器:根据方法的返回值得到 视图对象(View),视图对象决定如何渲染(转发?重定向?))
ContentNegotiatingViewResolver 组合所有的视图解析器;
如何定制:我们可以自己给容器中添加一个 视图解析器;自动的将其组合进来;
Support for serving static resources, including support for WebJars (see below).静态资源文件夹路径,webjars
Static index.html support.静态首页访问;
Custom Favicon support (see below).ffavicon.ico;
自动注册了 of Converter, GenericConverter, Formatter beans.
Convert:转换器,public String hello(User user):类型转换使用Convert
Formatter:格式化器;2017-12-17===Date;
自己添加的格式化器转换器,我们只需要放在容器中即可;
Support for HttpMessageConverters (see below)
HttpMessageConverters :SpringMVC用来转换Http请求和响应的;User--json;
HttpMessageConverters 是从容器中确定的;获取所有的 HttpMessageConverters ;
只需要自己将自己的组件注册在容器中;(@Bean、@component)
Automatic registration of MessageCodesResolver (see below).定义错误代码生成 规则;
Automatic use of a ConfigurableWebBindingInitializer bean (see below).我们可以配置一个ConfigurableWebBindingInitializer 来替换默认的;(添加到容器)
1、初始化WebDataBinder;
2、请求数据====JavaBean;
org.springframework.boot.autoconfigure.web:web的所有自动场景;
If you want to keep Spring Boot MVC features, and you just want to add additional MVC configuration (interceptors, formatters, view controllers etc.) you can add your own @Configuration class of type WebMvcConfigurerAdapter, but without @EnableWebMvc. If you wish to provide custom instances of RequestMappingHandlerMapping, RequestMappingHandlerAdapter or ExceptionHandlerExceptionResolver you can declare a WebMvcRegistrationsAdapter instance providing such components.
If you want to take complete control of Spring MVC, you can add your own @Configuration annotated with @EnableWebMvc.
2、扩展SpringMVC
既保留了所有的 自动配置,也能用我们扩展的配置;
<mvc:view-controller path="/hello" view-name="success"/>
<mvc:interceptors>
    <mvc:interceptor>
        <mvc:mapping path="/hello"/>
        <bean></bean>
    </mvc:interceptor>
</mvc:interceptors>
编写一个 配置类(@Configuration)是WebMvcConfigurerAdapter类型;不能标注@EnableWebMvc
/**
 * Created by windMan on 2018/5/28
 */
//使用WebMvcConfigurerAdapter可以来扩展SpringMVC功能
@Configuration
public class MyMvcConfig extends WebMvcConfigurerAdapter {
    @Override
    public void addViewControllers(ViewControllerRegistry registry) {
//        super.addViewControllers(registry);
            //浏览器发送portalkjt请求到success
            registry.addViewController("/portalkjt").setViewName("success");
    }
}
原理:
1)、WebMvcAutoConfiguration 是SpringMvc的配置类;
2)、在做其他自动配置时会导入;@Import({WebMvcAutoConfiguration.EnableWebMvcConfiguration.class})
@Configuration
public static class EnableWebMvcConfiguration extends DelegatingWebMvcConfiguration {

private final WebMvcConfigurerComposite configurers = new WebMvcConfigurerComposite();

//从容器中获取所有的WebMvcConfigurer
@Autowired(required = false)
public void setConfigurers(List<WebMvcConfigurer> configurers) {
   if (!CollectionUtils.isEmpty(configurers)) {
      this.configurers.addWebMvcConfigurers(configurers);
//一个参考实现;将所有的WebMvcConfigurater相关配置都来一起调用;
@Override
//public void addViewControllers(ViewControllerRegistry registry) {
//   for (WebMvcConfigurer delegate : this.delegates) {
//      delegate.addViewControllers(registry);
//   }
//}
   }
}
3)、容器中所有的WebMvcConfigurater都会一起起作用;
4)、我们的配置类也会被调用;
效果:SpringMVC的自动配置和我们的扩展配置都会起作用;
3、全面接管SpringMVC;
SpringBoot对SpringMVC的自动配置不需要了,所有都是我们自己配置;所有的SpringMVC的自动配置都失效了;
我们需要在 配置类中添加@EnableWebMvc即可;
/**
 * Created by windMan on 2018/5/28
 */
//使用WebMvcConfigurerAdapter可以来扩展SpringMVC功能

@EnableWebMvc
@Configuration
public class MyMvcConfig extends WebMvcConfigurerAdapter {
    @Override
    public void addViewControllers(ViewControllerRegistry registry) {
//        super.addViewControllers(registry);
            //浏览器发送portalkjt请求到success
            registry.addViewController("/portalkjt").setViewName("success");
    }
}
原理:
为什么添加@EnableWebMvc自动配置就失效了;
1)、@EnableWebMvc的核心
@Import(DelegatingWebMvcConfiguration.class)
public @interface EnableWebMvc {
2)、
@Configuration
public class DelegatingWebMvcConfiguration extends WebMvcConfigurationSupport {
3)、
@Configuration
@ConditionalOnWebApplication(
    type = Type.SERVLET
)
@ConditionalOnClass({Servlet.class, DispatcherServlet.class, WebMvcConfigurer.class})
//容器中没有这个组件的时候,这个自动配置类才生效
@ConditionalOnMissingBean({WebMvcConfigurationSupport.class})
@AutoConfigureOrder(-2147483638)
@AutoConfigureAfter({DispatcherServletAutoConfiguration.class, ValidationAutoConfiguration.class})
public class WebMvcAutoConfiguration {
4)、@EnableWebMvc将WebMvcConfigurationSupport组件导入进来;
5)、导入的WebMvcConfigurationSupport只是SpringMVC最基本的功能;
5、如何修改SpringBoot的默认配置
1)、SpringBoot在自动配置很多组件的时候,先看容器中有没有用户自己配置的(@Bean、@Component)如果 有就 用用户配置的,如果没有,才自动配置;如果有些组件可以有多个(ViewResolver)将用户配置的 和自己默认的组合起来;
2)、在SpringBoot中,会有非常多的xxConfigurater帮助我们进行扩展配置;
6、RestfulCRUD
1)、默认访问首页;
2)、国际化
1)、编写国际化配置文件;
2)、使用ResourceBundleMessageSource管理国际化资源文件
3)、在页面使用fmt:message取出国际化内容
步骤:
1)、编写国际化配置文件、抽取页面需要显示的国际化消息;
2)、SpringBoot自动配置好了管理国际化资源文件的组件;
@Bean
@ConfigurationProperties(prefix = "spring.messages")
public MessageSourceProperties messageSourceProperties()
String basename = context.getEnvironment().getProperty("spring.messages.basename", "messages");//我们的配置文件可以直接放在类路径下叫message.properties;

@Bean
public MessageSource messageSource() {
    MessageSourceProperties properties = this.messageSourceProperties();
    ResourceBundleMessageSource messageSource = new ResourceBundleMessageSource();
    if (StringUtils.hasText(properties.getBasename())) {
//设置国际化资源文件的基础名(去掉语言国家代码的) messageSource.setBasenames(StringUtils.commaDelimitedListToStringArray(StringUtils.trimAllWhitespace(properties.getBasename())));
    }

    if (properties.getEncoding() != null) {
        messageSource.setDefaultEncoding(properties.getEncoding().name());
    }

    messageSource.setFallbackToSystemLocale(properties.isFallbackToSystemLocale());
    Duration cacheDuration = properties.getCacheDuration();
    if (cacheDuration != null) {
        messageSource.setCacheMillis(cacheDuration.toMillis());
    }

    messageSource.setAlwaysUseMessageFormat(properties.isAlwaysUseMessageFormat());
    messageSource.setUseCodeAsDefaultMessage(properties.isUseCodeAsDefaultMessage());
    return messageSource;
}
3)、去页面获取国际化的值;
file-encording 文件及编码,根据当前浏览器语言设置的信息,切换的国际化;
原理:
国际化Locale(区域信息对象):LocalResolver(获取区域信息对象);
@Bean
@ConditionalOnMissingBean
@ConditionalOnProperty(
    prefix = "spring.mvc",
    name = {"locale"}
)
public LocaleResolver localeResolver() {
    if (this.mvcProperties.getLocaleResolver() == org.springframework.boot.autoconfigure.web.servlet.WebMvcProperties.LocaleResolver.FIXED) {
        return new FixedLocaleResolver(this.mvcProperties.getLocale());
    } else {
        AcceptHeaderLocaleResolver localeResolver = new AcceptHeaderLocaleResolver();
        localeResolver.setDefaultLocale(this.mvcProperties.getLocale());
        return localeResolver;
    }
}
默认的就是根据请求头带来的区域信息获取Locale进行国际化;
4)、点击链接切换国际化;
/**
 * Created by windMan on 2018/5/28
 * 可以在链接上携带区域信息
 */
public class MyLocalResolver implements LocaleResolver {

    @Override
    public Locale resolveLocale(HttpServletRequest request) {
        String l = request.getParameter("l");
        Locale locale=Locale.getDefault();
        if (!StringUtils.isEmpty(l)){
            String[] split = l.split("_");
            locale= new Local(split[0],split[1]);
        }
        return locale;
    }

    @Override
    public void setLocale(HttpServletRequest request, @Nullable HttpServletResponse response, @Nullable Locale locale) {

    }
}


@Bean
public LocaleResolver localeResolver(){
    return new MyLocalResolver();
}
3)、登录
开发期间模版引擎页面修改后,要实时生效;
1)、禁用模版引擎的缓存
#禁用缓存
spring.thymeleaf.cache=false
2)、页面修改完成后ctrl+f9:重新编辑;
登录错误消息的 显示;
3)、拦截器进行登录检查
 //注册拦截器
            @Override
            public void addInterceptors(InterceptorRegistry registry) {
//                super.addInterceptors(registry);
                    //静态资源:*.css ,*.js
                    //SpringBoot已经 做好了静态资源的映射
                    registry.addInterceptor(new LoginHandlerInterceptor()).addPathPatterns("/**")
                            .excludePathPatterns("index.html","/","user/login");
            }
5)、CRUD-员工列表
实验要求:
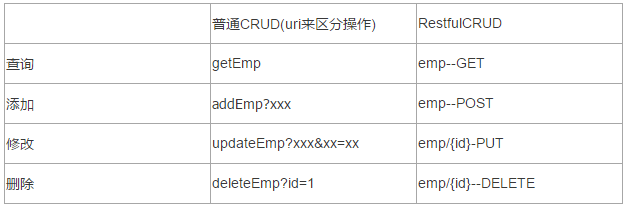
1)、RestfulCRUD:CRUD满足Rest风格;
URI:/资源名称/资源标识 HTTP请求方式区分对资源CRUD操作
2)、实验的请求架构;
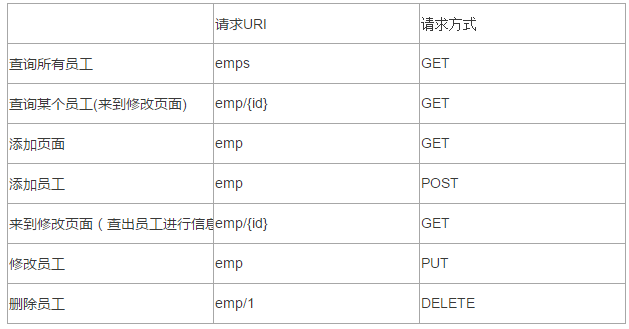
3)、员工列表
thymeleaf公共页面元素抽取
1、抽取公共片段
<div th:fragment="copy">
© 2011 The Good Thymes Virtual Grocery
</div>
2、引入公共片段
<div th:insert="~{footer :: copy}"></div>
~{templatename::selector}:模版名::选择器
~{templatename::fragmentname}:模版名::片段名
3、默认效果:
insert的公共片段在div标签中
如果使用th:insert等属性进行引入,可以不用写~{}:
行内写法可以加上====[[]]:[~()]
三种引入公共片段的th属性;
th:insert:将公共片段整个插入到声明引入元素中;
th:replace:将声明引入的元素替换为公共片段;
th:include:将被引入的片段的内容包含进这个标签中;
<footer th:fragment="copy"> © 2011 The Good Thymes Virtual Grocery </footer> 引入方式: <div th:insert="footer :: copy"></div> <div th:replace="footer :: copy"></div> <div th:include="footer :: copy"></div> 效果: <div> <footer> © 2011 The Good Thymes Virtual Grocery </footer> </div> <footer> © 2011 The Good Thymes Virtual Grocery </footer> <div> © 2011 The Good Thymes Virtual Grocery </div> 引入片段的时候传入参数: <div th:replace="::frag (onevar=${value1},twovar=${value2})"> ${#dates.format(date, 'dd/MMM/yyyy HH:mm')} 日期的格式化;SpringMVC将页面提交的值需要转换为指定的类型; 类型转换,格式化; 默认日期是按照/的方式;