在windows下安装运行disconf
一.环境准备
1.下载disconf源码 (本文以2.6.36为例)
https://github.com/knightliao/disconf
2.下载nginx1.10.2(windows版)
http://nginx.org/download/nginx-1.10.2.zip
3.安装好tomcat
4.安装好redis
5.安装好zookeeper,可参见http://www.cnblogs.com/mrluo735/p/5345879.html
二.修改配置
1.disconf配置修改
1).jdbc-mysql.properties 修改数据库连接
2).redis-config.properties 修改redis连接
3).zoo.properties 修改zookeeper连接
4).将application-demo.properties 改名为 application.properties
2.打包disconf-web
生成的最终target应当如下

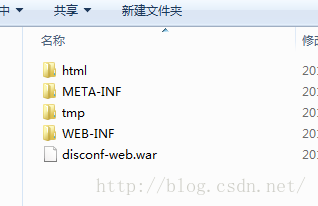
3.构建war包
新建war文件夹,然后分别将war包和相关文件夹从disconfig-web及生成的target下copy出来,最终结果如下,tmp文件夹可以忽略
4.修改tomcat配置
打开/conf/server.xml文件
在Host节点里增加
|
1
|
<Context path=
""
docBase=
"D:\\javaspace\\apache-tomcat\\apache-tomcat-8.0.36\\webapps\\disconfig-rd\\war"
></Context>
|
重启tomcat
5.修改nginx配置
打开/conf/nginx.conf文件
将nginx默认端口改为8000(因为默认端口被iis占用)
增加server节点如下
|
1
2
3
4
5
6
7
8
9
10
11
12
13
14
15
16
17
18
19
20
|
server {
listen 8082;
server_name localhost;
location / {
root D:\javaspace\apache-tomcat\apache-tomcat-8.0.36\webapps\disconfig-rd\war\html;
if
($query_string) {
expires max;
}
}
location ~ ^/(api|export) {
proxy_pass_header Server;
proxy_set_header Host $http_host;
proxy_redirect off;
proxy_set_header X-Real-IP $remote_addr;
proxy_set_header X-Scheme $scheme;
proxy_pass http:
//127.0.0.1:8080;
}
}
|
重启nginx
三.安装disconf数据库
可以参考disconf-web/sql/readme.md
注意顺序执行 0-init_table.sql,1-init_data.sql,201512/20151225.sql,20160701/20160701.sql