一、安装环境和软件
1、flume 运行需要java环境,所以运行flume之前必须安装并配置java环境(如果安装了jdk,但是没有配置jdk环境,运行 flume 时会抛出找不见 java.exe 的错误)。
2、flume 1.8 需要 java运行时环境java 1.8或更高。
3、下载 flume 1.8 ,下载地址:http://www.apache.org/dyn/closer.lua/flume/1.8.0/apache-flume-1.8.0-bin.tar.gz;
因为下载flume 是 tar.gz,直接解压就可以了。
4、配置FLUME_HOME环境变量
二、运行
1、在flume的conf目录下创建配置文件:example.conf
#flume-to-spark-push.conf: A single-node Flume configuration
#Name the components on this agent
a1.sources = r1
a1.sinks = k1
a1.channels = c1
#Describe/configure the source
#把Flume Source类别设置为netcat,绑定到node3的33333端口
#可以通过“telnet node3 33333”命令向Flume Source发送消息
a1.sources.r1.type = netcat
a1.sources.r1.bind = localhost
a1.sources.r1.port = 33333
#Describe the sink
#Flume Sink类别设置为avro,绑定到node2的44444端口
#Flume Source把采集到的消息汇集到Flume Sink以后,Sink会把消息推送给node2的44444端口
#Spark Streaming程序一直在监听node2的44444端口,一旦有消息到达,就会被Spark Streaming应用程序取走进行处理
a1.sinks.k1.type = avro
a1.sinks.k1.hostname = localhost
a1.sinks.k1.port = 44444
#Use a channel which buffers events in memory
a1.channels.c1.type = memory
a1.channels.c1.capacity = 1000000
a1.channels.c1.transactionCapacity = 1000000
a1.sources.r1.channels = c1
a1.sinks.k1.channel = c1
2、在powershell中运行命令:
flume-ng agent -conf-file %FLUME_HOME%\conf\example.conf -name a1
注意:
与Linux中命令的区别 --要换成- 且-Dflume.root.logger=INFO,console在window下不支持
若想像Linux中打印信息 则需更换为: -property “flume.root.logger=INFO,console”
如果无法识别%FLUME_HOME%则切换成物理路径
遇到的问题:
在运行此命令时首先会报无法运行.ps1文件的错误
此时运行 set-executionpolicy -executionpolicy unrestricted 可降低系统安全性即能够运行.ps1文件
详情请参见:https://www.cnblogs.com/bonelee/p/8043421.html
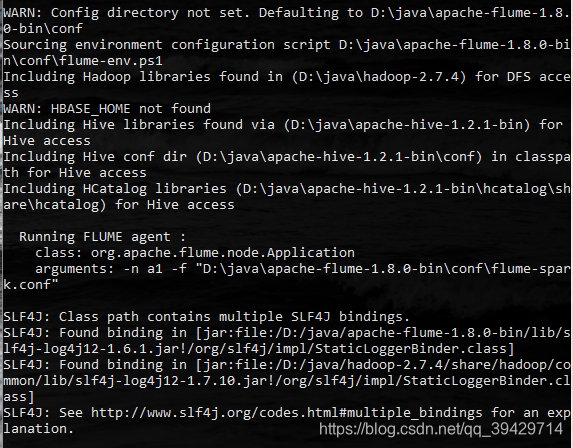
运行成功如下图:
三、测试
运行cmd:
telnet localhost 33333 后,按Ctrl+]键 ,再按回车,然后输入就有正常显示了。
数据的接收方可以编写sparkstreaming程序进行验证:
    package sparkstreaming

    import org.apache.spark.SparkConf
    import org.apache.spark.storage.StorageLevel
    import org.apache.spark.streaming._
    import org.apache.spark.streaming.flume._

    object FlumeEventCount {
      def main(args: Array[String]) {
        val host = "localhost"
        val port = 44444

        // Create the context and set the batch size
        val conf = new SparkConf().setAppName("FlumeEventCount").setMaster("local[2]")
        val ssc = new StreamingContext(conf, Seconds(10))
        // 减少终端的输出信息。设置为ERROR时,由于flume没有启动,仍有大量的输出信息
        ssc.sparkContext.setLogLevel("ERROR")

        // Create a flume stream
        val stream = FlumeUtils.createStream(ssc, host, port, StorageLevel.MEMORY_ONLY_SER_2)

        // Print out the count of events received from this server in each batch
        stream.map(x=>new String(x.event.getBody.array())
        ).flatMap(_.split("\\s+")).map((_, 1)).reduceByKey(_+_).print()
        ssc.start()
        ssc.awaitTermination()
      }
    }